Supports Godot 4.1/4.2 With .Net
Based on .Net, GD AtlasTexture Creator provides a handy editor window that resembles the SpriteEditor from UnityEditor for ease of AtlasTexture creation.
-
Configure the .Net runtime according to the
Prerequisitessection of the Godot Engine Docs. -
Download the zip file from Release.
-
Decompress the file, and place the
addonsfolder directly into the root of your project. -
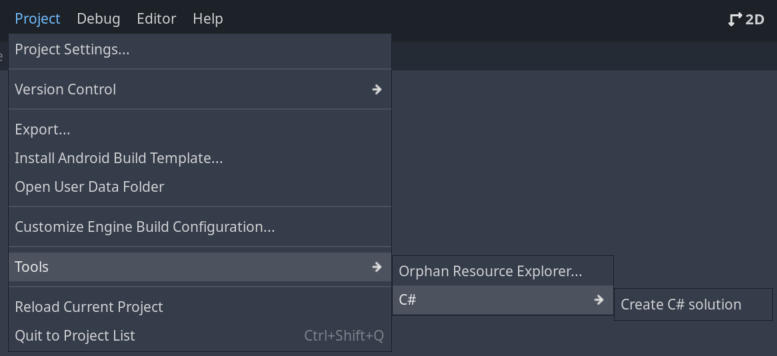
If you have not yet create a C# solution, select
Project/Tools/C#/Create C# solution, then click theBuildbutton at top right corner.

-
Navigate to
Project/Project Settings/Pluginsin Godot Editor, locate theGD AtlasTexture Creatorfrom theInstalled Pluginslist, and then checkEnableunder theStatuscolumn. -
The dedicated inspector for
GD AtlasTexture Creatorwill now launch located at theBottom Right Dock slot
When double-clicking a resource with type Texture2D inside the FileSystem Window, the GD AtlasTexture Creator will show the preview of the inspecting image.
| Control | Description | Selections |
|---|---|---|
Snap Mode |
Controls the snapping precision when editing rect parameters, similar to the options inside the AtlasTexture Region Editor Window. |
Pixel Snap: All Editing Metrics are clamped to integer precision.None: All Editing Metrics are clamped to two digits. |
AtlasTexture Slicer |
Toggle the visibility of the AtlasTexture Slicer, a tool for automating AtlasTexture creation. |
On: Displays the AtlasTexture SlicerOff: Hides the AtlasTexture Slicer |
Scan AtlasTexture Button |
Scan the eligible AtlasTextures which uses the current inspecting Texture2D and displays the result inside the viewport. |
Scan AtlasTexture In Folder: Scan the eligible AtlasTextures in the directory where the current inspecting Texture2D is located.Scan AtlasTexture In Project: Scan the eligible AtlasTextures everywhere inside the project. |
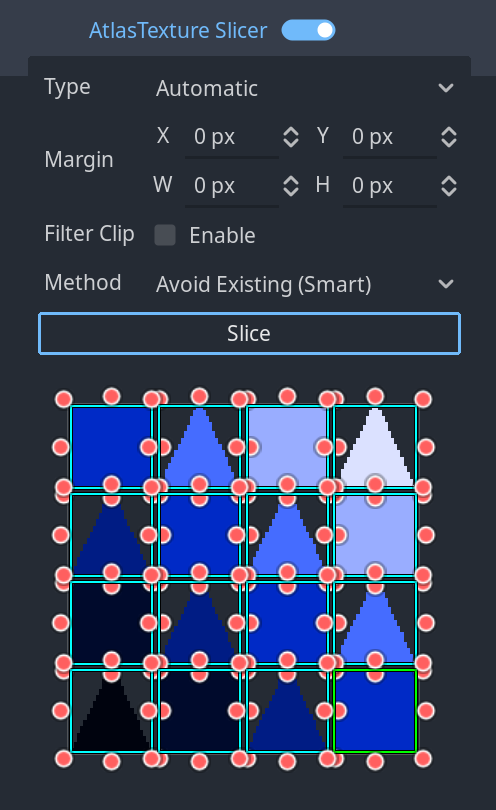
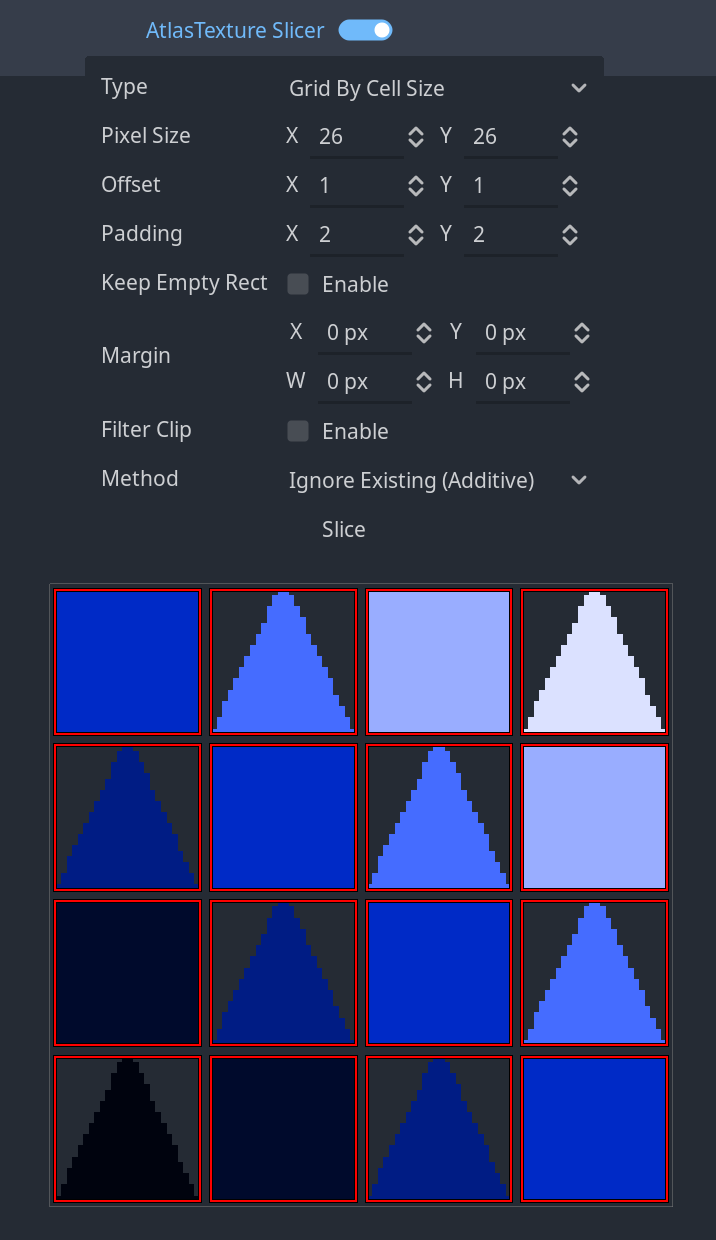
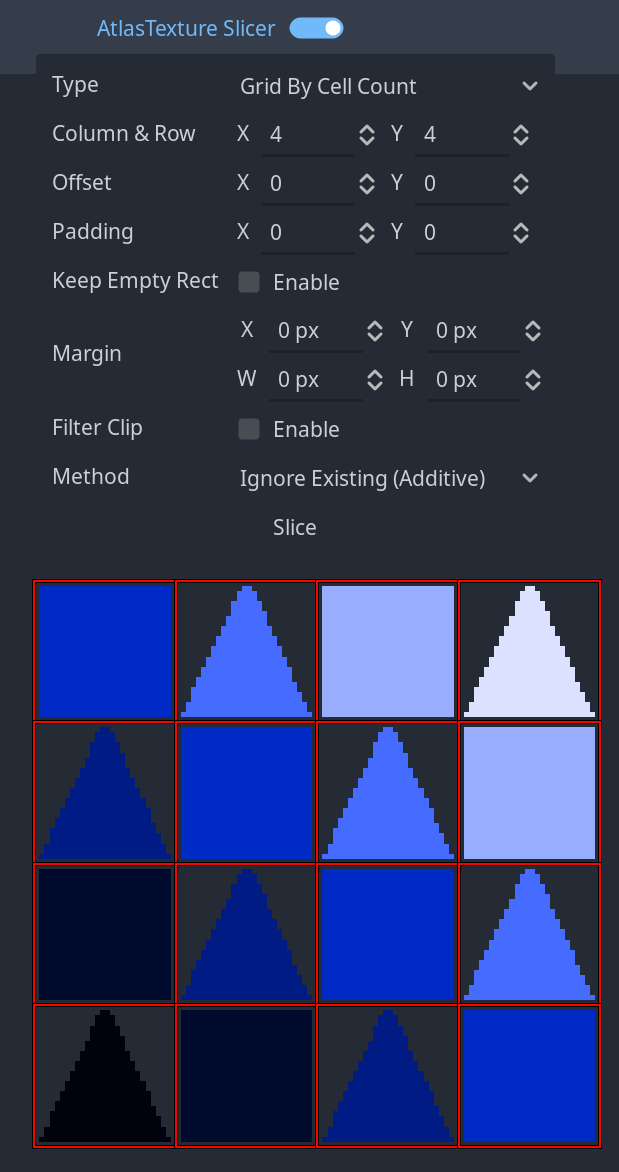
A powerful tool for creating AtlasTexture slices, there are three slicing types provided as follows.
When creating AtlasTexture slices using this tool, there are two Methods of creating slices available.
| Method Name | Description |
|---|---|
| Ignore Existing (Additive) | Create the slices directly, and ignore the current existing slices. |
| Avoid Existing (Smart) | New AtlasTexture slices that have their region occupied by existing AtlasTextures, will be ignored during the creation. |
This is the primary section for editing AtlasTexture Slices.
Similar to the AtlasTexture Region Editor Window, you can drag the viewport by holding the middle mouse button, and scale the viewport by scrolling the middle mouse button or through the buttons on the top left corner.
| Mouse Action | Description |
|---|---|
Left Click and Drag in the empty section of the area |
Create a new AtlasTexture from the texture & identify the sizing. |
Left Click and Drag on the handle (Red Circle) |
Modify the Size of an existing AtlasTexture |
Left Click and Drag inside an existing AtlasTexture Slice |
Modify the Position of an existing AtlasTexture |
The AtlasTextures created are Color Coded as following
| Color | Definition |
|---|---|
Green |
Current selected AtlasTexture. |
White |
The AtlasTexture from the project. |
Cyan |
The temporarily created AtlasTexture, you can edit their name or delete these slices since they are not written into the filesystem. |
Displays the Edible Parameters for the current selected AtlasTexture
| Control | Description |
|---|---|
X |
Remove the selected AtlasTexture, only available for temporarily created AtlasTextures. |
Name |
Edit the Name of the selected AtlasTexture, only available for temporarily created AtlasTextures. |
Region |
Edit the Region of the selected AtlasTexture. |
Margin |
Edit the Margin of the selected AtlasTexture. |
Filter Clip |
Edit the Filter Clip property of the selected AtlasTexture. |
All changes made to the inspecting texture are not written into the filesystem immediately, this section is used to apply or discard the pending modification.
| Button | Definition |
|---|---|
Discard |
Discard the pending modification and restore the Primary View Section to its initial state. |
Create / Update |
Creates all temporarily created AtlasTextures, and applies all changes to existing AtlasTextures into the project filesystem. |
此插件支持 包含.Net模块的Godot 4.1/4.2
基于 .Net,GD AtlasTexture Creator 提供一个类似于Unity编辑器中Sprite编辑器的实用的编辑器,用于简化AtlasTexture的创建过程。
-
根据 Godot Engine Docs 中
Prerequisites一栏的内容配置 .Net 运行时。 -
从Release处下载压缩包。
-
解压下载完成的压缩包,并且将其中的
addons文件夹放置在项目工程文件夹的根目录。 -
如果从未建立过C#解决方案,则执行
Project/Tools/C#/Create C# solution,之后点击窗口右上角的Build。

-
前往Godot编辑器的
项目/项目设置.../插件,从已安装插件列表中找到GD AtlasTexture Creator项目,然后将状态一列中的启用栏目勾上 -
GD AtlasTexture Creator专用的检查器将会启动于编辑器的右下停靠栏
在文件系统窗口中双击一个Texture2D类型的资源时,GD AtlasTexture Creator会展示当前正在检视的图像资源
| 控件 | 介绍 | 选项信息 |
|---|---|---|
吸附模式 |
控制编辑矩形时的对齐精度,类似于AtlastTexture 区域编辑器中的同名控件。 |
像素吸附:所有编辑时的参数都对齐到最近整数。无:所有编辑时的参数都对齐到最近两位小数。 |
AtlasTexture Slicer |
切换AtlasTexture Slicer可见性,一种用于自动化创建AtlasTexture的工具。 |
On: 显示AtlasTexture SlicerOff: 隐藏AtlasTexture Slicer |
Scan AtlasTexture Button |
扫描引用了当前Texture2D的AtlasTextures并且在视图中展示。 |
Scan AtlasTexture In Folder: 在当前Texture2D所在的文件夹中扫描符合条件的AtlasTextures。Scan AtlasTexture In Project: 在整个项目文件夹中扫描符合条件的AtlasTextures。 |
用于创建AtlasTexture切片的工具,提供了三种切片类型,如下所示。
| 切片模式 | 介绍 | 预览 |
|---|---|---|
| Automatic | 基于纹理内部的像素块创建AtlasTexture切片,这与AtlasTexture区域编辑器窗口中的行为相同。 |
 |
| Grid By Cell Size | 根据指定的单元格像素大小创建AtlasTexture切片。 |  |
| Grid By Cell Count | 基于指定的单元计数创建AtlasTexture切片。 |  |
使用此工具创建AtlasTexture切片时,有两种创建切片的方法可用。
| 方法名称 | 介绍 |
|---|---|
| Ignore Existing (Additive) | 直接创建切片,并忽略当前的现有切片。 |
| Avoid Existing (Smart) | 区域被现有AtlasTextures占据的新AtlasTexture切片将在创建过程中被忽略。 |
这是编辑AtlasTexture切片的主要部分。
与AtlasTexture区域编辑器窗口类似,可以通过按住鼠标中键拖动视口,并通过滚动鼠标滚轮或通过左上角的按钮缩放视口。
| 鼠标动作 | 介绍 |
|---|---|
在区域的空白区域中单击并拖拽 |
从纹理创建一个新的AtlasTexture并确定大小。 |
在缩放手柄上拖拽(红色圆圈) |
修改现有AtlasTexture的大小 |
在现有AtlasTexture切片内拖拽 |
修改现有AtlasTexture的位置 |
创建的AtlasTextures是按照颜色区分的,如下所示
| 颜色 | 定义 |
|---|---|
绿 |
当前选定的AtlasTexture。 |
白 |
项目资源中的AtlasTexture。 |
青 |
临时创建的AtlasTexture,你可以编辑它们的名称或删除这些切片,因为它们没有写入文件系统。 |
显示当前选定AtlasTexture的可编辑参数
| 控件 | 介绍 |
|---|---|
X |
删除选定的AtlasTexture,仅适用于临时创建的AtlasTextures。 |
Name |
编辑所选AtlasTexture的名称。 |
Region |
编辑所选AtlasTexture的Region属性。 |
Margin |
编辑所选AtlasTexture的Margin属性。 |
Filter Clip |
编辑所选AtlasTexture的Filter Clip属性。 |
对检查纹理所做的所有更改都不会立即写入文件系统,此部分用于应用或放弃挂起的修改。
| 按钮 | 介绍 |
|---|---|
Discard |
放弃挂起的修改并将主视图界面恢复到其初始状态。 |
Create / Update |
创建所有临时创建的AtlasTextures,并将对现有的AtlasTextures的所有更改应用到项目文件系统中。 |


