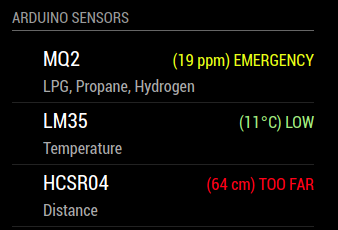
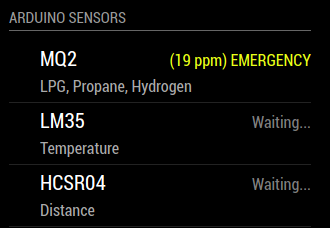
This is a module for the MagicMirror² smart mirror project.
This module provides Arduino serial communication support with Raspberry PI.
I created this module for my project real-time ArduRMMMQ project.
| Status | Version | Date | Maintained? | Minimum MagicMirror² Version |
|---|---|---|---|---|
| Working | 1.0.0 |
2019-01-11 | Yes | 2.0.0 |
To install the module, use your terminal to:
- Navigate to your MagicMirror's
modulesfolder. If you are using the default installation directory, use the command:
cd ~/MagicMirror/modules
- Clone the module to your computer by executing the following command:
git clone https://github.com/Dentrax/MMM-ArduPort.git
- Install the
python-shelllibrary by executing the following command:
npm install
- Configure the module in your
config.jsfile.
To use this module, add the following configuration block to the modules array in the config/config.js file:
var config = {
    modules: [
        ...
        {
            module: "MMM-ArduPort",
            position: "bottom_right",
            header: "MMM-ArduPort",
            config: {
                // See below for more Configuration Options
            }
        },
        ...
    ]
}| Option | Description | Value | Default |
|---|---|---|---|
portname |
REQUIRED The port name to which the Arduino will be connected Example: "/dev/ttyUSB0" |
string | NULL |
displayIcons |
Shows specific icons of the sensors |
boolean | NULL |
showDescription |
Shows the descriptions of the sensors |
boolean | false |
hideLoading |
Hide loding animation |
boolean | false |
hideWaiting |
Hide waiting animation if the sensor did not send any data yet |
boolean | false |
useColors |
Use colorful texts |
boolean | true |
sensors |
REQUIRED Sensor array to be used in the module |
array | NULL |
Each object in the sensors array can have the following parameters:
| Option | Description | Values | Default |
|---|---|---|---|
name |
REQUIRED The name of the sensor (case-sensitive, no space) Example: "HCSR04" |
string | NULL |
description |
If showDescription = true description shown under the sensorExample: "My awesome description" |
string | NULL |
maxValue |
MAXIMUM value that the sensor can produce |
integer | NULL |
maxFormat |
To format the string shown on the screen Example: ({0}) MAX |
string | NULL |
highestValue |
HIGHEST value that the sensor can produce |
integer | NULL |
highestFormat |
To format the string shown on the screen Example: ({0}) HIGHEST |
string | NULL |
highValue |
HIGH value that the sensor can produce |
integer | NULL |
highFormat |
To format the string shown on the screen Example: ({0}) HIGH |
string | NULL |
lowValue |
LOW value that the sensor can produce |
integer | NULL |
lowFormat |
To format the string shown on the screen Example: ({0}) LOW |
string | NULL |
lowestValue |
LOWEST value that the sensor can produce |
integer | NULL |
lowestFormat |
To format the string shown on the screen Example: ({0}) LOWEST |
string | NULL |
minValue |
MINIMUM value that the sensor can produce |
integer | NULL |
minFormat |
To format the string shown on the screen Example: ({0}) MIN |
string | NULL |
Here is an example of an entry in config.js with full-feature.
...
        {
	          module: 'MMM-ArduPort',
	          position: 'bottom_left',
              header: 'Arduino Sensors',
              config: {
                portname: "/dev/ttyUSB0",
                updateInterval: 1,
                animationSpeed: 1000,
                displayIcons: true,
                showDescription: true,
                hideLoading: false,
                hideWaiting: false,
                useColors: true,
                sensors: [
                    {
                        name: "MQ2",
                        description: "LPG, Propane, Hydrogen",
                        maxValue: 50,
                        maxFormat: "({0} ppm) MAXIMUM",
                        highestValue: 30,
                        highestFormat: "({0} ppm) CRITICAL",
                        highValue: 15,
                        highFormat: "({0} ppm) EMERGENCY",
                        lowValue: 10,
                        lowFormat: "({0} ppm) LOW",
                        lowestValue: 5,
                        lowestFormat: "({0} ppm) VERY LOW",
                        minValue: 0,
                        minFormat: "({0} ppm) OK"
                    },
                    {
                        name: "LM35",
                        description: "Temperature",
                        maxValue: 50,
                        maxFormat: "({0}°C) VERY HIGH",
                        highestValue: 30,
                        highestFormat: "({0}°C) HIGH",
                        highValue: 15,
                        highFormat: "({0}°C) NORMAL",
                        lowValue: 10,
                        lowFormat: "({0}°C) LOW",
                        lowestValue: 5,
                        lowestFormat: "({0}°C) VERY LOW",
                        minValue: 0,
                        minFormat: "({0}°C) OK"
                    },
                    {
                        name: "HCSR04",
                        description: "Distance",
                        maxValue: 50,
                        maxFormat: "({0} cm) TOO FAR",
                        highestValue: 30,
                        highestFormat: "({0} cm) FAR",
                        highValue: 15,
                        highFormat: "({0} cm) NORMAL",
                        lowValue: 10,
                        lowFormat: "({0} cm) CLOSE",
                        lowestValue: 5,
                        lowestFormat: "({0} cm) TOO CLOSE",
                        minValue: 0,
                        minFormat: "({0} cm) OK"
                    },
                ]
            }
        },
...
To communicate between Arduino and MMM-ArduPort, serial communication must be in this format:
Serial.println("[COMMAND:NAME:DATA]")
IMPORTANT: Do not any send sensor data in the setup() function.
In order to start the module, the Arduino's setup() function must be completed.
-
To send
startingsignal:[status:setup:starting] -
To send
startedsignal:[status:setup:started] -
To send
failedsignal: `[status:setup:failed]**
Example:
Serial.println("[status:setup:starting]");
Serial.println("[status:setup:failed]");
Serial.println("[status:setup:started]");
IMPORTANT: The signal command you send must be registered as name in the `sensors*** array.
Example
                sensors: [
                    {
                        name: "MQ2",
                    },
                    {
                        name: "LM35",
                    },
                    {
                        name: "HCSR04",
                    },
To transmit a sensor data to the module: `[sensor:SENSOR_NAME:SENSOR_VALUE]**
Example:
Serial.println("[sensor:MQ2:19]");
Serial.println("[sensor:LM35:11]");
Serial.println("[sensor:HCSR04:64]");
volatile int32_t m_counter = 0;
bool WasStarted = false;

static const char *pcMQ2Prefix = "[sensor:MQ2:";
static const char *pcLM35Prefix = "[sensor:LM35:";
static const char *pcHCSR04Prefix = "[sensor:HCSR04:";
static const char *pcPostfix = "]";

void setup() {
  Serial.begin(9600);
  while(!Serial);

  Serial.println("[status:setup:starting]");

  int test = 1;
  m_counter = test;

  if(test > 1) {
    WasStarted = false;
    Serial.println("[status:setup:failed]");
    return;
  }

  delay(3000);
  WasStarted = true;
  Serial.println("[status:setup:started]");
  delay(100);
}

void loop() {
  Serial.print(pcMQ2Prefix);
  Serial.print(m_counter);
  Serial.println(pcPostfix);

  if(m_counter % 3 == 0) {
    delay(1000);
    Serial.print(pcLM35Prefix);
    Serial.print(m_counter + 11);
    Serial.println(pcPostfix);
    delay(2000);
    Serial.print(pcHCSR04Prefix);
    Serial.print(m_counter + 33);
    Serial.println(pcPostfix);
  }

  if(m_counter >= 60) m_counter = 0;
  m_counter++;

  delay(1000);
}
Do not use Serial.print() instead of Serial.println() (Not supported yet)
- ISSUE: When the Arduino's reset button is pressed, sometimes the connection is terminated.
- FIX:
1. Disconnect the Arduino from the PC
2. Close the MagicMirror
3. Re-open the MagicMirror again
4. Connect Arduino to PC again
- Michael Teeuw for creating the awesome MagicMirror² project that made this module possible.
- Jeff Clarke for creating awesome module design (that i use in this project) and inspires me to do this module.
Copyright © 2018 Furkan 'Dentrax' Türkal
Permission is hereby granted, free of charge, to any person obtaining a copy of this software and associated documentation files (the “Software”), to deal in the Software without restriction, including without limitation the rights to use, copy, modify, merge, publish, distribute, sublicense, and/or sell copies of the Software, and to permit persons to whom the Software is furnished to do so, subject to the following conditions:
The above copyright notice and this permission notice shall be included in all copies or substantial portions of the Software.
The software is provided “as is”, without warranty of any kind, express or implied, including but not limited to the warranties of merchantability, fitness for a particular purpose and noninfringement. In no event shall the authors or copyright holders be liable for any claim, damages or other liability, whether in an action of contract, tort or otherwise, arising from, out of or in connection with the software or the use or other dealings in the software.


