Connect a WinForms Data Grid to an ASP.NET Core WebAPI Service Powered by EF Core — Authenticate Users and Protect Data
NOTE: This example extends the capabilities (introduces user login and permission-based access control) in the following example: Connect the DevExpress WinForms Data Grid to a .NET Core Service and Enable Data Editing.
Refer to the following step-by-step tutorial to run the example: Getting Started.
This example adds a key security feature to the application: user login and permission-based access control (uses Resource Owner Password Credentials (ROPC) for authentication).
Follow the steps below to set up and configure Keycloak, an open-source identity and access management framework. Our example uses Docker to run Keycloak locally and configure roles/users:
-
Install Docker.
-
Execute the following command to run Keycloak in a Docker Container:
> docker run -p 8080:8080 -e KEYCLOAK_ADMIN=admin -e KEYCLOAK_ADMIN_PASSWORD=admin -v ./data:/opt/keycloak/data quay.io/keycloak/keycloak:latest start-dev-e KEYCLOAK_ADMIN,-e KEYCLOAK_ADMIN_PASSWORD-- set the initial admin credentials.-v ./data:/opt/keycloak/data-- mounts the container's data directory to your host for persistence purposes.-p 8080:8080-- exposes Keycloak on port 8080 of your host machine.
-
Access Keycloak Admin Console
- Open your browser and go to
http://localhost:8080/admin. - Log in using the admin credentials set in the previous step (admin/admin).
- Open your browser and go to
-
Create a New Realm
- In the left navigation menu, navigate to Clients and click Create Client.
- Set a Client ID (for example, app1) and click Next.
- Ensure Direct access grants is enabled, then click Save.
-
Create a Role
- Navigate to Realm Roles in the left menu and click Create role.
- Name the role (e.g., writers) and click Save.
-
Adjust Login Settings
- Go to Realm Settings | Login tab.
- Disable Login with email.
- In the User Profile tab, disable the Required field for email.
-
Create a User
- Go to Users and click Create a new user.
- Set Username (for example, writer), random first/last names, and save the account.
- In the Credentials tab, set a password and deselect Temporary.
-
Assign Role to the User
Go to Role mapping, filter by realm roles, and assign the
writersrole. -
Create a Reader User
Repeat steps 7 and 8 for a second user (for example, reader), but do not assign a role.
-
Configure JWT Authentication
-
In your DataService app, extend service initialization to use JWT Bearer authentication.
-
Add the following code to configure
TokenValidationParametersin the Startup or Program class. This ensures that incoming requests are validated using JWT tokens issued by your Keycloak server:options.TokenValidationParameters = new TokenValidationParameters { ValidateIssuer = true, ValidIssuer = $"{builder.Configuration["Jwt:KeycloakUrl"]}/realms/{builder.Configuration["Jwt:Realm"]}", ValidateAudience = true, ValidAudience = builder.Configuration["Jwt:Audience"], ValidateLifetime = true, ValidateIssuerSigningKey = true, IssuerSigningKey = publicKey };
-
-
Ensure your appsettings.json contains correct JWT settings. Adjust values to match your Keycloak configuration if necessary.
"Jwt": {
  "Issuer": "http://localhost:8080/realms/winappdemo",
  "Audience": "account",
  "KeycloakUrl": "http://localhost:8080",
  "Realm": "winappdemo"
}
-
Add Authorization Policies
-
Define a policy for the role writers in the Startup or Program class:
builder.Services.AddAuthorization(o => {
    o.AddPolicy("writers", p => p.RequireRealmRole("writers"));
});
-
Use the
RequireRealmRolemethod to validate the role:public static class PolicyHelpers { public static void RequireRealmRole(this AuthorizationPolicyBuilder policy, string roleName) { policy.RequireAssertion(context => { var realmAccess = context.User.FindFirst("realm_access")?.Value; if (realmAccess == null) return false; var node = JsonNode.Parse(realmAccess); if (node == null || node["roles"] == null) return false; var array = node["roles"]!.AsArray(); return array.Select(r => r?.GetValue<string>()).Contains(roleName); }); } }
-
-
Protect API Endpoints
Use the
RequireAuthorizationmethod to secure API endpoints:- For open endpoints (e.g.,
/api/populateTestData), no authorization is required. - GET endpoints
/data/OrderItemsand/data/OrderItem/{id}callRequireAuthorization(), so that an authenticated user is required to successfully execute them, but no specific roles are needed. - The remaining endpoints POST to
/data/OrderItem, and PUT and DELETE to/data/OrderItem/{id}, callRequireAuthorization("writers"), so that policy writers is applied and realm role writers is required.
The example of the POST endpoint:
app.MapPost("/data/OrderItem", async (DataServiceDbContext dbContext, OrderItem orderItem) => {
    dbContext.OrderItems.Add(orderItem);
    await dbContext.SaveChangesAsync();
    return Results.Created($"/data/OrderItem/{orderItem.Id}", orderItem);
}).RequireAuthorization("writers");
- For open endpoints (e.g.,
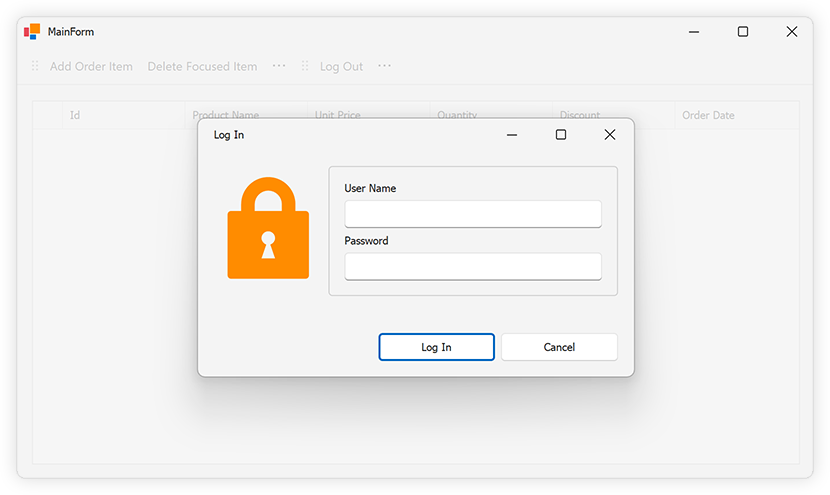
The LoginForm prompts users for username and password. The form contains two DevExpress TextEdit controls for username and password fields.
When a user clicks the "Log In" button, the LogIn form collects user credentials and sends a POST request to the Keycloak server to retrieve an access token:
// LoginForm.cs
private async void loginButton_Click(object sender, EventArgs e) {
    //...
    if (await DataServiceClient.LogIn(userNameEdit.Text, passwordEdit.Text)) {
        this.DialogResult = DialogResult.OK;
        this.Close();
    }
    else {
        XtraMessageBox.Show("Username or password are invalid, or a technical error occurred.", "Error",
            MessageBoxButtons.OK, MessageBoxIcon.Error);
    }
}

// DataServiceClient.cs
public static async Task<bool> LogIn(string username, string password) {
    //...
    var content = new FormUrlEncodedContent(new Dictionary<string, string> {
        {"client_id", clientId},
        {"username", username},
        {"password", password},
        {"grant_type", "password"}
    });
    var url = $"{authUrl}/realms/{realm}/protocol/openid-connect/token";
    var response = await bareHttpClient.PostAsync(url, content);
    try {
        response.EnsureSuccessStatusCode();
        var responseString = await response.Content.ReadAsStringAsync();
        (accessToken, refreshToken, expiresIn) = GetTokens(responseString);
        if (accessToken != null) {
            lastRefreshed = DateTime.Now;
            (name, realmRoles) = GetUserDetails(accessToken);
        }
        return true;
    }
    catch (Exception ex) {
        Debug.WriteLine(ex);
        return false;
    }
}
The GetTokens method parses the JSON response from Keycloak and extracts access_token, refresh_token, and expires_in fields:
static (string? access_token, string? refresh_token, int? expires_in) GetTokens(string jsonString) {
    var node = JsonNode.Parse(jsonString);
    if (node == null)
        return (null, null, null);
    else
        return (node["access_token"]?.GetValue<string>(),
            node["refresh_token"]?.GetValue<string>(),
            node["expires_in"]?.GetValue<int>());
}
A client must check the validity and expiration of an access token before its use and use the refreshToken to retrieve a new access token if the old one has expired (see the BearerTokenHandler class). The Authorization request header is configured to pass the value of the current access token to the server using a specific format:
protected override async Task<HttpResponseMessage> SendAsync(HttpRequestMessage request, CancellationToken cancellationToken) {
    if (!String.IsNullOrWhiteSpace(accessToken)) {
        //...
        request.Headers.Authorization = new AuthenticationHeaderValue("Bearer", accessToken);
    }
    return await base.SendAsync(request, cancellationToken);
}
The client application can now authenticate against the Keycloak server and send an access token to the data service (confirming permission to access data endpoints). The server determines the roles associated with a specific logged-in user account and allows/denies access to endpoints accordingly.
Once the user logs in and the accessToken is retrieved, decode the token on the client side to access the user's roles. Add the System.IdentityModel.Tokens.Jwt NuGet package to your project to handle JWT decoding.
The GetUserDetails method extracts user details such as username and roles:
static (string? name, string?[] realmRoles) GetUserDetails(string? accessToken) {
    if (String.IsNullOrEmpty(accessToken))
        return (null, []);
    var handler = new JwtSecurityTokenHandler();
    var token = handler.ReadJwtToken(accessToken);

    var claim = (string claimType) => token.Claims.FirstOrDefault(c => c.Type == claimType)?.Value;
    var name = claim("name");
    var realmAccess = claim("realm_access");
    var node = JsonNode.Parse(realmAccess);
    if (node == null || node["roles"] == null) return (name, []);
    var array = node["roles"]!.AsArray();
    var realmRoles = array.Select(r => r?.GetValue<string>()).ToArray();

    return (name, realmRoles);
}
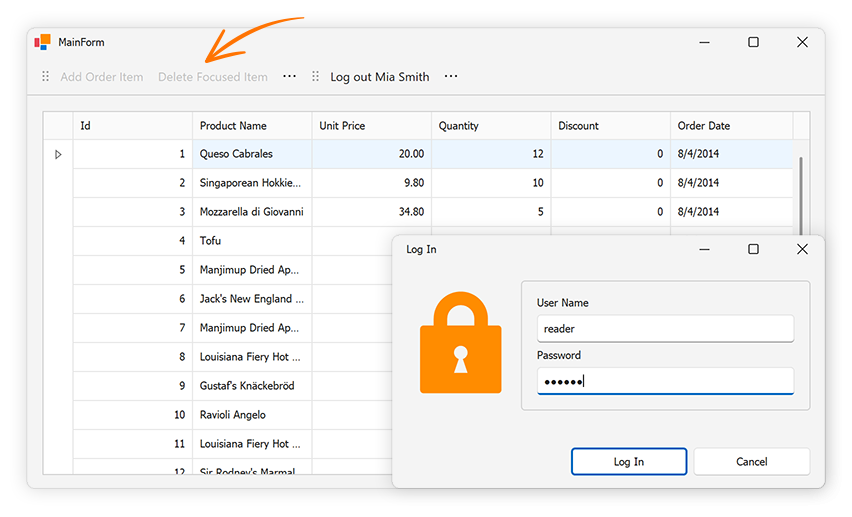
Evaluate user roles to determine which UI elements to enable/disable. The EvaluateRoles method enables/disables UI elements based on roles available to the user:
// MainForms.cs
private void EvaluateRoles() {
    if (DataServiceClient.LoggedIn) {
        if (DataServiceClient.UserHasRole("writers")) {
            userIsWriter = true;
            addItemButton.Enabled = true;
            deleteItemButton.Enabled = true;
        }
        else {
            userIsWriter = false;
            addItemButton.Enabled = false;
            deleteItemButton.Enabled = false;
        }
    }
    else {
        userIsWriter = false;
        addItemButton.Enabled = false;
        deleteItemButton.Enabled = false;
    }
}- Connect a DevExpress WinForms Data Grid to a .NET Core Service
- Connect a DevExpress WinForms Data Grid to a .NET Core Service and Enable Data Editing
- Connect a DevExpress WinForms Data Grid to a Backend using a Middle Tier Server (EF Core without OData)
- Connect a WinForms Data Grid to an ASP.NET Core WebAPI Service Using EF Core — Authorization Code Flow
- Connect a WinForms Data Grid to an Arbitrary ASP.NET Core WebAPI Service Powered by EF Core — Architecture and Data Binding (Part 1)
- Connect a WinForms Data Grid to an Arbitrary ASP.NET Core WebAPI Service Powered by EF Core — Add Editing Features (Part 2)
- Connect a WinForms Data Grid to an Arbitrary ASP.NET Core WebAPI Service Powered by EF Core — Authenticate Users and Protect Data (Part 3)
(you will be redirected to DevExpress.com to submit your response)


