This is a Gatsby starter for Theory Communication and Design. This is to create a new reflex site for our events. Below you will find detailed directions on how to use this starter.
The starter is built with GatsbyJS. So you need the gatsby cli to use it.
Getting Started
Folder Structure
Site Metadata
Site Layout
Images
Content
Add and Test your Form
If you already have gatsby-cli on your machine then you can skip this step. To get gatsby-cli open terminal on your computer and run the command:
npm install -g gatsby-cliOnce you have the gatsby-cli installed you are ready to create your new reflex site with the starter. To do this in your terminal navigate to the folder you'd like the directory for the new site to be stored. Once there enter this command:
gatsby new <new reflex site name> https://github.com/DigitalAtTheory/new-reflex-starterYou'll replace with the name of the site you are creating. This tells gatsby to create a new site directory with the name you entered using the new-reflex template.
After that's completed you'll want to navigate into your directory.
cd <new reflex site name>Once in the directory you'll install all the dependencies for the site.
npm installAfter those install you can start your server and take a look at the template.
Important: The site cannot run this command if the code that instantiates the form is uncommented. We will discuss how to test your form later in this document.
gatsby developThen in your browser of choice navigate to localhost:8000
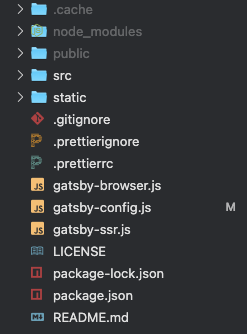
Here is a brief overview of the folder and files and what they do.
Most of the stuff in this top level you won't touch. Let's breakdown the things you'll need to know.
This file is the configuration file for your new site. It houses all the plugins used as well as the metadata for your site. We will talk about editing this later.
This is a file that passes code to gatsby to use in the browser during the build process. It primarily is for context and layouts. You shouldn't ever need to edit this file. But in case you have to it's here.
This file works like gatsby-browser.js except it acts like a server during build time. Again this isn't a file that should be edited but it's here if you need to.
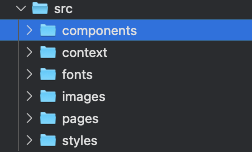
The src folder is where you will spend majority of your time building your site. Let's break down what you'll find inside.
In this folder you'll find all of your css for the site. We will mention editing a couple of these files when necesarry. The bulk of the build uses CSS modules and is pretty self explanatory based on the file names.
This is a special folder in Gatsby and creates all of our links. It's where the pages are stored. It's important to note that since the Thank You page has a nested url inside of /survey, you'll find that page in the survey folder.
This folder is where all your images are stored. We will be dealing with this later.
This folder is where the font for reflex is stored. You shouldn't need any other fonts however if you do this where they should be stored.
This folder is where the context file is stored for the couple of global states used in the site. We will talk about editing this file later.
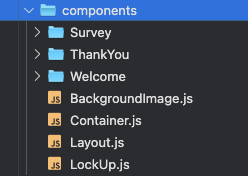
This folder is where all of our components are stored. Let's take a look in this folder.
First up you'll see the components that aren't in a folder. These are the basic components for your site. Then each folder houses the components needed to build that page. You'll find the components you need for the corresponding page in those folders.
The first thing you'll want to do is edit the metadata for your site. Navigate to the gatsby-config.js. You'll see this code:
siteMetadata: {
    title: `New Reflex Template`,
    siteUrl: `localhost:8000`,
    description: `A blank template for building a new reflex microsite`,
  },
It's pretty straightforward. Just fill out the info according the event you're working on.
Some of our sites use a lockup logo bar and some of them use background images. However, some of them don't. By default these additions are turned off, but I've made it simple to turn them back on.
Start by navigating to siteContext.js in the context folder. Find this code:
const [lockup, setLockup] = useState(false)
const [backgroundImage, setBackgroundImage] = useState(false)
When you set them to true the site will start using the respective feature. For now they'll still be placeholder images. We will discuss changing that in the next section.
The first step in getting the images you need in the site is by adding all the images to the images folder. There are some images that are required.
Needs
- Home page image
- Home page button image
- Thank you page image
- Thank you page button image
Optional
- Logo for lockup
- Background image
Below is a walkthrough of how to change each image.
Navigate to the WelcomeImage.js component inside the components folder and then welcome folder. Find this code:
const image = "../../images/image-placeholder.png"
const altText = "Placeholder image"
You'll change the image variable to the relative path for the need image. It's important to note that alt text is required.
Navigate to the WelcomeButton.js component inside the components folder and then welcome folder. Find this code:
const image = "../../images/button-placeholder.png"
const altText = "Placeholder button"
You'll change the image variable to the relative path for the need image. It's important to note that alt text is required.
Navigate to the ThankYouImage.js component inside the components folder and then thankyou folder. Find this code:
const image = "../../images/image-placeholder.png"
const altText = "Placeholder image"
You'll change the image variable to the relative path for the need image. It's important to note that alt text is required.
Navigate to the ThankYouButton.js component inside the components folder and then thankyou folder. Find this code:
const image = "../../images/button-placeholder.png"
const altText = "Placeholder button"
You'll change the image variable to the relative path for the need image. It's important to note that alt text is required.
Navigate to the LockUp.js component in the components folder. Find this code:
const image = "../images/logo-placeholder.png"
const altText = "Placeholder logo"
You'll change the image variable to the relative path for the need image. It's important to note that alt text is required.
This one is a little bit different from all the others. This image is implemented with css. So you'll navigate to the styles folder and find backgroundImage.module.css and find this line of code:
background-image: url("../images/bg-image-placeholder.png");Change that image path to the relative path of your new image. Now you should have a background image.
Now that we have our images we need to add the content. This is probably the simplest part of the build. You'll find the WelcomeContent.js and ThankYouContent.js components in their respective folders.
From there you'll see the dummy content. You can replace that with your content and you're all set.
If you should need to change your styles then you'll find yourself in the styles folder. The site uses vanilla CSS and CSS modules to build the styles. Most of the module files are self explanatory based on their name. Here are two files to note.
global.css - This is the file to apply all global styles. It should be used sparingly.
survey.css - Because of the way Cognito forms works, we also have to use a global css file to edit the survey styles. You'll find all of these styles in this file. This file should only be edited when you need to change what the survey generated by Cognito looks like.
Now that we have the rest of our site finished it's time to add our form and get that tested.
First we need to find the form we are using in Cognito forms. You'll go to the publish section on your form and find the embed code. It looks like this:
<div class="cognito">
  <script src="https://www.cognitoforms.com/s/VIFwyLJpI0-1pUDbhQ8wSg"></script>
  <script>
    Cognito.load("forms", { id: "50" })
  </script>
</div>
You no longer need all this code. You just need the number next to id. Once you have that number you'll go back to your code. Once there navigate to Survey.js component inside the components then survey folder. Once there find this code:
const formId = nullYou'll then change this to the number you got from Cognito.
Next you'll need to find this code in the same file:
// Cognito.load("forms", { id: formId })
// setLoading(false)
Uncomment this code and save the file.
Next make sure that your local gatsby server is not running then open terminal and run this command:
gatsby buildOnce that builds out you'll run the following command:
gatsby serveNow you should access your browser and go to localhost:9000. This will show you what the site will look like once published. Now your form should be working.
Now you're ready to publish the microsite.


