Up and run Django project in Docker
Steps-
First Download all this sample code from Github: https://github.com/Dipeshpal/djnago-with-docker, it will help you to understand all the code and files releated to this article.
-
Put this repository somewhere in VM / Main Machine / Host Machine. And open terminal in same folder.

-
Change dir to "djnago-with-docker", you must have "docker-entrypoint.sh", "Dockerfile" files and "mysite" folder. Type
lsto check.Dockerfile: This is the file which have instruction to create docker image. We will talk more about this file later in this document.
docker-entrypoint.sh: This is the file where we define what we want to perform once image is created, it's a entry point for the image. We will talk more about this file later in this document.
mysite: Simple Django project.
Note: In settings.py file of django app,
ALLOWED_HOST=['*']So, we have all these files-

-
Make the file "docker-entrypoint.sh" executable and change permission by type this command in terminal:
chmod u+x docker-entrypoint.sh
-
Now check your existing images (Optional):
sudo docker images -
Now check your existing containers (Optional):
sudo docker ps
Here you can see we don't have any image or container.
-
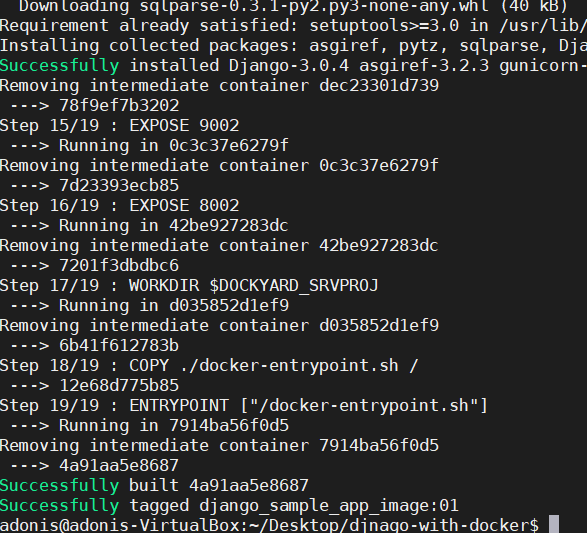
Now create docker image first by using "Dockerfile":
sudo docker build -t <image_name> -f Dockerfile .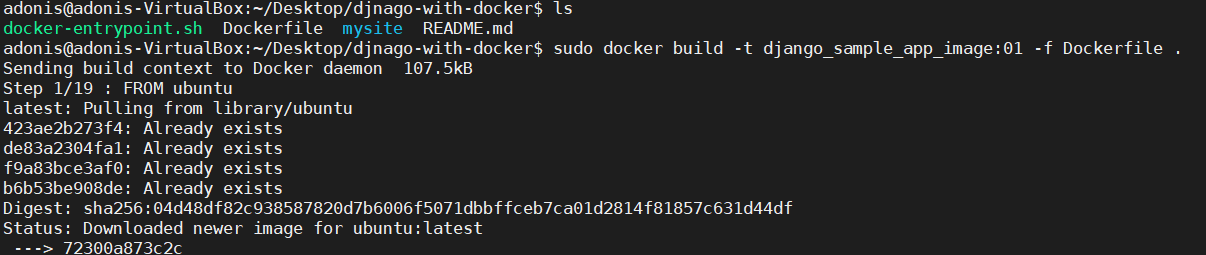
It may take few minutes.
After few minutes-
-
Once image is created successfully, then check image name:
sudo docker images
-
Now we will create container with above image:
sudo docker container run --publish 8000:8002 --detach --name <container_name> <image_ID>or
sudo docker run -itd -p 9010:8010 <image_name>or
sudo docker run -itd -p 9010:8010 -p 9011:8011 <image_name>(External_Port:Internal_Port)

You will have container id as output.
-
Now check your new container, you will find something new:
sudo docker psYou will find contatiner up and running, just check ports number field.
-
Now execute the container-
docker exec -it container_id bashIt will start container in bash / terminal. Now you can simply browse anything or do anything in container. Container is created here with Ubuntu base image itself (define in Dockerfile) so here you can run all ubuntu commands.
Now, navigate to your project (mysite) folder and run your python djnago server:
python3 manage.py runserver 0.0.0.0:8002[Make sure you enter correct port number]Now, Just close your terminal and do not stop the server, let your server running on background.
-
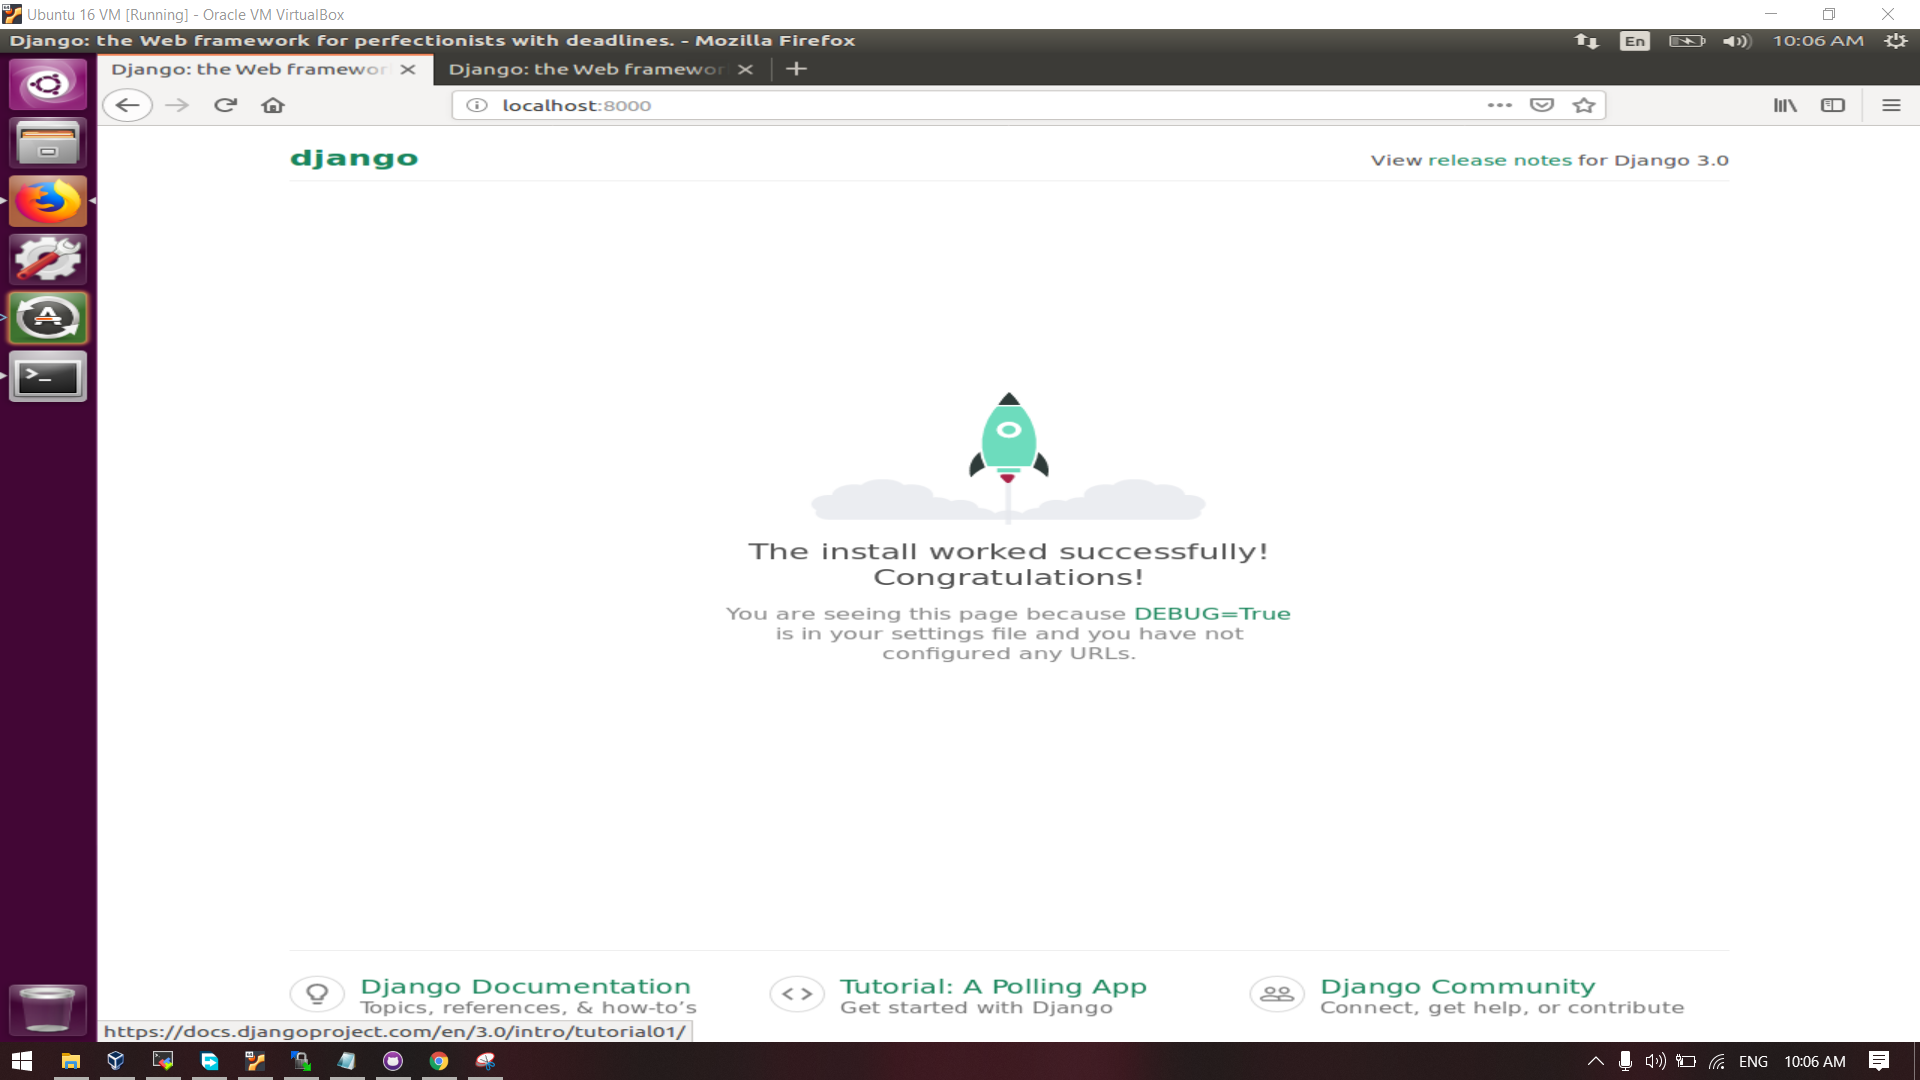
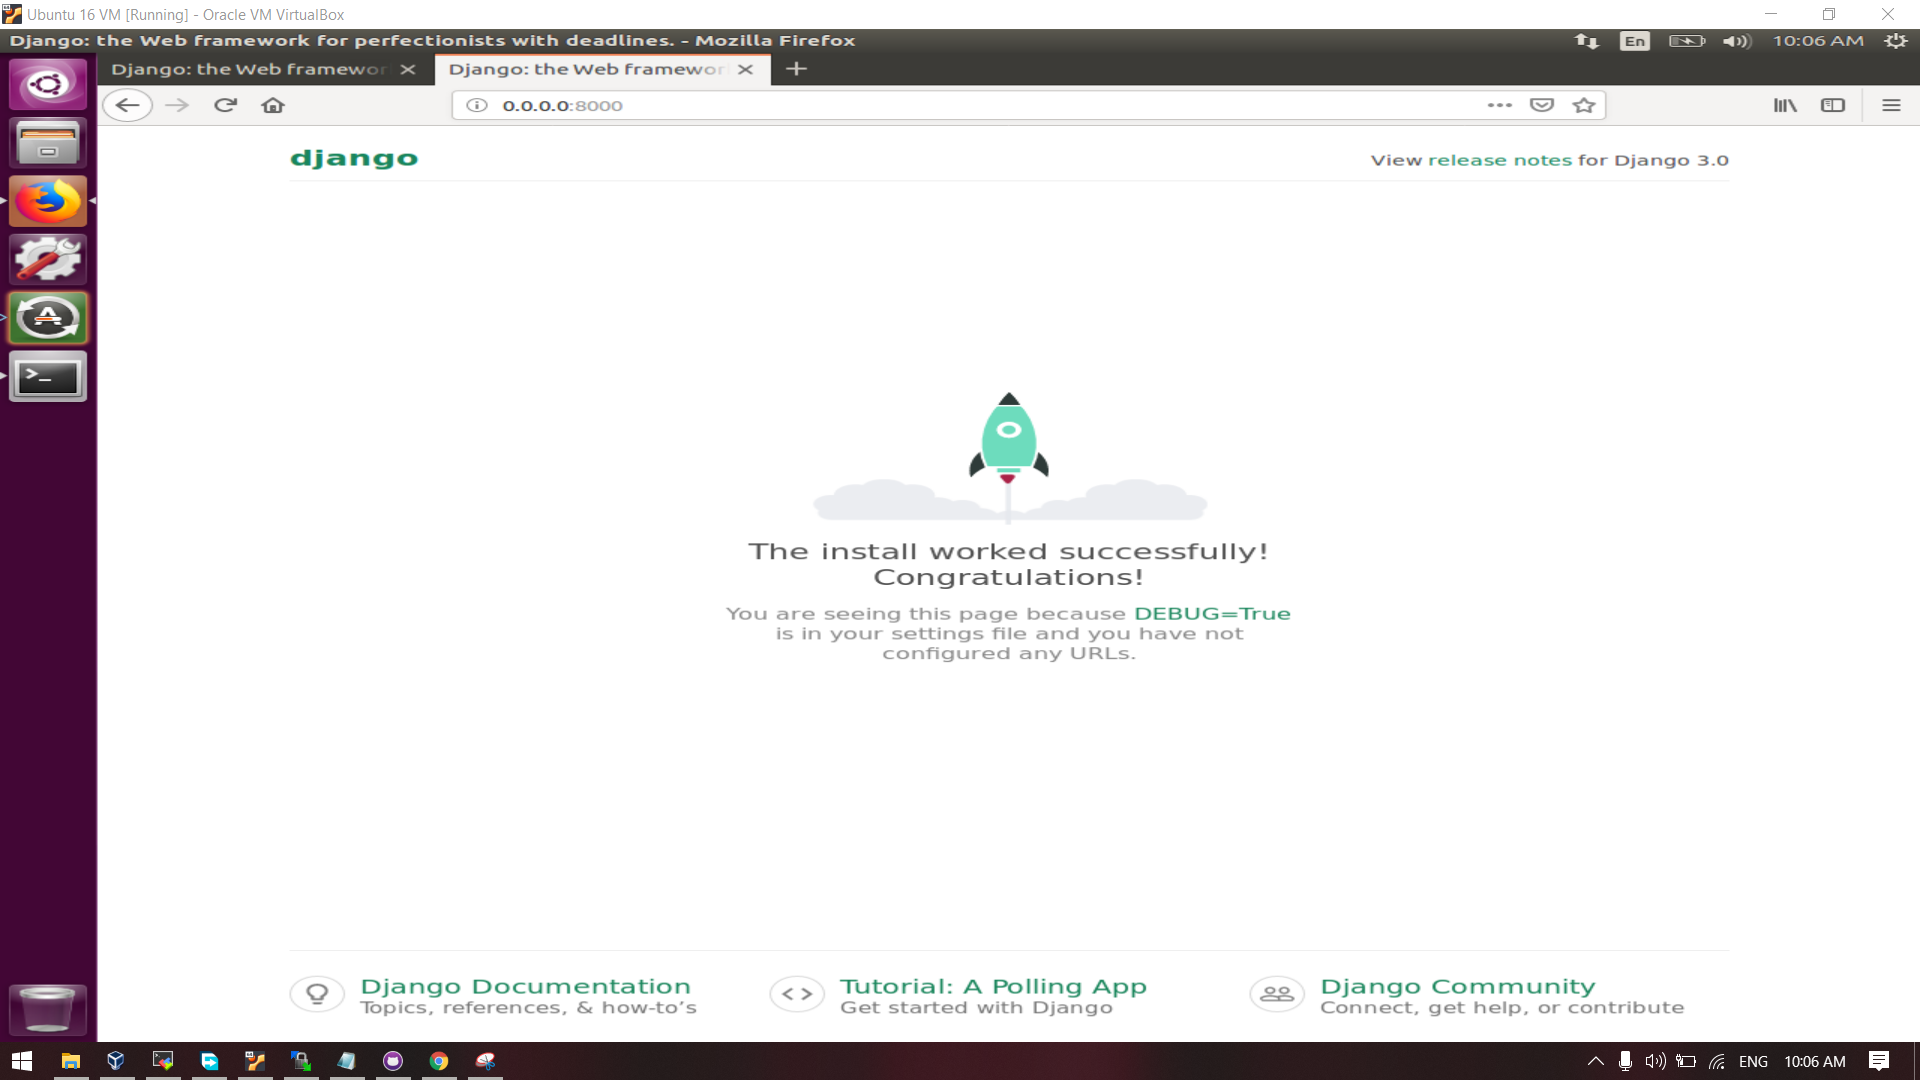
Now go to browser of VM / Main Machine / Host Machine and hit this URL in address bar: "localhost:8000", or "0.0.0.0:8000" if all host allowed in settings.py in djnago app.
Some useful commands-
1. Displaying Running Container
$ docker ps -a
CONTAINER ID        IMAGE               COMMAND                  CREATED             STATUS              PORTS                NAMES
df2caf9283e8        nginx               "nginx -g 'daemon of…"   35 seconds ago      Up 34 seconds       0.0.0.0:80->80/tcp   vigorous_jang
2. Export container into tar
$ docker export df2 > nginx.tar
3. Import container from tar
docker import - mynginx < nginx.tar
$ docker images
REPOSITORY          TAG                 IMAGE ID            CREATED             SIZE
mynginx             latest              aaaed50d250a        25 seconds ago      107MB
nginx               latest              568c4670fa80        2 weeks ago         109MB
4. Create Image from Conatiner-
`docker commit <running_container_id> <new_image_name>`
5. Create tar from Images (already commited) If you would rather deal with images that you have already committed, you can use the load and save commands:
$ docker save -o mynginx1.tar nginx
$ ls -l
total 218756
-rw-------    1 root     root     112844800 Dec 18 02:53 mynginx1.tar
-rw-r--r--    1 root     root     111158784 Dec 18 02:50 nginx.tar
This will create a tar.
6. Load Image from tar.
Run the below command to load Docker image into your system:
$ docker images
REPOSITORY          TAG                 IMAGE ID            CREATED             SIZE
$ docker load < mynginx1.tar
Loaded image: nginx:latest
[node1] (local) root@192.168.0.33 ~$ docker images
REPOSITORY          TAG                 IMAGE ID            CREATED             SIZE
nginx               latest              568c4670fa80        2 weeks ago         109MB
[node1] (local) root@192.168.0.33 ~
$
Now run this image to start container.
-
Let's Check Dockerfile code-
############################################################ # Dockerfile to run a Django-based web application # Based on an Ubuntu Image ############################################################ # Set the base image to use to Ubuntu FROM ubuntu # Set the file maintainer (your name - the file's author) MAINTAINER Calsoft Pvt Ltd # Set env variables used in this Dockerfile (add a unique prefix, such as DOCKYARD) # Local directory with project source ENV DOCKYARD_SRC=mlip_dashboard # Directory in container for all project files ENV DOCKYARD_SRVHOME=/srv # Directory in container for project source files ENV DOCKYARD_SRVPROJ=/srv/mlip_dashboard # Update the default application repository sources list RUN apt-get update RUN apt-get install -y python3 RUN apt-get install -y python3-pip RUN pip3 install --upgrade pip # Create application subdirectories WORKDIR $DOCKYARD_SRVHOME RUN mkdir media static logs VOLUME ["$DOCKYARD_SRVHOME/media/", "$DOCKYARD_SRVHOME/logs/"] # Copy application source code to SRCDIR COPY $DOCKYARD_SRC $DOCKYARD_SRVPROJ # Install Python dependencies RUN pip3 install -r $DOCKYARD_SRVPROJ/requirements.txt #RUN conda install --yes --file $DOCKYARD_SRVPROJ/requirements.txt # torch install # RUN pip3 install torch==1.2.0+cpu torchvision==0.4.0+cpu -f https://download.pytorch.org/whl/torch_stable.html RUN pip3 install celery RUN pip3 install celery_progress RUN pip3 install torch==1.4.0+cpu torchvision==0.5.0+cpu -f https://download.pytorch.org/whl/torch_stable.html RUN pip3 install fastai==1.0.53.post3 # Port to expose EXPOSE 8010 EXPOSE 8011 # Copy entrypoint script into the image WORKDIR $DOCKYARD_SRVPROJ COPY ./docker-entrypoint.sh / ENTRYPOINT ["/docker-entrypoint.sh"] -
Let's Check docker-entrypoint.sh code-
We use wsgi to run the project, for Django it is recommended. You can skip it, you can just run
python manage.py runserverbut for the production wsgi with gunicorn is recommended.#!/bin/bash #alias python=python3 #alias pip=pip3 python3 manage.py migrate # Apply database migrations #python3 manage.py collectstatic --noinput # Collect static files #python3 manage.py runserver 8010 # Prepare log files and start outputting logs to stdout touch /srv/logs/gunicorn.log touch /srv/logs/access.log tail -n 0 -f /srv/logs/*.log & # Start Gunicorn processes echo Starting Gunicorn. exec gunicorn mlip_dashboard.wsgi:application \ --name mlip_dashboard \ --bind 0.0.0.0:8010 \ --workers 3 \ --log-level=info \ --log-file=/srv/logs/gunicorn.log \ --access-logfile=/srv/logs/access.log \ "$@"
Recommended Articles and Courses-
Docker Begginer Course: https://www.udemy.com/course/docker-essentials/
Django Course:
- Corey Schafer YouTube
- Max Goodridge YouTube