Wearable Technology Badge Workshop
Make a small interactive rechargeable wearable badge over 4 weeks to get you started in the world of wearable technology. Designed to give you an understanding of basic fundamentals in electronics, embroidery and coding in the versatile progamming language micropython to control interactive intimate wearables. We'll use DIY conductive yarn pressure sensors and variants of low cost ESP8266 development boards that can help you deploy all kinds of wearable (and non-wearable) technology.
With this experience you'll be able to prototype and deply wearable tech for art, performance, fashion, product development. It's a chance to share your ideas with peers and meet other members of the DoES Liverpool community and get to know our facilities for the future.
All materials are provided, with extensive workshop notes, reference and resources here plus your own kit featuring an ESP8266 development board, Sublimation printed sensor, single and 6-ring NeoPixels, and a rechargeable battery pack you can for your next project.
Under 16s must be accompanied by a parent or guardian, suitable for ages 12 and up.
Structure
- Analog Textile Sensor making
- LED & NeoPixel control with ESP8266 and MicroPython
- Analog Sensor & ESP8266
- Advanced ESP8266, sensor & LED control & Wearable Badge constructing
Session 1
Make & test an analog textile sensor to understand the basics of electrical resistance and the flow of current in a simple circuit.
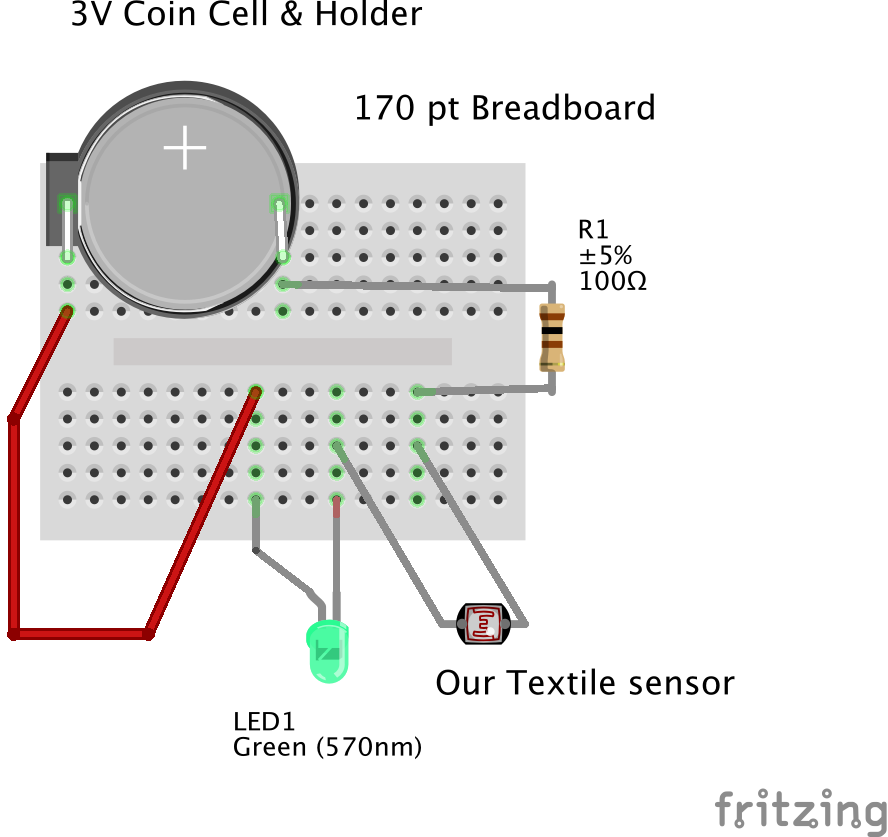
Our breadboard lets us easily connect electronic components and wire of the correct gauge clearly without the components falling out. They are how people prototype a circuit, and quite often you will rewire it in a way that's more robust and permanent or even design and make your own printed circuit boards (PCBs). On these mini 170-point breadboards there are 2 columns of 17 rows of 5 pins. Each 5 pin set on a row are connected electrically so current flows through components. We generally dont use voltage over 12V when using these breadboards so we never have anything close to mains voltage. We are not even going above 3.7V with our wearables!
Follow the pictures below to make the circuit and compare it with the circuit diagrams provided. That's how you'll find diagrams on the internet and in electronics books, so it's worth having a look at those and doing some further research.
Circuit
Insert your LED. It matters which way the LED goes in; it's got a negative cathode - and a positive anode + if you get it wrong you can damage it. The long leg of the LED is +'ve, the shorter leg, the cathode, is -'ve'
Add your coin cell holder and coin cell. Be careful you understand the +'ve and -'ve cathod and anode. The + on the coin cell should be visible facing up, the Flat side of the coin cell holder is -
Add a red jumper wire connecting the long leg + anode of the LED with the + anode of the coin cell holder, the pin nearest the flat side of the holder
Add a 100 Ohm resistor
Connect your completed Fabric sensor.
Stitch onto the felt with the resistive thread, leaving a long piece on the back of the felt before your first stitch Make some stitches close together some can be touching but not overlapping or on top of one another Continue until you have stitched along the back of the design, its fine to leave gaps. Leave a piece trailing at the other end. Tie a piece of conductive thread to one end of the stitching Stitch and add a snap fastener, then repeat at the other side with conductive thread. Solder wires onto the other side of the snap fasteners. Clip the fasteners togetherComponent List
| Component | No. | Source | Produced | Notes |
|---|---|---|---|---|
| 170 point mini breadboard |
1 | DoES | China | For prototyping |
| 3V CR2032 coin cell battery | 1 | Ebay | ||
| Two Pin Button | 1 | Taydae Electronics | China | simple breadboard compatible button |
| CR2032-compatible Watch Battery holder | 1 | BatteryHolders.com | China | Easy breadboarding holder |
| Red Stripped solid core 22AWG wire | 1 | Farnell | Alphawire New Jersey US | Stripped fits into breadboards easily |
| Green Stripped solid core 22AWG wire | 1 | Farnell | Alphawire New Jersey US | Stripped fits into breadboards easily |
| Resistor 100 Ohm | 1 | Ebay | China | Resistor; fits anyway round (polarity doesn't matter) |
| Resistor 10K Ohm | 1 | Ebay | China | Resistor; fits anyway round (polarity doesn't matter) |
This first step develops the basics of a pressure sensor; we can refer to more complex and accurate sensors and reflect on their usage.
Further Reading
You can read about an alternative form of pressure sensor using Velostat that Laura made for another workshop using a similar microcontroller Microbit belwo, that also runs micropython the programming language we are using to control our sensors and LED's.
Session 2
Flash LEDs using micropython on the ESP8266
Micropython and the ESP8266
The ESP8266 and it's larger ESP32 cousin is a powerful self contained microcontroller breakout board that is like arduino except incredibly powerful flexible and cheap, it's able to run web browsers, control LED's and motors and respond to a range of analog and digital sensors. What's special is that it can run micropython a powerful high level programming language which means that is quite easy to use and write even without being a programmer.
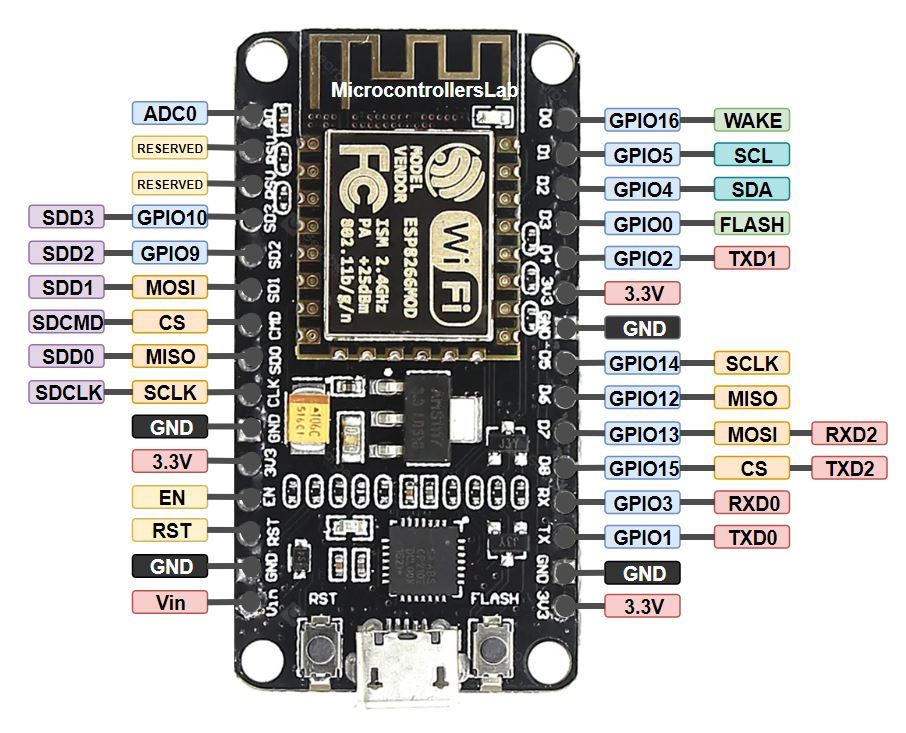
We're using the a few variant breakout boards of the ESP8266 like the WeMos D1 Mini Development Board in the diagram above or the bigger ESP-12E-CP2102 variant which you can see above with its GPIO pin arrangement. We'll be using these in our workshops and you'll be able to take them home.
Don't worry about the seemingly contradictory annotations on the diagram, it will make sense. We are first of all only using the 'pin' (the metal legs that fit a breadboard)
You can refer to the MicroPython tutorial for ESP8266 for full details, but we've selected.
Connecting up
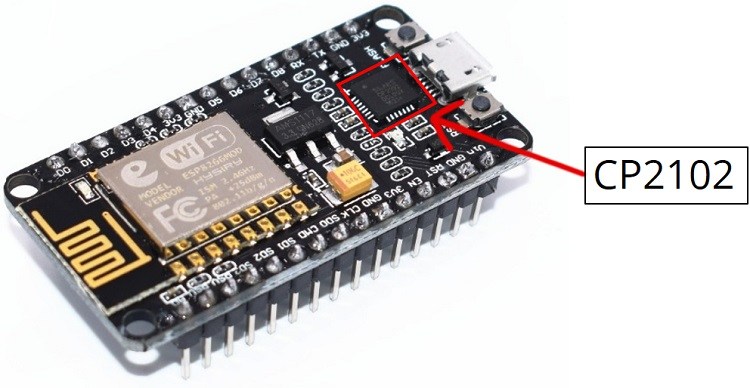
You will need CP2102 USB Module drivers to work with our ESP8266's which are the CP2102 variants which you can get from Silicon Labs. Basically there's a square chip on the board which is the CP2102, other variants have an oblong chip called the CH430 series which need different drivers linked here. Always check which chipset on ESP8266 you're buying. Generally we've found the CP2102 the most reliable and work with the generally useful & excellent ShrimpingIt kits that may prove useful if you need cut price arduino learning kits.
Linux distributions often include CP2102 drivers built in, although Linux user accounts may need membership of the 'dialout' or 'serial' permission groups to access the device.
We use these drivers so we can access our ESP8266 boards over their serial port over USB.
Software
Now you've got drivers for interfacing with the board with serial over your USB data cable, there are a few ways to send commands and files to the ESP8266. We are using some new software we've found, uPyCraft which is easiest for beginners. It's an IDE (Integrated Development Environment) i.e. an application where you can write and develop code and send it to the ESP8266 (it also works for microbits and ESP32 more on those later). It also let's you send commands to the board line by line in the console, a window at the bottom, which also returns (sends a message in response to what you do to the board) error messages and other useful feedback. You can manage and save complete files to the board that run when you are ready to deploy your project and run off batteries.
There's some more advanced alternatives using the command line below
Setting up uPyCraft
If you follow the links on the random nerd tutorials it seems to imply that you must install python on your machine first. You do not need python to use uPyCraft! Just hit the links to the software installs below. They are also invluded in the repository here.
- Windows Tested on Windows 10
- Mac (Ensure you allow apps to be downloaded from anywhere in your system security settings)
- Linux Currently only running on 16.x Ubuntu
Flashing the micropython environment to the board
When you first get your board you need to send or 'flash' the micropython environment to it first.
Download the .bin file here and note it's location. You need to click on the .bin file and then you will get a download box option on the webpage.
Selecting Serial Port
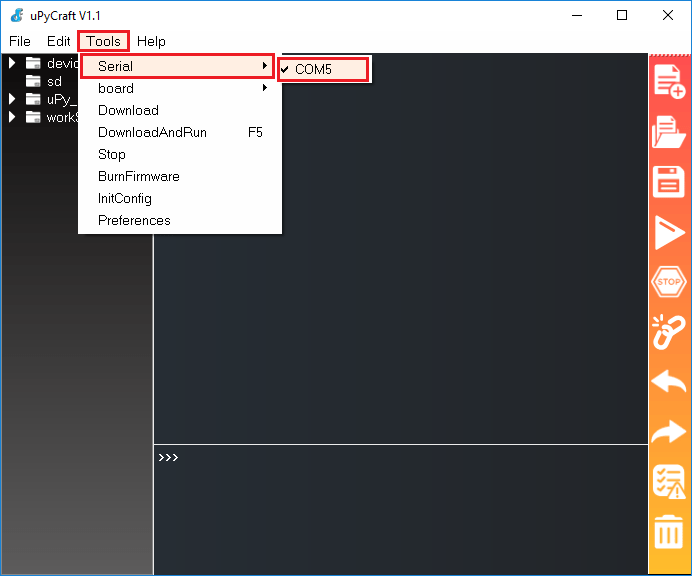
Plug in your ESP8266 with you usb data cable. Open uPyCraft and select Tools/Serial and select your ESP8266 COM port (on a PC Or Linux it's a COM number like COM5 or COM3, on Mac it should be something like tty.SLAB_USBtoUART).
If you plug your ESP8266 board to your computer, but you can't find the ESP8266 Port available in your uPyCraft IDE, it might be one of these two problems:
- USB drivers missing or
- USB cable without data wires.
- If you don't see your ESP's COM port available, this often means you don't have the USB drivers installed. Take a closer look at the chip next to the voltage regulator on board and check its name.
The ESP8266 ESP-12E NodeMCU board uses the CP2102 chip.
Go back to the Connection Up Step Once they are installed, restart the uPyCraft IDE and you should see the COM port in the Tools menu.
- If you have the drivers installed, but you can't see your device, double-check that you're using a USB cable with data wires.
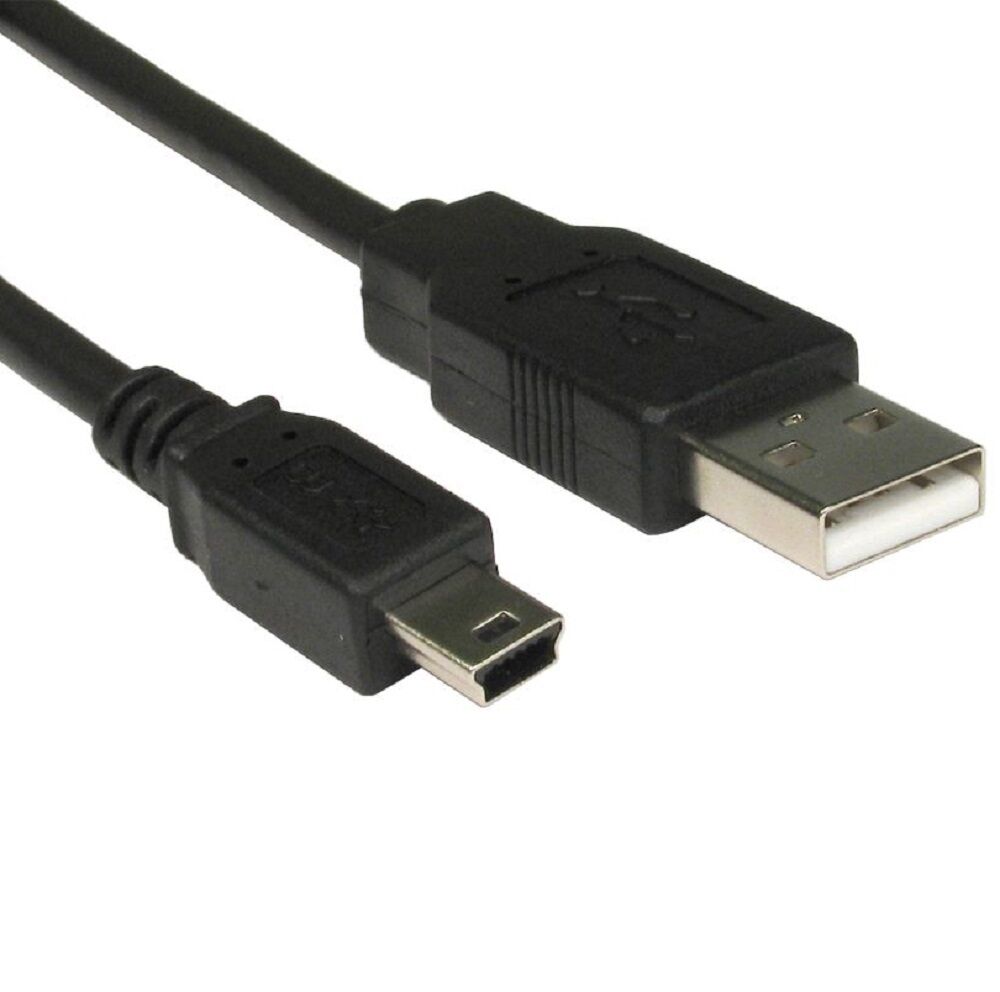
USB cables from powerbanks often don't have data wires (they are charge only). So, your computer will never establish a serial communication with your ESP8266. Using a proper USB data cable should solve your problem.
Flashing the Board
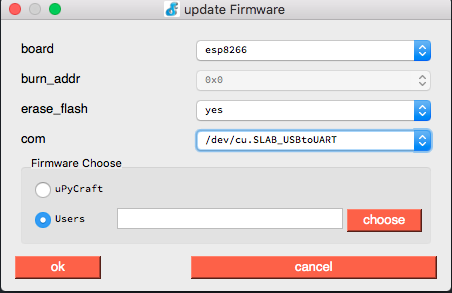
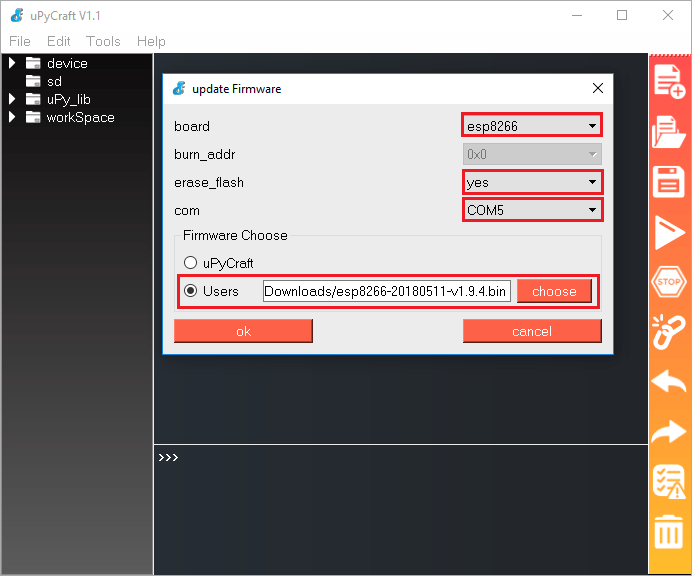
When you connect for the first time to the serial conection the steps described below happen automatically and you get a window pop-up like below, prompting you to flash the board with the .bin file you downloaded earlier. (The full set of updated firmwares for future ref are here)
If this happens click on all the options so they look like the above with your com portname COMx and select:
- board: esp8266
- burn_addr: 0x0
- erase_flash: yes
- com: COMx (in our case it's COM5)
- Firmware: Select
Usersand choose the.binfile you downloaded earlier
Click ok and a window will show you 'burning' the firmware onto the board. You should get an ok message when it's finished. If you get an error message in the console (window at the bottom with the python >>> prompt and other messages) then try again by re-selecting the Serial port in Tools > Board.
You should see the python prompt in the bottom console window
>>>
That's it you're ready to send commands to the board and control LED's!
Flashing the board from the Menu's
The following is a walkthrough if you have already flashed the board and want to start again, or change the firmware or the pop-up to prompt you has not turned up and you cant see the python >>> prompt in the console.
In this walkthrough it suggests that you need to hold-down the "BOOT/FLASH" button on your ESP8266 board to put it in the correct mode, but we've found that this is not necessary. We'll leave it in the walkthrough for now in case you have issues and find that extra step is helpful. Otherwise just follow the instructions without touching the board.
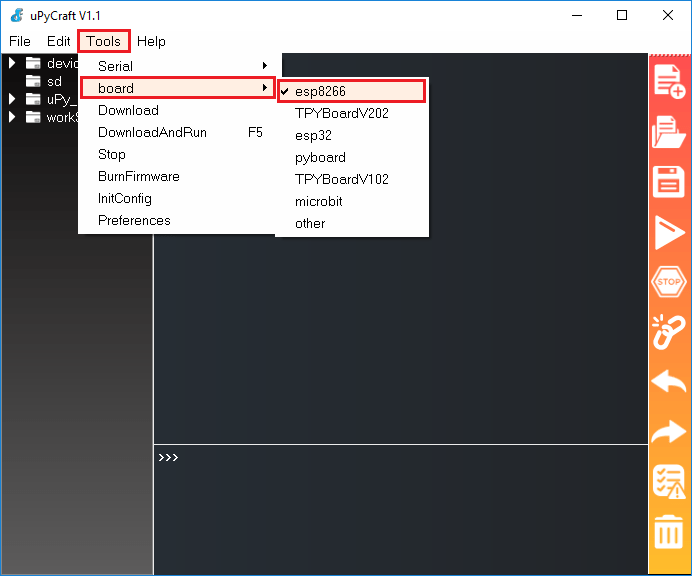
Go to Tools > Board. For this tutorial, we assume that you're using the ESP8266, so make sure you select the "esp8266" option:
Flashing/Uploading MicroPython Firmware
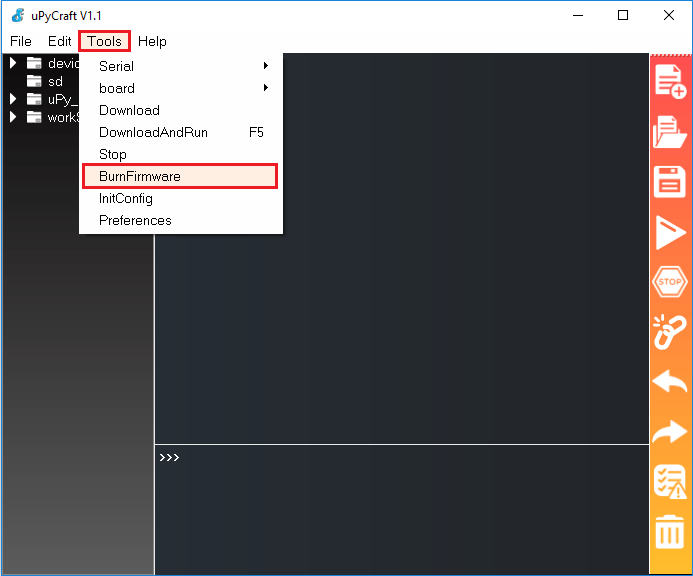
Finally, go to Tools > BurnFirmware menu to flash your ESP32 with MicroPython.
Select all these options to flash the ESP8266 board:
- board: esp8266
- burn_addr: 0x0
- erase_flash: yes
- com: COMX (in our case it's COM5)
- Firmware: Select
Usersand choose theESP8266 .binfile you downloaded earlier
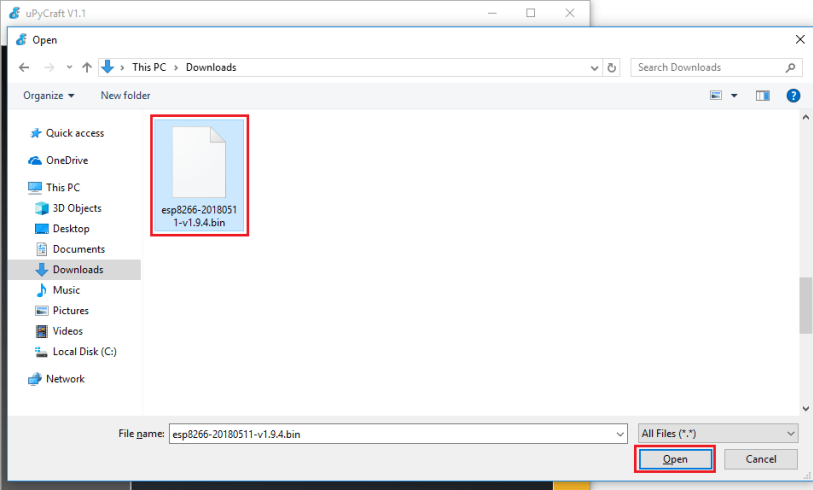
After pressing the "Choose" button, navigate to your Downloads folder and select the ESP8266 .bin file you got from here
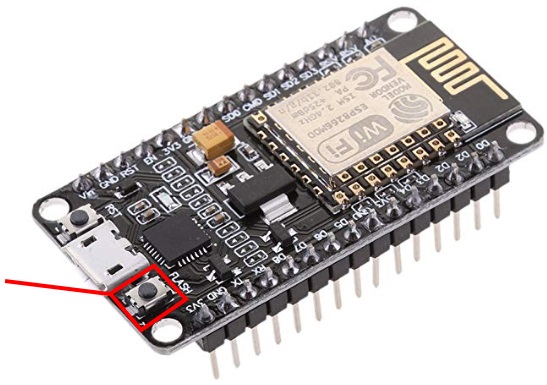
Having all the settings selected, hold-down the "BOOT/FLASH" button in your ESP8266 board:
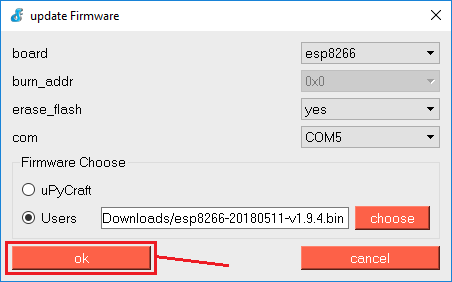
While holding down the "BOOT/FLASH", click the "ok" button in the burn firmware window:
When the "EraseFlash" process begins, you can release the "BOOT/FLASH" button. After a few seconds, the firmware will be flashed into your ESP8266 board.
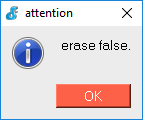
Note: if the "EraseFlash" bar doesn't move and you see an error message saying "erase false.", it means that your ESP8266 wasn't in flashing mode. You need to repeat all the steps described earlier and hold the "BOOT/FLASH" button again to ensure that your ESP8266 goes into flashing mode.
You should see the python prompt in the bottom console window
>>>
That's it you're ready to send commands to the board and control LED's!
Micropython Command Walkthrough Talking to Your Board
We generally prototype code by running it line by line, a bit like having a conversation with your board. We like the way that weirdly makes you feel more connected to it and we think it might help you learn. After that we can make and send python files to run independently of our computers. So bear with us and start your conversations and instructions.
The bottom window of uPyCraft is the console. This gives you messages telling you if you've downloaded things correctly, any issues with the board so you know whats going on.
Once you connect to the board using the connect icon above you'll see the python prompt in the console window at the bottom of uPyCraft.
>>>
You'll notice that the connect icon has changed to disconnect so use that icon if you need to disconnect
![]()
You can now 'talk' to the board. Start with typing
print("hello")
You should get a reply hello on the next line!
All functions like print() expect brackets and in some cases additional variables like a string of characters "hello"
Controlling the onboard blue LED
In python we import the tools inside micropython that we need to do what we want. This is done by importing modules which are like libraries of tools for using the board. Once imported you can call on them by using so-called dot notation. machine.Pin(). In that case you're saying "Ive imported machine so now go into the machine library and get the function called Pin()". Later you'll be able to make your own modules for accessing patterns of LEDs etc. So if you made code for making a flashing LED you could call it myFlash.py and import it by import myFlash and then you can run your own custom commands, but we'll come back to that.
Get the machine module to control our ins and outs
import machine
Lets define a Pin as an output, using the onboard LED which is called Pin no. 2.
ledPin2 = machine.Pin(2, machine.Pin.OUT)
This should turn the LED on!
Now try:
ledPin2.off()
Annoyingly defining the pin like this means off has no effect, because there's no reference for which is the default position. We can use another tool from machine called Signal to abstract away this problem.
from machine import Signal
We import like this so that you don't have to use dot notation and say machine.Signal, you can just use Signal.
Led2 = Signal(ledPin2, invert=True)
now things will work more intuitively if we use Led2 instead!
Led2.off()
Led2.on()
Making Permanent Changes
So far we've just been sending messages over the serial console in the bottom window of the uPyCraft IDE.
For our micropython code to work after we've disconnected you need to make a main.py file on the board.
When your board is powered up it 'boots up' like any computer and runs a file called boot.py. Dont change this its just for setting things up. Then it runs whatever code sits in main.py. If theres a loop in there it will keep it running until interrupted by pressing RST to re-boot or if you send a ctrl + c command in the console over serial.
Make a new file with the icon above. If asked call it main.py
Copy and paste the code below into it and save it as main.py if necessary. Try to follow the spaces exactly. Returning (pressing enter) at the end of the while True: line automatically indents the text correctly. These indents of 'whitespace' are important to micropython to know when a loop starts and ends.
from machine import Signal, Pin
from time import sleep

ledPin2 = machine.Pin(2, machine.Pin.OUT)
led2 = Signal(ledPin2, invert=True)
led2.off()

while True:
    led2.on()
    sleep(0.5)
    led2.off()
    sleep(0.25)
What we are doing here is called a while loop: basically while True: means 'while the python file is running, run the following commands forever unless interrupted. When you get to the end of the list, start back at the top'.
Within this loop we can add other conditional loops so that sensor inputs etc can affect changes to our LEDs. We'll do that in the next session.
Send the main.py code to the board
You should be already connected to your board. If not make sure you are. If the python prompt >>> in the console or disconnect icon is showing (a broken chain) then you're all connected. Click the big arrow icon on the right to Download & Run the code
You should see the LED flicker as the file is saved, and then flash on and off as expected. Try changing the values of sleep and what effects you can get.
NeoPixels
NeoPixels are cheap addressable RGB LEDs and micropython has a library module called NeoPixel just for that.
Picture of the single NeoPixel wiring
To wire up you just connect 3.3V(marked as 3V3 on your board) to + on the neopixel, GND (marked GND on your board) to GND on the neopixel, and GPIO5 (marked as D1 on your board to the IN or DIN on the neopixel. NeoPixels have got all the resistors on board so you wont need to protect your Digital pins when using them like we did in the first session. Use the GND and 3V3 pins that are on the same side of the board as D1
We'll solder 3 wires to our single NeoPixel and connect to the breadboard.
Once connected correctly, you can power and control the colour and brightness of your NeoPixel.
Single NeoPixel Use
NeoPixels, also known as WS2812 LEDs, are full-colour LEDs that are connected in serial, are individually addressable, and can have their red, green and blue components set between 0 and 255. They require precise timing to control them and there is a special neopixel module to do just this.
To create a NeoPixel object do the following. Like before we are going to send commands line by line in the python prompt using the console, the bottom window of uPyCraft.
>>> import machine, neopixel
>>> np = neopixel.NeoPixel(machine.Pin(5), 1)
This configures a NeoPixel on GPIO5 marked D1 on the board with 1 RGB NeoPixel LED. You can adjust the “4” (pin number) and the “1” (number of pixel) to suit other NeoPixels which you'll use later.
To set the colour of pixels use:
>>> np[0] = (255, 0, 0) # set to red, full brightness
Then use the write() method to output the colours to the LEDs:
>>> np.write()
Other commands you can try:
>>> np[0] = (0, 128, 0) # set to green, half brightness
>>> np[0] = (0, 0, 64)  # set to blue, quarter brightness
Don't forget to always do an np.write() to send the signal to the NeoPixel.
Handy RGB Value Calculator
Lets write a main.py for our NeoPixel
Now try to write a loop like we did last time changing with while True:
Here's an example
from machine import Pin
from neopixel import NeoPixel
from time import sleep

n = 1 # Set the number of pixels on your NeoPixel
pin = Pin(5, Pin.OUT)   # set GPIO5 (D1) to output to drive NeoPixels
np = NeoPixel(pin, n)   # create NeoPixel driver on GPIO0 for n pixels


while True:
    np[0] = (255, 255, 255) # set the first pixel to white, note computers in a list of numbers, the first number in the list is 0
    np.write() # write data to all pixels
    sleep(1)
    np[0] = (0, 0, 0) # set the first pixel to nothing (black)
    np.write()              # write data to all pixels
    sleep(0.5)
Try changing the colours.
Session 3
Multiple Neopixel control and Re-visiting our sensor circuit but this time combine with our ESP8266 boards and controlling our LEDs
Mutliple NeoPixels
This is based on the NeoPixel MicroPython Guide. NeoPixels get really handy when you get multiple pixels in interesting arrangements, in a row like with Jackies example circuit or in a circle, which we are going to play with today. The ESP8266 can handle quite a few without having to add any protective circuits with capacitors and resistors (remember protecting our lowly red LED?). 7 can be handled safely but big strips might need a separate power supply. You'll have to look into this NeoPixel Uberguide to work that out and in the final session we can talk about that and draw on wider DoESLiverpool expertise.
Wiring Up a Circular 7 Pixel NeoPixel
- Connect the
VCCon the NeoPixel Circle with the3V3pin (the one next toD4on the board) on the ESP8266 board - Connect the
GNDon the NeoPixel Circle with theGNDpin on the ESP8266 board - Connect the
INon the NeoPixel Circle with theD1pin on the ESP8266 board
Programming a Multi Neopixel Example
Add the lights.py script from our workshop page to your board. You can click on the Raw box on the github page to get an easily copy-able chunk of the code.
Once the lights.py file is on board, re-boot the board with the RST button and you should now be able to run these commands in the uPyCraft >>> console window:
cycle(), bounce(), fade() and clear()
There's also a main.py you can add so they run on a loop, on booting the board.
Try writing your own combinations of these functions on a loop and change the for loops to cycle through colours in your own main.py. I've tried to comment the code to help you get the maths behind each loop as they use basic and the lesser known math operators in python. You can just hack around the numbers and see what happens!
lights.py for the circle NeoPixel
Handy RGB Value Calculator
from machine import Pin
from neopixel import NeoPixel
import time

n = 7 # Set the number of pixels on your NeoPixel
pin = Pin(5, Pin.OUT)   # setup GPIO5 pin (D1) as output to drive the NeoPixels
np = NeoPixel(pin, n)   # create NeoPixel object on GPIO5, for n pixels
np[0] = (255, 255, 255) # set the first pixel to white
np.write()              # write data to all pixels
np[0] = (0, 0, 0) # set the first pixel to nothing (black)
np.write()              # write data to all pixels

def cycle():
    for i in range(4 * n): # setup a loop that lasts 4 times the number of NeoPixels and turns each LED on
        for j in range(n): # setup a nested loop that goes thru each pixel and turns the other LEDs off
            np[j] = (0, 0, 0)
        np[i % n] = (255, 255, 255) # turns one of n LEDs white in sequence with modulo ie 1 % 7 = 0, 7 % 7 = 0..8 % 7 = 1, 9 & 7 = 2..13 % 7 = 6, 14 % 7 = 0, and onwards to 4 * n
        np.write() # write to all LEDs
        time.sleep_ms(25) # sleep for 25 microseconds

def bounce():
    for i in range(4 * n):
        for j in range(n):
            np[j] = (0, 0, 128)
        if (i // n) % 2 == 0:
            np[i % n] = (0, 0, 0)
        else:
            np[n - 1 - (i % n)] = (0, 0, 0)
        np.write()
        time.sleep_ms(60)

def fade():
    for i in range(0, 4 * 256, 8):
        for j in range(n):
            if (i // 256) % 2 == 0:
                val = i & 0xff
            else:
                val = 255 - (i & 0xff)
            np[j] = (val, 0, 0)
        np.write()

def clear():
    for i in range(n):
        np[i] = (0, 0, 0)
    np.write()
main.py for the circle NeoPixel
from lights import * #import all of the things in lights.py
import time

while True:
    fade()
    time.sleep_ms(25)
    clear()
    bounce()
    time.sleep_ms(25)
    clear()
    cycle()
    time.sleep_ms(25)
    clear()
Session 4
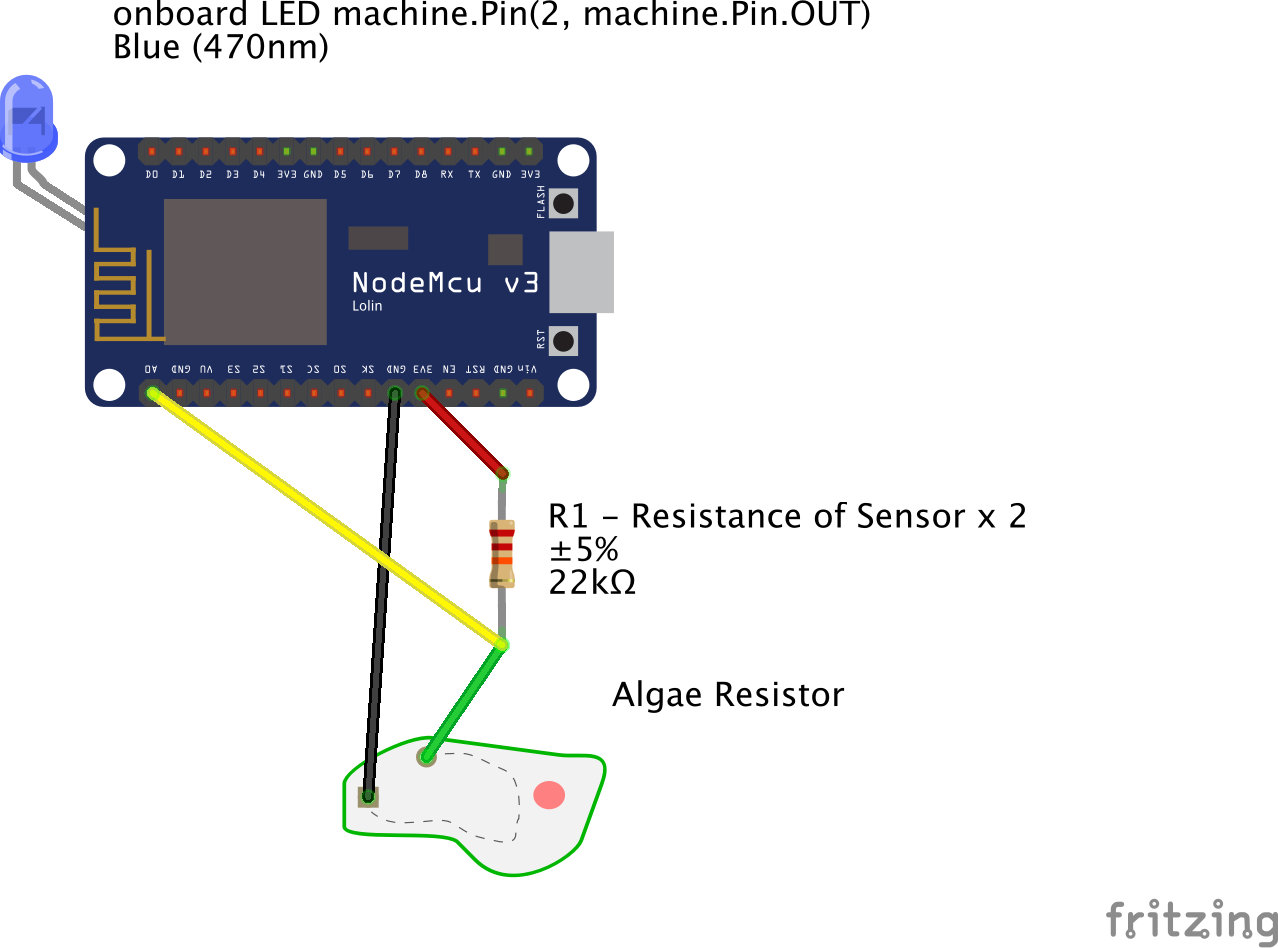
Test and setup a circuit to connect our fabric sensor to the ESP8266 so it can affect our circle NeoPixel and think about how we assemble everything into a wearable badge.
Testing
We need to measure the resistance of our sensor at rest. Take a Multimeter from the Workshop and place the probes on each of the connected press studs. Turn the dial to 200Ω and if you get no values, turn up to 20kΩ etc until you find the resistance range. Make a note of the number and double it to get roughly the right resistor for the circuit.
Wiring Up
The ESP8266 has a single pin (separate to the GPIO pins) which can be used to read analog voltages and convert them to a digital value. The values returned from the read() function are between 0 (for 0.0 volts) and 1024 (for 1.0 volts). This input can only tolerate a maximum of 1.0 volts and so we must use a voltage divider circuit to measure larger voltages, like the 3V we are running through our sensor from the board.
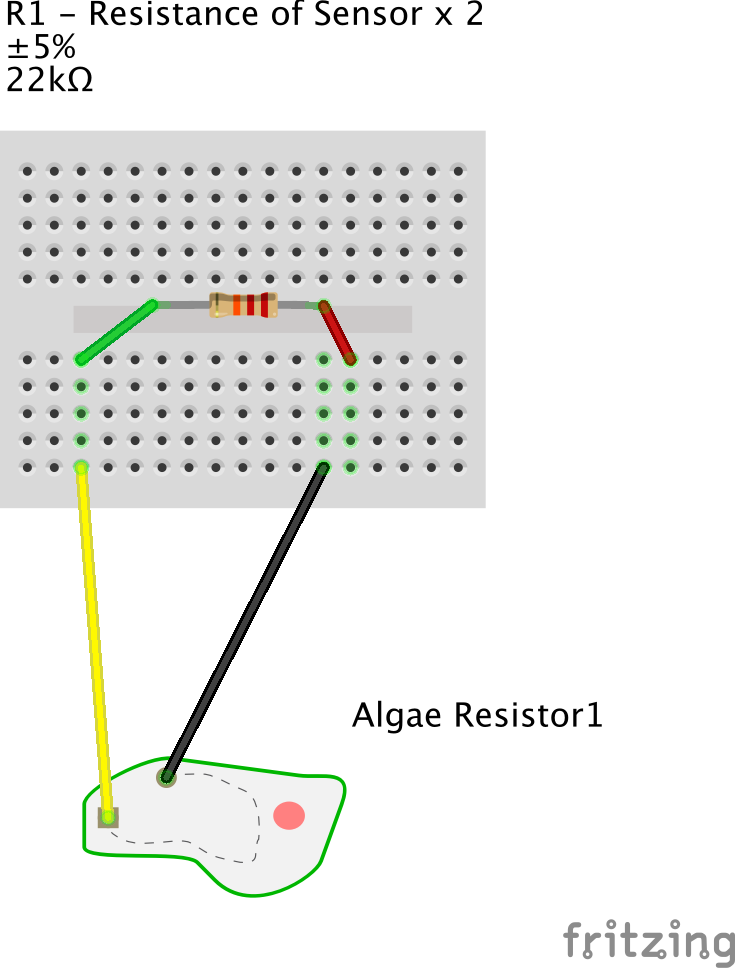
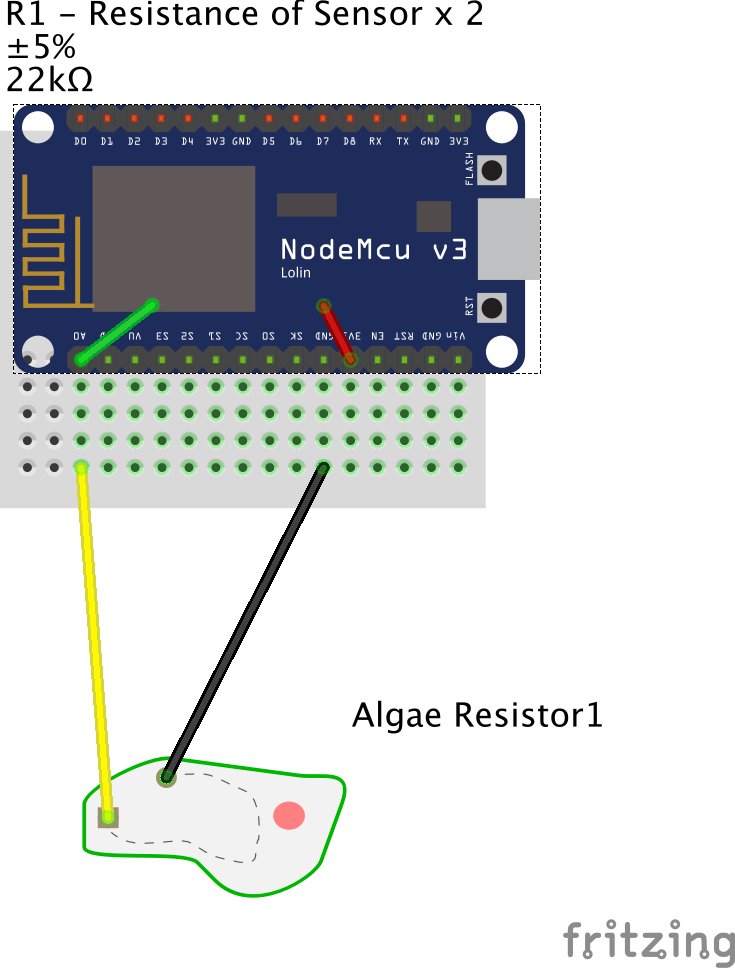
We make a voltage divider circuit across GND and 3V3 using our analog sensor. We do this by connecting a resistor (R1 in diagram above) from 3V3 to A0 on the breadboard and then one leg of the sensor to A0. The resistor value should be roughly twice as high as the resistance of the sensor at rest which we made a note of earlier with the Multimeter. In the diagrams above we use a 22KOhm resistor as our sensor had about 10-11KOhms resistance when we were not pressing it.
As we change the resistance by pressure on the strands of conductive thread, the other leg of the sensor connects to GND . This 'divides' the voltage between a known resistance and an unknown one, ie the changing resistance of our sensor, which ADC reads for us. We'll use a breadboard initially to keep everything safely connected, but eventually you could wire up through soldering wires and a resistor together to save space.
Now place your ESP8266 carefully on the board, over the resistor. Use the middle recess of the breadboard for the resistor to sit in. Now if you ensure the last pins by the usb connector connect to the last column on the breadboard then the resistor should connect to the 3V3 row, and there should be a spare accessible hole for the other sensor leg to connect to GND on the breadboard.
Sensor Reading
Ok now lets read the values of our sensors.
The ADC (analog to digital conversion) Pin is labelled A0 on your board and we will use the ADC object in MicroPython to make it work
So sending line-by-line messages to the board will return a value. So in uPyCraft console type:
from machine import ADC
to get the ADC library from machine
adc = ADC(0)
initialise an ADC object on Pin A0 and call it adc
adc.read()
This will read one value and print to the console.
Ok lets get it to read the values until we press the STOP on uPyCraft. We will use a simple loop using while.
Do this by making a new main.py or do it line by line in the console.
from machine import ADC
from time import sleep

adc = ADC(0)

while True:
  print(adc.read())
  sleep(0.25)
Play with your sensor and you'll get a steady stream of values so have a play and see what happens and what values you get. You may have to try a different resistor (bigger or smaller value) to adjust the sensitivity.
This is good test with the onboard LED main.py
from machine import Signal, Pin, ADC
from time import sleep


ledPin2 = machine.Pin(2, machine.Pin.OUT)
Led2 = Signal(ledPin2, invert=True)

adc = ADC(0)

lastledOn = False
ledOn = False
Led2.off()

while True:
  val = adc.read()
  if val < 50: # This can be changed to suit your readings
    ledOn = True
  else:
    ledOn = False
  #print(lastledOn)
  if ledOn != lastledOn:
    if ledOn == True:
      Led2.on()
      sleep(0.1)
    else:
      Led2.on()
      sleep(0.1)
      Led2.off()
      sleep(0.1)
      Led2.on()
      sleep(0.1)
      Led2.off()
    lastledOn = ledOn
sleep(1)
Based on this example we can trigger our functions from ligths.py.
Sensor Readings with NeoPixels
There should be a spare accessible hole on the other side of the ESP8266 so later on you can connect a NeoPixel to to D1, GND & 3V3 like before.
Because we are now on the breadboard you may need to place headers into these breadboard holes next to these ESP8266 pins so that the female ends of the Circle NeoPixels can connect easily.
Alternatively position the ESP on the board so these pins hangover the breadboard and allow you to connect your NeoPixel, while our sensor remains connected to 3V3, GND & A0
Now have a look in the sensor-bounce-circle directory and you'll find adapted light.py and main.py files to interact with our sensor readings.
Experiment with modifying lights.py and main.py and triggering the different functions bounce(), cycle(), colourbounce(colour_change_factor), fade(), clear()
Batteries & power
We've provided a basic way of recharging and using the 600mah LiPoly batteries like this one
We will be making another press stud switch so that when using the USB-B to charge our batteries, we isolate them from the ESP8266.
Warning! Charging and Using these batteries at the same time can potentially damage the ESP8266 and overheat and damage the battery. DO NOT LEAVE BATTERIES CHARGING UNATTENDED
DoESLiverpool cannot be held responsible for battery accidents! So charging these batteries are done at your own risk
The chargers need these older style USB-B mini connectors.
ESP8266 NeoPixel Components
| Component | No. | Source | Cost | Notes |
|---|---|---|---|---|
| Microusb data cable | 1 | Ebay | £1.20 | |
| NodeMcu-CP2102-ESP8266 Development Board (narrow profile) | 1 | AliExpress | £1.93 | |
| Jumper Wires | 10 | Ebay | £1 | |
| Resistor 4.7k Ohm | 1 | Ebay | £0.007 | |
| Conductive Yarn | 1 | Various | £1? | |
| Tape | 1 | Various | £1? | |
| Conductive Rubber | 1 | Various | ? | |
| Textile Back | 1 | Various | £? | |
| Single NeoPixel | 1 | AliExpress | £1.17 inc 2wk shipping | |
| Circle 7 RGB NeoPixel | 1 | Ebay | £8.60(use aliexpress link above for cheaper price!) | |
| Mini Breadboard | 1 | Ebay | £0.88 | |
| TOTAL | approx.£15 |
Additional Tutorials
Some extra, useful info, alternatives to uPyCraft, control 'normal' non-NeoPixel LEDs etc..
PWM output and Controlling LEDs
We've taken from this tutorial by Random Nerd Tutorials
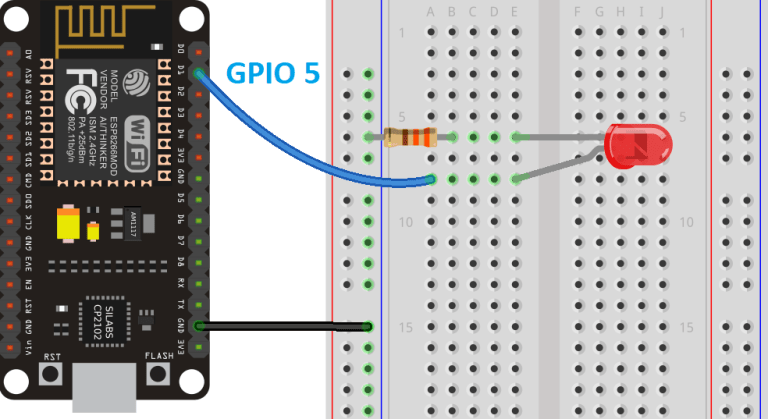
For this example, wire an LED to your ESP board. We’ll wire the LED to GPIO 5 (marked as D1 on your board), but you can choose another suitable PWM pin
Here’s the script that changes the LED brightness over time by increasing the duty cycle.
from machine import Pin, PWM
from time import sleep

frequency = 5000
led = PWM(Pin(5), frequency)

while True:
    for duty_cycle in range(0, 1024):
    led.duty(duty_cycle)
    sleep(0.005)
Also refer to these tutorials
Command Line alternatives to uPyCraft
Once you've got used to micropython there are soem command line options for advanced users that you can see below.
Using PUTTY
To get connected on Windows you could also use PUTTY
Windows Download PuTTY to connect your ESP8266 to your computer over USB-Serial and be able to send commands to control and set it up.
Open PuTTY and select serial and choose a COM port usually COM3 or COM7. Then change the baud rate to 115200 and leave the rest as defaults and select open. This will open a black screen with the python prompt >>>. You can now 'talk' to the board. Start with typing
print("hello!")
If you get hello printed on the next line you are all setup!
Linux - Use the built in screen, minicom or Putty using $ sudo apt-get install putty in your Linux Terminal. I'd recommend screen.
Mac - Download PuTTY or use the built-in Applications/Terminal and screen
Using screen
On macos and Linux you can just use a Terminal and screen. If your linux doesnt have screen install with sudo apt-get install screen or brew install screen on a mac after setting up HomeBrew
$ ls /dev/tty.*
to list your usb devices.
$ screen /dev/device-name baud-rate
is the general format.
$ screen -S wearable /dev/tty.SLAB_USBtoUART 115200
Then press enter and you'll see the python prompt. You are now connected to your ESP8266!
Making Permanent Changes Through Serial
You need to make a main.py file on the board. To do this you need to write your code and copy it into the command line prompt of the ESP
So copy the text from main.py. Then in your open console for your ESP:
f = open('main.py', 'w')
then use paste mode: move your cursor to just after the set of 3 quotes (they are essential) and press ctrl + e and you will be given a few options: right click paste or shortcut cmd + v to paste in your text for the programme. Then finish and call f.close() to close and save the file.
f.write('''paste_your_text here''')
f.close()
Check its there with
import os
and
os.listdir() to check it's there.
Now reboot, and if your file is correct it will run the boot.py script (don't worry about that for now it just sets up the board and python) and then your main.py file should run!
Ampy
There are other methods to upload more complex files you can look at like ampy
-
ampy --port /dev/MY_PORT_NAME lsLists files -
ampy --port /dev/MY_PORT_NAME put examples/circle/lights.pyPuts the file on the board -
ampy --port /dev/MY_PORT_NAME rm examples/circle/lights.pyRemoves the file on the board
TODO
- Re-solder the press studs


