This tutorial will show you how to build a full-stack MERN application;an employee database, with the most current tools available. Before you begin, make sure that you are familiar with Node.js and React.js basics and have Node and Create React App installed. You will also need access to the MongoDB Atlas database for this tutorial. The full code is available on this GitHub repo.
The MERN stack is a web development framework made up of the stack of MongoDB, Express.js, React.js, and Nodejs.
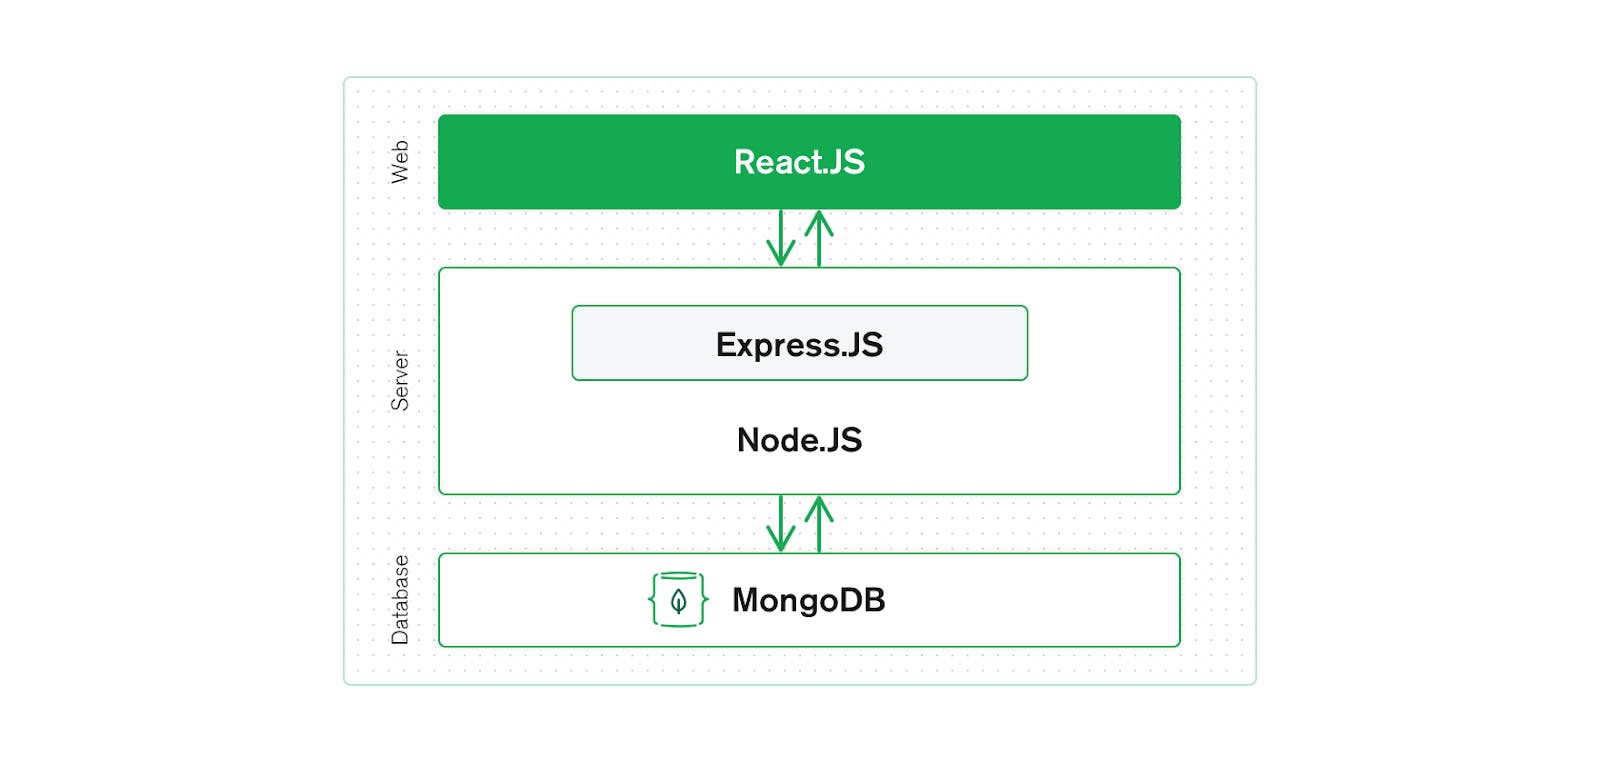
When you use the MERN stack, you work with React to implement the presentation layer, Express and Node to make up the middle or application layer, and MongoDB to create the database layer.
In this MERN stack tutorial, we will utilize these four technologies to develop a basic application able to record the information of employees and then display it using React.
MERN lets us create full-stack solutions. We will be creating a MERN stack project. For this project, we will create both a back end and a front end. The front end will be implemented with React and the back end will be implemented with MongoDB, Node, and Express. We will call the front end client and the back end server.
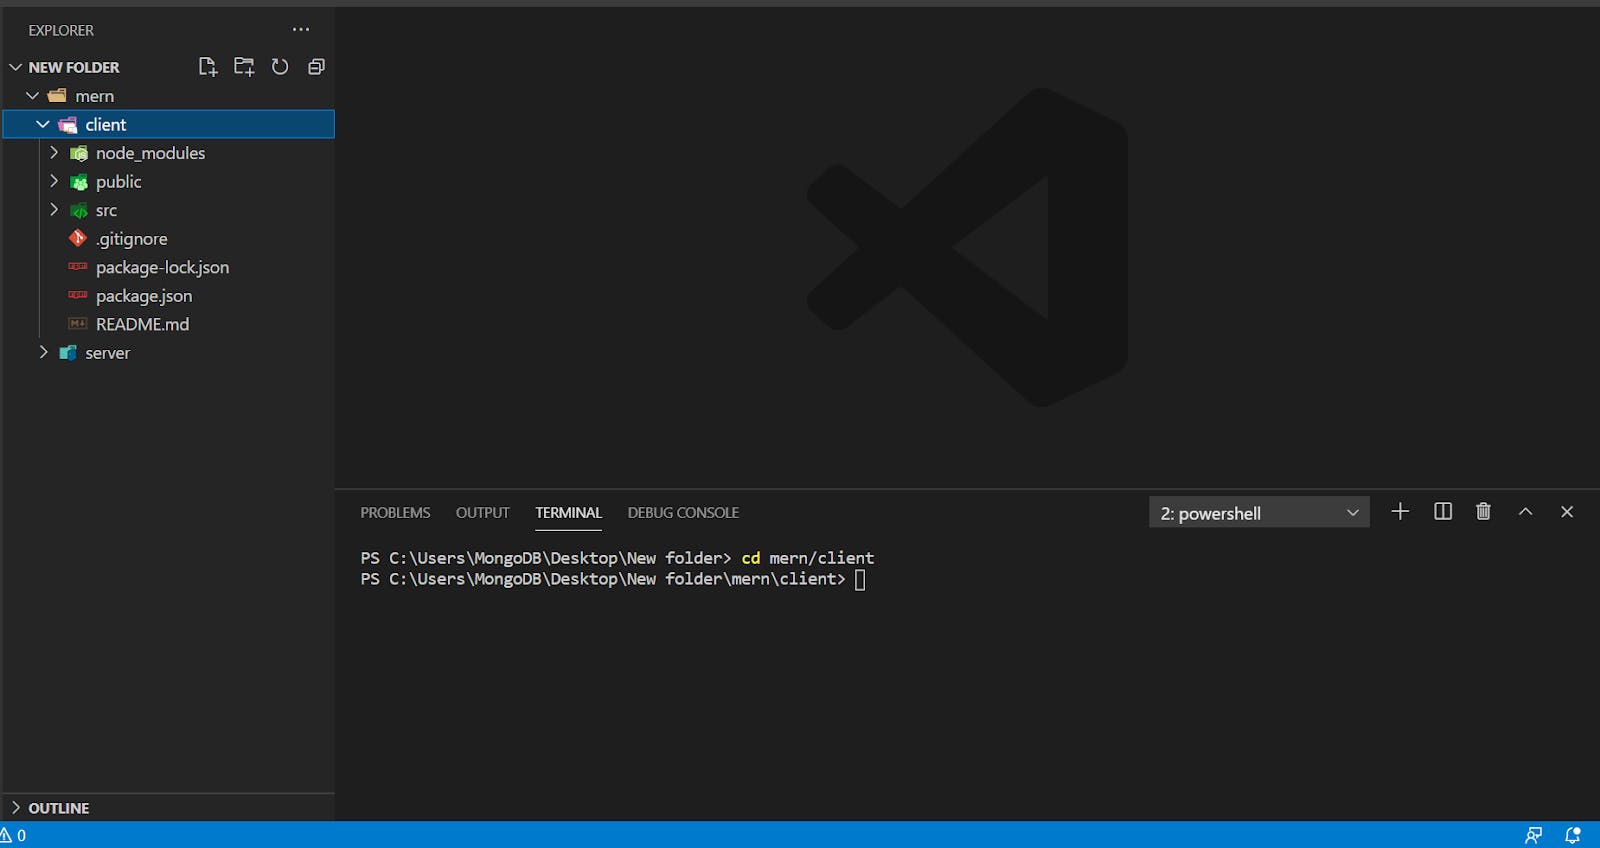
Start by creating an empty directory: mern.
- This folder will hold all our files after we create a new project.
- Then we will create a React app—client—in it.
mkdir mern
cd mern
npx create-react-app client
Then, we create a folder for the back end and name it server.
mkdir server
We will jump into the server folder we created previously and create the server. Then, we will initialize package.json using npm init.
cd server
npm init -y
We will also install the dependencies.
npm install mongodb express cors dotenv
The command above uses a couple of keywords:
- mongodb command installs MongoDB database driver that allows your Node.js applications to connect to the database and work with data.
- express installs the web framework for Node.js. (It will make our life easier.)
- cors installs a Node.js package that allows cross origin resource sharing.
- dotenv installs the module that loads environment variables from a
.envfile intoprocess.envfile. This lets you separate configuration files from the code.
We can check out installed dependencies using the package.json file. It should list the packages along with their versions.
After we have ensured that dependencies were installed successfully, we create a file called server.js with the following code.
mern/server/server.js
const express = require("express");
const app = express();
const cors = require("cors");
require("dotenv").config({ path: "./config.env" });
const port = process.env.PORT || 5000;
app.use(cors());
app.use(express.json());
app.use(require("./routes/record"));
// get driver connection
const dbo = require("./db/conn");

app.listen(port, () => {
  // perform a database connection when server starts
  dbo.connectToServer(function (err) {
    if (err) console.error(err);

  });
  console.log(`Server is running on port: ${port}`);
});
Here, we are requiring express and cors to be used. const port process.env.port will access the port variable from the config.env we required.
Connect our server to the database. We will use MongoDB Atlas as the database. MongoDB Atlas is a cloud-based database service that provides robust data security and reliability. MongoDB Atlas provides a free tier cluster that never expires and lets you access a subset of Atlas features and functionality.
Follow the Get Started with Atlas guide to create an account, deploy your first cluster, and locate your cluster’s connection string.
With the connection string, go back to the server directory and create a config.env file. There, assign the connection string to a new ATLAS_URI variable. Once done, your file should look similar to the one below. Replace and the with your database username and password.
mern/server/config.env
ATLAS_URI=mongodb+srv://<username>:<password>@sandbox.jadwj.mongodb.net/employees?retryWrites=true&w=majority
PORT=5000
Create a folder under the server directory, db and inside it, a file conn.js. There we can add the following code to connect to our database.
mern/server/db/conn.js
const { MongoClient } = require("mongodb");
const Db = process.env.ATLAS_URI;
const client = new MongoClient(Db, {
  useNewUrlParser: true,
  useUnifiedTopology: true,
});

var _db;

module.exports = {
  connectToServer: function (callback) {
    client.connect(function (err, db) {
      // Verify we got a good "db" object
      if (db)
      {
        _db = db.db("employees");
        console.log("Successfully connected to MongoDB.");
      }
      return callback(err);
         });
  },

  getDb: function () {
    return _db;
  },
};
Now it's time for the Server API endpoint. Start by creating a routes folder and adding record.js in it. Navigate back to your server directory and create the new directory and file:
cd ../server
mkdir routes
touch routes/record.js
The routes/record.js file will also have the following lines of code in it.
mern/server/routes/record.js
const express = require("express");

// recordRoutes is an instance of the express router.
// We use it to define our routes.
// The router will be added as a middleware and will take control of requests starting with path /record.
const recordRoutes = express.Router();

// This will help us connect to the database
const dbo = require("../db/conn");

// This help convert the id from string to ObjectId for the _id.
const ObjectId = require("mongodb").ObjectId;


// This section will help you get a list of all the records.
recordRoutes.route("/record").get(function (req, res) {
 let db_connect = dbo.getDb("employees");
 db_connect
   .collection("records")
   .find({})
   .toArray(function (err, result) {
     if (err) throw err;
     res.json(result);
   });
});

// This section will help you get a single record by id
recordRoutes.route("/record/:id").get(function (req, res) {
 let db_connect = dbo.getDb();
 let myquery = { _id: ObjectId(req.params.id) };
 db_connect
   .collection("records")
   .findOne(myquery, function (err, result) {
     if (err) throw err;
     res.json(result);
   });
});

// This section will help you create a new record.
recordRoutes.route("/record/add").post(function (req, response) {
 let db_connect = dbo.getDb();
 let myobj = {
   name: req.body.name,
   position: req.body.position,
   level: req.body.level,
 };
 db_connect.collection("records").insertOne(myobj, function (err, res) {
   if (err) throw err;
   response.json(res);
 });
});

// This section will help you update a record by id.
recordRoutes.route("/update/:id").post(function (req, response) {
 let db_connect = dbo.getDb();
 let myquery = { _id: ObjectId(req.params.id) };
 let newvalues = {
   $set: {
     name: req.body.name,
     position: req.body.position,
     level: req.body.level,
   },
 };
 db_connect
   .collection("records")
   .updateOne(myquery, newvalues, function (err, res) {
     if (err) throw err;
     console.log("1 document updated");
     response.json(res);
   });
});

// This section will help you delete a record
recordRoutes.route("/:id").delete((req, response) => {
 let db_connect = dbo.getDb();
 let myquery = { _id: ObjectId(req.params.id) };
 db_connect.collection("records").deleteOne(myquery, function (err, obj) {
   if (err) throw err;
   console.log("1 document deleted");
   response.json(obj);
 });
});

module.exports = recordRoutes;
If you run the application at this point, you will get the following message in your terminal as the connection establishes.
node server.js

Server is running on port: 5000
Successfully connected to MongoDB.
Now, we will start working on the front end.
We have already set up our React application using the create-react-app command. Navigate to the client folder and check our React application code.
We need to install two additional dependencies that will be used in our project. Open a new terminal , navigate to the client directory, and install bootstrap and react-router-dom.
npm install bootstrap react-router-dom
bootstrap lets you quickly deploy a template and components for your new web application without having to do everything from scratch. And, the react-router-dom installs React router components for web applications. Make sure your server application is still running!
Start by emptying the src folder and adding two new files in it:
index.jsandApp.js.
rm src/**/*
touch src/index.js src/App.js
Inside src/index.js, add the following code:
mern/client/src/index.js
import React from "react";
import ReactDOM from "react-dom";
import App from "./App";
import { BrowserRouter } from "react-router-dom";

ReactDOM.render(
  <React.StrictMode>
    <BrowserRouter>
      <App />
    </BrowserRouter>
  </React.StrictMode>,
  document.getElementById("root")
);
We used BrowserRouter to keep our UI in sync with the URL. BrowserRouter helps with seamless transitions while switching between components. Basically, it will only reload/refresh the component that needs to be changed instead of refreshing/reloading the entire page. Though BrowserRouter is not a necessity, it is a must if you want your app to be responsive.
After adding the code to index.js file, we create a components folder inside src. For each component we create, we will add a new .js file inside the components folder. In this case, we will add create.js, edit.js, navbar.js, and recordList.js.
mkdir src/components
(cd src/components &&
touch create.js edit.js navbar.js recordList.js
A snapshot of each file would look like the following.
The following code creats component for our records. Using this component, users can create a new record. This component will submit a create command to our server.
mern/client/src/components/create.js
import React, { useState } from "react";
import { useNavigate } from "react-router";

export default function Create() {
 const [form, setForm] = useState({
   name: "",
   position: "",
   level: "",
 });
 const navigate = useNavigate();

 // These methods will update the state properties.
 function updateForm(value) {
   return setForm((prev) => {
     return { ...prev, ...value };
   });
 }

 // This function will handle the submission.
 async function onSubmit(e) {
   e.preventDefault();

   // When a post request is sent to the create url, we'll add a new record to the database.
   const newPerson = { ...form };

   await fetch("http://localhost:5000/record/add", {
     method: "POST",
     headers: {
       "Content-Type": "application/json",
     },
     body: JSON.stringify(newPerson),
   })
   .catch(error => {
     window.alert(error);
     return;
   });

   setForm({ name: "", position: "", level: "" });
   navigate("/");
 }

 // This following section will display the form that takes the input from the user.
 return (
   <div>
     <h3>Create New Record</h3>
     <form onSubmit={onSubmit}>
       <div className="form-group">
         <label htmlFor="name">Name</label>
         <input
           type="text"
           className="form-control"
           id="name"
           value={form.name}
           onChange={(e) => updateForm({ name: e.target.value })}
         />
       </div>
       <div className="form-group">
         <label htmlFor="position">Position</label>
         <input
           type="text"
           className="form-control"
           id="position"
           value={form.position}
           onChange={(e) => updateForm({ position: e.target.value })}
         />
       </div>
       <div className="form-group">
         <div className="form-check form-check-inline">
           <input
             className="form-check-input"
             type="radio"
             name="positionOptions"
             id="positionIntern"
             value="Intern"
             checked={form.level === "Intern"}
             onChange={(e) => updateForm({ level: e.target.value })}
           />
           <label htmlFor="positionIntern" className="form-check-label">Intern</label>
         </div>
         <div className="form-check form-check-inline">
           <input
             className="form-check-input"
             type="radio"
             name="positionOptions"
             id="positionJunior"
             value="Junior"
             checked={form.level === "Junior"}
             onChange={(e) => updateForm({ level: e.target.value })}
           />
           <label htmlFor="positionJunior" className="form-check-label">Junior</label>
         </div>
         <div className="form-check form-check-inline">
           <input
             className="form-check-input"
             type="radio"
             name="positionOptions"
             id="positionSenior"
             value="Senior"
             checked={form.level === "Senior"}
             onChange={(e) => updateForm({ level: e.target.value })}
           />
           <label htmlFor="positionSenior" className="form-check-label">Senior</label>
         </div>
       </div>
       <div className="form-group">
         <input
           type="submit"
           value="Create person"
           className="btn btn-primary"
         />
       </div>
     </form>
   </div>
 );
}
The following code will be the editing component for our records. It will use a similar layout to the create component and will eventually submit an update command to our server.
mern/client/src/components/edit.js
import React, { useState, useEffect } from "react";
import { useParams, useNavigate } from "react-router";

export default function Edit() {
 const [form, setForm] = useState({
   name: "",
   position: "",
   level: "",
   records: [],
 });
 const params = useParams();
 const navigate = useNavigate();

 useEffect(() => {
   async function fetchData() {
     const id = params.id.toString();
     const response = await fetch(`http://localhost:5000/record/${params.id.toString()}`);

     if (!response.ok) {
       const message = `An error has occurred: ${response.statusText}`;
       window.alert(message);
       return;
     }

     const record = await response.json();
     if (!record) {
       window.alert(`Record with id ${id} not found`);
       navigate("/");
       return;
     }

     setForm(record);
   }

   fetchData();

   return;
 }, [params.id, navigate]);

 // These methods will update the state properties.
 function updateForm(value) {
   return setForm((prev) => {
     return { ...prev, ...value };
   });
 }

 async function onSubmit(e) {
   e.preventDefault();
   const editedPerson = {
     name: form.name,
     position: form.position,
     level: form.level,
   };

   // This will send a post request to update the data in the database.
   await fetch(`http://localhost:5000/update/${params.id}`, {
     method: "POST",
     body: JSON.stringify(editedPerson),
     headers: {
       'Content-Type': 'application/json'
     },
   });

   navigate("/");
 }

 // This following section will display the form that takes input from the user to update the data.
 return (
   <div>
     <h3>Update Record</h3>
     <form onSubmit={onSubmit}>
       <div className="form-group">
         <label htmlFor="name">Name: </label>
         <input
           type="text"
           className="form-control"
           id="name"
           value={form.name}
           onChange={(e) => updateForm({ name: e.target.value })}
         />
       </div>
       <div className="form-group">
         <label htmlFor="position">Position: </label>
         <input
           type="text"
           className="form-control"
           id="position"
           value={form.position}
           onChange={(e) => updateForm({ position: e.target.value })}
         />
       </div>
       <div className="form-group">
         <div className="form-check form-check-inline">
           <input
             className="form-check-input"
             type="radio"
             name="positionOptions"
             id="positionIntern"
             value="Intern"
             checked={form.level === "Intern"}
             onChange={(e) => updateForm({ level: e.target.value })}
           />
           <label htmlFor="positionIntern" className="form-check-label">Intern</label>
         </div>
         <div className="form-check form-check-inline">
           <input
             className="form-check-input"
             type="radio"
             name="positionOptions"
             id="positionJunior"
             value="Junior"
             checked={form.level === "Junior"}
             onChange={(e) => updateForm({ level: e.target.value })}
           />
           <label htmlFor="positionJunior" className="form-check-label">Junior</label>
         </div>
         <div className="form-check form-check-inline">
           <input
             className="form-check-input"
             type="radio"
             name="positionOptions"
             id="positionSenior"
             value="Senior"
             checked={form.level === "Senior"}
             onChange={(e) => updateForm({ level: e.target.value })}
           />
           <label htmlFor="positionSenior" className="form-check-label">Senior</label>
       </div>
       </div>
       <br />

       <div className="form-group">
         <input
           type="submit"
           value="Update Record"
           className="btn btn-primary"
         />
       </div>
     </form>
   </div>
 );
}
The following code will be the viewing component for our records. It will fetch all the records in our database through a GET method.
mern/client/src/components/recordList.js
import React, { useEffect, useState } from "react";
import { Link } from "react-router-dom";

const Record = (props) => (
 <tr>
   <td>{props.record.name}</td>
   <td>{props.record.position}</td>
   <td>{props.record.level}</td>
   <td>
     <Link className="btn btn-link" to={`/edit/${props.record._id}`}>Edit</Link> |
     <button className="btn btn-link"
       onClick={() => {
         props.deleteRecord(props.record._id);
       }}
     >
       Delete
     </button>
   </td>
 </tr>
);

export default function RecordList() {
 const [records, setRecords] = useState([]);

 // This method fetches the records from the database.
 useEffect(() => {
   async function getRecords() {
     const response = await fetch(`http://localhost:5000/record/`);

     if (!response.ok) {
       const message = `An error occurred: ${response.statusText}`;
       window.alert(message);
       return;
     }

     const records = await response.json();
     setRecords(records);
   }

   getRecords();

   return;
 }, [records.length]);

 // This method will delete a record
 async function deleteRecord(id) {
   await fetch(`http://localhost:5000/${id}`, {
     method: "DELETE"
   });

   const newRecords = records.filter((el) => el._id !== id);
   setRecords(newRecords);
 }

 // This method will map out the records on the table
 function recordList() {
   return records.map((record) => {
     return (
       <Record
         record={record}
         deleteRecord={() => deleteRecord(record._id)}
         key={record._id}
       />
     );
   });
 }

 // This following section will display the table with the records of individuals.
 return (
   <div>
     <h3>Record List</h3>
     <table className="table table-striped" style={{ marginTop: 20 }}>
       <thead>
         <tr>
           <th>Name</th>
           <th>Position</th>
           <th>Level</th>
           <th>Action</th>
         </tr>
       </thead>
       <tbody>{recordList()}</tbody>
     </table>
   </div>
 );
}
In the navbar.js component, we will create a navigation bar that will link us to the required components using the following code.
mern/client/src/components/navbar.js
import React from "react";

// We import bootstrap to make our application look better.
import "bootstrap/dist/css/bootstrap.css";

// We import NavLink to utilize the react router.
import { NavLink } from "react-router-dom";

// Here, we display our Navbar
export default function Navbar() {
 return (
   <div>
     <nav className="navbar navbar-expand-lg navbar-light bg-light">
       <NavLink className="navbar-brand" to="/">
       <img style={{"width" : 25 + '%'}} src="https://d3cy9zhslanhfa.cloudfront.net/media/3800C044-6298-4575-A05D5C6B7623EE37/4B45D0EC-3482-4759-82DA37D8EA07D229/webimage-8A27671A-8A53-45DC-89D7BF8537F15A0D.png"></img>
       </NavLink>
       <button
         className="navbar-toggler"
         type="button"
         data-toggle="collapse"
         data-target="#navbarSupportedContent"
         aria-controls="navbarSupportedContent"
         aria-expanded="false"
         aria-label="Toggle navigation"
       >
         <span className="navbar-toggler-icon"></span>
       </button>

       <div className="collapse navbar-collapse" id="navbarSupportedContent">
         <ul className="navbar-nav ml-auto">
           <li className="nav-item">
             <NavLink className="nav-link" to="/create">
               Create Record
             </NavLink>
           </li>
         </ul>
       </div>
     </nav>
   </div>
 );
}
Now, we add the following to the src/App.js file we created earlier.
mern/client/src/App.js
import React from "react";

// We use Route in order to define the different routes of our application
import { Route, Routes } from "react-router-dom";

// We import all the components we need in our app
import Navbar from "./components/navbar";
import RecordList from "./components/recordList";
import Edit from "./components/edit";
import Create from "./components/create";

const App = () => {
 return (
   <div>
     <Navbar />
     <Routes>
       <Route exact path="/" element={<RecordList />} />
       <Route path="/edit/:id" element={<Edit />} />
       <Route path="/create" element={<Create />} />
     </Routes>
   </div>
 );
};

export default App;
We have completed creating components. We also connected our React app to the back end using fetch. fetch provides cleaner and easier ways to handle http requests. fetch is used in create.js, edit.js, and recordList.js to handle http requests. In create.js, we appended the following code to the onSubmit(e) block. When a POST request is sent to the create URL, fetch will add a new record to the database.
// This function will handle the submission.
 async function onSubmit(e) {
   e.preventDefault();

   // When a post request is sent to the create url, we'll add a new record to the database.
   const newPerson = { ...form };

   await fetch("http://localhost:5000/record/add", {
     method: "POST",
     headers: {
       "Content-Type": "application/json",
     },
     body: JSON.stringify(newPerson),
   })
   .catch(error => {
     window.alert(error);
     return;
   });

   setForm({ name: "", position: "", level: "" });
   navigate("/");
 }
Similarly, in edit.js, we appended the following code to the onSubmit(e) block.

async function onSubmit(e) {
   e.preventDefault();
   const editedPerson = {
     name: form.name,
     position: form.position,
     level: form.level,
   };

   // This will send a post request to update the data in the database.
   await fetch(`http://localhost:5000/update/${params.id}`, {
     method: "POST",
     body: JSON.stringify(editedPerson),
     headers: {
       'Content-Type': 'application/json'
     },
   });

   navigate("/");
 }
We also placed the following block of code to edit.js beneath the constructor block.
useEffect(() => {
   async function fetchData() {
     const id = params.id.toString();
     const response = await fetch(`http://localhost:5000/record/${params.id.toString()}`);

     if (!response.ok) {
       const message = `An error has occurred: ${response.statusText}`;
       window.alert(message);
       return;
     }

     const record = await response.json();
     if (!record) {
       window.alert(`Record with id ${id} not found`);
       navigate("/");
       return;
     }

     setForm(record);
   }

   fetchData();

   return;
 }, [params.id, navigate]);
Last, we have recordList.js. recordList.js fetches the records from the database, so we will be using fetch's get method to retrieve records from the database. To achieve this, we added the following lines of code above the recordList() function in recordList.js.
useEffect(() => {
   async function getRecords() {
     const response = await fetch(`http://localhost:5000/record/`);

     if (!response.ok) {
       const message = `An error occurred: ${response.statusText}`;
       window.alert(message);
       return;
     }

     const records = await response.json();
     setRecords(records);
   }

   getRecords();

   return;
 }, [records.length]);

 // This method will delete a record
 async function deleteRecord(id) {
   await fetch(`http://localhost:5000/${id}`, {
     method: "DELETE"
   });

   const newRecords = records.filter((el) => el._id !== id);
   setRecords(newRecords);
 }
After closing everything, to start the app, follow these steps.
Ensure the server app is still running. If it’s not, start by executing the following command in the server/ directory:
node server.js
Go back to the client directory and run the command:
npm start
This is what the landing page of the record component will look like after we added records for “Vicki Bealman" via the “Create Record” button.

This is what the screen that lets you add an employee will look like.
