The original source is located here : https://github.com/Stef-aap/RFLink-ESP Stef-aap & Etimou has done a very great job to make a version of RFlink on ESP. I was really enthousisast to observe that this firmware is fast and supports KAKU protocol so I've added some functionalities to their work to make it easier to configure.
You have needs ? Please participate to this great project : edit and push your modification or buy me a coffee :)
Cosmetic & functional changes (but the basics of RFlink-ESP are still the same)
- added : Wifi Manager (thx to Autoconnect)
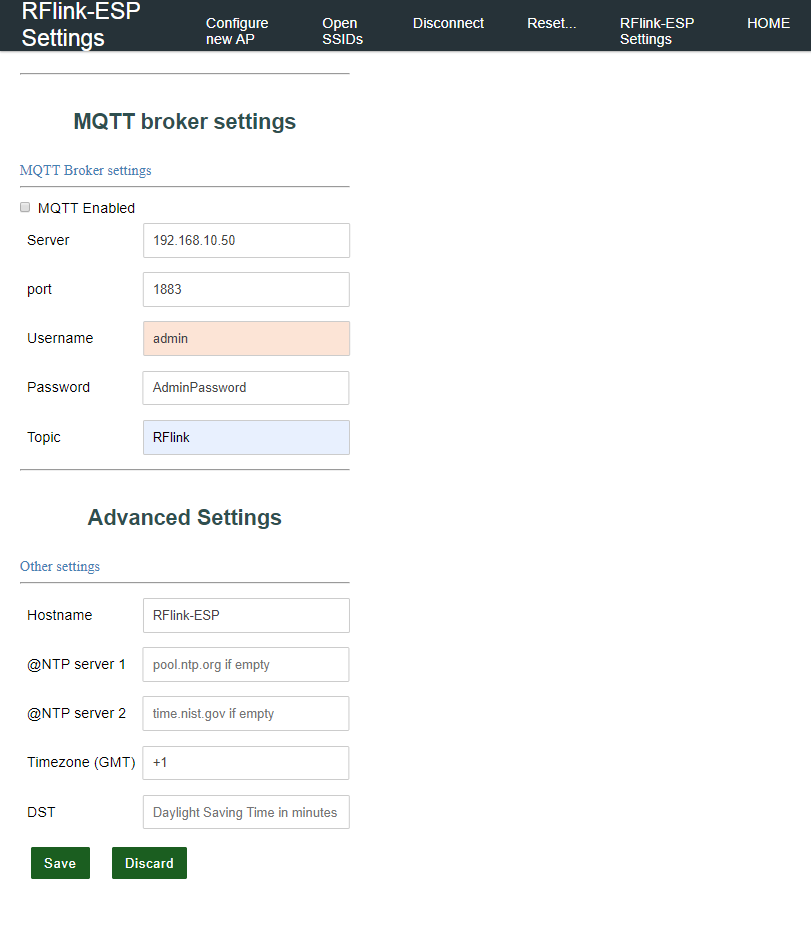
- added : advanced settings Tab (via Autoconnect library example) : allow to configure MQTT with authentication and many other handful things like NTP...
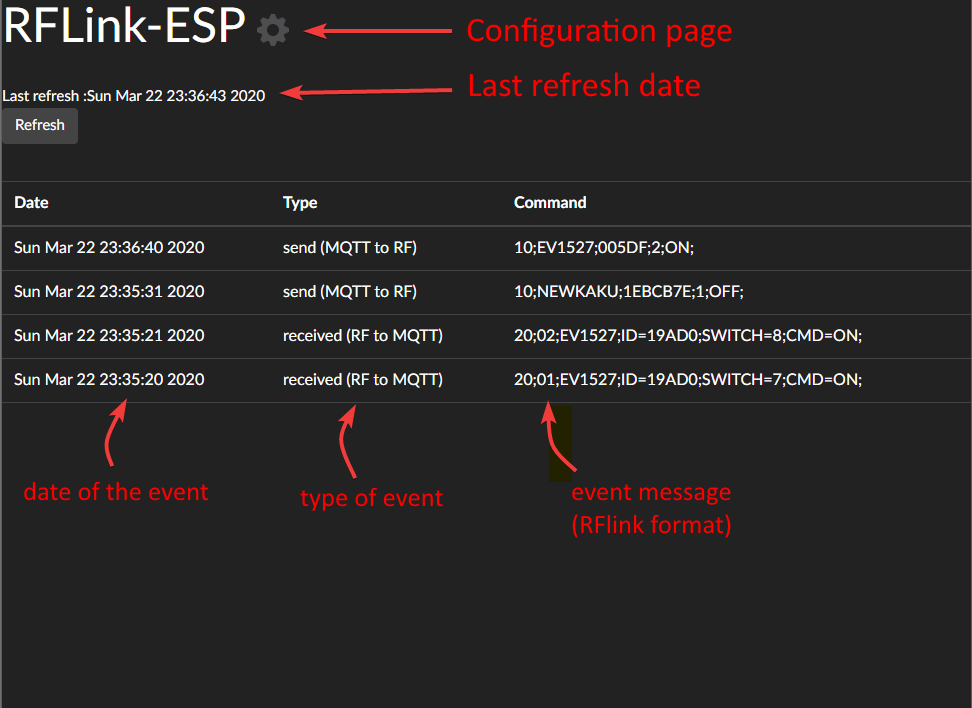
- added : home page that allow to see the last RF events received or sent
- added : New way to send RFlink commands from MQTT : RFlink/send payload : {"TRANSMIT":"10;EV1527;005DF;2;ON;"}
- added : New Template for MQTT to RF message (the payload is in JSON format and the "CMD" is included in payload)
- added : Compatibility with Sonoff RF Bridge with direct Hack (in arduino IDE -> choose "ESP8285", 160Mhz, flash size 1MB + FS 64KB ) Due too low memory of the Sonoff RF Bridge, please use "BasicOTA.ino" Sketch and then make an OTA from IDE.
- added : A pre-compiled version for Sonoff RF Bridge with direct Hack (use it at your own risk).
- Correction : some modifications for sending KAKU protocol in "RFL_Protocol_KAKU.h" (to make it works with DIO plugs)
2020/03/21
These modifications have been tested on esp8285 (Sonoff RF Bridge) and esp8266 (Lolin). ESP32 probably needs some changes to work again :/
- Better web interface with dynamic table to display automatically new RF events on the home page
- Repair ESP32 part (and a little tidying up in the tags #ifdef :-p)
- allow serial commands and MQTT commands simultaneously
- Add some protocols (& finish oregon that have been started). pilight is interesting, the few RFlink sources also exposes a lot of protocols
- OTA debugging / remote debug (could also allow to use it as a classic RFlink remotely, this one seems nice : RemoteDebug)
- Better GMT / DST management (mine is probably bugged)
- Tansform FetchSignal function in asynchronous function
- html update (via autoconnect)
- Transfer web code in SPIFFs
- add a web SPIFFs file explorer / file uploader
- ability to record / replay some RF signals directly directly from web interface.
- A great IHM to record / replay some RF signals (ESPUI ?)
- auto discovery home assistant with gateway state and "last RF event" sensor
- An update of the html documentation joined to this project
- Async MQTT client
- ability to define your own MQTT message format with a template (more adapted to Home Assistant or all in payload...)
- inexpensive hardware
- Fast to decode RF signals and to send MQTT messages
- RFlink message format, easy to handle
- Compatible with Sonoff RF Bridge with direct Hack
- Compatible with new KAKU protocols (e.g. DIO plugs)
- You need an ESP8266 or Lolin or Wemos D1 (it is the same).
- A RF receiver and a RF emitter. There are many advice to choose the right one.
- For receiver, avoid cheapest chinese and choose at minimal STX882 or RXB6. If you want a good reception you can optimize it (Credits Offical RFlinks website). RECEIVE_PIN = GPIO 4 = D2 on wemos & Lolin TRANSMIT_PIN = GPIO 5 = D1 on wemos & Lolin
- If you use the pre-compiled bin for Sonoff RF Bridge you can flash it quickly with esphome-flasher, follow any tutorial i.e. this one from tasmota or this one from espurna
- The first time that RFlink-ESP boot, it start an AP called RFlink-ESP-xxxxxx , the default password is 12345678
- Then there will be a captive portal where you will be able to specify your SSID and password. Stay on this configuration page few instatn more to get the current IP of your device.
- Naviguate to the new IP, the home page look like this :

- Reset the module one time then go to configuration an specify mqtt server, put your settings and reset again the device. Exemple of configuration :

RFlink communication is based on the official RFlink communication detailed here.
Exemples :
================ RF message reception ================
MQTT message :
Topic: RFlink/received/EV1527/19BD0
Payload: {"SWITCH":4,"CMD":"ON"}
==> Correspond to this rflink message :
20;02;EV1527;ID=19BD0;SWITCH=4;CMD=ON;
================ RF message sending ================
MQTT message :
Topic: RFlink/send/EV1527/19BD0
Payload: {"SWITCH":4,"CMD":"ON"}
OR to send a RF message directly in RFlink format :
Topic: RFlink/send
Payload: {"TRANSMIT":"10;EV1527;19BD0;4;ON;"}
- Ater configurating SSID, a reset is necessary to display mqtt settings
- "MQTT enabled" checkbox has no effect at that time (v2.2)
- GMT / DST time settings are probably bugged
- ESP32 compilation is probably broken at that time, needs some easy modifications on autoconnect
- some regex are bad in mqtt settings. So sometimes it is displayed in red but your settings will be saved anyway.
Home Assistant / Domoticz tested with a RFLink, modified for ESP8266 and ESP32
This is a fork of RFLink, and because we couldn't get it working reliable, we ended up in a complete rewrite of RFLink. Problem is that the latest version of RFLink is R48. We couldn't only find sources of version R29 and R35. Both sources didn't work correctly, R29 was the best. We tried to contact "the stuntteam" which owns the orginal sources but no response.
This version of RFLink has the following features
- just a few protocols are translated and tested
- Protocols are more generic, so you need less protocols
- Protocols are written as classes and all derived from a common class
- Protocols can easily be selected and the order can be determined
- Debugmode replaced with a more flexible Learning_Mode
- Removed a lot of redundancies
- Device must be registered before they will be recognized ( (almost) no more false postives)
- Dynamically determine long/short pulse, by measuring Min,Max,Mean
- Runs on ESP32 and even on a ESP8266
- Fully open source
- Codesize is strongly reduced
- Can communicate over USB/RS232 or MQTT
Some ideas for the future
- Implementing rolling code SomFy / Own
- Cleanup global constants and variables
- Using SI4432 as Receiver / Transmitter (Transmitter can be used for all frequencies, Receiver might be able to fetch a complete sequence, so listening at more frequencies at the same time might even be possible)
- Logging of false positives, including time (Neighbours ??) NTP: https://www.instructables.com/id/Arduino-Internet-Time-Client/
