Tool/Assistant for helping decoding and visualizing data from stream.
This tool is meant for an assitant tool for users who want to visualize data comming from serial port or net socket(hasn't been implemented).
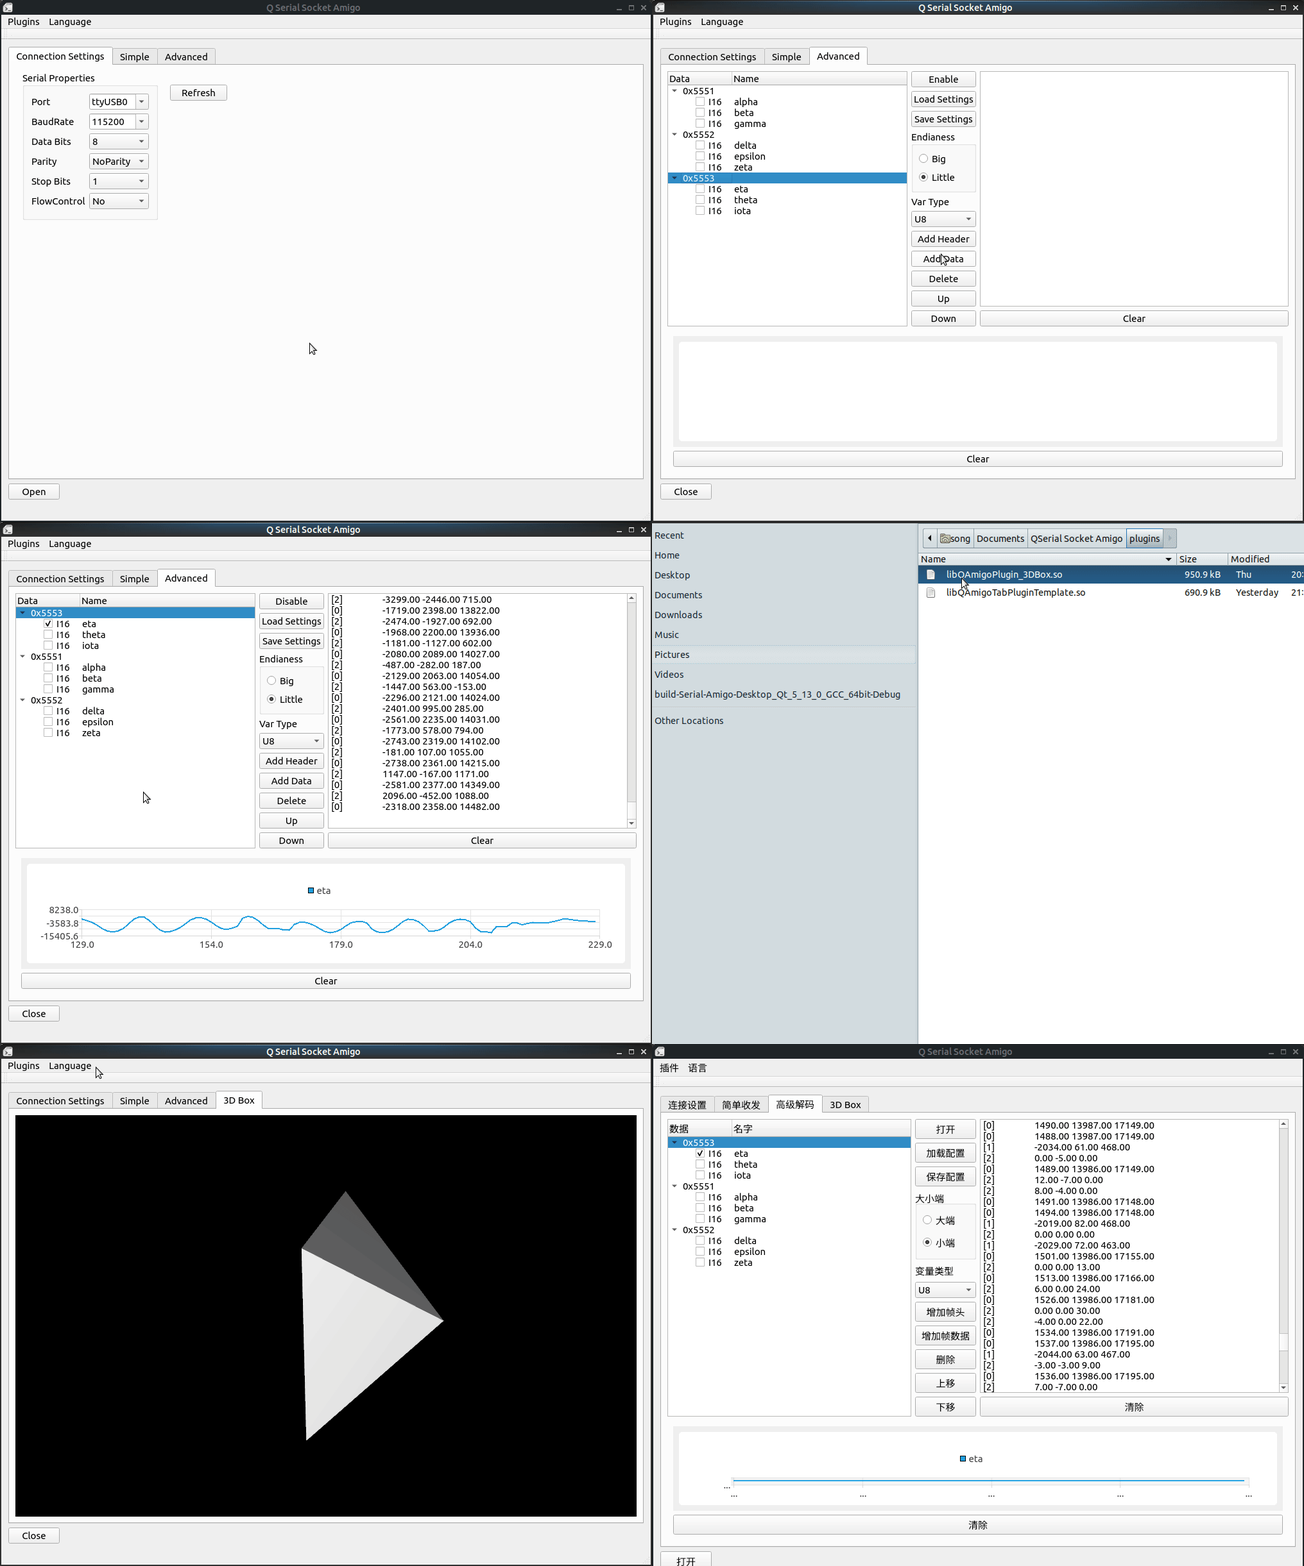
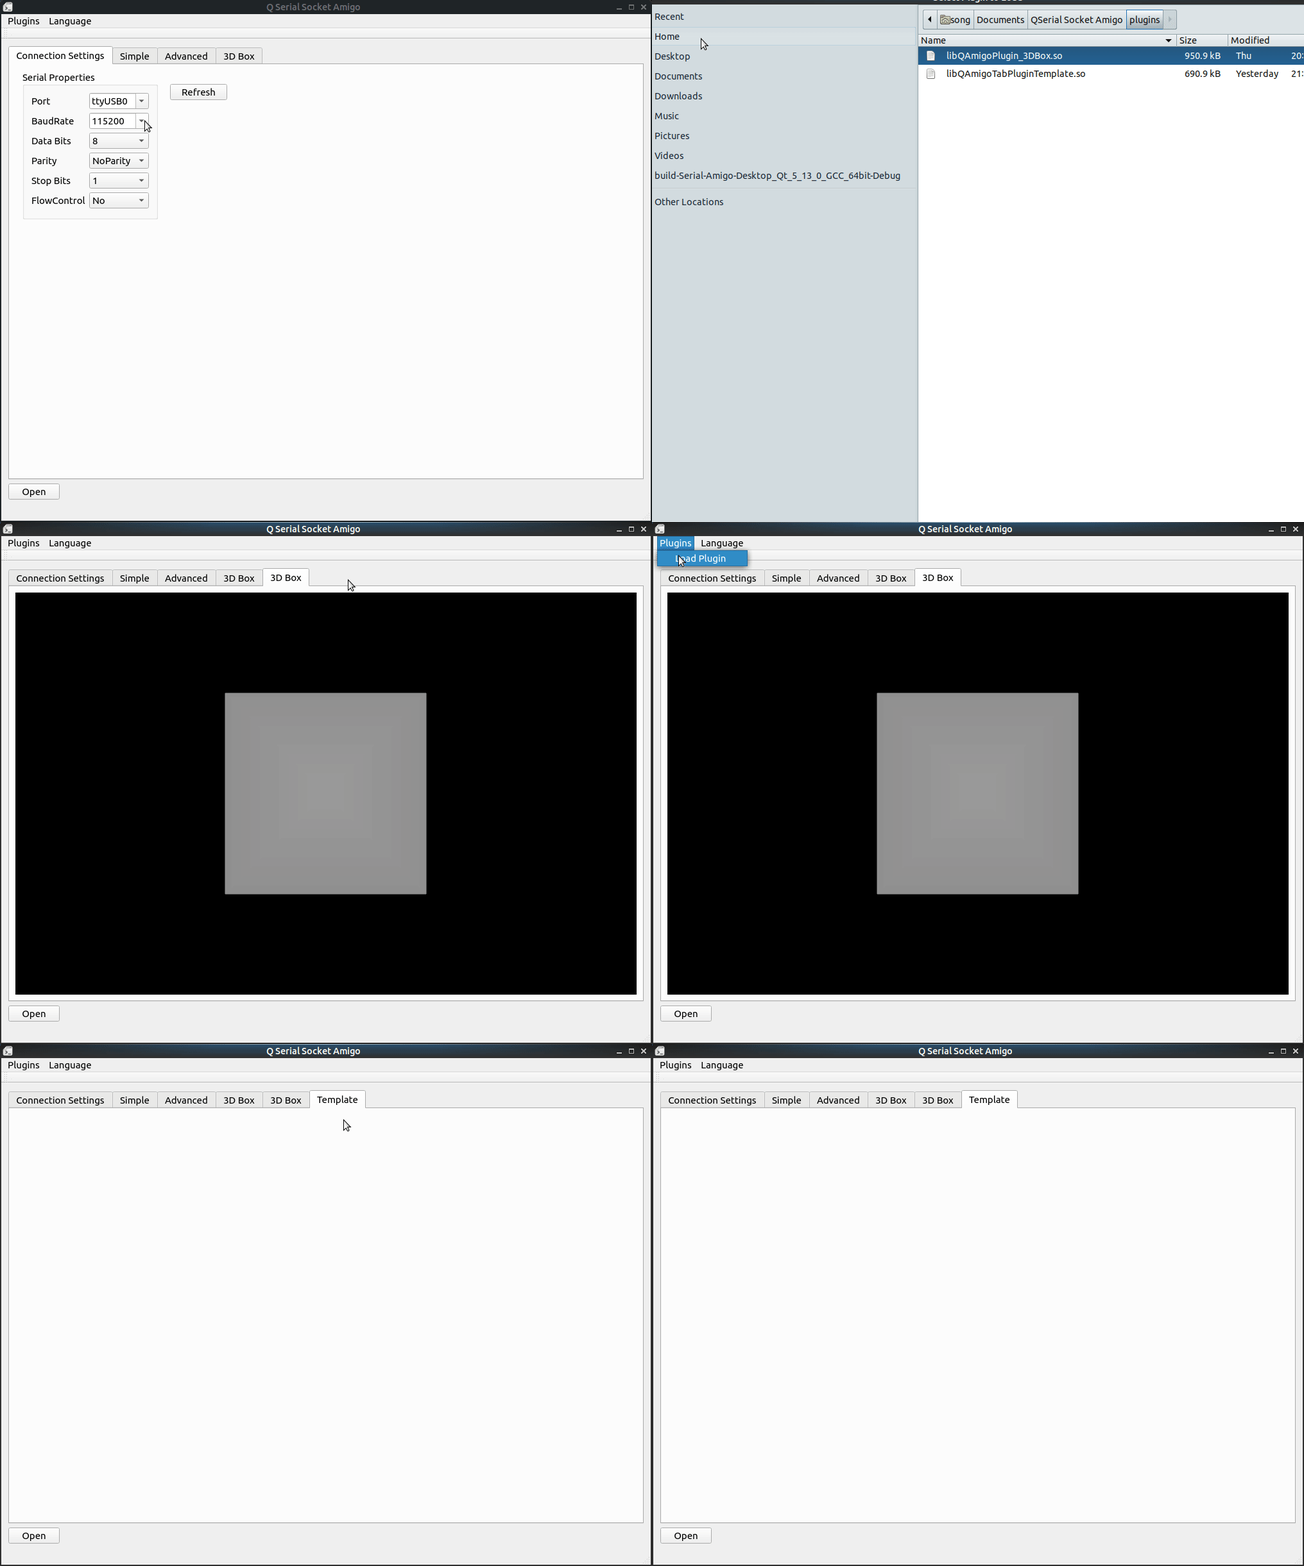
This gif in the begining shows how to load protocals from json and a 3D Box plugin from shared library, which is a normal operation sequence of the tool.
The start goal of this project was to create a simple serial assistant for linux users, since qt is cross-platform this should be used on all platforms qt supports. And with the support of the decoding system, it should be able to help to visualize data coming from serial and net socket easier.
There should be many hardware modules and custom project are using this kind of communication protocal:
[some bytes frameheader] [function byte] [data] [CRC]
Like 0xAAAA for the frame header, 0x01 for function byte to indicate what this frame is and fowllowed with data and crc.
Download it at release page.
Use the latest qtcreator to compile and debug the project.
First configure the paramters of the connection on connection tab, and click 'open' button to open the connection.
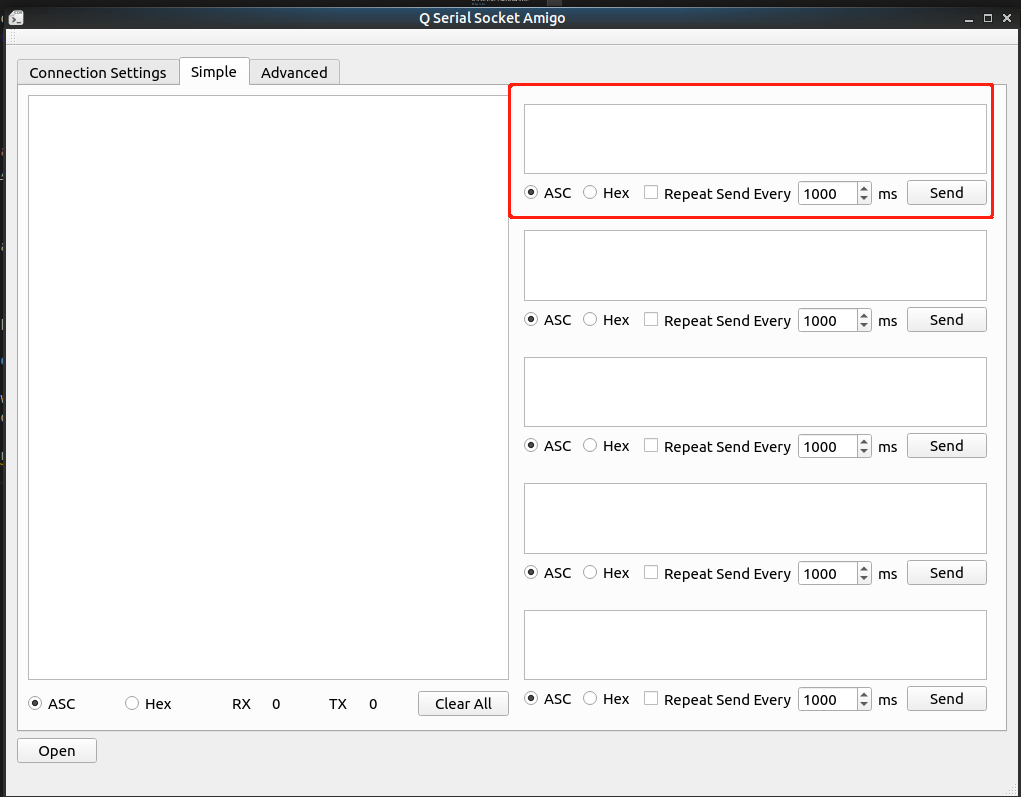
For simple read and write, just turn to the 'simple' tab and select the intepret type of sending and receiving, which should be hex or asc code.
Each send box is standalone for users may have many candidates buffers to send.
Repeat send will automatically start when the checkbox is checked.
Advanced read means decoding of the income data with custom protocal and shows it on some specific chart and send the decoded values to the plugins.
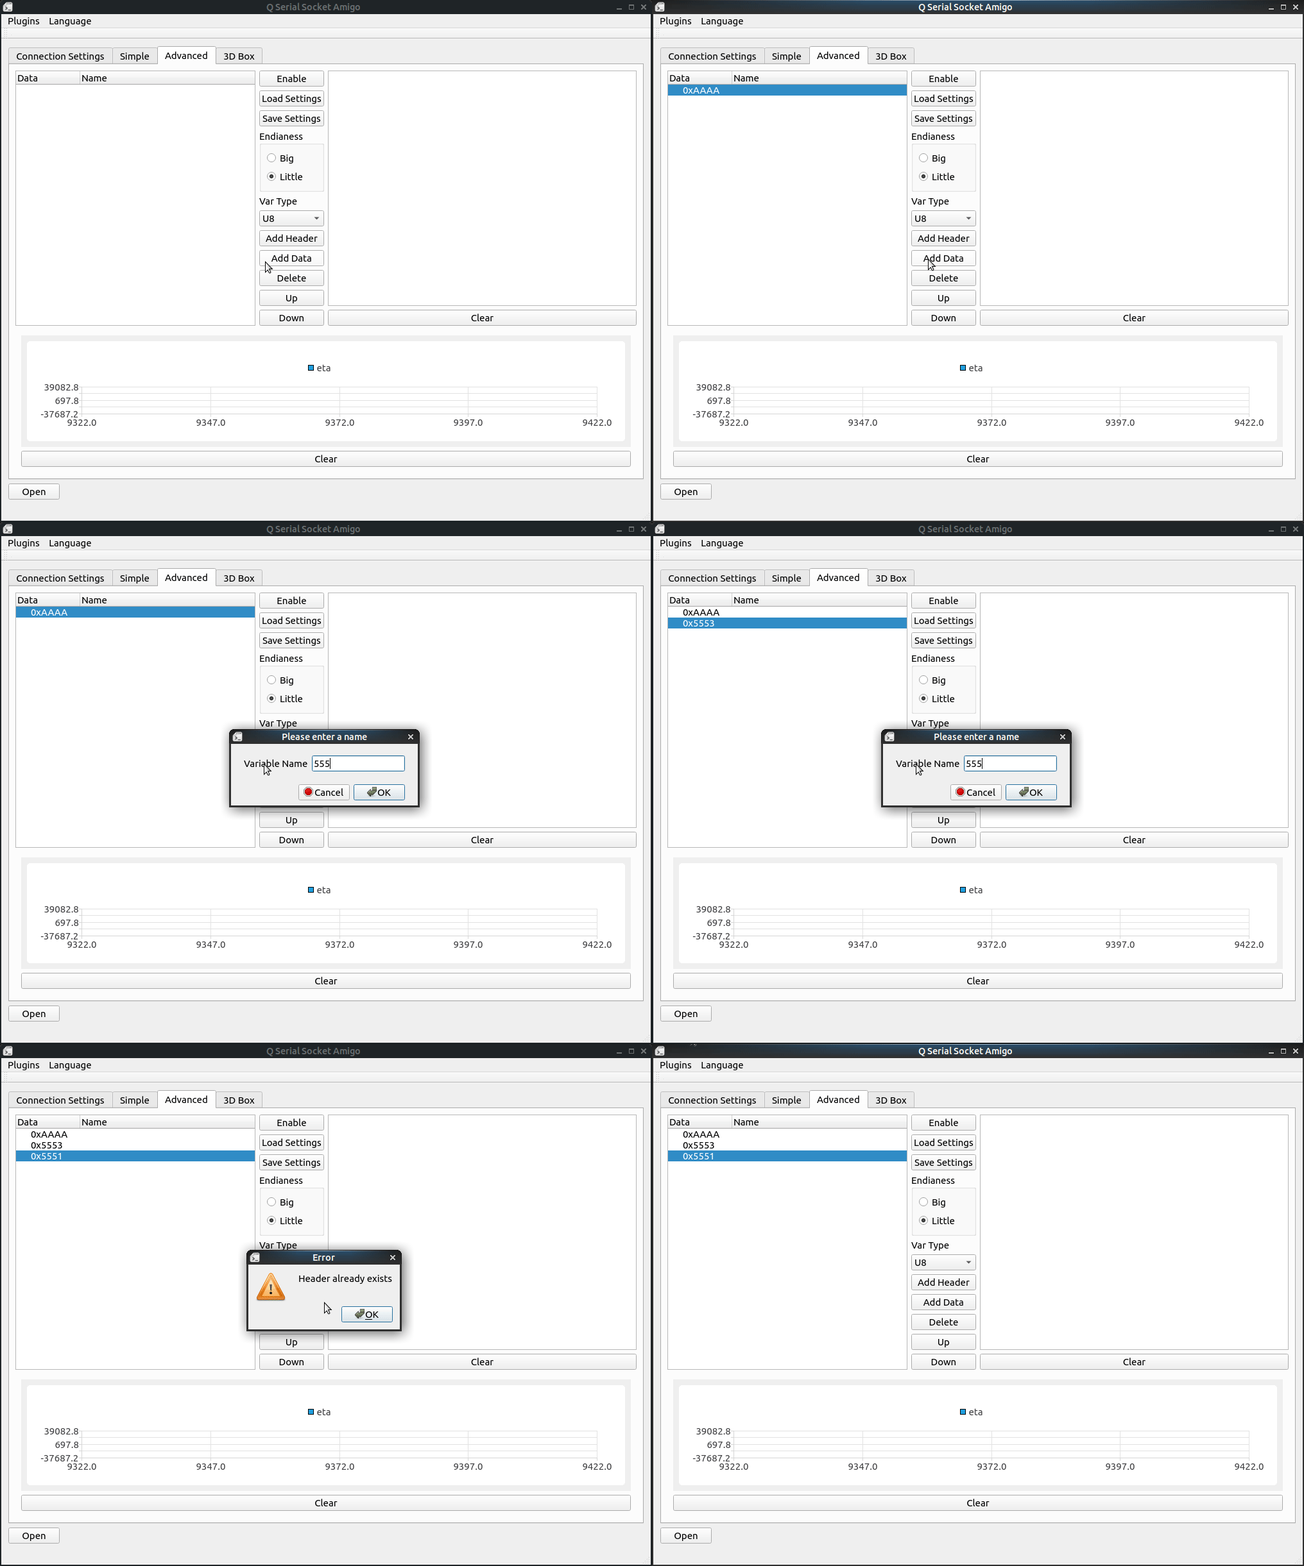
Firstly, Using "Add Header" and "Add Data" button to add frame protocol settings, notice that we have to add header first data(means type data) are child nodes of the frame headers.
When we click the "Add header" button, the tool will ask for a hex byte array to be frame header:
Secondly, Add some variables to be decoded after the frame header. Select variable type and the frame to add then click add to add.
Adding data needs us to select one header or data, the new type data will append to the frame we are selecting to.
Thirdly, Select the endianess the protocal uses.
Most case in communication people uses big endian because it transfers MSB first to decrease the effect of losing later data bytes, while some devices may use little endian.
For example, a 16-bit variable with value 1, big endian of its two bytes should be 0x00 0x01, and the little endian version of it should be 0x01 0x00.
Fourthly, Click the 'Enable' button.
Also this tab can be enabled both before and after the connection is opened.
Here I got an IMU module keeps sending me its angles, angular velocity and angular acceleration from serial. It sends me 3 kinds of frames, each of them are started with two bytes header, 0x5553, 0x5552, 0x5551, respectively. Three int16_t datas follows the header in each frame, represents their value.
Notice that there are CRC values following them, but decoding CRC is not supported yet. CRC will be seen as garbage values in frame and dumped.
For example, in angle frame, each of the int16_t value represents results for angle / 180.0 * 65535 for roll, pitch, yaw.
More specifically, frame of their data is composed of these following bytes:
Accelerometer
[0x55][0x51][Lower byte of roll][Higher byte of roll][Lower byte of pitch][Higher byte of pitch][Lower byte of yaw][Higher byte of yaw][CRC bytes]
Angular velocity
[0x55][0x52][Lower byte of roll][Higher byte of roll][Lower byte of pitch][Higher byte of pitch][Lower byte of yaw][Higher byte of yaw][CRC bytes]
Angle
[0x55][0x53][Lower byte of roll][Higher byte of roll][Lower byte of pitch][Higher byte of pitch][Lower byte of yaw][Higher byte of yaw][CRC bytes]
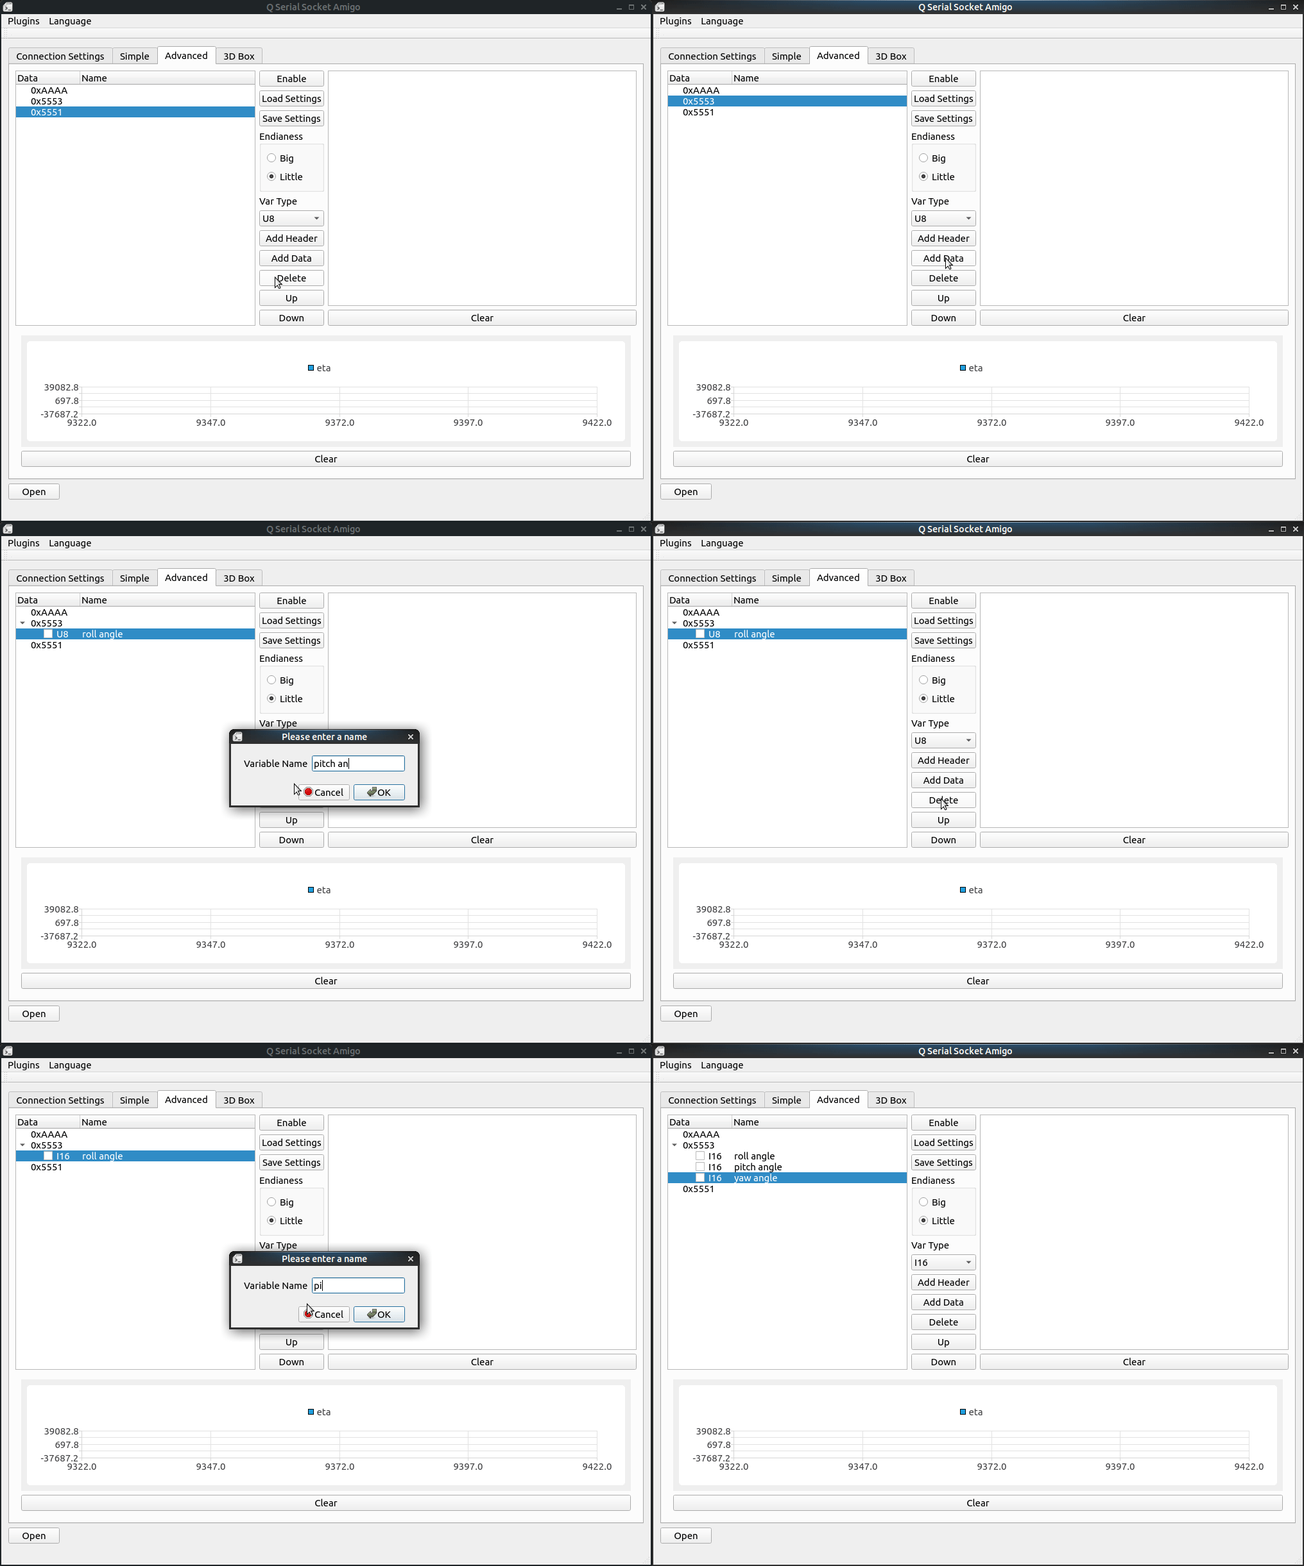
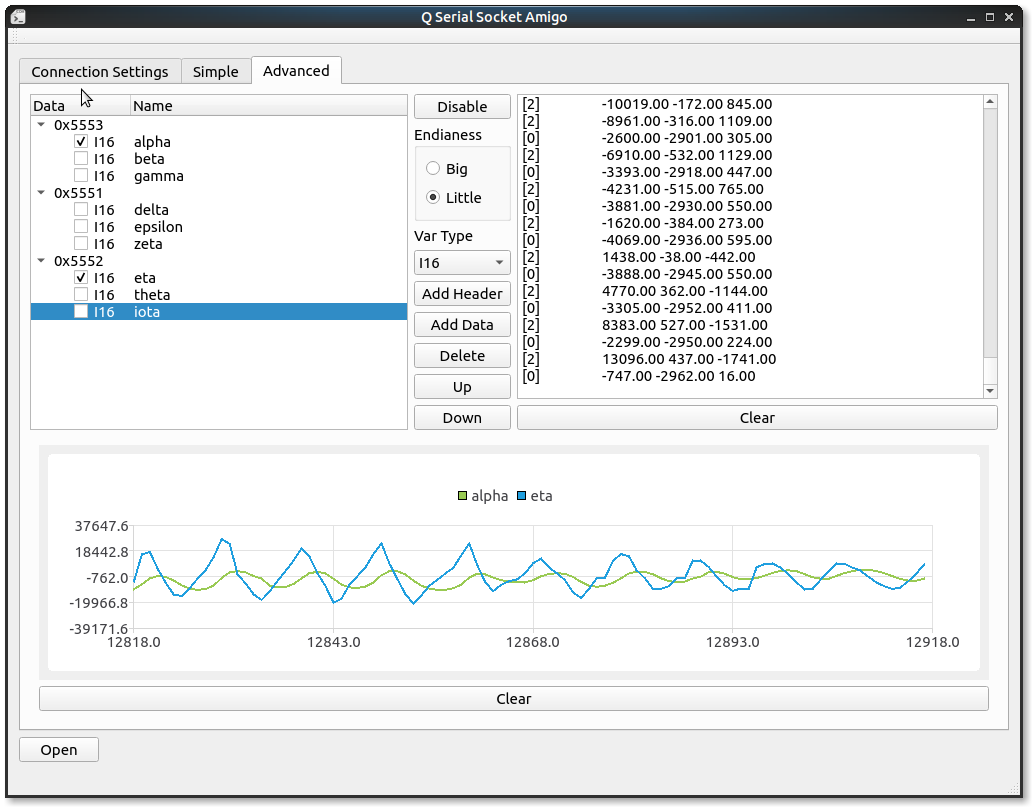
To decode these frames on one serial, we can configure our tool like this:
Log area on the right will show the value it decodes, number in the beginning represents the frame index.
Checkbox in front of the data line is for drawing data in chart, just check the data you want to plot and have some fun!
Protocol configurations in the treeProtocol widget and the endianess configurations can be saved to a json file through Save Settings button, and we can load them with Load Settings next time we open the tool.
This tool supports redevelopment through writing plugins, plugins are a small qt library project consists of a layout ,some widgets and a pair of generic data transfer functions.
Using the Load Plugin option under Plugins menu in menubar to open the plugin selection dialog, and select the shared library generated by the plugin project.
There's a template project to help writing plugins, QAmigo_Plugin_Template
Copy this project and change the project name to ours, also change some paths in .pro file then we can start writing the logic part of the plugins.
The first function to introduce is onFrameUpdated.
void QAmigoTabPluginTemplate::onFrameUpdated(int id, QList<double> listValues);
The most important function in the plugin is to receive the values the advanced page decoded. Whenever a new frame is decoded, the above function in the plugin will be called with two parameters to pass the values in. The first one is the frame id, which is the index of the frame in the advanced page, and the second one, which is a value list, contains the values it decoded.
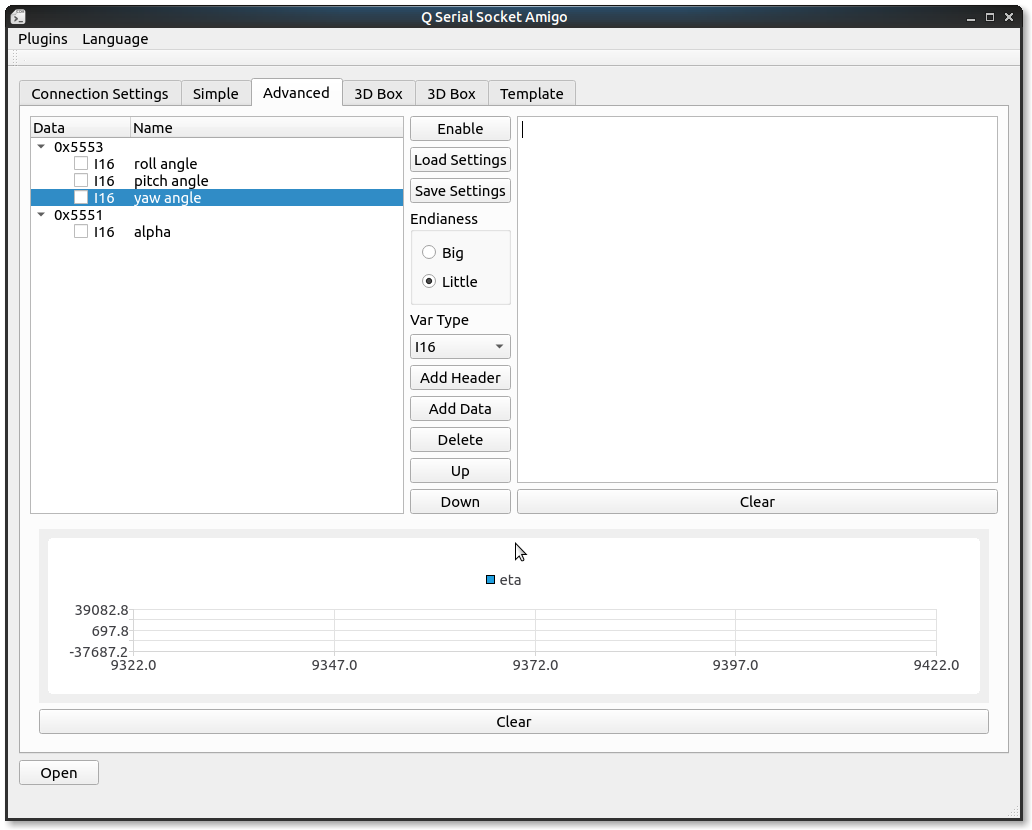
For example, for protocols like this:
Plugins will receive two possible id, 0 for frame with header 0x5553 and 1 for frame with header 0x5551, and listValues.count() for them will be 3 and 1 respectively.
Due to the plugin system in Qt does not supports signal/slots system, it's hard for the main program to detect plugin's sending buffer command. So in the current implementation, the main program send the handler of current connection to the plugin, and the plugin can do write operations with the handler.
For example, if I added a button in my plugin and a slot function onButtonTestClicked, sending a hello world should be like this:
void QAmigoTabPluginTemplate::onButtonTestClicked()
{
        connection->write("hello world").
}
The main program will retrive the tab name through the following interface:
QString QAmigoTabPluginTemplate::getName() const
{
    return tr("Template");
}
Just change this name.
There is an example plugin project 3D Box plugin, should be able to help users to know how a plugin is written.
This program supports I18N(internationalization) through Qt's I18N support, only supports English and Chinese, select the one you want in menubar.
The linux version released package uses CQtDeployer to deploy, thanks to the author's great work!
帮助从流数据中解码和可视化数据的工具程序。
这个工具用于解析绝大多数通用的串行协议,解析串口和socket(正在写)传来的数据并且提供可视化和非常简单的二次开发插件机制。
开头的图展示了从json文件读取协议配置信息和从动态链接库读取3D Box plugin这个插件的过程,通常这个也是使用这个工具的一个常规流程。
这个项目本来只是想写一个Linux下的通用串口助手,不过因为Qt是跨平台的,所以这个软件应该也可以跨平台使用,并且有了动态的协议解析和插件的支持,应该可以作为绝大部分应用的测试上位机使用。
许多常用的小的硬件模块使用这种协议:
[几个字节的帧头] [功能字节] [数据] [CRC]
比如0xAAAA作为帧头,0x01是指示角度信息的功能字节,后面跟着数据和CRC校验。
可以在Release页下载发布好的程序 release page.
使用最新的Qt Creator来编译程序。
首先要在连接配置页面配置连接信息,配置好之后点击open就可以打开连接。
对于简单收发,转到"Simple"("简单收发")页面,和平常的小串口助手的操作类似。
其中简单收发页面中,每一个发送框都是独立的,方便同时准备多个发送的东西准备发送。
重复发送在checkbox被选中的情况下自动开启。
高级解码提供自定义解析协议来解析当前收到的数据,并且可以将数据绘制到chart中和送入plugin中提供二次开发使用。
首先, 使用 "Add Header"("增加帧头") 和 "Add Data"("增加数据") 案件来增加解析的帧和帧内部的数据,注意在没有帧头的情况下是不能够添加解析数据的。解析数据作为帧头的字节点存在。
当点击"增加帧头"时,软件会询问一个hex数组作为帧头使用。
第二步, 在帧头后增加一些需要解析的变量,首先选择好变量类型然后使用"Add Data"("增加数据")按键增加解析变量。
增加数据时需要选中一个帧头或者变量,会在选中的帧后增加解析数据
第三步, 选择大小端
大多数通信情况下我们使用大端数据格式,因为大端模式下MSB在前这样后面数据丢失的话对整个数据的大小损失影响小,不过很多情况下我们也使用小端模式。
例如,一个16位的变量,值为1,大端模式下他发送出去的两个字节是0x00, 0x01,小端模式下是0x01, 0x00.
第四步, 点击"Enable"("打开")按键
什么时候按都可以,无论是连接开启前还是开启后。
我这里有一个IMU块在通过串口持续发出他的角度,角速度和角加速度数据,这些数据分布在三个帧当中,帧头分别是0x5553, 0x5552, 0x5551,后面分别跟了三个int16_t型的小端数据,代表在roll, pitch和yaw三个维度上的值。
要注意我这个模块其实是带有CRC校验的,不过解析CRC还不支持,CRC会被当做帧里的无用值直接丢掉。
例如在角度帧中,每个int16_t型值代表三个维度上angle / 180.0 * 65535的结果。
更详细的说名下,他们的每个帧由如下数据组成:
角加速度
[0x55][0x51][roll低字节][roll高字节][pitch低字节][pitch高字节][yaw低字节][yaw高字节][CRC字节]
角速度
[0x55][0x52][roll低字节][roll高字节][pitch低字节][pitch高字节][yaw低字节][yaw高字节][CRC字节]
角度
[0x55][0x53][roll低字节][roll高字节][pitch低字节][pitch高字节][yaw低字节][yaw高字节][CRC字节]
要解析从同一串口来的这些数据,我们要把我们的程序设置成下面这种协议:
右边的Log区会显示解析成功的数据,最前面的数字代表帧ID.
前面的checkbox用于将变量的值实时显示在下面的chart中,只要勾选就可以。
协议配置信息和大小端信息可以通过点击"Save Settings"("保存配置")进行保存,会被保存成一个json文件,下次使用软件的时候只需要点击"Load Settings"("加载配置")就可以省去手动输入配置的步骤。
这个程序支持使用Qt插件进行二次开发,Qt插件是指包含指定类接口的一个Qt共享库工程,在这个程序里插件使用一个layout来储存自己的按钮,label和chart等组件,并且通过一些预定义的函数接口来读取解析到的数据和发送数据。
在菜单栏的"plugins"("插件")栏下有一个"Load Plugin"("加载插件")的选项,点击之后会弹出对话框选择编译好的共享库文件就可以将插件加载到程序当中。
我编写了一个模板工程来帮助编写插件, QAmigo_Plugin_Template
拷贝这个工程之后修改工程名和一些.pro中的路径配置信息就可以直接开始写插件的逻辑部份了。
第一个要介绍的函数是 onFrameUpdated.
void QAmigoTabPluginTemplate::onFrameUpdated(int id, QList<double> listValues);
插件中最重要的功能就是如何接收在Advanced Tab中主程序解析好的数据,这个函数在每次主程序解析好一帧数据的时候都会被调用将数据传递进来,包含两个参数,第一个是帧ID,第二个是解析好的帧数据的列表。
例如,对于下图里的协议:
Plugins will receive two possible id, 0 for frame with header 0x5553 and 1 for frame with header 0x5551, and listValues.count() for them will be 3 and 1 respectively.
插件会受到两种可能的ID,0和1, 0就是说明是0x5553为帧头的帧,1就是说明是帧头为0x5551开头的帧。并且对于他们来说,listValues.count()的值分别为3和1.
由于插件系统不能和主程序的signal/slot系统兼容,当前发送操作不可直接被封装在主程序中。所以当前是通过将QIODevice *直接传递给插件来实现让插件自定义发送数据的。
For example, if I added a button in my plugin and a slot function onButtonTestClicked, sending a hello world should be like this:
例如,如果我在插件中增加了一个按键并绑定了一个槽函数onButtonTestClicked,发送一个hello world的代码就是下面这个样子的:
void QAmigoTabPluginTemplate::onButtonTestClicked()
{
        connection->write("hello world").
}
主程序会通过下面的接口来读取插件的名字:
QString QAmigoTabPluginTemplate::getName() const
{
    return tr("Template");
}
修改里面的字符串就行.
示例插件程序 3D Box plugin, 为大家展示了一个简单的插件是什么样的.
当前程序通过Qt的I18N(internationalization)支持I18N,仅支持英文和中文,在菜单栏中选择需要的语言。
Linux版本的发布程序使用 CQtDeployer 发布, 感谢作者的工作!
