Alexa Music Bypass is a tool that allows you to deploy Alexa Music on cloud hosting platforms like Heroku and Railway. With this tool, you can bypass the usual deployment restrictions and deploy any repository regardless of the programming language or dependencies. To use Bypass, you first need to click on the buttons to deploy and set up the necessary environment variables. Once that's done, you can deploy the repository to either hosting platform and start using it right away. With Bypass, you can deploy Alexa Music on Heroku or Railway and take advantage of the benefits of cloud hosting. You can scale your application to handle more traffic, access powerful analytics and monitoring tools, and use add-ons to add functionality to your application. Whether you're deploying a small side project or a large-scale application, Bypass makes it easy to deploy your repository on the cloud hosting platform of your choice.
- If you do not want to edit the Alexa repo and wish to use the original Vars, after deploying, all usernames including support, channel, support group, and start message will remain the same as the original Alexa showing on the start command, except the owner name. Therefore, there will be no need to edit anything. Simply click on the deploy button, login to your Heroku and Railway accounts, fill the Vars, and wait for the complete deployment. Check the logs to make sure to add both assistant and bot as admins in the log channel.
- If you want to edit the repo, instructions have also been added on how you can edit the Alexa repo after forking it from the original repo.
Here is the official Alexa Music repo click on the button given below
ʜᴇʀᴏᴋᴜ ʜᴀs ᴛᴡᴏ ᴠᴀʀs[ ʜᴇʀᴏᴋᴜ_ᴀᴘɪ_ᴋᴇʏ & ʜᴇʀᴏᴋᴜ_ᴀᴘᴘ_ɴᴀᴍᴇ ] ғᴏʀ ᴜᴘᴅᴀᴛᴇʀ ᴛᴏ ᴡᴏʀᴋ. ʙʏ sᴇᴛᴛɪɴɢ ᴛʜᴏsᴇ ᴛᴡᴏ ᴠᴀʀs ʏᴏᴜ ᴄᴀɴ ɢᴇᴛ ʟᴏɢs ᴏғ ʏᴏᴜʀ ʜᴇʀᴏᴋᴜ ᴀᴘᴘ, sᴇᴛ ᴠᴀʀ, ᴇᴅɪᴛ ᴠᴀʀ, ᴅᴇʟᴇᴛᴇ ᴠᴀʀs , ᴄʜᴇᴄᴋ ᴅʏɴᴏ ᴜsᴀɢᴇ ᴀɴᴅ ᴜᴘᴅᴀᴛᴇ ʙᴏᴛ. ᴛʜᴏsᴇ ᴛᴡᴏ ᴠᴀʀs ᴀʀᴇ ɴᴏᴛ ᴍᴀɴᴅᴀᴛᴏʀʏ, ʏᴏᴜ ᴄᴀɴ ʟᴇᴀᴠᴇ ᴛʜᴇᴍ ʙʟᴀɴᴋ ᴛᴏᴏ.
It's a original template click on the button given below to directly deploy on railway and fills you vars.ᴛʜᴇʀᴇ ᴀʀᴇ ᴛᴡᴏ sᴛᴇᴘs ᴛᴏ ᴅᴇᴘʟᴏʏ ᴏɴ ʀᴀɪʟᴡᴀʏ. ꜰɪʀsᴛ, ʏᴏᴜ ʜᴀᴠᴇ ᴛᴏ ᴄʟɪᴄᴋ ᴏɴ ᴛʜᴇ ʙᴜᴛᴛᴏɴ ɢɪᴠᴇɴ ʙᴇʟᴏᴡ ᴛᴏ ᴅɪʀᴇᴄᴛʟʏ ᴅᴇᴘʟᴏʏ ᴏɴ ʀᴀɪʟᴡᴀʏ. sᴇᴄᴏɴᴅ, ғᴏʀᴋ ᴛʜɪs ʀᴇᴘᴏ ᴀɴᴅ ᴏᴘᴇɴ ʀᴀɪʟᴡᴀʏ, ᴄᴏɴɴᴇᴄᴛ ᴛᴏ ɢɪᴛʜᴜʙ, ᴛʜᴇɴ sᴇʟᴇᴄᴛ ʏᴏᴜʀ ꜰᴏʀᴋᴇᴅ ʀᴇᴘᴏ, ᴛʜᴇɴ ᴀᴅᴅ ᴄᴏɴꜰɪɢ ᴠᴀʀs ᴀɴᴅ ᴡᴀɪᴛ ꜰᴏʀ ᴄᴏᴍᴘʟᴇᴛᴇ ᴅᴇᴘʟᴏʏᴍᴇɴᴛ. ᴛʜᴀᴛ's ɪᴛ!

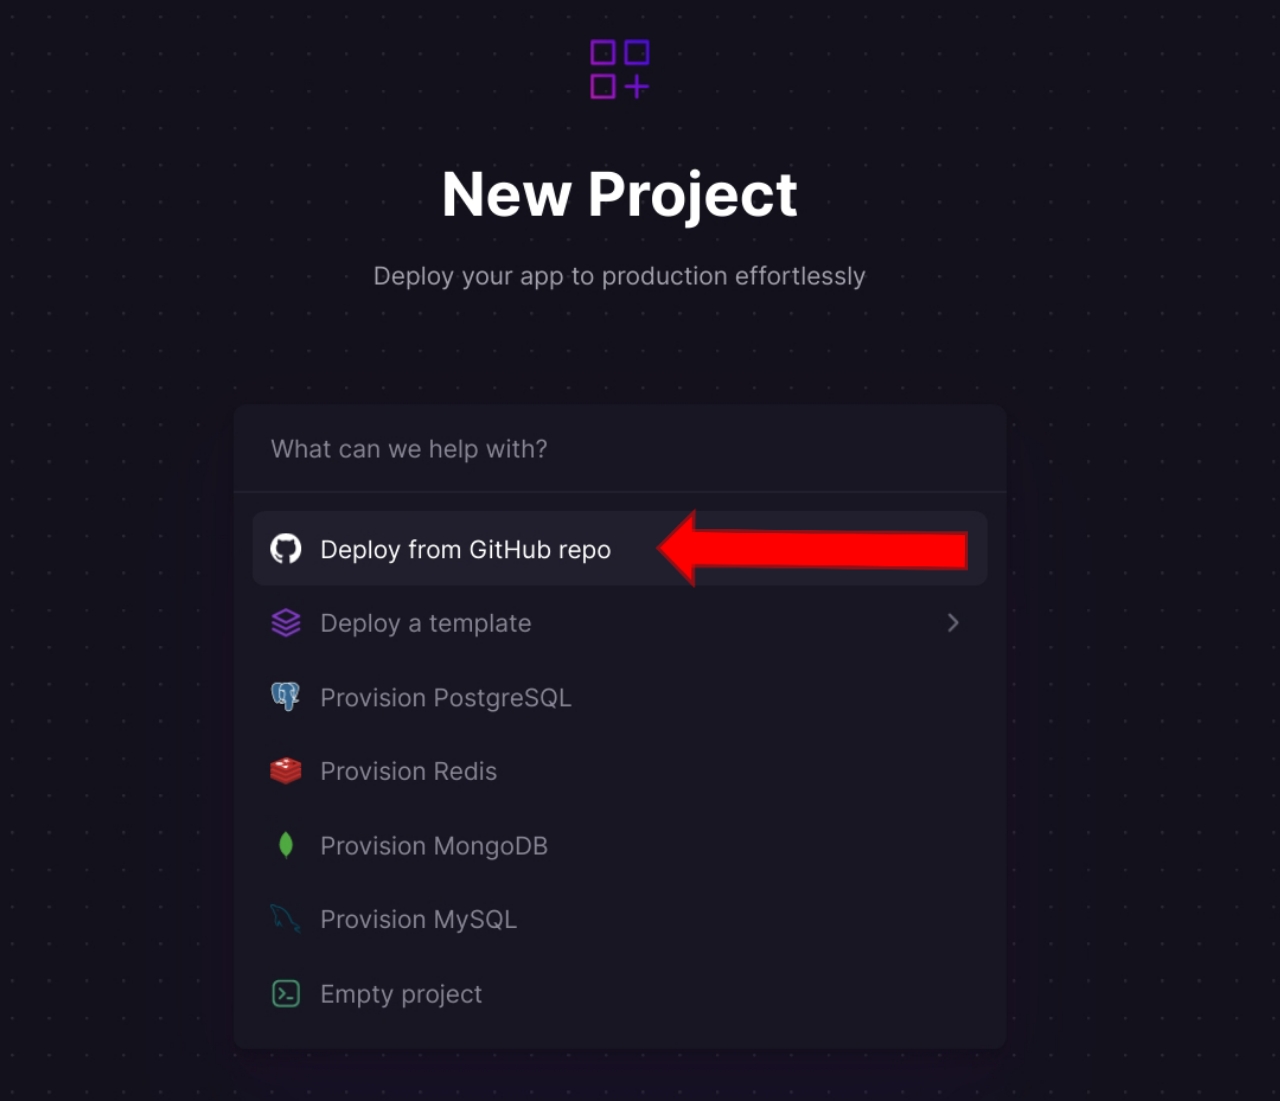
If you prefer not to use the template, you can login to Railway and click on 'New Project' to create a new project.

To deploy, click on 'Deploy from GitHub Repo' and connect your GitHub account. Next, select 'AlexaMusic-Bypass' as shown in the picture below.
NOTE
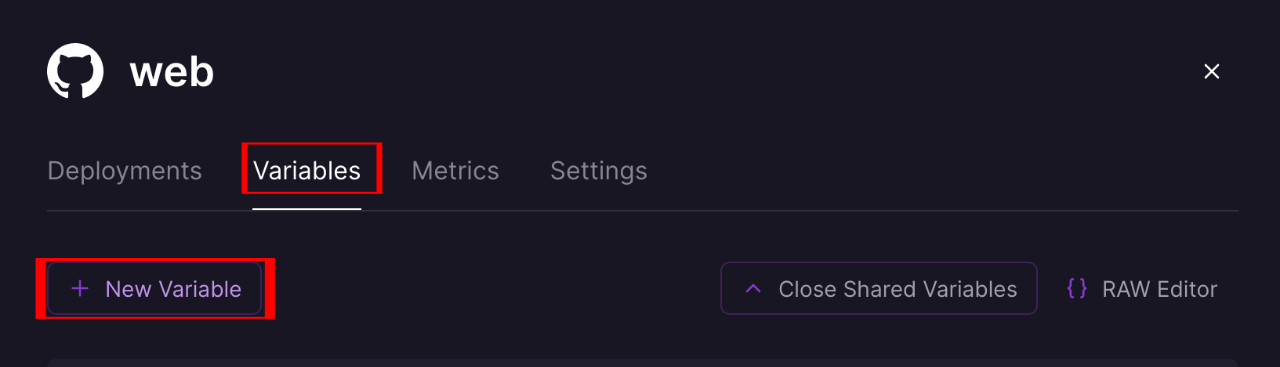
Here are the necessary vars that you need to fill in the variable section for this code to work properly: OWNER_ID, MONGO_DB_URI, BOT_TOKEN, API_HASH, API_ID, LOG_GROUP_ID, and STRING_SESSION. Fill these vars and wait for deployment.
Here is the complete guide to deploy Alexa Music on Railway and Heroku with detailed images. You have to make some changes if you want to deploy this music bot. Firstly, you have to fork both the main project and Alexa bypass. If you don't want to edit the repo and want to use Alexa Original vars, simply click on the above button. If you want to add your own name, like channel name or support group, then you have to edit the Alexa repo. All the processes are given below.
You don't have need to do any steps given below if you just want to Deploy Alexa Music or if you want to make changes then try the steps given below.
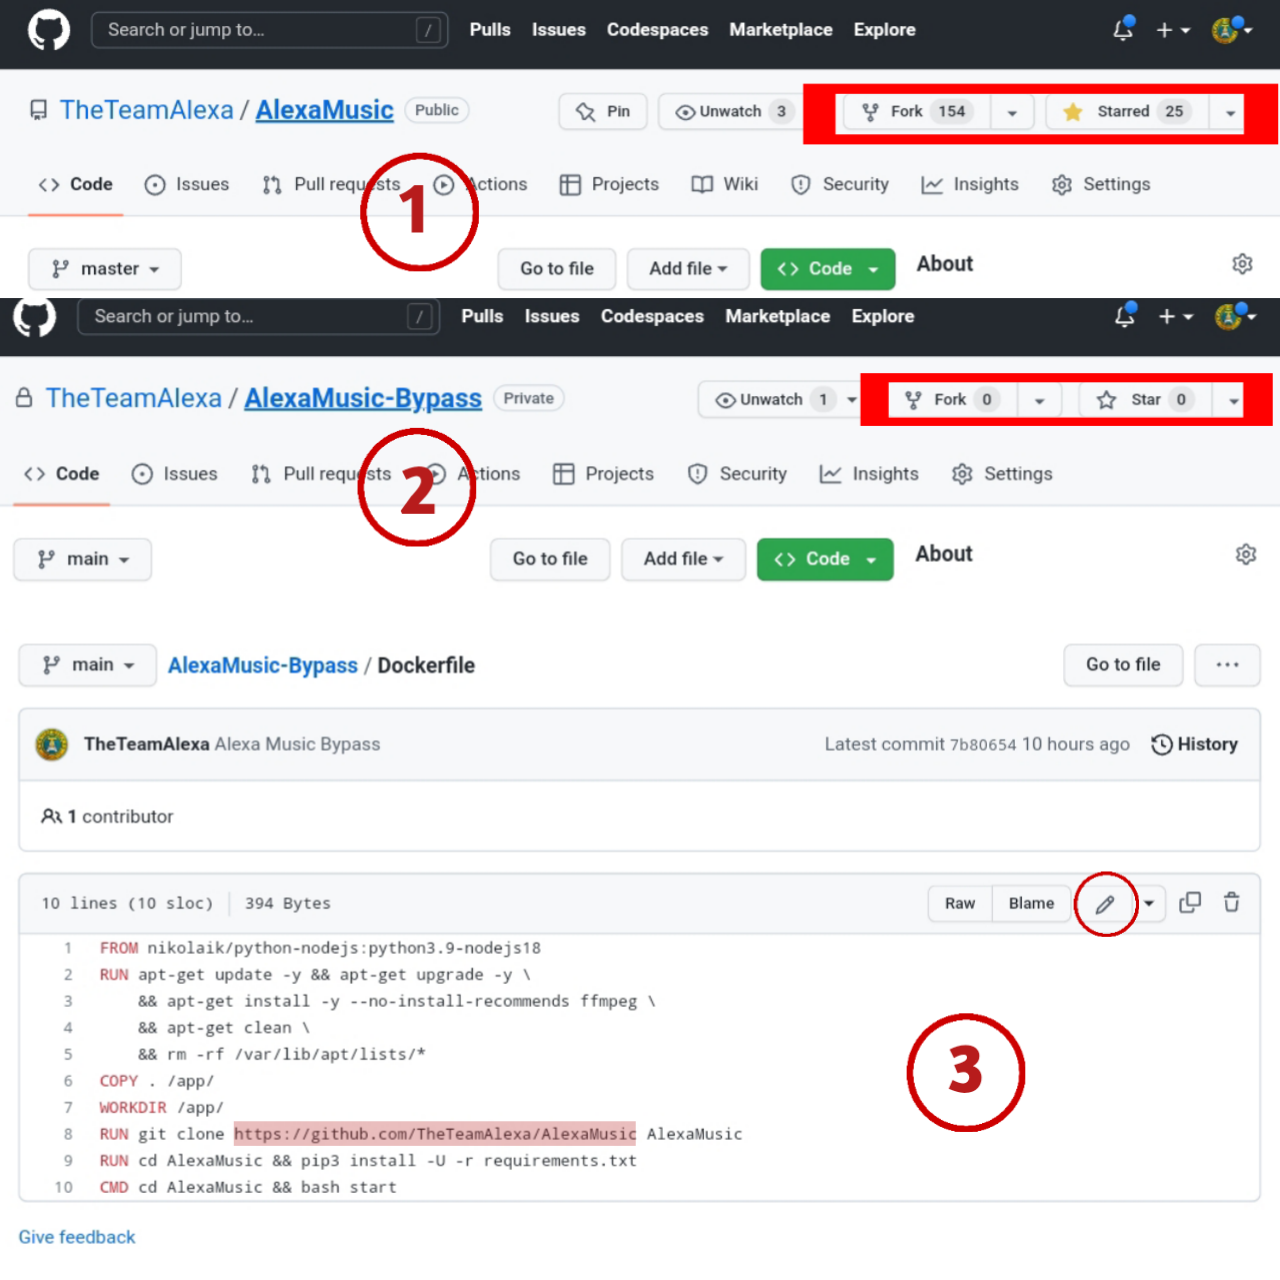
- You need to fork and star both repos.
- Then, open the forked Alexa Bypass repo and edit the Dockerfile, as I have mentioned in the picture. Replace
https://github.com/TheTeamAlexa/AlexaMusicwith your own repo link that you have forked from Alexa as mentioned in picture. - After that, edit the
Readme.mdfile, and in theDeploy To Herokusection, change the GitHub username and Repo name to your own repo name that you have forked.
- If you want to edit the repository, open the forked repository that you have forked from Alexa Music and change the name that I have used in the repository, such as support group, channel, owner name, etc.
- Open
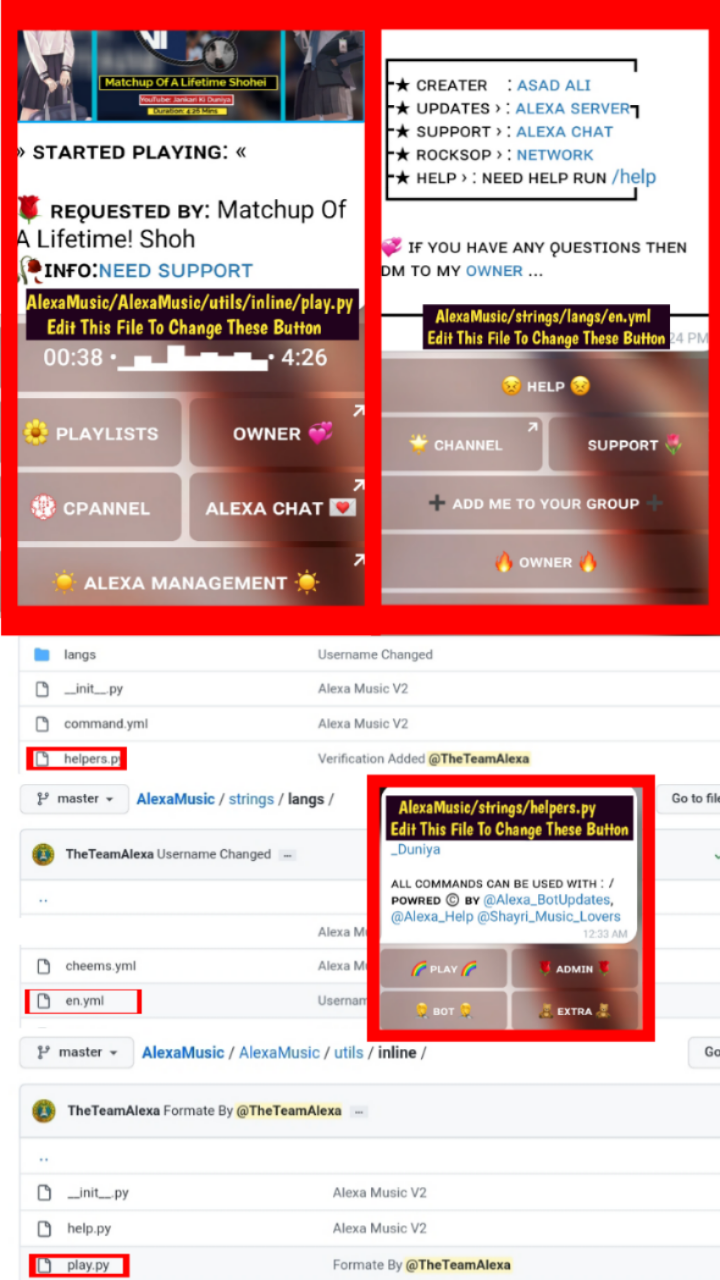
AlexaMusicin your forked repository, then go toAlexaMusic/strings/langs/en.ymland locate where I have used my channel name, etc. Make sure to change only the username and not change any{},0words, like that. - Furthermore, you can visit
AlexaMusic/strings/helpers.pyto replace my usernames with yours. - After that, go to
AlexaMusic/AlexaMusic/utils/inline/play.pyfor further editing of the play button, which will show when the song is playing. - In the picture given below i have mentioned which file you need to edit to add your own values.
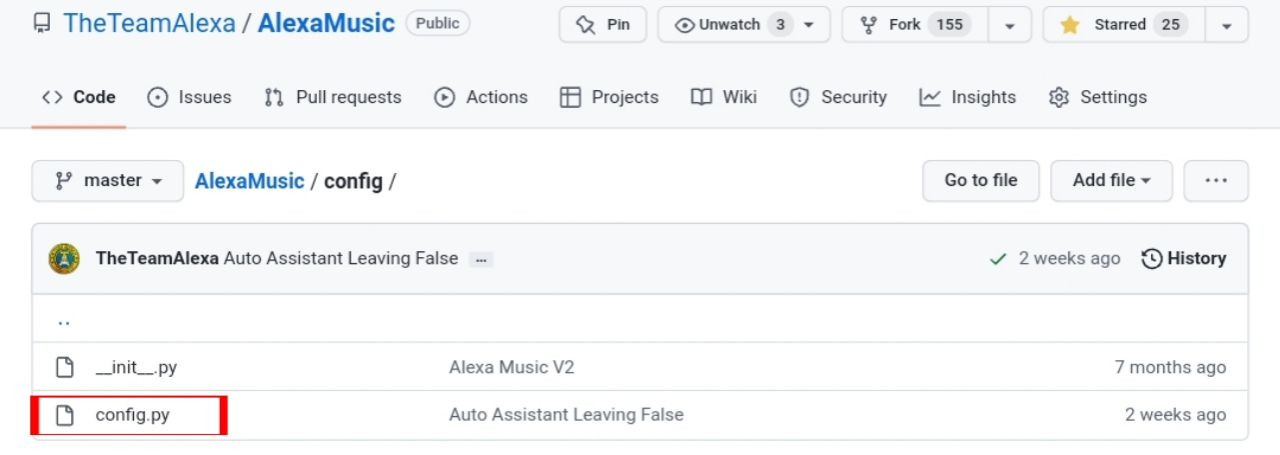
- Open your forked repo and go to
AlexaMusic/config/config.pyedit necessary Vars which i have give below. - Don't Need to edit or replace values of the vars already given in
app.jsonandrailway.jsonedit only thses vars which i have mentioned below. - MUSIC_BOT_NAME =
You Music Bot NameEdit InConfig.pybecause it's not will be available inapp.jsonandrailway.json - UPSTREAM_REPO = In
Config.pyput your edited repo link - UPSTREAM_BRANCH = in
Config.pyputt Branch name it's necessary to update the bot - SUPPORT_CHANNEL = In
Config.pyreplace you channel link with Mine - SUPPORT_GROUP = In
Config.pyreplace you group link with Mine - SPOTIFY_CLIENT_ID = you can use these vars if you want to listen Spotify music also edit it in
Config.py - SPOTIFY_CLIENT_SECRET = you can use these vars if you want to listen Spotify music also edit it in
Config.py
- Above instructions for those who want to edit repo otherwise just click on the and fills your vars and wait for the deployment, By the help of this you can bypass railway and heroku restrictions on your deployment there will be no more account suspension on heroku and railway.
Here is the list of all people who made this project even better. Thanks to:
-
For the final look of this project and creating the Bypass. -
Eximinati for adding the Railway template, thanks bruh. -
Abhi Bro, no need for any introduction.