OK I know it's not the best name, but in short, this is a .NET Core 3.0 service that monitors the temperature of a Dell PowerEdge R620 and automatically engages or disengages static fan control based on temperature, in order to control noise in a homelab.
While designed around a R620 (which is what I have), I believe it will work with the R610, R720, and R710. And probably lots others. YMMV.
FAAAAT: I am using this to drop down fan speed for my r630 and r510. In my case, the r510 server DO NOT support read cpu temp from BMC/IPMI. So I use LMSensor to read temp from it. Please install lm sensors manually.
This program sends automated, raw IPMI commands to your iDRAC device at regular intervals. As such, USE AT YOUR OWN RISK.
- Ensure target machine has
ipmitoolinstalled, and has access to the iDRAC device you wish to monitor/control. Test it with a simple command like./ipmitool -I lanplus -H 10.10.1.2 -U root -P password sdr type temperaturewhere the host, user, and password are replaced as appropriate. - Install .NET Core runtime on your target machine, whether it's Windows or Linux.
(Sorry, no Mac support yet, but I have a MBP coming soon and might add support later. It's just a few lines to support the process runner. I welcome pull requests.) - Build & publish for your target environment, or download the latest Release for your system, then deploy to your target machine.
- Set
DOTNET_ENVIRONMENTenvironment variable toProductionon target machine. - (Optional)
Install as Windows Services using sc.exe(due to a .net core bug, I hard code some config to support notify type service in linux. so do not register this as windows service.) or as Systemd service (skip to "Service/Daemon setup"). - Start it.
Example:
{
  "Settings": {
    "PollingIntervalInSeconds": 3,
    "RollingAverageNumberOfTemps": 10,
    "BackToManualThresholdInSeconds": 20,
    "ManualModeFanPercentage": 16,
    "HostSettings": {
      "0": {
        "Name": "what ever you want",
        "Host": "hostname or ip",
        "User": "username",
        "Password": "this can spec in environment or CLI parameter using Settings__HostSettings__0__Password=",
        "RegexToRetrieveTemp": "(?<=0Eh|0Fh).+(\\d{2})",
        "Type": "ipmi",
        "PathToIpmiToolIfNotDefault": null,
        "MaxTempInC": 68
      },
      "1": {
        "Name": "what ever you want",
        "Host": "hostname or ip for IPMI",
        "User": "username for IPMI",
        "Password": "this can spec in environment or CLI parameter using Settings__HostSettings__1__Password=",
        "LMHost": "hostname for ssh",
        "LMUser": "username for ssh",
        "LMPassword": "password for ssh this can spec in env or CLi param.",
        "RegexToRetrieveTemp": "(?<=Core.\\d+:\\W*\\+)\\d*\\.\\d+",
        "Type": "ssh_lm_sensors",
        "PathToIpmiToolIfNotDefault": null,
        "MaxTempInC": 68
      }
    }
  },
  "Logging": {
    "LogLevel": {
      "Default": "Information",
      "Microsoft": "Warning",
      "Microsoft.Hosting.Lifetime": "Information"
    }
  }
}
Why LMSensor used? Becase BMC in some old model like r510 not support read sensors. So I use an alternative way to get temp from LMSensors.
Please install lm sensors manually.
Settings for this app are stored in appsettings.json, and its environment-specific derivatives. Settings in environment-specific app settings files, like appsettings.Production.json, override the setting of the same name and path in the parent JSON file.
It's easier for you to simply delete the file appsettings.Production.json. That way, the app will only take its configuration from appsettings.json and you can keep it all in one spot.
Here are the settings and what they do:
- PollingIntervalInSeconds
How often you want the app to check the temperature. - RollingAverageNumberOfTemps
How many temperature readings you want as part of the average to be used to determine when it's safe to turn off automatic fan control. Multiply this value by your polling interval to get the total amount of time the rolling average covers. - BackToManualThresholdInSeconds
How soon after the temperature drops below the maximum allowed that manual control can be engaged again. If your server drops to an average temp of 30 over the span of 3 minutes, and your max is 50, but this is set to 300, it will still wait an additional 2 minutes before switching back to manual mode. - ManualModeFanPercentage
The percentage of full speed you wish the fans to run in manual fan control mode. I set mine to 30, since that seems tolerable, and my R620 idles around 37-38 C here. 100% is screaming loud, but cool. 15% is very quiet, but the server runs a bit too warm. Experiment first to find your sweet spot.
- Host
The address of your iDRAC device. - User
The user you configured for access in your iDRAC settings, usually "root". - Password
The password. Note: You can leave this blank here and instead provide it in the environment variable "Settings__IpmiPassword", either system-wide or in the systemd service settings. See below. - Type
values: ipmi or ssh_lm_sensors. using "ipmi" to read cpu temp and control fan speed through ipmi. using "ssh_lm_sensors" to read cpu temp through LMSensor->SSH and control fan speed through ipmi. - RegexToRetrieveTemp
This is how the app fetches the 2-digit temperature from the output of the "sdr type temperature" ipmitool command. The default,(?<=0Eh).+(\d{2}), works for me, but your output may look different from mine. My output is stored intestdata.txt, for reference.
To get an idea of how the Regex works, if you're not comfortable, go to a site like RegEx101.com, paste the content oftestdata.txtin the "Text String" box, and paste the Regex from the settings file,(?<=0Eh).+(\d{2}), in the Regex field. Note the capture groups on the right. Then replace the Test String with your ipmitool output for "sdr type temperature", and change the Regex to capture the same groups as mine did.
The Regex matches on multiline, case-sensitive. - MaxTempInC
The temperature at which you want your server to switch to automatic fan control. - PathToIpmiToolIfNotDefault
If your ipmitool isn't located at/usr/bin/ipmitoolin Linux orC:\Program Files (x86)\Dell\SysMgt\bmc\ipmitool.exein Windows, specify its path here. Otherwise leave blank. Any value you provide here will be used to attempt to execute the tool, regardless of operating system, so make sure you use the right slashes!
- LMHost
Host name or ip for ssh. - LMUser
User name for ssh. - LMPassword Password for ssh.
These instructions assume you're using an Ubuntu/Debian-based system. Adjust as necessary for your distribution. Any will work, so long as dotnet is installed and it's 64-bit.
- Create a dedicated user under which the service will Run. I created a user called "dotnetuser" in the "dotnetuser" group using the adduser command:
sudo adduser dotnetuser. - Extract the linux x64 release to
/var/dotnet/r620-monitor/. You can place it wherever you like, but this is where I put it, and where the rest of the instructions will assume you put it. - Modify settings in
appsettings.production.jsonto your preferences. This is where you set polling frequency, max temperature, how should parse your ipmitool output to read temperature, etc. - Change the ownership of the folder, and all files within to dotnetuser:
sudo chown dotnetuser:dotnetuser /var/dotnet/r620-monitor && sudo chown dotnetuser:dotnetuser /var/dotnet/r620-monitor/* - Add execute bit to R620TempMonitor binary:
sudo chmod +x /var/dotnet/r620-monitor/R620TempMonitor - Create a service file here:
/etc/systemd/system/dotnet-r620-monitor.serviceusing your favorite text editor with elevated privileges. I used vim:sudo vim /etc/systemd/system/dotnet-r620-monitor.service. - Paste in the below service definition. Be sure to replace "{your_iDRAC_password}", then tweak to your liking. It's critical it remain of type "notify"!
(when I run this in debug mode, example: dotnet xxxx.dll, notify mode will automaticly restart the service. so i change it to exec mode.)
[Unit]
Description=Temp monitor and fan control for R620 server

[Service]
Type=notify
ExecStart= /var/dotnet/r620-monitor/R620TempMonitor
WorkingDirectory=/var/dotnet/r620-monitor
User=dotnetuser
Group=dotnetuser
Restart=on-failure
RestartSec=10
KillSignal=SIGINT
SyslogIdentifier=%n
PrivateTmp=true
Environment=DOTNET_ENVIRONMENT=Production
Environment=Settings__IpmiPassword={your_iDRAC_password}

[Install]
WantedBy=multi-user.target
- Reload systemctl config to load this service:
sudo systemctl daemon-reload - Start the service:
sudo systemctl start dotnet-r620-monitor.service - Monitor its status:
sudo systemctl status dotnet-r620-monitor.serviceorsudo journalctl -u dotnet-r620-monitor.service -f - Stress your box to see if it works as intended!
Here's a shot of the service running on my system with a set threshold of 50 C, with 20-second polling, 10-reading average, and 60 second manual release:
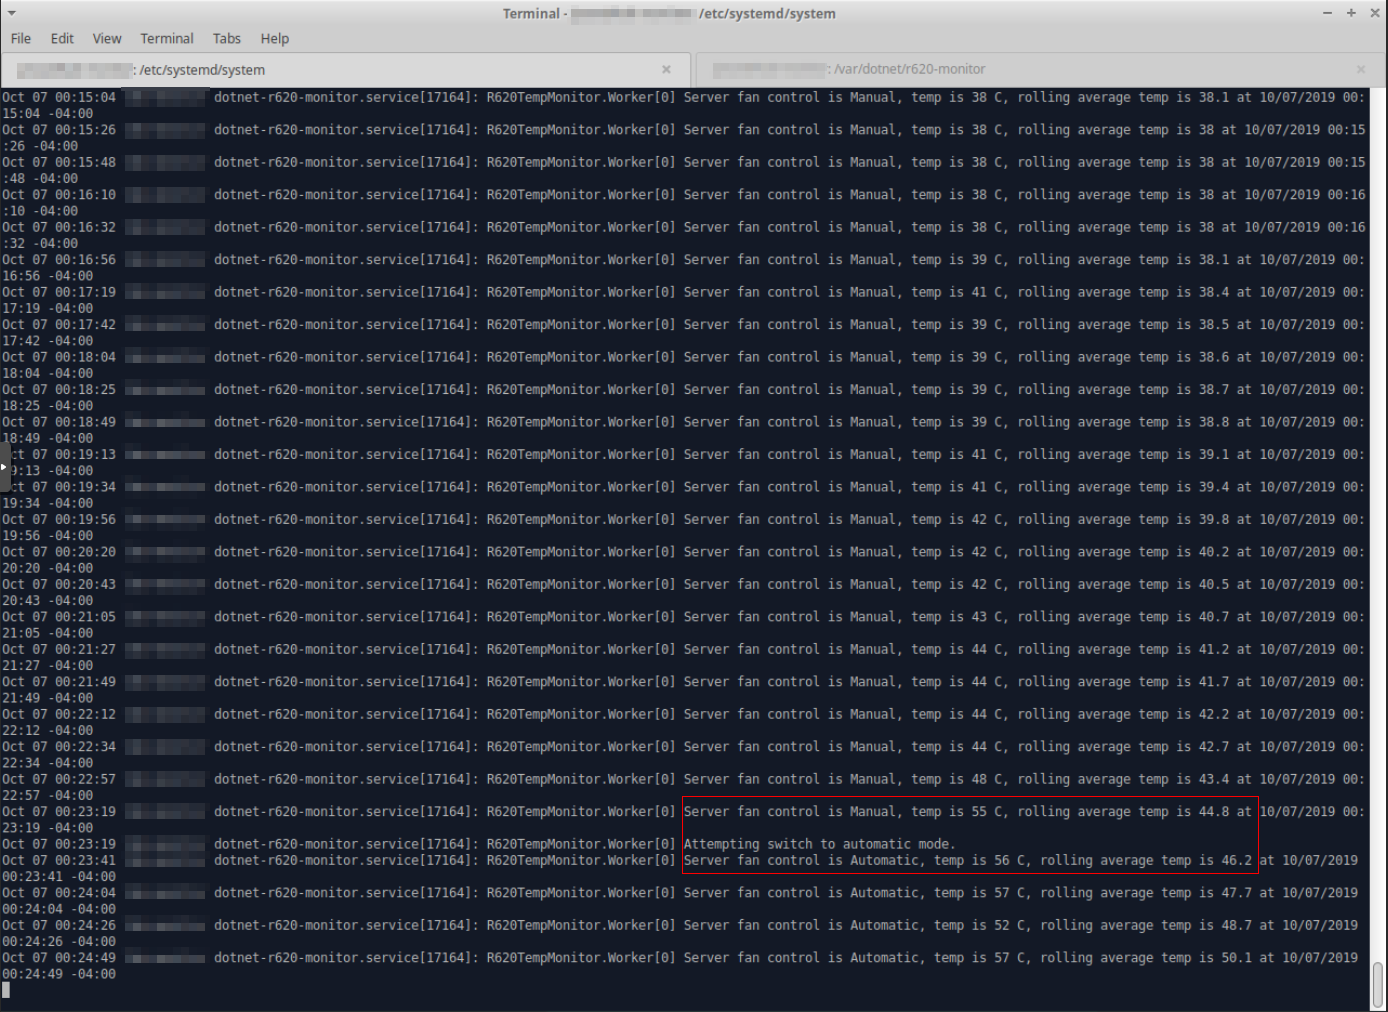
Sure enough, I heard the beast (the R620) start screaming from our basement the moment it switched to Automatic mode.