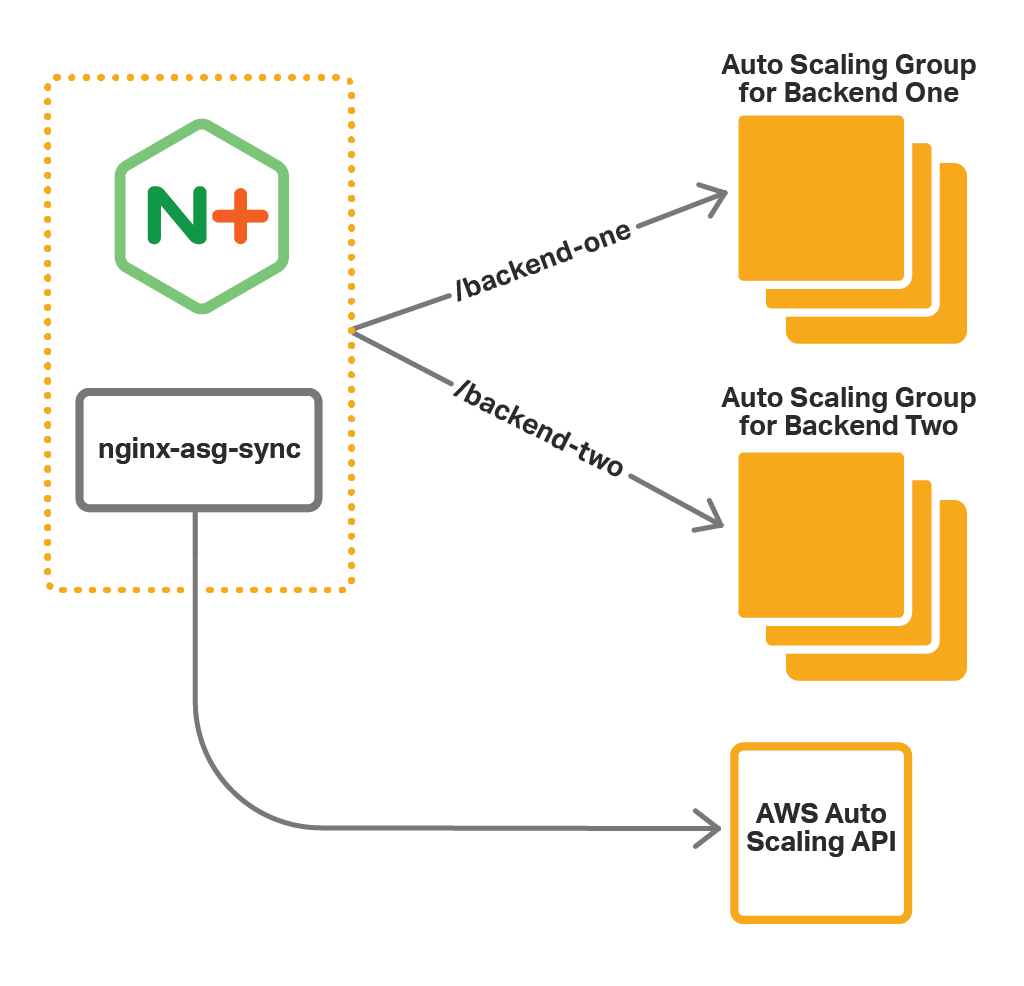
nginx-asg-sync allows NGINX Plus to discover instances of AWS Auto Scaling groups. When the number of instances in an Auto Scaling group changes, nginx-asg-sync adds the new instances to the NGINX Plus configuration and removes the terminated ones.
nginx-asg-sync is an agent process that runs on the same EC2 instance as NGINX Plus. It polls for changes to the backend Auto Scaling groups via the AWS Auto Scaling API. When it sees that a scaling event has happened, it adds or removes the corresponding backend instances from the NGINX Plus configuration via the NGINX Plus API.
Note: nginx-asg-sync does not scale Auto Scaling groups, it only gets the IP addresses of the instances of Auto Scaling groups.
In the example below, NGINX Plus is configured to load balance among the instances of two Auto Scaling groups -- Backend One and Backend Two. nginx-asg-sync, running on the same instance as NGINX Plus, ensures that whenever you scale the Auto Scaling groups, the corresponding instances are added (or removed) from the NGINX Plus configuration.
Below you will find documentation on how to use nginx-asg-sync.
Note: the documentation for the latest stable release is available via a link in the description of the release. See the releases page.
Contents:
- Supported Operating Systems
- Setting up Access to the AWS API
- Installation
- Configuration
- Usage
- Troubleshooting
- Building a Software Package
- Support
We provide packages for the following operating systems:
- Ubuntu: 14.04 (Trusty), 16.04 (Xenial)
- CentOS/RHEL: 7
- Amazon Linux
Support for other operating systems can be added.
nginx-asg-sync uses the AWS API to get the list of IP addresses of the instances of an Auto Scaling group. To access the AWS API, nginx-asg-sync must have credentials. To provide credentials to nginx-asg-sync:
- Create an IAM role and attach the predefined
AmazonEC2ReadOnlyAccesspolicy to it. This policy allows read-only access to EC2 APIs. - When you launch the NGINX Plus instance, add this IAM role to the instance.
- Get a software package for your OS:
- For a stable release, download a package from the releases page.
- For the latest source code from the master branch, build a software package by following these instructions.
- Install the package:
- For Amazon Linux or CentOS/RHEL, run:
$ sudo rpm -i <package-name>.rpm - For Ubuntu, run:
$ sudo dpkg -i <package-name>.deb
- For Amazon Linux or CentOS/RHEL, run:
As an example, we configure NGINX Plus to load balance two AWS Auto Scaling groups -- backend-group-one and backend-group-two. NGINX Plus routes requests to the appropriate Auto Scaling group based on the request URI:
- Requests for /backend-one go to Backend One group.
- Requests for /backend-two go to Backend Two group.
This example corresponds to the diagram at the top of this README.
upstream backend-one {
   zone backend-one 64k;
   state /var/lib/nginx/state/backend-one.conf;
}

upstream backend-two {
   zone backend-two 64k;
   state /var/lib/nginx/state/backend-two.conf;
}

server {
   listen 80;

   status_zone backend;

   location /backend-one {
       proxy_set_header Host $host;
       proxy_pass http://backend-one;
   }

   location /backend-two {
       proxy_set_header Host $host;
       proxy_pass http://backend-two;
   }
}

server {
    listen 8080;

    location /api {
        api write=on;
    }

    location /dashboard.html {
      root /usr/share/nginx/html;
    }
}- We declare two upstream groups – backend-one and backend-two, which correspond to our Auto Scaling groups. However, we do not add any servers to the upstream groups, because the servers will be added by nginx-aws-sync. The
statedirective names the file where the dynamically configurable list of servers is stored, enabling it to persist across restarts of NGINX Plus. - We define a virtual server that listens on port 80. NGINX Plus passes requests for /backend-one to the instances of the Backend One group, and requests for /backend-two to the instances of the Backend Two group.
- We define a second virtual server listening on port 8080 and configure the NGINX Plus API on it, which is required by nginx-asg-sync:
- The API is available at 127.0.0.1:8080/api
nginx-asg-sync is configured in /etc/nginx/aws.yaml. For our example, we define the following configuration:
region: us-west-2
api_endpoint: http://127.0.0.1:8080/api
sync_interval_in_seconds: 5
upstreams:
 - name: backend-one
   autoscaling_group: backend-one-group
   port: 80
   kind: http
 - name: backend-two
   autoscaling_group: backend-two-group
   port: 80
kind: http- The
regionkey defines the AWS region where we deploy NGINX Plus and the Auto Scaling groups. - The
api_endpointkey defines the NGINX Plus API endpoint. - The
sync_interval_in_secondskey defines the synchronization interval: nginx-asg-sync checks for scaling updates every 5 seconds. - The
upstreamskey defines the list of upstream groups. For each upstream group we specify:name– The name we specified for the upstream block in the NGINX Plus configuration.autoscaling_group– The name of the corresponding Auto Scaling group.port– The port on which our backend applications are exposed.kind– The protocol of the traffic NGINX Plus load balances to the backend application, herehttp. If the application uses TCP/UDP, specifystreaminstead.
nginx-asg-sync runs as a system service and supports the start/stop/restart commands.
For Ubuntu 14.04 and Amazon Linux, run: $ sudo start|stop|restart nginx-asg-sync
For Ubuntu 16.04 and CentOS7/RHEL7, run: $ sudo service nginx-asg-sync start|stop|restart
If nginx-asg-sync doesn’t work as expected, check its log file available at /var/log/nginx-aws-sync/nginx-aws-sync.log.
You can compile nginx-asg-sync and build a software package using the provided Makefile. Before you start building a package, make sure that the following software is installed on your system:
- make
- Docker
To build a software package, run: $ make <os>
where <os> is the target OS. The following values are allowed:
amazonfor Amazon Linuxcentos7for CentOS7/RHEL7ubuntu-trustyfor Ubuntu 14.04ubuntu-xenialfor Ubuntu 16.04
If you run make without any arguments, it will build software packages for all supported OSes.
Support from the NGINX Professional Services Team is available when using nginx-asg-sync.
