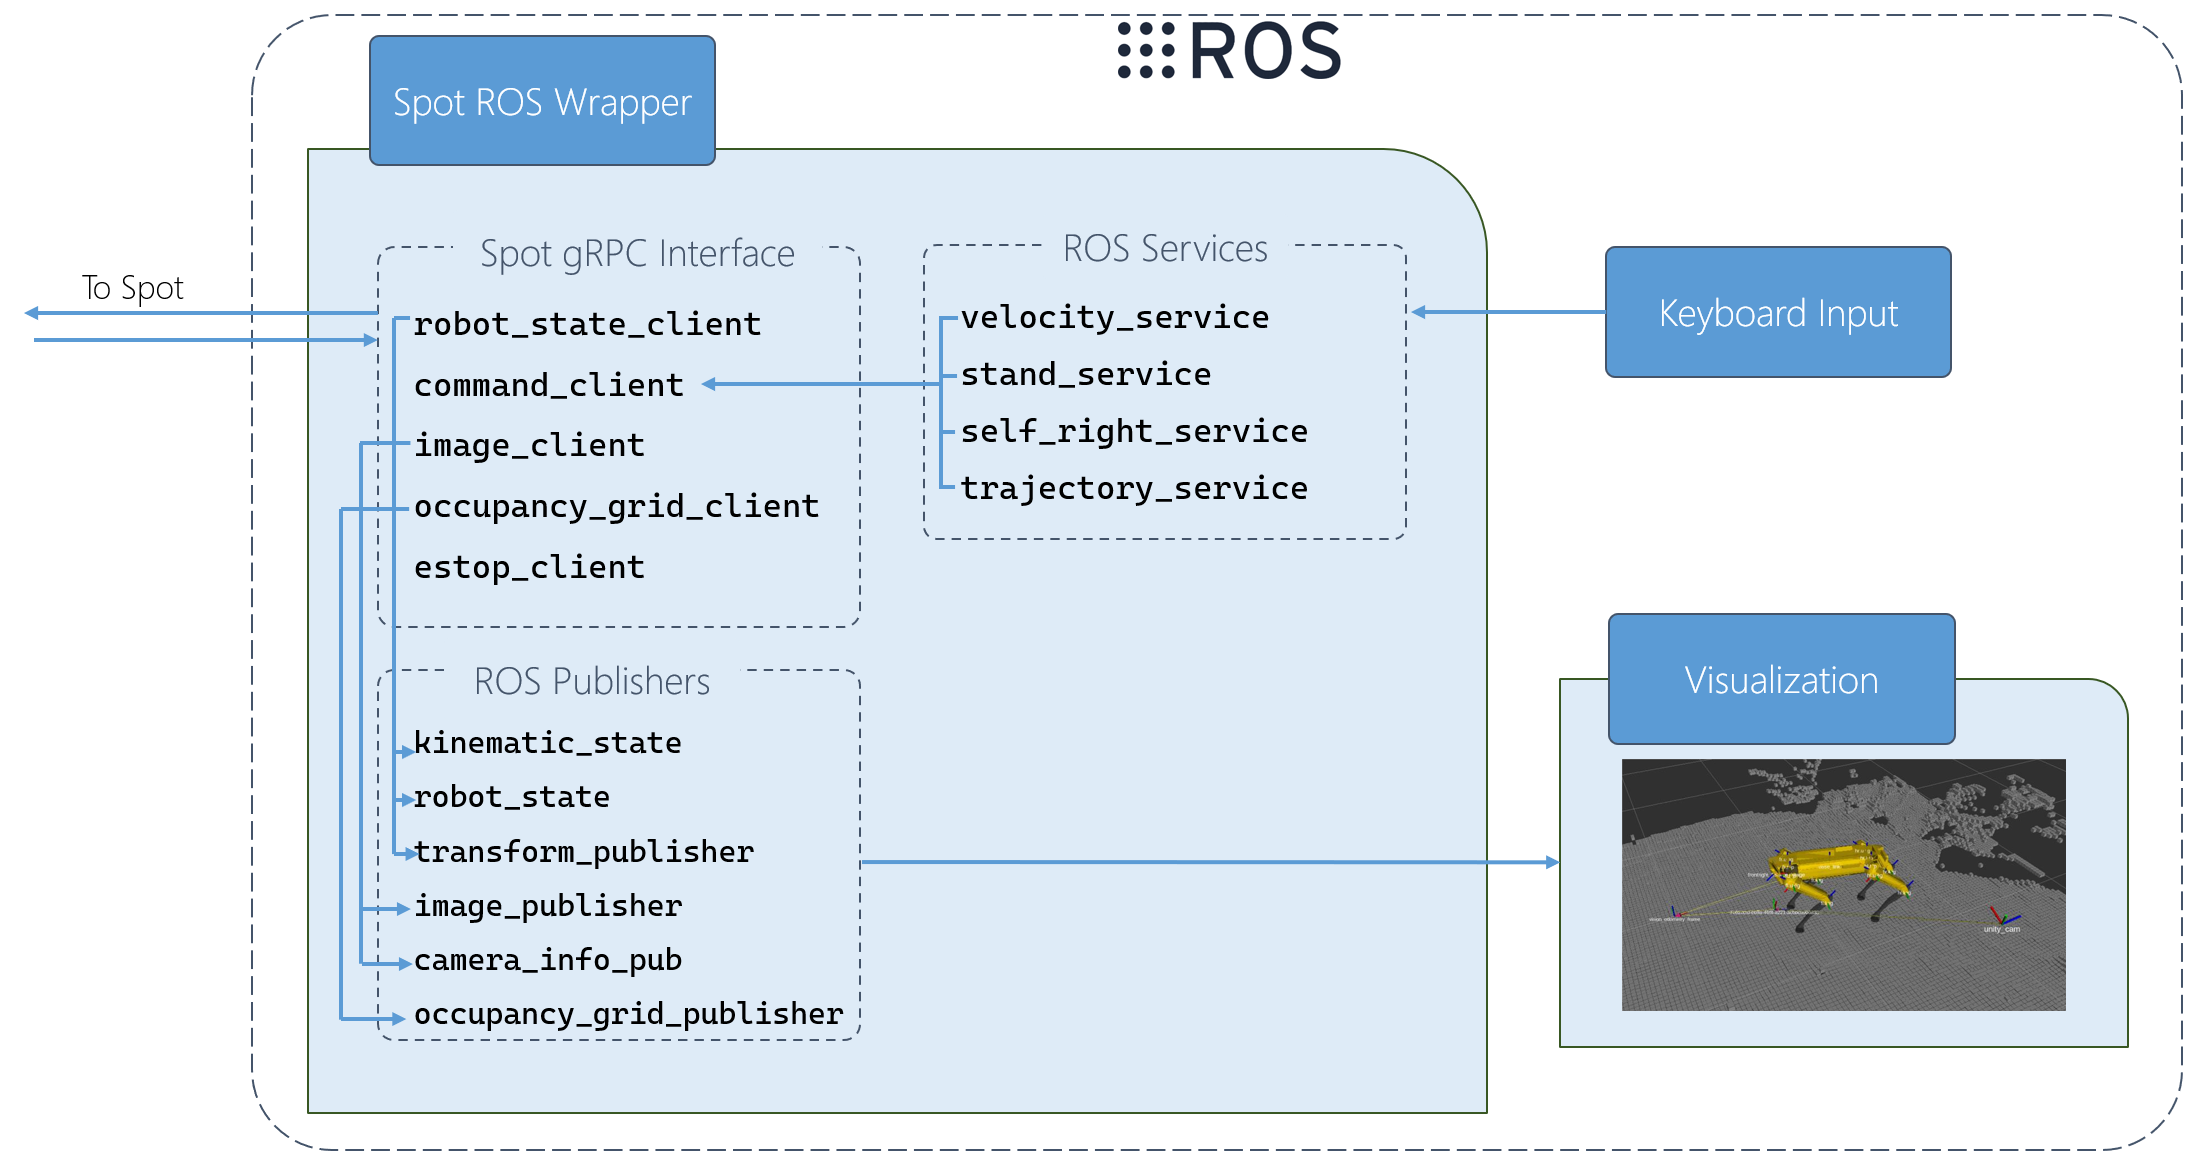
Enable programmatic control of the Boston Dynamic Spot robot through the Robot Operating System (ROS) interface.
The spot_ros_interface ROS package provides a ROS interface to the Spot API converting ROS messages to API/gRPC calls to the Spot robot.
https://docs.microsoft.com/en-us/windows/wsl/install-win10
https://github.com/boston-dynamics/spot-sdk/blob/master/docs/python/quickstart.md#getting-the-code
Follow Boston Dynamics' instructions for upgrading
-
Configure your Ubuntu repositories to allow "restricted," "universe," and "multiverse". Follow instructions here. Remember to
sudo apt-get updateafter this. -
Set up sources.list
sudo sh -c 'echo "deb http://packages.ros.org/ros/ubuntu $(lsb_release -sc) main" > /etc/apt/sources.list.d/ros-latest.list'
- Set up keys
sudo apt-key adv --keyserver 'hkp://keyserver.ubuntu.com:80' --recv-key C1CF6E31E6BADE8868B172B4F42ED6FBAB17C654
If you experience issues connecting to the keyserver, you can try substituting hkp://pgp.mit.edu:80
Alternatively, you can use curl instead of the apt-key command, which can be helpful if you are behind a proxy server:
curl -sSL 'http://keyserver.ubuntu.com/pks/lookup?op=get&search=0xC1CF6E31E6BADE8868B172B4F42ED6FBAB17C654' | sudo apt-key add -
If you still experience issues like:
gpg: keyserver receive failed: No dirmngr
or
gpg: can't connect to the agent: IPC connect call failed (see here and here), ensure dirmngr is installed:
sudo apt-get install dirmngr
If this still does not solve the problem:
sudo apt remove gpg
sudo apt install gnupg1
You should now be able to re-run the key setup command above.
- Install
sudo apt update
sudo apt install ros-noetic-desktop-full
This will take some time. Go grab a coffee ☕.
Once that is done, let us verify the installation. You must source this script in every bash terminal you use ROS in:
source /opt/ros/noetic/setup.bash
To automatically source it whenever you open a new terminal, add it to your .bashrc:
echo "source /opt/ros/noetic/setup.bash" >> ~/.bashrc
source ~/.bashrc
Note: If you were in a virtual environment, you will have to re-activate your virtual environment after sourcing your .bashrc
To verify the installation, run roscore in the terminal. This should start a roslaunch server without any errors. Feel free to kill the server (Ctrl+C) now.
Congratulations! You have just set up ROS. Now let's install the the dependencies.
Install VcXsrv: https://sourceforge.net/projects/vcxsrv/
Add the following to your .bashrc:
# Forward GUI windows to vcxsrv
export DISPLAY=:0
export LIBGL_ALWAYS_INDIRECT=
Start VcXsrv without native OpenGL:

Request spot.urdf and .stl mesh files from Boston Dynamics in order to be able to utilize the real-time RViz visualization of Spot's state.
The directory structure must be as follows for compatibility with the rviz_display.launch file:
workspace_directory/
	...
	spot_urdf/
		...
		link_models/
			base.stl
			fl.lleg.stl
			fr.hip.stl
			...
			hl.uleg.stl
			hr.lleg.stl
		urdf/
			spot.urdf
Make install_dependencies.sh executable and run it:
cd ~/spot-ros-wrapper/src/install_script/
chmod +x install_dependencies.sh
./install_dependencies.sh
Now, go to your catkin workspace directory (e.g. ~/spot-ros-wrapper) and setup your catkin workspace:
cd ~/spot-ros-wrapper
catkin config --init --merge-devel --cmake-args -DCMAKE_BUILD_TYPE=Release
catkin config --extend /opt/ros/noetic
Note: The structure of a catkin workspace must be as follows. For more info on catkin workspaces and packages, consult the tutorials.
workspace_directory/
    src/
        package_1/
            CMakeLists.txt
            package.xml
            scripts/
            src/
        ...
        package_n/
            CMakeLists.txt
            package.xml
            scripts/
            src/
    build/                      -- Auto-generated by catkin build
    devel/                      -- Auto-generated by catkin build
Go to your catkin workspace directory, and build
cd ~/spot-ros-wrapper
catkin build
After the build finishes, you must source the environment. This must be done every time after building.
source ~/spot-ros-wrapper/devel/setup.bash
Now let us start the ROS Wrapper Node. We first need to run roscore:
roscore
That process must be up and running whenever you want to run ROS Nodes.
Open a new terminal, source your virtual environment and source the latest build:
# In a new terminal
activate_venv spot_venv
cd ~/spot-ros-wrapper
source devel/setup.bash
And finally, let us start the ROS Wrapper node:
rosrun spot_ros_interface spot_ros_interface.py --username USERNAME --password PASSWORD 192.168.80.3
Note: Spot's default IP address is 192.168.80.3 over WiFi, and 10.0.0.3 over ethernet.
Note: You must be able to ping Spot's IP addess in order to communicate. The easiest way to do so is to connect to Spot's Wi-Fi hotspot directly, or to its ethernet port. For more information, reference Spot's instruction manuals on ways to communicate.
With the ROS wrapper running, open a new terminal and run keyboard_teleop.py in the spot_ros_interface ROS package:
rosrun spot_ros_interface keyboard_teleop.py
and follow the instructions on screen.
Ensure spot_ros_interface.py is running.
Note: If Spot is in a faulty state and/or upside down, make sure to call the self-right command first (from the keyboard_teleop application, press "r").
roslaunch spot_urdf rviz_display.launch
Potential Issues:
-
Spot model RViz visualization is white and not oriented properly
- Solution: Ensure spot_ros_interface and robot_state_publisher nodes are running (the latter should have started by the rvis_display.launch file).
-
The occupancy grid is not being displayed:
- Solution: Ensure that RViz is set to display a Marker type msg (on the left-hand panel), and that it is subscribed to the
occupancy_gridtopic.
- Solution: Ensure that RViz is set to display a Marker type msg (on the left-hand panel), and that it is subscribed to the
Contribute
This project has adopted the Microsoft Open Source Code of Conduct. For more information see the Code of Conduct FAQ or contact opencode@microsoft.com with any additional questions or comments.
