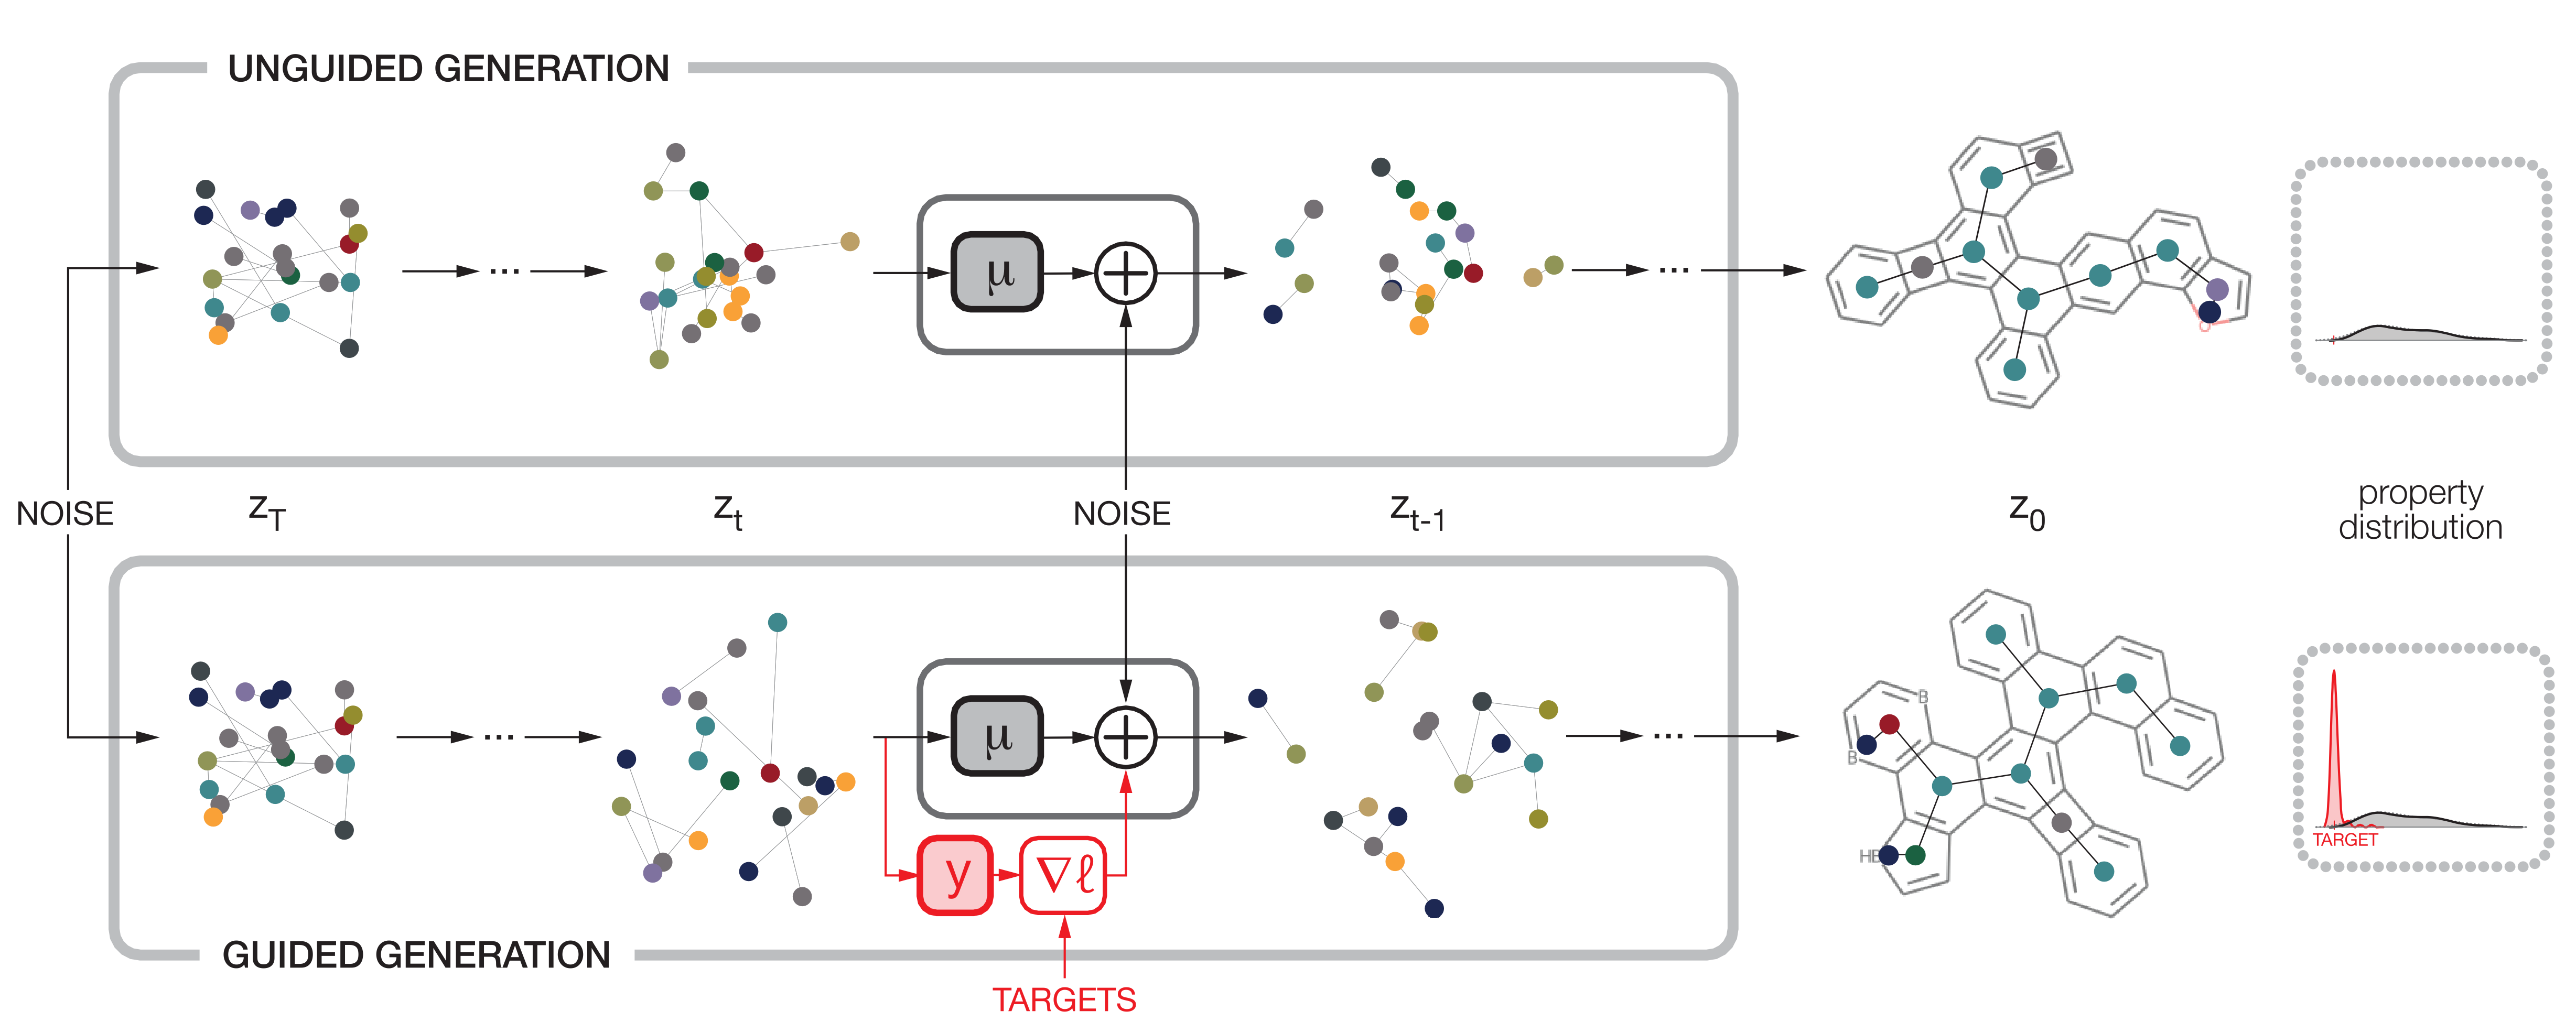
The holy grail of material science is \emph{de novo} molecular design -- i.e., the ability to engineer molecules with desired characteristics and functionalities. In recent years, we have witnessed advances in two directions: first, in the ability to predict molecular properties using models such as equivariant graph neural networks; second, in the performance of generation tasks and especially in conditional generation, such as text-to-image generators and large language models. Herein, we combine these two achievements to introduce a guided diffusion model for inverse molecular design, a generative model that enables design of novel molecules with desired properties. We use newly-reported data sets of polycyclic aromatic systems to illustrate the method's effectiveness for a variety of single- and multiple-objective tasks. We demonstrate that the method is capable of generating new molecules with the desired properties and, in some cases, even discovering molecules that are better than the molecules present in our data set of 500,000 molecules.
For more information, refer to our paper Guided Diffusion for Inverse Molecular Design https://www.nature.com/articles/s43588-023-00532-0
You can try our method and use it generate molecules with your own target function - Colab.
- Clone this repository by invoking
git clone https://github.com/tomer196/GaUDI.git
- Download datasets (
csv+xyzs) from:
a. cc-PBH dataset from COMPAS.
b. PASs dataset from link. - Update
csv+xyzs paths inget_paths@data/aromatic_dataloaders.py. - Install conda environment. The environment can be installed using the
environment.ymlby invoking
conda env create -n GaUDI --file environment.yml
Alternatively, dependencies can be installed manually as follows:
conda create -n <env_name> python=3.8
conda activate <env_name>
conda install pytorch=1.10 cudatoolkit=<cuda-version> -c pytorch
conda install rdkit
pip install matplotlib networkx tensorboard pandas scipy tqdm imageio
First, we need to train the unconditioned diffusion model (EDM) and the time-conditioned property prediction model.
- To train the EDM, set the required configuration in
utils/args_edm.pyand run:
python train_edm.py
This will take 4 hours to train on a single GPU for the cc-PBH dataset. The logs and trained model will be saved in <save_dir>/<name>.
- To train the predictor, set the required configuration in
cond_prediction/prediction_args.pyand run:
python cond_prediction/train_cond_predictor.py
The logs and trained model will be saved in <save_dir>/<name>.
To evaluate stability of the unconditional diffusion model,
updatie the experiment name in line 128 of eval_validity.py and run:
python eval_validity.py
Results should be as the results in Table 1 in the paper.
Finally, we can start designing molecules using the guided diffusion model. In order to sample from the guided model, follow these steps:
- Configure the paths to the diffusion model and the time conditioned prediction model
in
generation_guidance.pylines 227 and 228. - Set the gradient scale and number of desired molecules - lines 189-191.
- Define a target function - line 198.
- Run:
python generation_guidance.py
When finished, a summary of the results will be printed to stdout and the 5 best generated molecules will be saved in <save_dir>/<name>.
Testd on Ubuntu 20.04 with the following libarys varsions:
pytorch=1.10, matplotlib=3.7.1, networkx=3.0, tensorboard=2.9.1, pandas=1.4.1, scipy=1.10.1
Equivariant diffusion model (EDM) code provided here includes portions of the code by Emiel Hoogeboom, Victor Garcia Satorras, Clément Vignac from
https://github.com/ehoogeboom/e3_diffusion_for_molecules
distributed under the MIT license. For more information, refer to the license file in ./edm.
