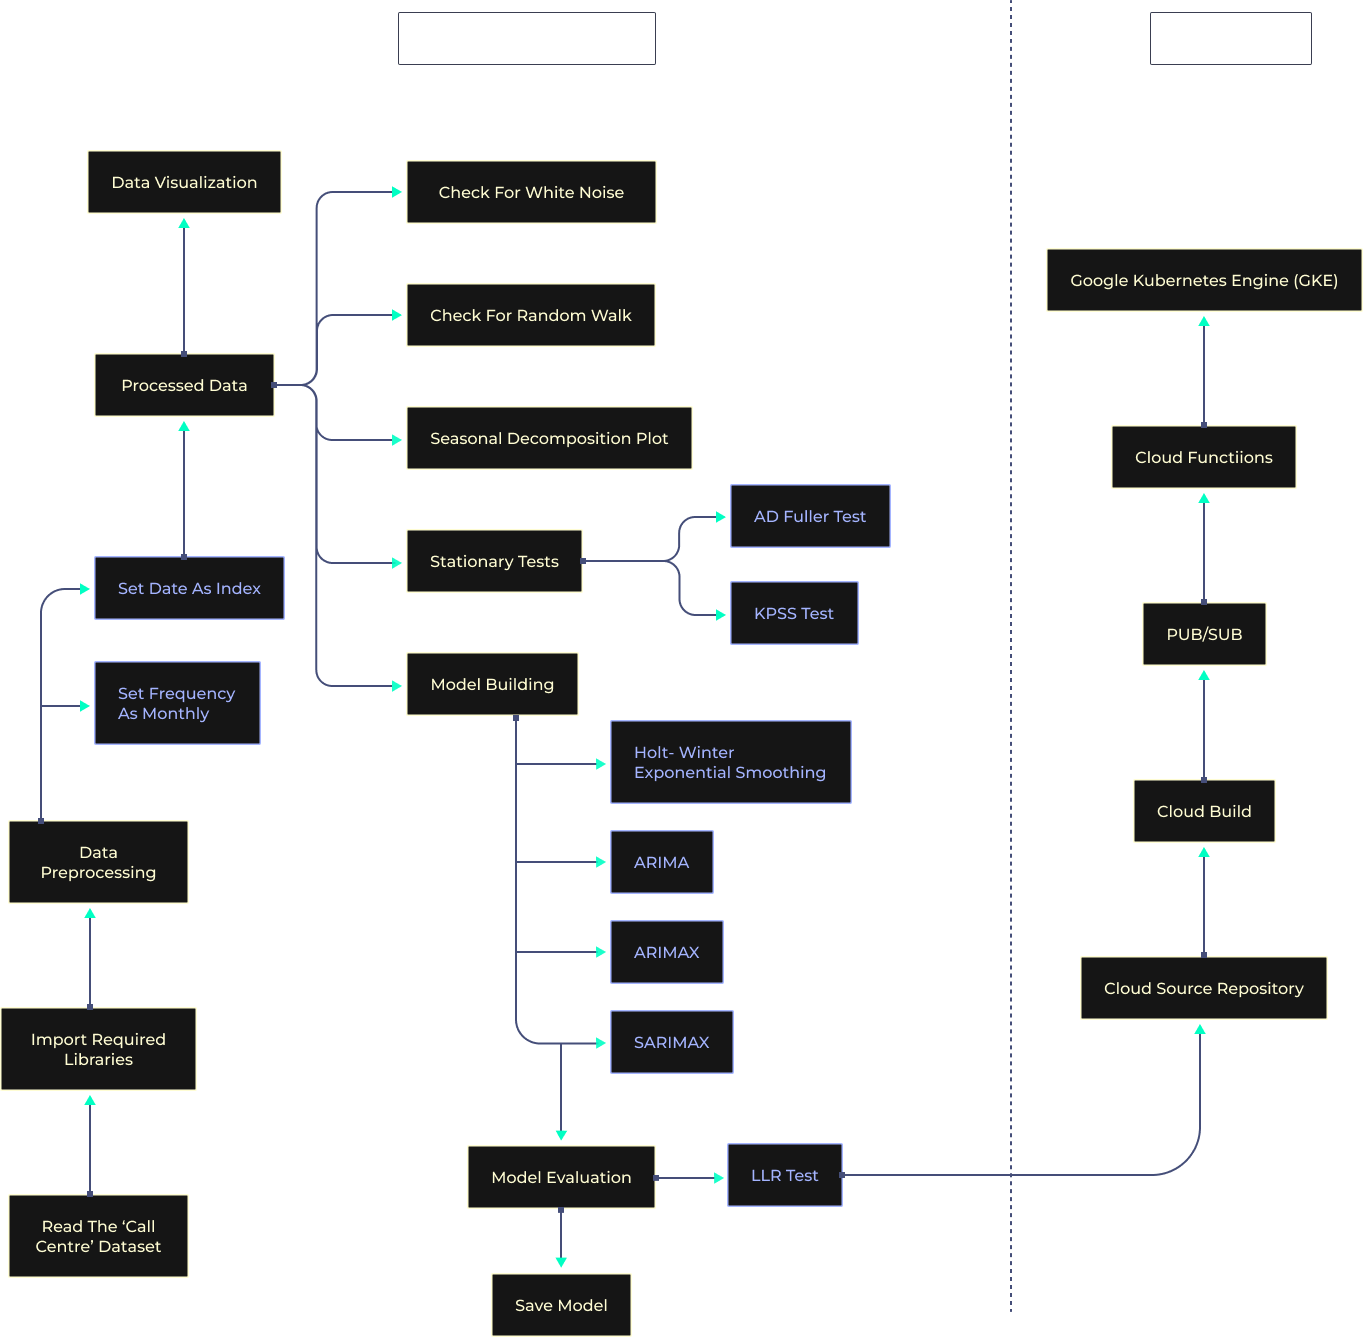
 Auto Regressive Integrated Moving Average (ARIMA) model is among one of the more popular and widely used statistical methods for time-series forecasting.
It is a class of statistical algorithms that captures the standard temporal dependencies that is unique to a time series data.
ARIMA is an acronym for “autoregressive integrated moving average.” It’s a model used in statistics and econometrics to measure events that happen over a period of time.
The model is used to understand past data or predict future data in a series.
It’s used when a metric is recorded in regular intervals, from fractions of a second to daily, weekly or monthly periods.
- Auto Regressive (AR) regression model is built on top of the autocorrelation concept, where the dependent variable depends on the past values of itself.
- Integrated(I): The integrated part of ARIMA attempts to convert the non-stationarity nature of the time-series data to something a little bit more stationary. By performing prediction on the difference between any two pair of observation rather than directly on the data itself.
- Moving Average(MA) attempts to reduce the noise in ourtime series data by performing some sort of aggregation operation to your past observations in terms of residual error.
File Name : Engine.py
File Description : Main class for starting different parts and processes of the lifecycle


File Name : WhiteNoise.py
File Description : Steps to test if the visualization is white noise or not


File Name : RandomWalk.py
File Description : Steps to test if the visualization is random walk or not


File Name : Stationarity.py
File Description : Steps to test if the visualization is stationary or not


File Name : Seasonality.py
File Description : Steps to test if the visualization is seasonal or not


File Name : WinterHolt.py
File Description : Holt-winters exponential smoothing code


File Name : ARIMA.py
File Description : ARIMA model code and evaluation
This repository contains the code files involved in creating an automated MLOps Pipeline on GCP (Google Cloud Platform).
- Clone the repository
- Place your model file inside the
outputfolder
Once you made the changes, create a new repository and commit the changes. From here on, this will be your source repository. Proceed with the below steps
- In your GCP concole, create a new cloud build trigger.
- Point the trigger to your source repository
- From the console lauch a kubernetes cluster
- Connect to the cluster and create the following two files
- deployment.yaml
- service.yaml
- Copy the code for both files from "Kubernetes Files" folder in cloned repository
- Execute the following commands
kubectl apply -f deployment.yamlkubectl apply -f service.yaml
- Get the name of the deployment with the following command
kubectl get deployments
- Create a Pub/Sub topic with the name
cloud-build - Provide a subscription for the topic, which is to trigger a cloud function
- From Pub/Sub console launch the cloud function window
- Provide the following Environment variables through the GUI console
PROJECT(project name)ZONE(Region in which in the project is deployed ex.uscentral-1)CLUSTER(Name of the kubernetes cluster created earlier)DEPLOYMENT(Name of the deployment inside the kubernetes cluster)
- Copy the program code and requirements.txt files for the cloud function from
cloud-function-triggerfolder - Configure the Entrypoint for the cloud function as
onNewImage - Deploy the function
After successful deployment, make a commit to source repository and the following will happen in sequence
- Cloud Build will push message to Pub/Sub upon successful build
- Pub/Sub will trigger the cloud function
- Cloud function will deploy the new image on Kubernetes
- To test the deployment, check the logs on kubernetes cluster using the following command
kubectl get podskubectl logs <pod name>
- The deployment will reflect in the logs as well as in the endpoints
- To test the deployment, check the logs on kubernetes cluster using the following command