In this repository, we have investigated several LIDAR feature map representations and how they perform compared to the ones used by Kujason et.al in Joint 3D Proposal Generation and Object Detection from View Aggregation. Our changes are described in detail in Multimodal 3D Object Detection from Simulated Pretraining. If you use our code, please cite our paper, in addition to the original AVOD paper:
@article{brekke2019multimodal,
  title={Multimodal 3D Object Detection from Simulated Pretraining},
  author={Brekke, {\AA}smund and Vatsendvik, Fredrik and Lindseth, Frank},
  journal={arXiv preprint arXiv:1905.07754},
  year={2019}
}
@article{ku2018joint,
  title={Joint 3D Proposal Generation and Object Detection from View Aggregation},
  author={Ku, Jason and Mozifian, Melissa and Lee, Jungwook and Harakeh, Ali and Waslander, Steven},
  journal={IROS},
  year={2018}
}
Our modified source code allows for more easily testing different types of LIDAR BEV representation before being fed to the network. These feature maps are grouped in two, slice maps and cloud maps. Slice maps vertically slices the point cloud as defined by height_lo, height_hi and num_maps. Cloud maps use the whole point cloud (still within height_lo and height_hi). Implemented and tested maps include max, min, density, dnd and cluster. To configure the slice and cloud maps simply define the maps wanted to use as lists under bev_generator/slices. If none are specified the default avod configuration will be used, which is equivalent to:
slice_maps: ['max'}
cloud_maps: ['density']
num_slices: 5
Though several example configurations from our tests are included, some manual configuration is required before training:
- Make sure to remove previously generated files under avod/data/mini_batches and avod/data/label_clusters. Note that preprocessed files can be reused if re-training the same model (with same BEV configuration and classes). If using a different set of target classes or a different dataset from previous training this can be skipped, as the new files will get their own folders. AVOD does not regenerate files if it already finds files in their expected place.
- Make sure that scripts/preprocessing/gen_mini_batches is correctly configured. For example when training on cars, make sure car_dataset_config_path points to the correct config under mb_preprocessing matching the desired model and that process_car is set to True.
- If wanting to train a new model, make sure not model with the same name exists under avod/data/outputs. AVOD will attempt to restore the latest checkpoint and resume training.
- If wanting to sequentually train and evaluate a model, run ./trainval.sh config_subfolder config_name. For example if training carped_max_density, run ./trainval.sh carped carped_max_density. You can instead only start training using train.sh, however make sure the correct preprocessed files exist. If so one can also run evaluation alongside training (simplified using eval.sh) provided the machine has enough resources.
We also note that by default our configurations expects the datasets to exist under /notebooks/DATA. If using a docker container for AVOD, this directory containing DATA can simply be mounted to the cointainer as /notebooks.
The evaluation script uses the configuration found in the folder of the trained model under avod/data/outputs. In order to evaluate on a different dataset this file must be modified to point to the new dataset. For example, if having trained using a dataset generated by CADET, two changes must be made under dataset_config; name must be altered from 'carla' to 'kitti' and dataset_dir must replace Carla with Kitti (expecting the datasets have a structure like Kitti/object/training etc.). The dataset name tells AVOD where to look for preprocessed files, such as label clusters, and only carla and kitti are currently implemented.
For our experiments on simulated pre-training, some manual changes must be done before fine-tuning on KITTI, similar to the evaluation above.
- As AVOD names all generated files with the model name, we recommend renaming the folder of the trained model after training on CADET and creating a new folder with its original name and an empty checkpoints folder inside.
- Copy the configuration file, as well as the decired checkpoint files from the checkpoints folder of the trained model. In our case this means copying all files generated at step 90k as well as the file called configuration.
- Modify the copied "checkpoint" file, such that latest checkpoint and the listed checkpoints underneath only point to the copied checkpint.
- Modify the original configuration file under avod/configs such that it points to the new dataset (for example from Carla to Kitti as described for evaluation), as well as max_iterations (total training steps). If continuing training on carla_car (traind on CADET), this means modyfing avod/configs/cars/carla_cars such that it now points to Kitti.
- Make sure to use the modify scripts/preprocessing/gen_mini_batches.py to use a configuration file matching the BEV configuration of your trained model and the NEW dataset. For example when fine-tuning carla_cars on Kitti, the set preprocessing to use mb_preprocessing/cars.config.
- Start training as described above. AVOD will print which checkpoint is restored and the configuration file can be set to store summary_img_images such that training on the correct dataset can be validated using tensorboard and the log file generated with the model files.
Our CADET dataset used for testing can be downloaded from: https://studntnu.sharepoint.com/:u:/s/teamsite2/10199/EfudfwtiCqFOqUcFWTKcUkEBCJeIQIYHGT83_dRQA4w2fQ?e=IfzAqE
Pre-trained models for AVOD can be downloaded from:
https://studntnu.sharepoint.com/:f:/s/teamsite2/10199/Ek3vSVACVppIuxvJa7MaAE0B2OK-7UVeJA9Cp7prHwdvgA
NOTE: Models may be configured to point to the incorrect dataset due to testing. Not all tested models are included above, and more will be uploaded in the following weeks.
This repository is forked from AVOD-FPN. The original README follows below.
This repository contains the public release of the Python implementation of our Aggregate View Object Detection (AVOD) network for 3D object detection.
Joint 3D Proposal Generation and Object Detection from View Aggregation
Jason Ku, Melissa Mozifian, Jungwook Lee, Ali Harakeh, Steven L. Waslander
If you use this code, please cite our paper:
@article{ku2018joint,
  title={Joint 3D Proposal Generation and Object Detection from View Aggregation},
  author={Ku, Jason and Mozifian, Melissa and Lee, Jungwook and Harakeh, Ali and Waslander, Steven},
  journal={IROS},
  year={2018}
}
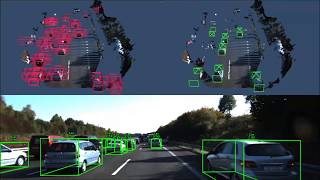
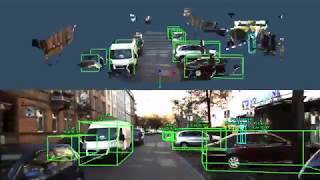
These videos show detections on several KITTI sequences and our own data in snowy and night driving conditions (with no additional training data).
| AP-3D | AP-BEV | ||||||||
|---|---|---|---|---|---|---|---|---|---|
| Method | Runtime | Easy | Moderate | Hard | Easy | Moderate | Hard | ||
| Car | |||||||||
| MV3D | 0.36 | 71.09 | 62.35 | 55.12 | 86.02 | 76.90 | 68.49 | ||
| VoxelNet | 0.23 | 77.47 | 65.11 | 57.73 | 89.35 | 79.26 | 77.39 | ||
| F-PointNet | 0.17 | 81.20 | 70.39 | 62.19 | 88.70 | 84.00 | 75.33 | ||
| AVOD | 0.08 | 73.59 | 65.78 | 58.38 | 86.80 | 85.44 | 77.73 | ||
| AVOD-FPN | 0.10 | 81.94 | 71.88 | 66.38 | 88.53 | 83.79 | 77.90 | ||
| Pedestrian | |||||||||
| VoxelNet | 0.23 | 39.48 | 33.69 | 31.51 | 46.13 | 40.74 | 38.11 | ||
| F-PointNet | 0.17 | 51.21 | 44.89 | 40.23 | 58.09 | 50.22 | 47.20 | ||
| AVOD | 0.08 | 38.28 | 31.51 | 26.98 | 42.52 | 35.24 | 33.97 | ||
| AVOD-FPN | 0.10 | 50.80 | 42.81 | 40.88 | 58.75 | 51.05 | 47.54 | ||
| Cyclist | |||||||||
| VoxelNet | 0.23 | 61.22 | 48.36 | 44.37 | 66.70 | 54.76 | 50.55 | ||
| F-PointNet | 0.17 | 71.96 | 56.77 | 50.39 | 75.38 | 61.96 | 54.68 | ||
| AVOD | 0.08 | 60.11 | 44.90 | 38.80 | 63.66 | 47.74 | 46.55 | ||
| AVOD-FPN | 0.10 | 64.00 | 52.18 | 46.61 | 68.09 | 57.48 | 50.77 |
Table: Comparison of results with other published methods on the KITTI 3D Object and BEV benchmarks (accessed Apr 11, 2018).
There is a single stage version of AVOD available here
See here for more information on the modified KITTI native evaluation script.
Implemented and tested on Ubuntu 16.04 with Python 3.5 and Tensorflow 1.3.0.
- Clone this repo
git clone git@github.com:kujason/avod.git --recurse-submodulesIf you forget to clone the wavedata submodule:
git submodule update --init --recursive- Install Python dependencies
cd avod
pip3 install -r requirements.txt
pip3 install tensorflow-gpu==1.3.0- Add
avod (top level)andwavedatato your PYTHONPATH
# For virtualenvwrapper users
add2virtualenv .
add2virtualenv wavedata
# For nonvirtualenv users
export PYTHONPATH=$PYTHONPATH:'/path/to/avod'
export PYTHONPATH=$PYTHONPATH:'/path/to/avod/wavedata'- Compile integral image library in wavedata
sh scripts/install/build_integral_image_lib.bash- Avod uses Protobufs to configure model and training parameters. Before the framework can be used, the protos must be compiled (from top level avod folder): https://askubuntu.com/questions/1072683/how-can-i-install-protoc-on-ubuntu-16-04
sh avod/protos/run_protoc.shAlternatively, you can run the protoc command directly:
protoc avod/protos/*.proto --python_out=.To train on the Kitti Object Detection Dataset:
- Download the data and place it in your home folder at
/notebooks/DATA/Kitti/object - Go here and download the
train.txt,val.txtandtrainval.txtsplits into/notebooks/DATA/Kitti/object. Also download theplanesfolder into/notebooks/DATA/Kitti/object/training
The folder should look something like the following:
Kitti
    object
        testing
        training
            calib
            image_2
            label_2
            planes
            velodyne
        train.txt
        val.txt
The training data needs to be pre-processed to generate mini-batches for the RPN. To configure the mini-batches, you can modify avod/configs/mb_preprocessing/rpn_[class].config. You also need to select the class you want to train on. Inside the scripts/preprocessing/gen_mini_batches.py select the classes to process. By default it processes the Car and People classes, where the flag process_[class] is set to True. The People class includes both Pedestrian and Cyclists. You can also generate mini-batches for a single class such as Pedestrian only.
Note: This script does parallel processing with num_[class]_children processes for faster processing. This can also be disabled inside the script by setting in_parallel to False.
cd avod
python3 scripts/preprocessing/gen_mini_batches.py
Once this script is done, you should now have the following folders inside avod/data:
data
    label_clusters
    mini_batches
There are sample configuration files for training inside avod/configs. You can train on the example configs, or modify an existing configuration. To train a new configuration, copy a config, e.g. pyramid_cars_with_aug_example.config, rename this file to a unique experiment name and make sure the file name matches the checkpoint_name: 'pyramid_cars_with_aug_example' entry inside your config.
To start training, run the following (add --device='0' for systems with one GPU):
python3 avod/experiments/run_training.py --pipeline_config=avod/configs/pyramid_cars_with_aug_example.config(Optional) Training defaults to using GPU device 1, and the train split. You can specify using the GPU device and data split as follows:
python3 avod/experiments/run_training.py --pipeline_config=avod/configs/pyramid_cars_with_aug_example.config --device='0' --data_split='train'Depending on your setup, training should take approximately 16 hours with a Titan Xp, and 20 hours with a GTX 1080. If the process was interrupted, training (or evaluation) will continue from the last saved checkpoint if it exists.
To start evaluation, run the following:
python3 avod/experiments/run_evaluation.py --pipeline_config=avod/configs/pyramid_cars_with_aug_example.config(Optional) With additional options:
python3 avod/experiments/run_evaluation.py --pipeline_config=avod/data/outputs/pyramid_cars_with_aug_example/pyramid_cars_with_aug_example.config --device='0' --data_split='val'The evaluator has two main modes, you can either evaluate a single checkpoint, a list of indices of checkpoints, or repeatedly. The evaluator is designed to be run in parallel with the trainer on the same GPU, to repeatedly evaluate checkpoints. This can be configured inside the same config file (look for eval_config entry).
To view the TensorBoard summaries:
cd avod/data/outputs/pyramid_cars_with_aug_example
tensorboard --logdir logs
Note: In addition to evaluating the loss, calculating accuracies, etc, the evaluator also runs the KITTI native evaluation code on each checkpoint. Predictions are converted to KITTI format and the AP is calculated for every checkpoint. The results are saved inside scripts/offline_eval/results/pyramid_cars_with_aug_example_results_0.1.txt where 0.1 is the score threshold. IoUs are set to (0.7, 0.5, 0.5)
To run inference on the val split, run the following script:
python3 avod/experiments/run_inference.py --checkpoint_name='pyramid_cars_with_aug_example' --data_split='val' --ckpt_indices=120 --device='1'The ckpt_indices here indicates the indices of the checkpoint in the list. If the checkpoint_interval inside your config is 1000, to evaluate checkpoints 116000 and 120000, the indices should be --ckpt_indices=116 120. You can also just set this to -1 to evaluate the last checkpoint.
To run inference on a separate test set with a preptrained model make sure to have the config set to use the cluster and data split from the data the network was trained on ("train"). Data_split_dir must point to the root folder where the test set is located (such as "TestSet/object"), then run:
python3 avod/experiments/run_inference.py --checkpoint_name='name_of_model' --data_split='test' --ckpt_indices=-1 --device='0'All results should be saved in avod/data/outputs. Here you should see proposals_and_scores and final_predictions_and_scores results. To visualize these results, you can run demos/show_predictions_2d.py. The script needs to be configured to your specific experiments. The scripts/offline_eval/plot_ap.py will plot the AP vs. step, and print the 5 highest performing checkpoints for each evaluation metric at the moderate difficulty.
Copyright (c) 2018 Jason Ku, Melissa Mozifian, Ali Harakeh, Steven L. Waslander
Permission is hereby granted, free of charge, to any person obtaining a copy of this software and associated documentation files (the "Software"), to deal in the Software without restriction, including without limitation the rights to use, copy, modify, merge, publish, distribute, sublicense, and/or sell copies of the Software, and to permit persons to whom the Software is furnished to do so, subject to the following conditions:
The above copyright notice and this permission notice shall be included in all copies or substantial portions of the Software.
THE SOFTWARE IS PROVIDED "AS IS", WITHOUT WARRANTY OF ANY KIND, EXPRESS OR IMPLIED, INCLUDING BUT NOT LIMITED TO THE WARRANTIES OF MERCHANTABILITY, FITNESS FOR A PARTICULAR PURPOSE AND NONINFRINGEMENT. IN NO EVENT SHALL THE AUTHORS OR COPYRIGHT HOLDERS BE LIABLE FOR ANY CLAIM, DAMAGES OR OTHER LIABILITY, WHETHER IN AN ACTION OF CONTRACT, TORT OR OTHERWISE, ARISING FROM, OUT OF OR IN CONNECTION WITH THE SOFTWARE OR THE USE OR OTHER DEALINGS IN THE SOFTWARE.