- 커져가는 네일시장
- 네일 시술 후 맘에 들지 않는 고객
- 고객 유치가 어려운 네일 샵
- 네일 디자인에 대한 저작권 의식 부재
- 커져가는 네일시장에 맞춰 고객과 디자이너의 이어주는 서비스를 제공
- 고객들의 취향에 맞는 네일아트를 선택할 수 있는 서비스 제공
- MiriNail은 Designer, Community 페이지를 통해 고객과 디자이너간의 원활한 소통 서비스를 제공합니다.
- MiriNail은 AR 기술을 통해 손톱위에 자신이 원하는 디자인의 네일아트 피팅서비스를 제공합니다.
- MiriNail은 블록체인 기술을 통해 디자이너의 네일아트를 NFT화 합니다.
- Jira
- MatterMost
- GitLap
- Notion
$ ubuntu-drivers devices
이후 드라이버 버전중 하나를 선택 하여 설치
$ sudo apt install nvidia-driver-570
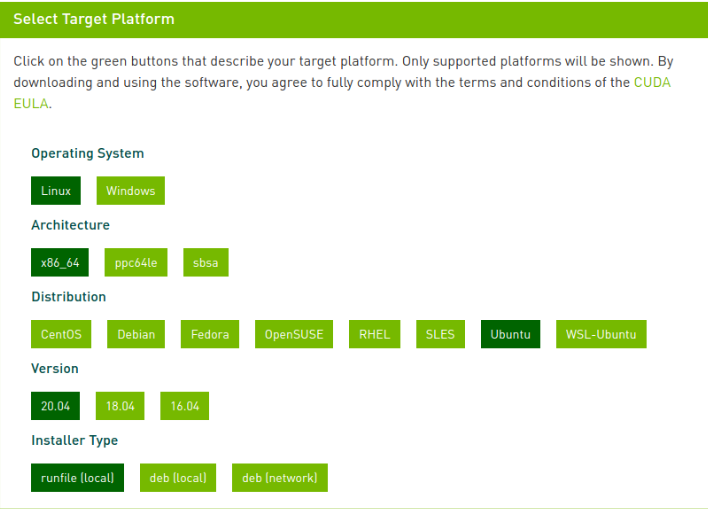
아래 링크에 접속하여 CUDA Toolkit 11.2를 선택
https://developer.nvidia.com/cuda-toolkit-archive
아래와 같이 선택
아래 명령어를 입력
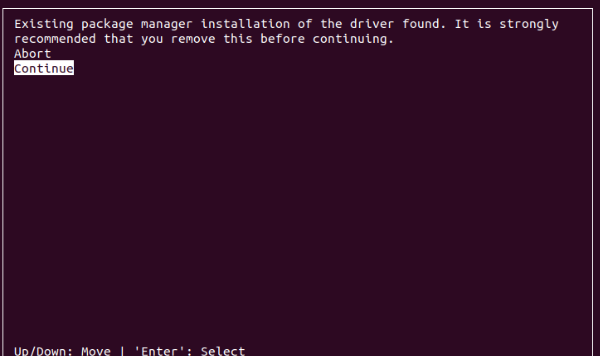
명령어 실행 후 아래와 같은 창이 뜬다면
Continue 선택
다음처럼 에러가 난다면 gcc가 설치안되어 있는 상태
Failed to verify gcc version. See log at /var/log/cuda-installer.log for details.
개발을 위한 필수 프로그램을 설치하고 다시 실행
$ sudo apt-get install build-essential
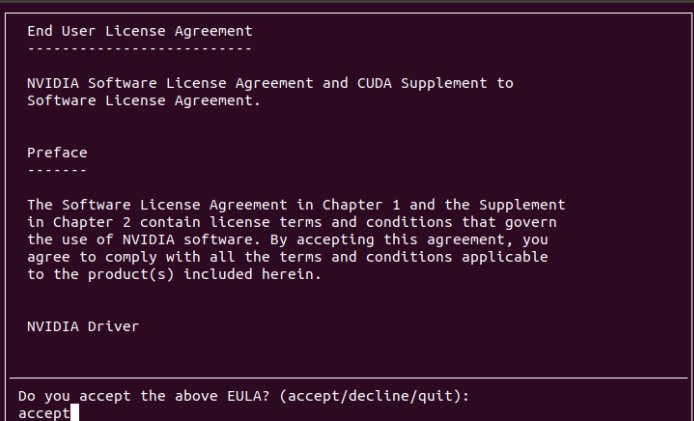
accept 입력 후, 엔터를 입력
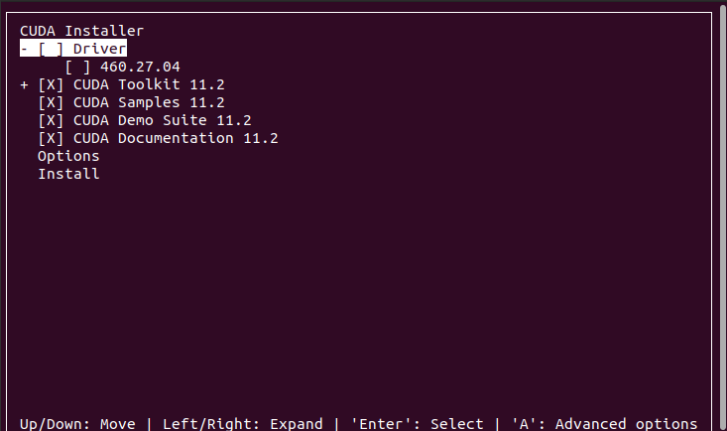
Driver 항목에서 스페이스바 눌러서 체크 해제하고 , Install 항목에서 엔터를 입력
(해당 사진은 Driver version이 460으로 표기 되지만 위에서 설치한 570에 맞춰서 설치)
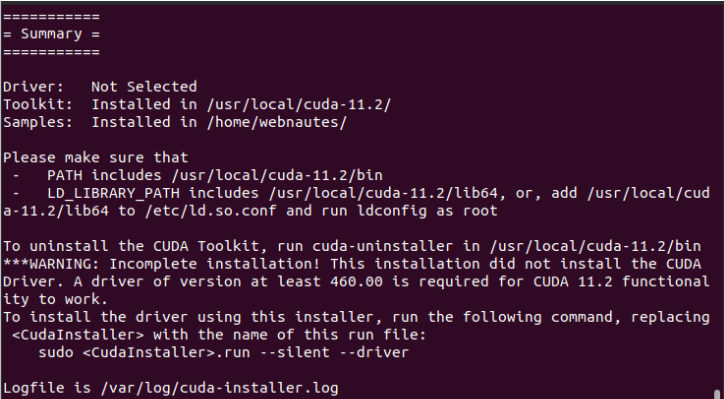
문제 없이 설치되면 다음처럼 표기
다음 명령을 사용하여 CUDA Toolkit 관련 설정을 환경 변수에 추가하고 바로 적용
$ sudo sh -c "echo 'export PATH=$PATH:/usr/local/cuda-11.2/bin' >> /etc/profile"
$ sudo sh -c "echo 'export LD_LIBRARY_PATH=$LD_LIBRARY_PATH:/usr/local/cuda-11.2/lib64' >> /etc/profile"
$ sudo sh -c "echo 'export CUDADIR=/usr/local/cuda-11.2' >> /etc/profile"
$ source /etc/profile
설치가 잘되었는지 확인. 11.2 가 보여야 함
다음 명령어를 입력
$ nvcc -V
아래와 같이 보인다면 설치가 완료
nvcc: NVIDIA (R) Cuda compiler driver

Copyright (c) 2005-2020 NVIDIA Corporation

Built on Mon_Nov_30_19:08:53_PST_2020

Cuda compilation tools, release 11.2, V11.2.67

Build cuda_11.2.r11.2/compiler.29373293_0
아래 링크에 접속
https://developer.nvidia.com/cudnn
Download cuDNN을 클릭
계속 진행하려면 로그인 진행
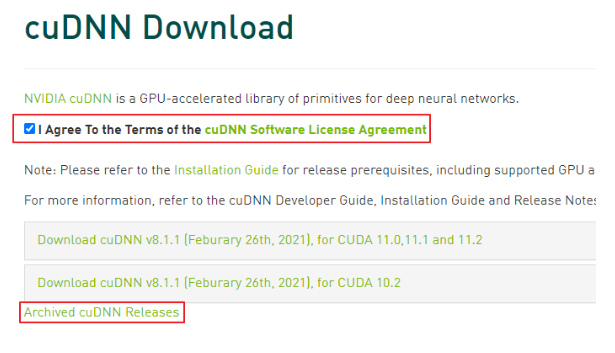
라이센스에 동의한다고 체크하고( I Agree to the Terms of… )
Archived cuDNN Releases를 클릭
목록에서 다음 항목을 클릭
Download cuDNN v8.1.0 (January 26th, 2021), for CUDA 11.0,11.1 and 11.2
다음 항목을 클릭
cuDNN Library for Linux (x86_64)
다운로드 받은 파일을 압축풀어서 파일 복사
$ cd 다운로드

$ tar xvzf cudnn-11.2-linux-x64-v8.1.0.77.tgz

$ sudo cp cuda/include/cudnn* /usr/local/cuda/include

$ sudo cp cuda/lib64/libcudnn* /usr/local/cuda/lib64


$ sudo chmod a+r /usr/local/cuda/include/cudnn.h /usr/local/cuda/lib64/libcudnn*
링크를 다시 걸어줌
$ sudo ln -sf /usr/local/cuda-11.2/targets/x86_64-linux/lib/libcudnn_adv_train.so.8.1.0 /usr/local/cuda-11.2/targets/x86_64-linux/lib/libcudnn_adv_train.so.8

$ sudo ln -sf /usr/local/cuda-11.2/targets/x86_64-linux/lib/libcudnn_ops_infer.so.8.1.0  /usr/local/cuda-11.2/targets/x86_64-linux/lib/libcudnn_ops_infer.so.8

$ sudo ln -sf /usr/local/cuda-11.2/targets/x86_64-linux/lib/libcudnn_cnn_train.so.8.1.0  /usr/local/cuda-11.2/targets/x86_64-linux/lib/libcudnn_cnn_train.so.8

$ sudo ln -sf /usr/local/cuda-11.2/targets/x86_64-linux/lib/libcudnn_adv_infer.so.8.1.0  /usr/local/cuda-11.2/targets/x86_64-linux/lib/libcudnn_adv_infer.so.8

$ sudo ln -sf /usr/local/cuda-11.2/targets/x86_64-linux/lib/libcudnn_ops_train.so.8.1.0  /usr/local/cuda-11.2/targets/x86_64-linux/lib/libcudnn_ops_train.so.8

$ sudo ln -sf /usr/local/cuda-11.2/targets/x86_64-linux/lib/libcudnn_cnn_infer.so.8.1.0 /usr/local/cuda-11.2/targets/x86_64-linux/lib/libcudnn_cnn_infer.so.8

$ sudo ln -sf /usr/local/cuda-11.2/targets/x86_64-linux/lib/libcudnn.so.8.1.0  /usr/local/cuda-11.2/targets/x86_64-linux/lib/libcudnn.so.8
새로 추가된 라이브러리를 시스템에서 찾을 수 있도록 하고 루트 디렉토리로 이동
$ sudo ldconfig

$ cd
설정이 제대로 되었는지 확인 ( 다음처럼 8.1.0이 표기되었는지 확인 )
$ ldconfig -N -v $(sed 's/:/ /' <<< $LD_LIBRARY_PATH) 2>/dev/null | grep libcudnn

libcudnn_adv_train.so.8 -> libcudnn_adv_train.so.8.1.0

libcudnn_adv_infer.so.8 -> libcudnn_adv_infer.so.8.1.0

libcudnn_ops_infer.so.8 -> libcudnn_ops_infer.so.8.1.0

libcudnn.so.8 -> libcudnn.so.8.1.0

libcudnn_ops_train.so.8 -> libcudnn_ops_train.so.8.1.0

libcudnn_cnn_train.so.8 -> libcudnn_cnn_train.so.8.1.0

libcudnn_cnn_infer.so.8 -> libcudnn_cnn_infer.so.8.1.0
1. JVM : 1.8.0_192
2. Web Server : Nginx 1.18.0
3. WAS : Tomcat 9.0.45
4. Visual Studio : 1.64.2
5. IntelliJ : IntelliJ IDEA 2021.3.2 (community)
6. React : 17.02
7. NodeJS : 16.13.2
8. springBootVer : '2.6.4'
9. solidity : 0.8.12
10. web3js : 1.7.1
11. 기타 상세 버전 정보
    - React : package.json
- SpringBoot : build.gradleFROM node:16.13.2 as build-stage
WORKDIR /app
COPY package*.json ./
RUN npm install
COPY . .
RUN npm run build
FROM nginx:stable-alpine as production-stage
COPY ./nginx/nginx.conf /etc/nginx/conf.d/default.conf
COPY --from=build-stage /app/build /usr/share/nginx/html
CMD ["nginx", "-g", "daemon off;"]
server {
    listen 80;
    listen [::]:80;

    # server_name 도메인;
    server_name k6e101.p.ssafy.io;

		access_log /var/log/nginx/access.log;
		error_log /var/log/nginx/error.log;

    location / {
        return 301 https://$server_name$request_uri; # http 접속 시 https 로 자동 접속
    }
}

server {
	client_max_body_size 20M;
	listen 443 ssl;
	listen [::]:443 ssl;

	# server_name 도메인;
	server_name k6e101.p.ssafy.io;

	access_log /var/log/nginx/access.log;
	error_log /var/log/nginx/error.log;

	ssl_certificate /var/www/html/fullchain.pem;
	ssl_certificate_key /var/www/html/privkey.pem;

	root /usr/share/nginx/html;
	index index.html;

	location / {
		try_files $uri $uri/ /index.html;
	}

	location /api {
		proxy_pass https://k6e101.p.ssafy.io:8443;
	}

	location /nail {
		proxy_http_version 1.1;
    	proxy_set_header Upgrade $http_upgrade;
    	proxy_set_header Connection "Upgrade";
    	proxy_set_header Host $host;
		proxy_pass http://k6e101.p.ssafy.io:8000;
	}

	location /websocket {
		proxy_http_version 1.1;
    	proxy_set_header Upgrade $http_upgrade;
    	proxy_set_header Connection "Upgrade";
    	proxy_set_header Host $host;
		proxy_pass http://k6e101.p.ssafy.io:8000;
	}
}
FROM openjdk:8-jdk-alpine

# jar 파일 경로는 직접 입력해주세요.
COPY build/libs/backend-0.0.1-SNAPSHOT.jar app.jar

## 배포용 properties 실행 명령어
ENTRYPOINT ["java","-jar","app.jar","--spring.config.name=application-prod"]

# 만약 배포용 properties를 사용하지 않는다면
# Default properties 실행 명령어
# ENTRYPOINT ["java","-jar","app.jar"]
#it will be set build date by gradle. if this value is @build.date@, front-end is development mode
build.date=@build.date@

# nginx.conf ? Backend port? ????.
server.port=8443
# ???? ??
#server.address=localhost
server.servlet.contextPath=/
# Charset of HTTP requests and responses. Added to the "Content-Type" header if not set explicitly.
server.servlet.encoding.charset=UTF-8
# Enable http encoding support.
server.servlet.encoding.enabled=true
# Force the encoding to the configured charset on HTTP requests and responses.
server.servlet.encoding.force=true

#database
spring.jpa.hibernate.naming.implicit-strategy=org.springframework.boot.orm.jpa.hibernate.SpringImplicitNamingStrategy
spring.jpa.hibernate.naming.physical-strategy=org.springframework.boot.orm.jpa.hibernate.SpringPhysicalNamingStrategy
spring.jpa.hibernate.ddl-auto=update
spring.jpa.properties.hibernate.dialect=org.hibernate.dialect.MySQL57Dialect
spring.data.web.pageable.one-indexed-parameters=true
spring.datasource.url=jdbc:mysql://mirinail.com:3306/MIRINAIL?useUnicode=true&characterEncoding=utf8&serverTimezone=Asia/Seoul&zeroDateTimeBehavior=convertToNull&rewriteBatchedStatements=true
spring.datasource.driver-class-name=com.mysql.cj.jdbc.Driver
spring.datasource.hikari.username= { Mysql.userName }
spring.datasource.hikari.password= { Mysql.userPassword }

# SQL log show
spring.jpa.show.sql=true
spring.jpa.properties.hibernate.format_sql=true
logging.level.org.hibernate.type.descriptor.spi.BasicBinder=trace

# jwt
jwt.secret= { jwt.secret.key }
# unit is ms. 15 * 24 * 60 * 60 * 1000 = 15days
jwt.refreshTokenExpiration=1296000000
jwt.accessTokenExpiration=216000000

#logging
logging.file.name=./logging/nailart.log
logging.level.root=INFO
logging.level.com.samsung.security=DEBUG
logging.level.org.springframework.web=DEBUG
logging.level.org.apache.tiles=INFO
logging.level.org.sringframework.boot=DEBUG
logging.level.org.sringframework.security=DEBUG

# console Color
spring.output.ansi.enabled=always

#AWS S3 Cloud key
cloud.aws.credentials.accessKey= { AWS.S3.accessKey }
cloud.aws.credentials.secretKey= { AWS.S3.secretKey }
cloud.aws.stack.auto=false

# AWS S3 Service bucket
cloud.aws.s3.bucket=mirinail-bucket
cloud.aws.region.static=ap-northeast-2

# AWS S3 Bucket URL
cloud.aws.s3.bucket.url=https://s3.ap-northeast-2.amazonaws.com/mirinail-bucket

# file upload limit
spring.servlet.multipart.max-file-size=20MB
spring.servlet.multipart.max-request-size=20MB
spring.http.multipart.enabled=true
spring.http.multipart.location= /upload

# kakao social login
spring.security.oauth2.client.registration.kakao.client-id={ kakao.client.id }
spring.security.oauth2.client.registration.kakao.client-secret={ kakao.client.secret }
spring.security.oauth2.client.registration.kakao.client-authentication-method=post
spring.security.oauth2.client.registration.kakao.authorization-grant-type=authorization_code
spring.security.oauth2.client.registration.kakao.redirect-uri=https://k6e101.p.ssafy.io:8443/login/oauth2/code/kakao
spring.security.oauth2.client.registration.kakao.scope=profile_nickname, profile_image, account_email, gender, age_range
spring.security.oauth2.client.registration.kakao.client-name=Kakao

# Provider
spring.security.oauth2.client.provider.kakao.authorization-uri=https://kauth.kakao.com/oauth/authorize
spring.security.oauth2.client.provider.kakao.token-uri=https://kauth.kakao.com/oauth/token
spring.security.oauth2.client.provider.kakao.user-info-uri=https://kapi.kakao.com/v2/user/me
spring.security.oauth2.client.provider.kakao.user-name-attribute=id

# token Key & redirectUri
app.auth.token-secret= { auth.token.secret }
app.auth.token-expiry=1800000
app.auth.refresh-token-expiry=604800000
app.oauth2.authorizedRedirectUris=https://k6e101.p.ssafy.io/oauth2/redirect

# SSL setting
server.ssl.enabled=true
server.ssl.key-store-type=PKCS12
server.ssl.key-store=/root/key.p12
server.ssl.key-store-password= { ssl.password }
version: '3.7'

services:
  frontend:
    image: frontend-react
    build:
      context: frontend/
      dockerfile: Dockerfile
    ports:
      - "80:80"
      - "443:443"
    # [인증서 파일 저장 경로]:/var/www/html
    volumes:
      - /home/ubuntu/docker-volume/ssl:/var/www/html
    container_name: "frontend"

  backend:
    image: backend-spring
    build:
      context: backend/
      dockerfile: Dockerfile
    ports:
      - "8443:8443"
        # [인증서 파일 저장 경로]:/root
    volumes:
      - /home/ubuntu/docker-volume/ssl:/root
    container_name: "backend"
1. Python : 3.7
2. AWS : EC2 (p3.2xlarge)
2. Web Server : Nginx 1.18.0
3. PyCharm : 2022.1 (community)
4. Fastapi : 0.76.0
5. opencv-python : 4.5.5.64
6. tensorflow : 2.8.0
7. uvicorn : standard
8. websockets : 10.3 AI 폴더를 AWS GPU 서버의 /home/ubuntu/ 폴더로 복사
$ cd AI
위의 위치로 이동 후 해당 명령어 입력
$ pip install -r moduelist.txt
$ uvicorn main:app --host 0.0.0.0 --port 8001 --proxy-headers
- 기본적으로 스마트 컨트랙트는 openzeppelin 프레임워크를 사용
- ERC721 토큰에 tokenURI(*ipfs해쉬 값 저장)를 저장하여 데이터를 블록체인에 기록
function mintNFT(address to, string memory tokenURI)
	public onlyOwner
	returns (uint256)
    {
    	_tokenIds.increment();
        uint256 newItemId = _tokenIds.current();
        _mint(to, newItemId);
        _setTokenURI(newItemId, tokenURI);
        return newItemId;
}- web3로 프론트와 스마트 컨트랙트 간 데이터 전달
var Web3 = require('web3');

    var web3 = new Web3(new Web3.providers.HttpProvider('https://rinkeby.infura.io/v3/1b71a03449674cfe98b98c4915a7cbc7'));
    // 컨트랙트 abi와 주소를 통해 배포한 컨트랙트를 지정
    let contract = new web3.eth.Contract( contractInfo.abi, contractInfo.address)
- IPFS해쉬 생성
- tokenuri 에 저장할 값(testbuffer)를 ipfs에 저장하기 위해 ipfs-api 라이브러리 사용.
- ipfs에 데이터를 업로드하고 생성된 ipfs해쉬를 발급할 토큰의 uri에 저장.
const getIPFS = (data:any) => {

      return new Promise(function(resolve,reject){
        ipfs.files.add(data, (err:any,file:any)=>{
          if(err) {
              console.log(err);
          }
          const temp = file[0].hash
          // setIpfsPath(temp)
          resolve(temp)
        })

      });

    }

    const returnValue = registDesign(files).then(async(res) => {
      const ipfs = await getIPFS(testBuffer)
      await pushIpfs({nailartSeq : Number(res.data), nailartNft : ipfs}).then(response => {
        console.log(response)
      })
- NFT 발급
export default async function publishToken(ipfsHash:any) {

	var Web3 = require('web3');
	var web3 = new Web3(new								Web3.providers.HttpProvider('https://rinkeby.infura.io/v3/1b71a03449674cfe98b98c4915a7cbc7'));

const receiveAccount = '0xbDE82EE0713a93dE7e91C0b194382B64C58a9Aad'

var sender = web3.eth.accounts.privateKeyToAccount('0x' + "3f5480375cbab19af805d26913fb9e7ee93ae744434ec20fbffc3c06ba39d18e");

web3.eth.accounts.wallet.add(sender);

let contract = new web3.eth.Contract( contractInfo.abi, contractInfo.address)
const abc = await contract.methods.mintNFT(receiveAccount,ipfsHash).send({from: "0xbDE82EE0713a93dE7e91C0b194382B64C58a9Aad",gas:600000, })

}
(흐름도)
FRONT - BACK - FRONT
위 구조를 취하는 이유는 파이썬에서 클라이언트의 카메라에 접근할 수 가 없었기 때문이다. 먼저 프론트에서 클라이언트 캠에 접근하고, 영상 이미지를 백엔드(FAST-API)로 송신한다. 이 때 백엔드에서, 영상 인식 및 후처리를 진행하고 처리된 이미지를 다시 프론트로 전송하여 유저가 인식된 이미지를 볼 수 있는 구조이다.
(프론트- 백 - 프론트로 데이터를 이동하기 때문에 비효율적이고, 백에서 과부하가 생기지만 개발환경의 제약을 감안함.
최대한 연산 속도를 높이기 위해 AWS P3서버를 사용.)
templates = Jinja2Templates(directory="templates")

@app.get("/nail/client")
async def client(request: Request, item:Item):
    global test
    test = item.strings

    return templates.TemplateResponse("client.html", {"request":request})


# 웹소켓 설정 ws://127.0.0.1:8000/ws 로 접속할 수 있음
@app.websocket("/websocket")
async def websocket_endpoint(websocket: WebSocket):

    # 프론트에 가상 피팅을 적용할 네일 이미지를 요청
    response = requests.get(f'https://k6e101.p.ssafy.io/api/nailart/detail/{test}')
    nailImage = response.json()['nailartImgUrl']

    # client의 websocket접속 허용
    await websocket.accept()
    await websocket.send_text(f"Welcome client : {websocket.client}")
    i = 0

    # 미디어 파이프 라이브러리 적용(1)
    mp_drawing = mp.solutions.drawing_utils
    mp_drawing_styles = mp.solutions.drawing_styles
    mp_hands = mp.solutions.hands

    # 텐서 플로우 실행
    args = {
        "model": "./model/export_model_008/frozen_inference_graph.pb",
        "labels": "./record/classes.pbtxt",
        "num_classes": 1,
        "min_confidence": 0.6,
        "class_model": "../model/class_model/p_class_model_1552620432_.h5"}
    COLORS = np.random.uniform(0, 255, size=(args["num_classes"], 3))
    print('1 : 모델 생성')
    model = tf.Graph()
    with model.as_default():
        print("> ====== loading NAIL frozen graph into memory")
        graphDef = tf.GraphDef()

        with tf.gfile.GFile(args["model"], "rb") as f:
            serializedGraph = f.read()
            graphDef.ParseFromString(serializedGraph)
            tf.import_graph_def(graphDef, name="")

        print(">  ====== NAIL Inference graph loaded.")


    with mp_hands.Hands(min_detection_confidence=0.8,min_tracking_confidence=0.5) as hands:

        with model.as_default():
            with tf.Session(graph=model) as sess:

                imageTensor = model.get_tensor_by_name("image_tensor:0")
                boxesTensor = model.get_tensor_by_name("detection_boxes:0")
                scoresTensor = model.get_tensor_by_name("detection_scores:0")
                classesTensor = model.get_tensor_by_name("detection_classes:0")
                numDetections = model.get_tensor_by_name("num_detections:0")
                drawboxes = []

                # 프론트에서 받은 네일이미지를 디코딩
                image_nparray = np.asarray(bytearray(requests.get(nailImage).content), dtype=np.uint8)
                imageDecode = cv2.imdecode(image_nparray, cv2.IMREAD_COLOR)
                print(imageDecode)
                img = imageDecode


                while True:
					# 웹소켓 수신 데이터 대기(2)
                    data = await websocket.receive_text()
                    data = data.split(',')[1]

                    # 수신받은 base64데이터를 BytesIo 객체로 변환
                    imgtest = imread(io.BytesIO(base64.b64decode(data)))
                    frame = cv2.flip(imgtest, 1)
                    (H, W) = frame.shape[:2]
                    output = frame.copy()

                    # 함수 실행(3)
                    img_ff, bin_mask, res = ff.find_hand_old(output)

                    image = cv2.cvtColor(res, cv2.COLOR_BGR2RGB)
                    image_2 = cv2.cvtColor(output, cv2.COLOR_BGR2RGB)
                    results = hands.process(image_2)
                    image = np.expand_dims(image, axis=0)
                    imageHeight, imageWidth, _ = image_2.shape

                    # 미디어파이프 실행
                    if results.multi_hand_landmarks:
                        for num, hand in enumerate(results.multi_hand_landmarks):
                            # 중지의 끝 마디와 아래 마디 좌표를 마크
                            normalizedLandmark = hand.landmark[12]
                            normalizedLandmark_2 = hand.landmark[11]
                            pixelCoordinatesLandmark = mp_drawing._normalized_to_pixel_coordinates(normalizedLandmark.x, normalizedLandmark.y, imageWidth, imageHeight)
                            pixelCoordinatesLandmark_2 = mp_drawing._normalized_to_pixel_coordinates(normalizedLandmark_2.x, normalizedLandmark_2.y, imageWidth, imageHeight)

                            # 회전각 계산
                            try:
                                tanTheta = ((pixelCoordinatesLandmark_2[0]-pixelCoordinatesLandmark[0]))/((pixelCoordinatesLandmark_2[1]-pixelCoordinatesLandmark[1]))
                                theta = np.arctan(tanTheta)

                                angle = theta*180/math.pi
                            except:
                                print('수평')

							# 세션 실행
                            (boxes, scores, labels, N) = sess.run(
                                [boxesTensor, scoresTensor, classesTensor, numDetections],
                                feed_dict={imageTensor: image})
                            boxes = np.squeeze(boxes)
                            scores = np.squeeze(scores)
                            labels = np.squeeze(labels)
                            boxnum = 0
                            box_mid = (0, 0)

                            # 인식률과 인식 좌표 마킹
                            for (box, score, label) in zip(boxes, scores, labels):

                                if score < args["min_confidence"]:
                                    continue

                                boxnum = boxnum + 1
                                (startY, startX, endY, endX) = box
                                startX = int(startX * W)
                                startY = int(startY * H)
                                endX = int(endX * W)
                                endY = int(endY * H)

                                # 네일 중심 좌표
                                X_mid = startX + int(abs(endX - startX) / 2)
                                Y_mid = startY + int(abs(endY - startY) / 2)

                                startX = startX -17
                                startY = startY -17
                                endX = endX +17
                                endY = endY +17
                                wi = int(abs(endY-startY))
                                he = int(abs(endX-startX))

                                # 네일 이미지 크기 재조정 및 회전각에 맞게 회전
                                try:
                                    cat_sticker = cv2.resize(img,(wi,he))
                                    # print(cat_sticker.shape)

                                    # 회전
                                    img_rotate = ff.rotate_image(cat_sticker,angle)
                                    # print('회전된 이미지 shape : ' ,img_rotate.shape)
                                except:
                                    print('에러')


                                xx = X_mid -wi // 2
                                yy = Y_mid - he // 2
                                if xx < 0:
                                    cat_sticker = cat_sticker[:,xx:]
                                if yy < 0:
                                    cat_sticker = cat_sticker[-yy:,:]

                                try :
                                    sticker_area = image_2[yy:yy+img_rotate.shape[0],xx:xx+img_rotate.shape[1]]
                                    image_2[yy:yy+img_rotate.shape[0], xx:xx+img_rotate.shape[1]] = np.where(img_rotate==0,sticker_area,img_rotate).astype(np.uint8)
                                except :
                                    print('에러')


                    # (4)
                    encode_param = [int(cv2.IMWRITE_JPEG_QUALITY), 65]
                    buffer = cv2.imencode('.jpg', image_2,encode_param)[1]

                    image_2 = buffer.tobytes()

                    await websocket.send_text(buffer.tobytes())
(1) - 미디어파이프를 이용하면 손 마디마다 좌표를 얻을 수 있음. 해당 좌표와 네일의 중심점 사이의 탄젠트 값을 얻을 수 있기 때문에 이미지를 손톱 각도에 맞춰 회전할 수 있음
(2) - client.html의 캠에서 웹소켓을 통해 이미지를 수신받음.
# (3) - 초기 캠 이미지를 이진화
def find_hand_old(frame):
    img = frame.copy()
    gray = cv2.cvtColor(frame, cv2.COLOR_BGR2GRAY)
    YCrCb_frame = cv2.cvtColor(frame, cv2.COLOR_BGR2YCrCb)
    YCrCb_frame = cv2.GaussianBlur(YCrCb_frame, (3, 3), 0)
    mask = cv2.inRange(YCrCb_frame, np.array([0, 127, 75]), np.array([255, 177, 130]))
    bin_mask = mask
    kernel = cv2.getStructuringElement(cv2.MORPH_ELLIPSE, (5, 5))
    bin_mask = cv2.dilate(bin_mask, kernel, iterations=5)
    res = cv2.bitwise_and(frame, frame, mask=bin_mask)

    return img, bin_mask, res
(4) 후처리된 이미지를 다시 client.html로 보내기 위해 바이너리 데이터로 형변환. 그 뒤 다시 웹소켓을 통해 이미지를 송신한다.
<html>
<head>
	<title>AR 가상 피팅 서비스</title>
  <link href="{{ url_for('static', path='/style.css') }}" rel="stylesheet">
</head>
<script async src="https://docs.opencv.org/3.4/opencv.js"></script>
<body>
	<video id="videoInput" style="display:none;"></video>
  <canvas id="videoOutput" style="display:none"></canvas>
  <div class="buttonPlace" id="text">
    <div class="btn" >Virtual Try On</div>
    <div class="on_now_tag" onclick=stream()></div>
  </div>
  <canvas id="testt" width="640" height="480" style=""></canvas>
  <div id="status">
    Connection failed. Somebody may be using the socket.
  </div>
</body>


<script>

  var w = 640, h = 480;

  // 웹소켓 연결
  var url = "ws://localhost:8000/websocket"
  var ws = new WebSocket(url);
  let testt = document.getElementById("testt");
  testt.width = w;
  testt.height = h;
  ws.addEventListener('open', (e) => {
    document.getElementById("status").innerHTML = "Opened";
  });

  ws.addEventListener('message', (e) => {
    console.log(e.data)
    let ctx = testt.getContext("2d");
    let image = new Image();
    try {
    image.src = URL.createObjectURL(e.data);

    }
    catch {
      image.srcObject = e.data
    }
    console.log(image)
    image.addEventListener("load", (e) => {
        ctx.drawImage(image, 0, 0, testt.width, testt.height);
    });
  });


	ws.onopen = function(){
		console.log("Websocket is connected.");

	}

// 클라이언트 측 캠을 사용
navigator.getUserMedia = navigator.getUserMedia || navigator.webkitGetUserMedia || navigator.mozGetUserMedia;
  var constraints = {audio: false, video: true};
  var video = document.getElementById("videoInput");
  video.width = w;
  video.height = h;
  function successCallback(stream){
  	video.srcObject = stream;
  	video.play();
  }

  function errorCallback(error){
   	console.log(error);
  }
  navigator.getUserMedia(constraints, successCallback, errorCallback);
	var canvas = document.getElementById("videoOutput");
  canvas.width = w;
  canvas.height = h;
  var ctx = canvas.getContext("2d");
  function processImage(){
        ctx.drawImage(video, 0, 0, w, h);
        setTimeout(processImage, 1);
  }
  processImage();

  // 100ms 간격으로 이미지를 송신한다.
  function stream(){
    var x = document.getElementById("text");
    console.log(x)
    x.style.display = 'none'

    setInterval(sendImage, 100);
  }

  function sendImage(){
    var rawData = canvas.toDataURL("image/jpeg", 1.0);
    ws.send(rawData)
  }

</script>
</html>


