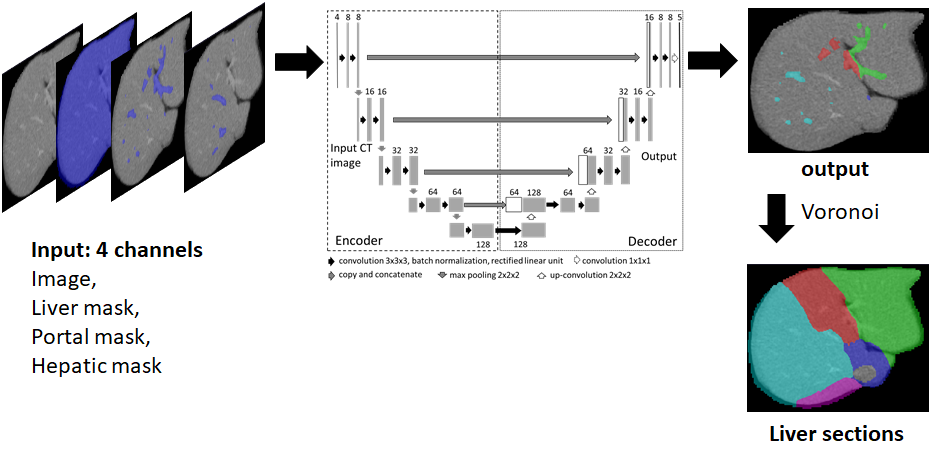
The network takes 4 inputs; CT image, Liver mask, Hepatic Vein Mask and Portal Vein mask. It outputs portal vein branch labels which is then used to compute liver segments using Voronoi tesselation.
Before you begin, ensure you have met the following requirements:
- You have installed Docker
- You have a compatible operating system (e.g., Windows, macOS, or Linux)
To set up the project using Docker, follow these steps:
- Clone the repository:
git clone https://github.com/username/LiverSegmentation.git
cd LiverSegmentation- Build the Docker image:
docker build -t LiverSegmentation:latest .- Run the docker container:
docker run --gpus all -v path/to/LiverSegmentation/:/home/LiverSegmentation -it LiverSegmentation:latest- Training the neural network
Four different models are prepared for labeling portal vein into 8 segments. First neural network labels portal vein into 5 section labels (S1, S23, S4, S58, S67). Next three neural networks are used to further subdivide each section into two sub sections.
python main.py --exp_name="5section" --train --num_classes=5 --gpu_num=0 --data_dir="./data/"python main.py --exp_name="S23" --train --num_classes=2 --gpu_num=0 --data_dir="./data/"python main.py --exp_name="S58" --train --num_classes=2 --gpu_num=0 --data_dir="./data/"python main.py --exp_name="S67" --train --num_classes=2 --gpu_num=0 --data_dir="./data/"- Testing the neural network
python main.py --exp_name="5section" --test --num_classes=5 --gpu_num=0 --data_dir="./data/"python main.py --exp_name="S23" --test --num_classes=2 --load_model_dir="./train/model_files/S23/" --gpu_num=0 --data_dir="./data/"python main.py --exp_name="S58" --test --num_classes=2 --load_model_dir="./train/model_files/S58/" --gpu_num=0 --data_dir="./data/"python main.py --exp_name="S67" --test --num_classes=2 --load_model_dir="./train/model_files/S67/" --gpu_num=0 --data_dir="./data/"data/
│
├── train/
│ ├── image_id.hdr
│ ├── image_id.raw
│ ├── image_id.msk
│ └── image_id.label
│
└── test/
├── image_id.hdr
├── image_id.raw
├── image_id.msk
└── image_id.label
Within each subdirectory (train/ and test/), the user must place four files for each training data point:
image_id.hdr: Contains information about the image size and voxel spacing.image_id.raw: A binary image containing the abdominal CT image.image_id.msk: Contains liver mask, IVC mask, portal mask, and hepatic mask stored in bits "0", "1", "2", and "3", respectively.image_id.label: Contains liver segment labels. By default, the code considers following labels for each of the liver segments, S1:1, S2:2, S3:3,S4:4,S5:5, S6:6, S7:7, S8:8
Make sure to replace image_id with the corresponding identifier for each image in both the train and test subdirectories.
Code in this repository is bound by License issued from Fujifilm Corporation. Note that, the code must be used non-commercially. Please, see the details in LICENSE.txt file
