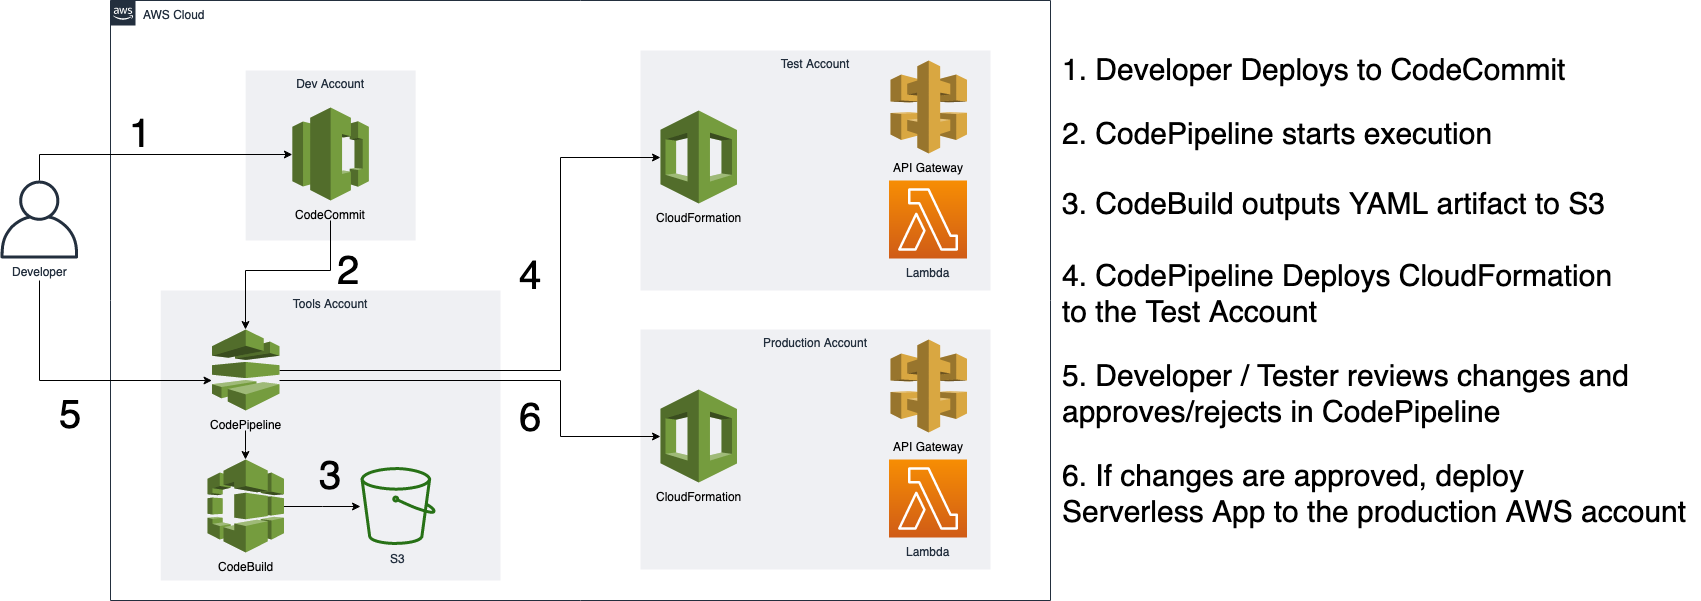
Reference Architecture: Cross Account AWS CodePipeline
This reference architecture demonstrates how to push code hosted in AWS CodeCommit repository in Development Account, use AWS CodeBuild to do application build, store the output artifacts in S3Bucket and deploy these artifacts to a Test AWS account, validate your deployment then approve the changes to be deployed to the Production Account using AWS CloudFormation. This orchestration of code movement from code checkin to deployment is securely handled by AWS CodePipeline.
Running the example
You need to create the CodeCommit repository (steps below) before making the pipeline infrastructure. When creating the pipeline infrastructure, you can use the
single-click-cross-account-pipeline.shscript or else follow the "Walkthrough" section of the blog post.
Pre-requisites
- Install the AWS CLI.
- Intall the SAM CLI.
- Clone this repository.
- Have the following AWS accounts (if using Control Tower, this is useful):
- Tooling
- Development
- Test
- Production
1. Create a sample application using Serverless Application Model (SAM).
We will create a sample serverless application locally, then commit the code to CodeCommit. From there, CodePipeline will build the serverless application, deploy it using CloudFormation to a test account then you will accept/reject the change from the pipeline. If you accept the review in CodePipeline, the application will be deployed to production using CloudFormation.
Create the sample application locally
From your terminal application/command line, execute the following command:
sam init
# Use the values:
# - Template source:  Quick Start template
# - Runtime: Python 3.7
# - Project Name: sample-lambda
This creates a directory named sample-lambda in your current directory, which contains the code for a serverless application.
Navigate to the project folder and initialize the git client
cd sample-lambda/
git init
2. Create AWS CodeCommit repository in Development Account
Console Method
Follow the instructions here to create a CodeCommit repository in the Development Account. Name your repository as sample-lambda.
Terminal Method
From your terminal application, execute the following command. You may refer here for further details on installing the AWS CLI if needed.
aws codecommit create-repository --repository-name sample-lambda --repository-description "Sample Serverless App" --profile {{DEV-ACCOUNT-PROFILE}}Note the cloneUrlHttp URL in the response from above CLI.
3. Add a new remote
From your terminal application, execute the following command:
git remote add AWSCodeCommit {{HTTP_CLONE_URL_FROM_STEP_2}}Follow the instructions here for local git setup required to push code to CodeCommit repository.
Tip: The AWS CodeCommit Helper is useful to obtain Codecommit credentials using a profile, for example:
git config --global credential.helper '!aws --profile {{YOUR-PROFILE-HERE}} codecommit credential-helper $@'
4. Push the code AWS CodeCommit
From your terminal application, execute the following command:
git add .
git commit -m "First push of my SAM app!"
git push AWSCodeCommit master
5. See the pipeline in action.
Once you have your pipeline configured as per the blog post across your tools, development, test and production AWS accounts, codepipeline will listen for new deployments to your 'sample-lambda' repository. You can configure the pipeline by following the walkthrough in the blog post or by running the single-click-cross-account-pipeline.sh script in this repo. Once it's spun up, push a change to the CodeCommit repo you just made then log in to your tools AWS account to ensure your codepipeline execution has kicked off.
Next Steps
- If you want to deploy a different type of application, you will need to edit the buildspec file defined in the
code-pipeline.yamlfile.- You will also need to change the permissions of the roles deployed to the test/dev accounts depending on what type of resources you are deploying. This is in the
toolsacct-codepipeline-cloudformation-deployer.yamlfile which gets deployed to the Test & Prod accounts in step 3 of the blog instructions.
- You will also need to change the permissions of the roles deployed to the test/dev accounts depending on what type of resources you are deploying. This is in the
