Multi-Resolution Cameras for Blender
This is a Blender add-on written to easily customize render resolutions, and render your cameras. With the add-on you can:
- Set a custom render resolution for the cameras in the scene, without impacting the scene rendering resolution/aspect.
- Easily render a still for a camera with the custom resolution.
- Easily preview multi-camera animation sequences in the 3D Viewport.
- Easily render sequences.
But what makes the add-on cool is that you can preview the render right there in the viewport, as a frame is added to the camera which updates in real-time while you adjust the size and ratio of the render.
It is a single file add-on. After installation, it appears here: View3D > Sidebar [N] > Render Resolutions

Installation
To install this add-on please follow these steps:
- Download.
- Open Blender Preferences (CMD+comma on MacOS).
- Go to the Add-ons tab and click
Install. - Browse to the downloaded python script and select it.
- Enable the script, it is called:
3D View: Multi-Resolution Cameras.
Quick Overview
The add-on presents you with 3 panels under a new Cameras tab shown in your 3D Viewport:
- Camera List: Shows your current cameras and allows you to customize.
- Settings Panel: Preferences to customize this Add-on.
- Animation Panel: A set of options and actions to help you easily preview and render multi-camera animation sequences.
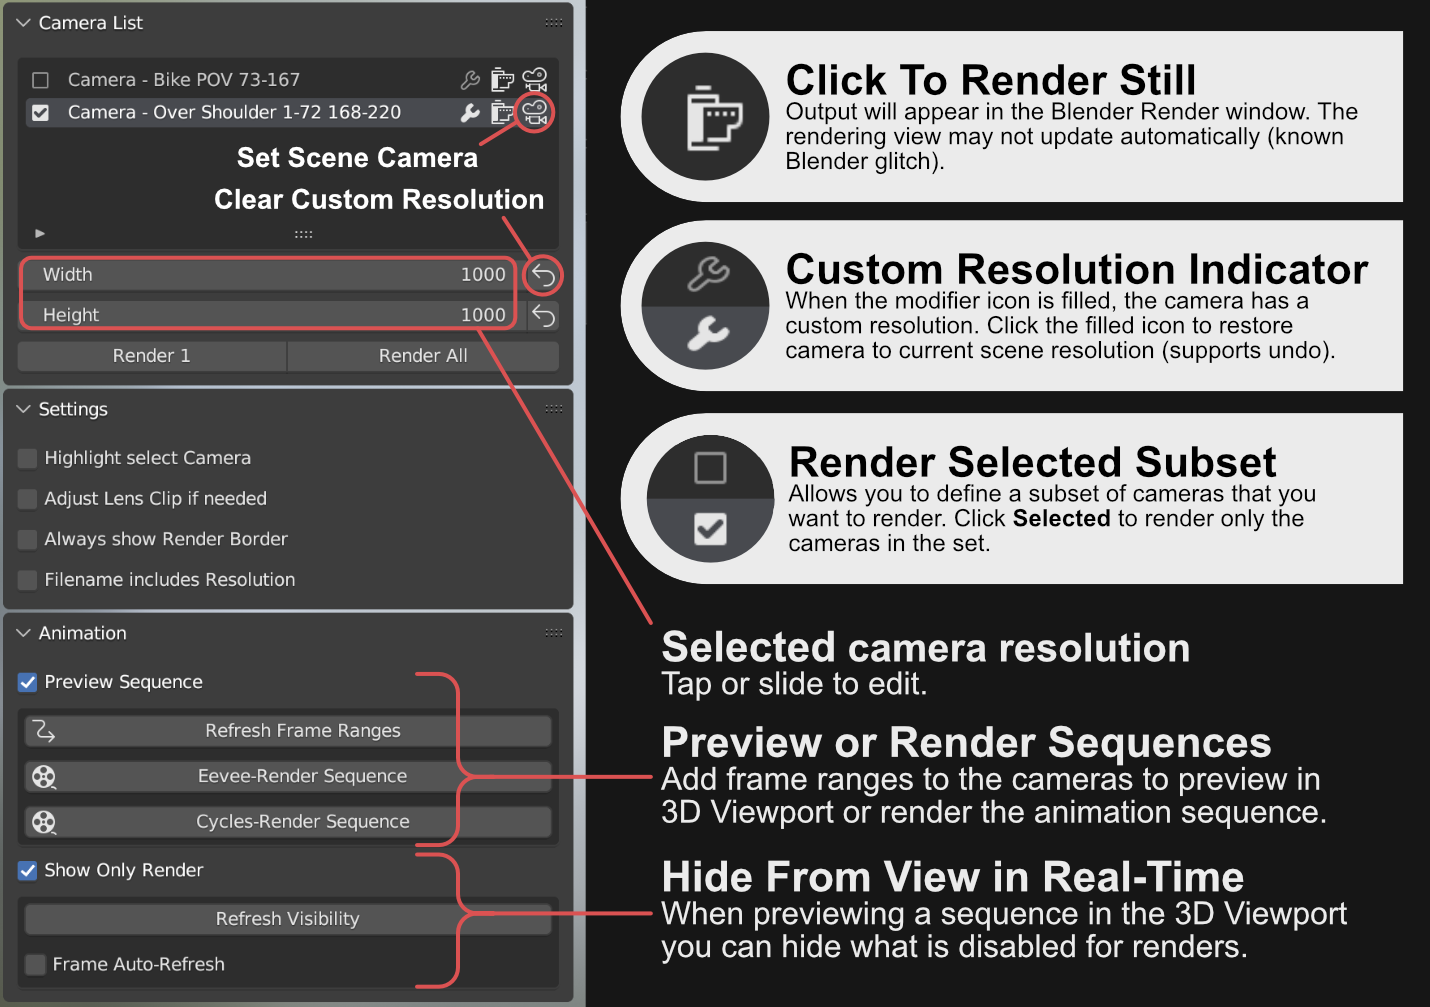
Camera List
For each camera row you will find:
- Checkbox to create a subset of cameras. Tick the checkbox to include the camera. Shit+Click (or Opt+Click) to toggle all cameras.
- The name of the camera. Double-click the name to rename the camera.
- The wrench is filled when the camera has a custom resolution. Click it to restore default scene resolution. Shift+Click to clear all custom resolutions (cannot be undone).
- The Render Still button will render the camera to
Blender Renderwindow in the current slot. - The Scene Camera: click it to make the camera the Scene Camera, allowing you to adjust the rendered image dimensions in real-time. This is the killer feature. Very happy I managed to add this exactly as I wanted it to work.
Below the list you can click to edit or slide to adjust the resolution of the highlighted camera.
There is also two buttons:
- Render : Renders only the current subset of selected cameras in the custom resolution; tick the checkbox to include the camera in the set.
- Renders All: Yep, you guessed it, this button renders all cameras in the scene with the custom resolution (if one is set).
Using this button will render in the custom resolution is one is set, othewise default resolution will be used.
Please note that changing the scene resolution will not automatically update the cameras with default resolution. Tap the wrench of the cameras that you want to update after a scene resolution change.
How It Works
The plugin appends a property group (a data struct) to your file for each camera. The property group contains the name of the camera, index; X and Y dimensions, as well as the state of the checkbox. In other words, your file size will not be notably affected by the additional data.
When you save the file, the data is retained—even if you uninstall the add-on. The data becomes part of the file. So you can share the file with others, and as long as they have the add-on installed, they will be able to render the different camera sizes.
Settings Panel
Let me quickly explain each option:
- Highlight select Camera: Now you can use the keys to navigate the list so update the Scene Camera and quickly verify the custom resolution of each camera.
- Adjust Lend Clip if needed: If the Lens Clip is set to high, or too low, the custom render frame will not be visible in the 3D Viewport. Enable this option to have the Lens Clip adjusted to a more suitable value.
- Always show Render Border: Enable this so you can see the render border even while selecting other objects in the scene, allowing you to compose the scene according to the custom render ratio—make sure your POV is where it should be.
- Filename includes Resolution: When experimenting with different resolutions, you can include it in the filename, so you can quickly tell them apart and not have different resolutions overwrite each other.
Animation Panel
If you are working on a multi-camera sequence and need to quickly see it animated directly in your 3D Viewport, this panel is for you:
- Preview Sequence: When enabled, the current frame will determine which camera is the Scene Camera (the one being rendered). If you add one or many frame ranges to your camera names (ref. screenshot above), and make sure they are not overlapping, you will see the entire sequence in your 3D Viewport—no rendering required. Win!
- If you update the frame ranges of your cameras, you can manually refresh them by tapping the Refresh Frame Ranges button.
- Eevee and Cycles render buttons are for rendering out the entire squence. The files will be saved to the Output destination, so make sure that is properly set. While rendering Blender will be unresponsive. Progress can be seen in the Terminal if you launch Blender from the Terminal:
- Show Only Render: When ticked, all objects in the scene that are disabled from renders based on the current frame, will be hidden from the Viewport. Basically this option will make the scene shown in the 3D Viewport look more like your final render.
- There is a button to refresh the visibility of the objects in the scene, however you also enable "Frame Auto-Refresh" which will refresh the visibility of the objects ever time the frame is changed. This is nice when previewing animation sequences in the Viewport.
That's it! Thanks for checking out my first add-on for Blender. I have spend weeks on this, an so far it has turned into everything I wanted it to be—and then some. I'm very happy about it. I will probably keep adding features to it as I need them.
I hope you find it useful!
All the best!
Johan