This is a guide on converting the amazing "Elevated" 4k demo (2009) (see also source code & Youtube Video) to an image file, and then back to an executable.
Without going into the details of the demoscene, in short, "Elevated" is a computer program/app that was written to demonstrate programming prowess, and to push the limits of what can be done on a computer. It shows a tour around a 3d-rendered landscape, while synchronized music plays in the background.
Normally, in the 21st century, most graphical computer software uses a fair bit (pun unintended) of disk space. From watching Elevated, one might estimate that it would use at minimum ~10MB of storage, or 10,000kilobytes. Instead, the entire program is 4 kilobytes - which is shocking when truly considered. For example, the text of the document you are reading now is about 4.3 kilobytes, without including the images or HTML!
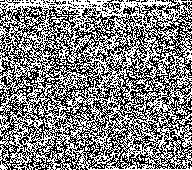
"4 Kilobytes" by itself isn't very meaningful to most people; even among computer programmers, we don't usually have much context for it. This page shows what the demo's entire 4k file looks like as a 1-bit black & white bitmap image. Every single bit - the smallest unit of computer data) is displayed as a single pixel / dot.
In one of the images below, every single bit that makes up the Elevated demo is shown - with white pixels for 1s and black pixels for 0s. Compare to the low-resolution, compressed screenshot of the demo, fully 18 kilobytes, or more than 3x the size!
| Direct Bit Representation (4k) | Screenshot (18k) |
|---|---|
 |
 |
This page details how you can do this yourself - convert this demo (or potentially other files) into an image like the one shown here, to see for yourself that yes, these tiny images do in fact contain the entire demo!
This guide uses several standard-ish utilities available (or potentially even preinstalled) on many Linux Distros. The expected utilities are:
wget- for getting the demoimagemagick- for image conversionunzip- to decompress the zip file, of course!
You'll also presumably want a Windows machine to run the demo on. Fortunately, with Windows 10, you can do all of the linux steps in WSL (Windows Subsystem for Linux). Setting that up is beyond the scope of this article, see the excellent official docs.
Let's create a PNG image from the "Elevated" 4k demo. Let's start by downloading the demo.
## Download the file from the scene.org archives
wget https://files.scene.org/get/parties/2009/breakpoint09/in4k/rgba_tbc_elevated_2016.zip

## Decompress
unzip rgba_tbc_elevated_2016.zip

## "Convert" the file to a PBM file, by creating a header, and padding with zeroes to account
## for the 4066 byte file not fitting perfectly into 192 bit units (192x169.4166666...)

#   Create Header, split w/newlines
#   P4 = bitmap, 192x170 = size                           Generate 14 bytes of zeroes      Save to PBM file
#
cat <(echo -e "P4\n192 170\n") elevated_1920_1080.exe <(dd if=/dev/zero bs=1c count=14) > elev-192x170-zeropadded.pbm

## Convert this PBM to a PNG file
convert elev-192x170-zeropadded.pbm elev-192x170.png
You should now be able to open this .png file, and see the following image:
Now, let's turn that image file back to an EXE!
## Convert to Binary PBM file
convert elev-192x170.png elev-decoded-stage1.pbm

## Remove the header lines and write to exe
tail -n +4 elev-decoded-stage1.pbm > elevated-demo-decoded.exe
Now, give that EXE file a try!
- The Elevated 4k Demo Authors (TBC and rgba / rgba and TBC)
- pouet.net
- scene.org
- authors of imagemagick, unzip, wget, bash, etc