Geoguess Master is a free geoguess game. Players compete how close each player can guess a random locations in five rounds. You can play multiplayer game with your friends up to five friends. The first player creates a room and decide a room size, and then other players type the same room name name as the first player decided and the game will start.
You need to configure Google Maps Platform and Firebase to make game work. See the instructions below.
Once you get an API key and register the project with Firebase, create files named .env.development.local and .env.production.local inside this project to put environment variables.
The files should be like this.
.env.production.local
NODE_ENV=production
VUE_APP_API_KEY=YOUR_GOOGLE_MAPS_API_KEY
VUE_APP_FIREBASE_API_KEY=YOUR_FIREBASE_API_KEY
VUE_APP_FIREBASE_PROJECT_ID=YOUR_FIREBASE_PROJECT_ID
VUE_APP_FIREBASE_MESSAGING_SENDER_ID=YOUR_FIREBASE_MESSAGING_SENDER_ID
VUE_APP_FIREBASE_APP_ID=YOUR_FIREBASE_APP_ID
VUE_APP_FIREBASE_MEASUREMENT_ID=YOUR_FIREBASE_MEASUREMENT_ID
.env.development.local
NODE_ENV=development
...
Now you can run this game.
Download Node.js here if you don't have and make sure you can run npm from the terminal.
# install dependencies
npm install

# run locally
npm run serve

# build for production
npm run build
First, create your Github account if you don't have and fork this project (Click Fork button at the top right coner of the this project page). There should be a copy of this project on your list of repository now.
You could use other hosting service but here I use Netlify. Create your Netlify account if you don't have. You can connect your Netlify account when you sign up or on user settings (Click the avatar icon at the top right corner and there is Connected accounts section there).
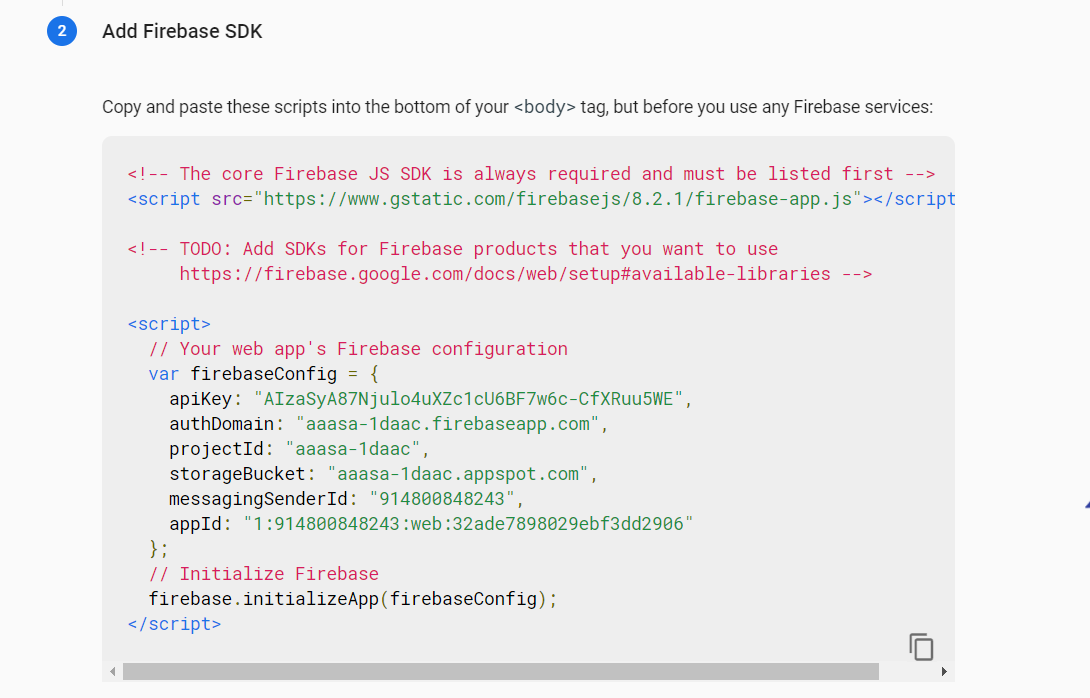
Create a Firebase project from Firebase console. (Make sure to turn on Enable Google Analytics for this project.) After you created a project, you need to add your website to the Firebase project. Cick the Web icon and enter your app's nickname and then click Register app. Some variables will be generated for your website. These variables will be used at step 5. Go back to project overview page, and select Realtime Database from the left sidebar. Click Create Database button.
Go to Google Cloud Console, and create a Google Cloud project. After creating a project, go to project top page and select APIs & Services > Credentials from the left sidebar. On the Credentials page, click Create credentials > API key. The new API key is listed on the Credentials page under API keys. This Google API key will be used at step 5.
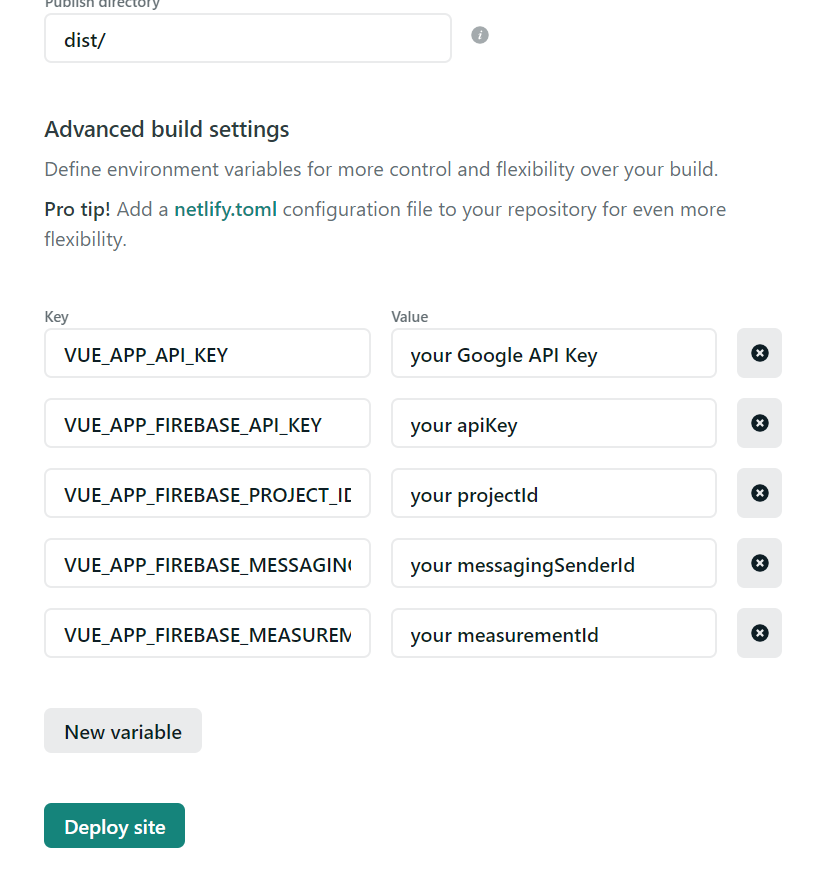
Click New site from Git button from your Netlify top page. Click Github icon and choose your project repository you forked. Build options will look like below. Also you need to connect your project to your database in your Firebase project. Click Show advanced button and New variable button will appear. Click New variable button and you can set API key and variables that have been generated at step 3 and step 4. Set variables like below. (Replace the values with yours. The last two key names are VUE_APP_FIREBASE_MESSAGING_SENDER_ID and VUE_APP_FIREBASE_MEASUREMENT_ID.) Click Deploy site.
That's it! Your site domain will appear on the project page after the project has been deployed. Now you can play games as much as you want! Feel free to ask questions on Discord if you have troubles.
- Free game with no ads
- Multiplayer game using realtime database
Paulo Gomes, UI design
Licensed under MIT License
Feel free to give me feedback.

