The full guide can be found on the AWS Compute Blog https://aws.amazon.com/blogs/compute/building-a-serverless-document-scanner-using-amazon-textract-and-aws-amplify/
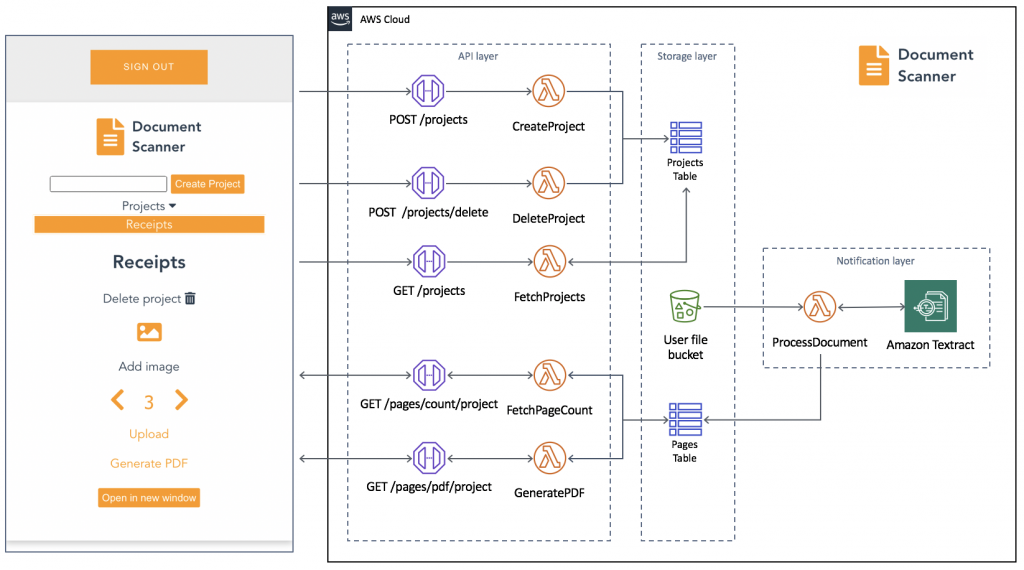
An example serverless application for using Amazon Textract, AWS Amplify, Amazon API Gateway, AWS Lambda, Amazon S3, Amazon Cognito, and Amazon DynamoDB to create a document scanner application. Users can register, login, create projects, and upload images of text and generate a downloadable PDF of the detected text.
- Follow the instructions to install and configure the Amplify CLI.
- Clone this project from GitHub and navigate to the amplify-frontend directory.
git clone https://github.com/aws-samples/aws-serverless-document-scanner
cd aws-serverless-document-scanner/amplify-frontend- Install the dependencies.
npm install- Initialize Amplify in the project using this command. Follow the prompts.
amplify init- Use Amplify to deploy the backend resources using AWS CloudFormation.
amplify pushThe Serverless Application Model Command Line Interface (SAM CLI) is an extension of the AWS CLI that adds functionality for building and testing Lambda applications. It uses Docker to run your functions in an Amazon Linux environment that matches Lambda. It can also emulate your application's build environment and API.
To use the SAM CLI, you need the following tools.
- SAM CLI - Install the SAM CLI
- Node.js - Install Node.js 10, including the NPM package management tool.
- Docker - Install Docker community edition
To build and deploy your application for the first time, run the following in your shell from the serverless-backend/ directory:
sam build
sam deploy --guided
The first command will build the source of your application. The second command will package and deploy your application to AWS, with a series of prompts. You'll be asked for the UserPoolID and AmplifyStackName created by the Amplify CLI. Those values can be found in the amplify-frontend/amplify/backend/amplify-meta.json file generated by Amplify.
Once deployed, the SAM cli will output an API Endpoint. Create a file, api-config.js in the amplify-frontend/src/ directory with the endpoint:
const apiConfig = {
    "endpoint": "<ENDPOINT>",
    "s3_bucket_name": "<BucketName>",
    "s3_region": "<S3 REGION>"
};

export default apiConfig;To run the application locally, enter this command from the amplify-frontend/ directory:
npm run serveTo publish the frontend to AWS cloud hosting:
amplify publish