English | Español
This repository, including all associated workflows and automations, represents an opinionated set of best practices aimed at demonstrating a reference architecture for building a web application on Google Cloud using Cloud Run for Anthos.
A detailed description of the architecture of the web app can be found in architecture.md.
NOTE: the steps in this guide assume that you are working in a POSIX-based development environment.
The only requirement to run this example out of the box is a working
installation of gcloud. Optionally, having make installed will allow you
to make use of the convenience targets provided in the makefile.
NOTE: Your gcloud user account must have Owner permission in order
to complete setup of the application.
This example can be run directly from Cloud Shell!
Follow the steps to set up gcloud in your local environment,
then git clone this repo.
For this reference application to work properly, you will need a custom domain that has been set up properly and verified.
The easiest way to do this is by running the interactive script domain-setup.sh:
./scripts/domain-setup.shThis script:
- Allows you to create a custom subdomain or use an existing one.
- Creates custom subdomains and managed zones ready for use using the steps at cloud-tutorial.dev.
- Ensures any custom domains are associated with a Cloud DNS Managed Zone in the same project that you are using for this application.
- For provided custom domains, links to documentation to update name server records to point to your managed zone.
- Walks you through domain ownership verification.
-
Enable Identity Platform for your project.
- This will create an OAuth 2.0 Client ID that can be used by the web application.
- This additionally creates a Firebase project where Cloud Firestore can be used.
-
Authorize your custom domain in Identity Platform.
- In the GCP console, navigate to Identity Platform > Settings.
- Click on the Security tab.
- Add your custom domain under Authorized Domains.
- Click Save.
-
Authorize your OAuth 2.0 Client ID to be usable by your custom domain.
- In the GCP console, navigate to APIs & Services > Credentials.
- Click on the OAuth 2.0 Client ID that was auto created.
- "(auto created by Google Service)" appears in the name.
- $PROJECT_ID.firebaseapp.com should appear under Authorized JavaScript origins.
- Take note of the Client ID and Client secret. You'll use them in the next step.
- Under Authorized JavaScript origins,
add your custom domain prefixed with
https://. - Click Save.
-
Add Google as an Identity Provider in Identity Platform:
- In the GCP console, navigate to Identity Platform > Providers.
- Click Add a provider.
- Select Google from the list.
- Fill in the Web Client ID and Web Client Secret fields with those from the OAuth 2.0 Client ID created in the previous step.
- Click Save.
-
Configure the OAuth consent screen.
- User Type can be set to either Internal or External.
- You'll need to set the Support email and the
Application homepage link (your custom domain prefixed with
https://). - Additional information here.
-
Setup
webui/firebaseConfig.ts.- Identify your Web API Key by navigating to Project Settings in the Firebase console: https://console.firebase.google.com/project/$PROJECT_ID/settings/general
- Run firebase-config-setup.sh to create
webui/firebaseConfig.ts:
./scripts/firebase-config-setup.sh $PROJECT_ID $API_KEY
-
Create Firestore database:
- Navigate to the Develop > Database in the Firebase console at: https://console.firebase.google.com/project/$PROJECT_ID/database.
- Click Create Database
- Choose production mode, then click Next
- Use the default location, or customize it as desired, then click Done
-
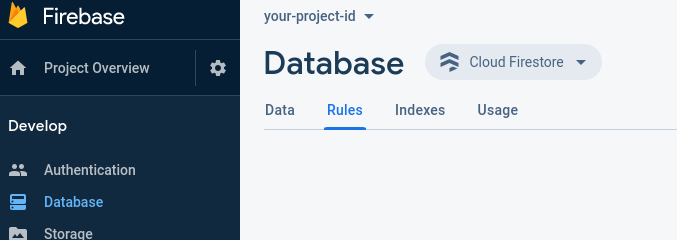
Set up the Firestore security rules:
- Navigate to the Develop > Database > Rules in the Firebase console at: https://console.firebase.google.com/project/$PROJECT_ID/database/firestore/rules.
- Ensure that Cloud Firestore is selected in the dropdown above.

- Set the security rules to the ones found in
firestore/firestore.rules.
This project uses Cloud Build and Config Connector to automate code and infrastructure deployments. The instructions below describe how to deploy the application.
You will need to bootstrap the services and permissions required by this example. The easiest way to do so is by running bootstrap.sh:
./scripts/bootstrap.sh $PROJECT_IDThis step additionally creates a file named env.mk based on env.mk.sample.
Address the TODO comment at the top of env.mk and ensure values are correct.
Run make cluster
Add the following service account as an additional verified owner:
cnrm-system@${PROJECT_ID}.iam.gserviceaccount.com
where ${PROJECT_ID} is replaced by your Google Cloud project ID.
Run make build-all.
Once your application is deployed, you can try it out by navigating to https://$DOMAIN,
where $DOMAIN is the custom domain you configured in env.mk.
After you login at least once to the app, you can use this script to make your
account an admin. Afterwards you'll be able to use the Users page to manage
other accounts. To use this script you will need to
Initialize the Firebase Admin SDK and setup
GOOGLE_APPLICATION_CREDENTIALS environment variable.
cd webui
npm install
npm run init-admin <email>Running make build-all will rebuild and deploy the app, including any changes
made to the infrastructure. Note that removing resources from infrastructure-tpl.yaml
will not cause them to be deleted. You must either run make delete before removing
the resource (then redeploy with make build-all after removing it), or manually
delete the resource with kubectl delete.
# builds and deploys backend, frontend, and KCC infrastructure
make build-all

# builds and deploys only the backend Go service
make build-backend

# builds and deploys only the frontend angular webapp
make build-webuiRunning make delete will delete the Config Connector resources from your cluster,
which will cause Config Connector to delete the associated GCP resources.
However, you must manually delete your Cloud Run for Anthos service and GKE Cluster.
