此文是关于如何修改添加 Mpfshell 的 Adapter 插件到 scratch3 vm 系统中,以及基于 mpfshell 实现对应的实例示范,你也可以基于此进行设计和开发属于自己的硬件积木。
我在这里补充一下几个文档
一、如何搭建出本地的 scratch3 环境的文档,创建你的第一个Scratch3.0 Extension。
注意步骤,我这里备份一次我常用步骤,和上述原文会有些许出入。
先准备 scratch-vm 。
cd Scratch3
git clone https://github.com/LLK/scratch-vm --depth=1
cd scratch-vm
yarn install
yarn link
yarn add uglifyjs-webpack-plugin
yarn run watch

# 新开一个shell
cd scratch-gui
yarn link scratch-vm
完成yarn link scratch-vm之后, scratch-gui 就会采用我们开发环境里的 scratch-vm ,而不是默认的 scratch-vm 这样一来我们就可以定制 scratch-vm 了。
再准备 scratch-vm 。
node -v # v10.15.0. v11.7.0也没问题 , 推荐使用n来管理nodejs版本
npm install -g yarn
npm install -g webpack
npm install -g webpack-dev-server
mkdir Scratch3 #
cd Scratch3
git clone https://github.com/LLK/scratch-gui --depth=1

cd scratch-gui
yarn install
现在你就得到了一个可在本地运行Scratch3.0编辑器。
运行webpack-dev-server --https,打开:https://127.0.0.1:8601/
注意,如果 gui 的网站添加的拓展点不开,要么看 F12 报错,要么是 VM 链接不上,需要在 gui 文件夹中 yarn unlink scratch-vm ,后再 yarn link scratch-vm ,重新连接虚拟机。
关于如何修改和添加积木代码,包括实现,请参考原文内容。
二、如何调用 Mpfshell 的 Adapter 插件的接口,文档在此 adapter.codelab.club。
先进入codelab-adapter并下载 codelab-adapter 的软件,在打开本地后,勾选 extension_mpfshell 插件。

接着的我们看调试接口(DEBUG)


在这里,你可以看到积木实际向插件发送的指令,我们现在尝试一下如何使用 mpfshell 插件吧。
点击如图所示菜单,进入 scratch3 编辑器。


点击左下角,滚动到底下,看到 mpfshell 插件,点开它加载积木拓展。


点开两个基本的变量,观察插件是否连接硬件,以及硬件返回了哪些消息,注意小猫头上的绿点,表示 adapter 插件是否被打开(就是 codelab-adapter 软件。

现在你把烧有 MicroPython 固件的硬件插入电脑,如果你没有用过 mpfshell 我建议你先到这里简单学习一下如何使用它,Hello, World!,然后再回来,你就知道如何烧写 MPY 固件和使用 mpfshell 软件了。
这里我结合一点局部代码extension_mpfshell.py来说明指令,配合调试器可以知道它们背后偷偷摸摸做了什么。
message  = self.read() # python code
# self.logger.debug(message)
topic = message.get("topic")
if self.TOPIC in topic:
    data = message.get('payload')
    obj = topic.split('/')
    mpfs_name = 'default' if len(obj) < 4 else obj[3]
    self.logger.debug(mpfs_name)
    if 'open' in topic:
        message = {
            "topic": topic,
            "payload": str(self.open_device(mpfs_name, data)).rstrip()
        }
        self.publish(message)
    if 'exec' in topic:
        message = {
            "topic": topic,
            "payload": str(self.exec_pycode(mpfs_name, data)).rstrip()
        }
        self.publish(message)
    if 'isconnected' in topic:
        message = {
            "topic": topic,
            "payload": str(self.cache[mpfs_name]._MpFileShell__is_open())
        }
        self.publish(message)
    if 'close' in topic:
        self.cache[mpfs_name].do_close(None)
        message = {
            "topic": topic,
            "payload": str(self.cache[mpfs_name]._MpFileShell__is_open())
        }
        self.publish(message)
假如我们直接点击 open 积木,它实际上就会向 extension_mpfshell.py 插件发送命令,发送了什么呢?

直接看调试器就知道了,但我还是说明一下实现的代码在这里 scratch3_mpfshell/index.js。

可以看到,实际上就是发送了 {"topic":"eim/mpfshell/open/default","payload":"serial not found!"},然后 extension_mpfshell.py 插件里接受到这些后就对应处理。
具体的源码分析我就不解释太多了,但你知道了这个相互之间的通信关系后无非就是,各自做各自的事情,然后彼此间通信,就这样简单。
那么我在这里介绍一下 mpfshell 积木的具体使用说明。
-
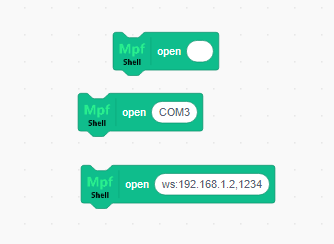
open 积木,参数默认 留空 表示自动查找电脑最新插入的 USB 串口设备,如果不留空,则表示对应的 mpfshell 的 open 操作,如下图。
-
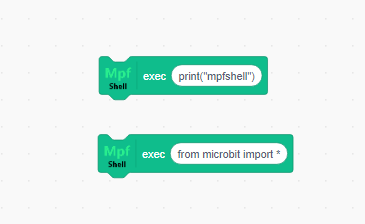
exec 积木,参数默认 print("mpfshell") 表示通过 repl 发送给硬件运行一段 python 代码,也就是 mpfshell 的 exec 操作,第二张图表示,在代码中的时候,积木背后做了什么。
-
其他不重要的积木,如下图。
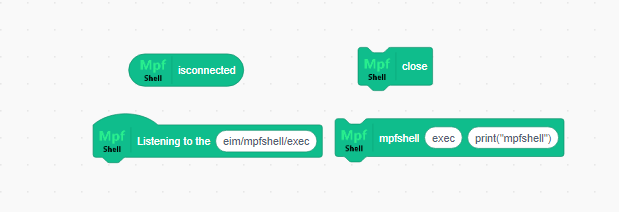
- isconnected 返回 true 和 false 表示设备是否连接,如果连接不上,直接重启硬件或拔插一下,开发的时候经常会不知道谁又占用了串口。
- close 关闭打开的设备,让出串口。
- listening to the (topic) 如果你需要接收 exec 后的数据,你需要用这个,像 debug 一样接收 topic 事件,比如
eim/mpfshell/open/default的监听,如下图。 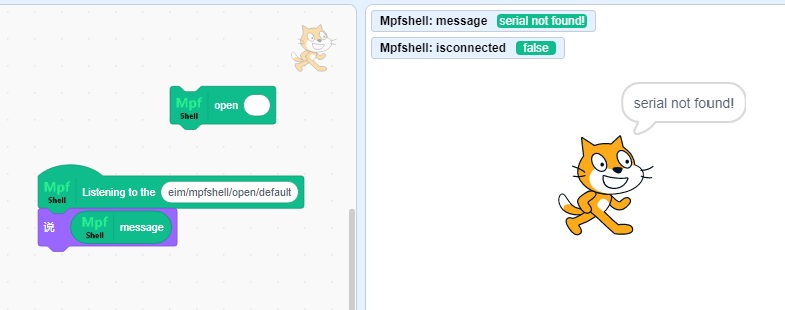
- 最后一个积木是留给拓展插件命令时调试用的。


现在,你应该可以在 scratch3 中使用 mpfshell 了,但如果你想要基于它开发属于你自己的积木,你需要继续往下看,并且你需要深入到源码当中,如果有不懂的地方,欢迎给我 留言 或提交 issue 。
下面将描述如何添加 mpfshell 的积木到你自建的网站当中,包括提供了一个 bpi:bit 积木实例,并基于 mpfshell 来实现的,然后 mpfshell 是基于 scratch3_eim 插件而来的,也就是说,你只要基于这个插件,就可以直接提交给 codelab 网站后台,实现无缝对接。
对此,我也提供了在 webduino-blockly 当作使用 mpfshell 插件的开发文档,如果你觉得 scratch3 不好用,你也可以使用 允许多语言并动态加载积木 的 webduino-module-eim ,这只需要你专注实现积木即可。
How to add to scratch3 ?
Have the following requirements base on codelab_adapter_extensions.
move scratch3_mpfshell to \scratch-vm\src\extensions\scratch3_mpfshell.
open index.jsx in \Scratch3\scratch-gui\src\lib\libraries\extensions .
export default [
    // After the other plug-ins
	,{
        name: 'Mpfshell',
        extensionId: 'mpfshell',
        // iconURL: mpfshellImage, // add icon `import mpfshellImage from './mpfshell.png';` if your need.
        description: (
            <FormattedMessage
                defaultMessage="Mpfshell for Scratch3"
                description="Use mpfshell control micropython."
                id="gui.extension.Mpfshell.description"
            />
        ),
        featured: true
    }
]
However, it does not work yet. You need to provide this plugin in your scratch-vm.
open extension-manager.js in \Scratch3\scratch-vm\src\extension-support .
const Scratch3EimBlocks = require('../extensions/scratch3_eim');
const Scratch3MpfshellBlocks = require('../extensions/scratch3_mpfshell');

const builtinExtensions = {
    // After the other Extensions
    eim: Scratch3EimBlocks, // add eim extension
    mpfshell: Scratch3MpfshellBlocks, // add mpfshell extension
};
This completes the plug-in offering.
If you click on the plugin and nothing happens, you need to re-click yarn unlink and yarn link in scratch-vm.
click image directory.

move extensions to codelab_adapter\extensions.

checked extension_mpfshell start mpfshell.
into scratch3 select mpfshell extension, let's play!

We can use micropython firmware based on mpfshell.
According to the building blocks of mpfshell, we can make control blocks of other hardware. Here I take bpibit as an example.

So we can convert the above definition into a built-in building block.
see scratch3_bpibit/index.js
Take this as an example(same as mpfshell).
- in
extension-manager.js
const Scratch3BpibitBlocks = require('../extensions/scratch3_bpibit');

const builtinExtensions = {
    bpibit: Scratch3BpibitBlocks
};- in
index.jsx
export default [
    // After the other plug-ins
    ,{
        name: 'Bpibit',
        extensionId: 'bpibit',
        collaborator: 'Bananapi',
        description: (
            <FormattedMessage
                defaultMessage="Bpibit for Scratch3"
                description="bpibit"
                id="gui.extension.bpibit.description"
            />
        ),
        featured: true
    }
]
- in
index.js
const ArgumentType = require('../../extension-support/argument-type');
const BlockType = require('../../extension-support/block-type');
const formatMessage = require('format-message');
// const MathUtil = require('../../util/math-util');
const Scratch3MpfshellBlocks = require('../scratch3_mpfshell');
class Scratch3BpibitBlocks {
constructor (runtime) {
/**
* The runtime instantiating this block package.
* @type {Runtime}
*/
this.runtime = runtime;
this.mpfshell = new Scratch3MpfshellBlocks();
}
/**
* The key to load & store a target's pen-related state.
* @type {string}
*/
static get STATE_KEY () {
return 'Scratch.bpibit';
}
/**
* @returns {object} metadata for this extension and its blocks.
*/
getInfo () {
return {
id: 'bpibit',
name: formatMessage({
id: 'bpibit.categoryName',
default: 'Bpibit',
description: 'Use it to control your micropython'
}),
// menuIconURI: menuIconURI,
blockIconURI: blockIconURI,
// showStatusButton: true,
blocks: [
{
opcode: 'isconnected',
blockType: BlockType.REPORTER,
arguments: {}
},
{
opcode: 'connect',
blockType: BlockType.COMMAND,
text: formatMessage({
id: 'bpibit.connect',
default: 'connect [DATA]',
description: 'connect micropython device.'
}),
arguments: {
DATA: {
type: ArgumentType.STRING,
defaultValue: formatMessage({
id: 'bpibit.defaultArgsToOpen',
default: '',
description: 'connect device name(default is none to find).'
})
}
}
},
{
opcode: 'display',
blockType: BlockType.COMMAND,
text: formatMessage({
id: 'bpibit.dispaly',
default: 'dispaly [DATA]',
description: 'dispaly led pixel'
}),
arguments: {
DATA: {
type: ArgumentType.STRING,
defaultValue: formatMessage({
id: 'bpibit.defaultTextToDispaly',
default: 'hello world!',
description: 'bpibit display.'
})
}
}
}
],
menus: {
}
};
}
display (args) {
const cmd = "display.scroll('" + args.DATA + "')";
// console.log(cmd);
this.mpfshell.exec({mutation: null, TOPIC: 'eim/mpfshell/exec', DATA: cmd});
}
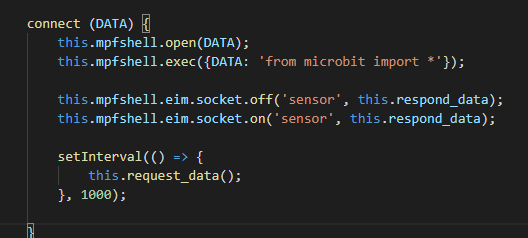
connect (DATA) {
this.mpfshell.open(DATA);
this.mpfshell.exec({mutation: null, TOPIC: 'eim/mpfshell/exec', DATA: 'from microbit import *'});
}
isconnected () {
this.mpfshell.isconnected();
return this.mpfshell.return_info();
}
}
module.exports = Scratch3BpibitBlocks;then your see this.


make hardware for scratch3 by yourself. let go!