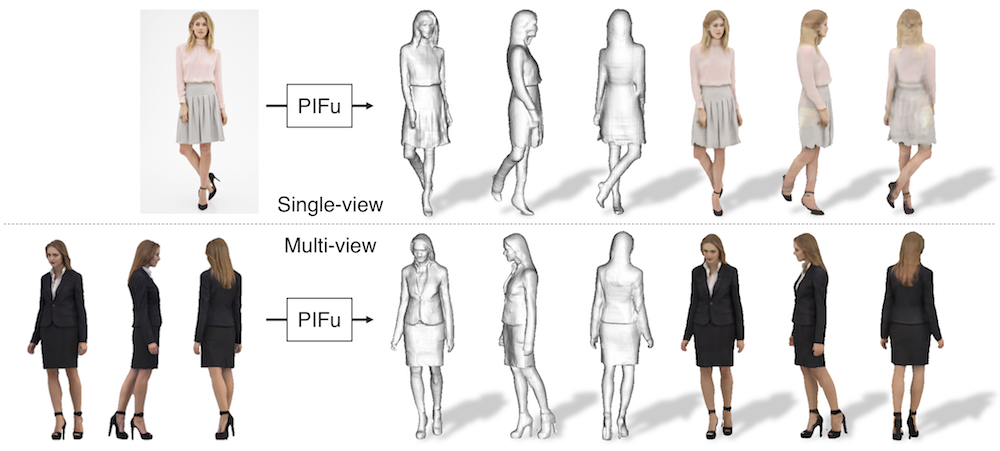
PIFu: Pixel-Aligned Implicit Function for High-Resolution Clothed Human Digitization
This repository contains a pytorch implementation of "PIFu: Pixel-Aligned Implicit Function for High-Resolution Clothed Human Digitization".
If you find the code useful in your research, please consider citing the paper.
@InProceedings{saito2019pifu,
author = {Saito, Shunsuke and Huang, Zeng and Natsume, Ryota and Morishima, Shigeo and Kanazawa, Angjoo and Li, Hao},
title = {PIFu: Pixel-Aligned Implicit Function for High-Resolution Clothed Human Digitization},
booktitle = {The IEEE International Conference on Computer Vision (ICCV)},
month = {October},
year = {2019}
}
This codebase provides:
- test code
- training code
- data generation code
Requirements
- Python 3
- PyTorch tested on 1.4.0
- json
- PIL
- skimage
- tqdm
for training and data generation
- trimesh with pyembree
- cv2
- pyexr
- PyOpenGL
- freeglut (use
sudo apt-get install freeglut3-devfor ubuntu users)
Demo
- run the following script to download the pretrained models from the following link and copy them under
./PIFu/checkpoints/.
sh ./scripts/download_trained_model.sh
- run the following script. the script creates a textured
.objfile under./PIFu/eval_results/. You may need to use./apps/crop_img.pyto roughly align an input image and the corresponding mask to the training data for better performance. For background removal, you can use any off-the-shelf tools such as removebg.
sh ./scripts/test.sh
Data Generation (Linux Only)
While we are unable to release the full training data due to the restriction of commertial scans, we provide rendering code using free models in RenderPeople.
This tutorial uses rp_dennis_posed_004 model. Please download the model from this link and unzip the content under a folder named rp_dennis_posed_004_OBJ. The same process can be applied to other RenderPeople data.
Warning: the following code becomes extremely slow without pyembree. Please make sure you install pyembree.
- run the following script to compute spherical harmonics coefficients for precomputed radiance transfer (PRT). In a nutshell, PRT is used to account for accurate light transport including ambient occlusion without compromising online rendering time, which significantly improves the photorealism compared with a common sperical harmonics rendering using surface normals. This process has to be done once for each obj file.
python -m apps.prt_util -i {path_to_rp_dennis_posed_004_OBJ}
- run the following script. Under the specified data path, the code creates folders named
GEO,RENDER,MASK,PARAM,UV_RENDER,UV_MASK,UV_NORMAL, andUV_POS. Note that you may need to list validation subjects to exclude from training in{path_to_training_data}/val.txt(this tutorial has only one subject and leave it empty).
python -m apps.render_data -i {path_to_rp_dennis_posed_004_OBJ} -o {path_to_training_data}
Training (Linux Only)
Warning: the following code becomes extremely slow without pyembree. Please make sure you install pyembree.
- run the following script to train the shape module. The intermediate results and checkpoints are saved under
./resultsand./checkpointsrespectively. You can add--batch_sizeand--num_sample_inputflags to adjust the batch size and the number of sampled points based on available GPU memory.
python -m apps.train_shape --dataroot {path_to_training_data} --random_flip --random_scale --random_trans
- run the following script to train the color module.
python -m apps.train_color --dataroot {path_to_training_data} --num_sample_inout 0 --num_sample_color 5000 --sigma 0.1 --random_flip --random_scale --random_trans