So below is a traditional, non-CNN approach of feature engineering with ORB descriptiors and DBSCAN clustering!
- Python 3.6.8
- numpy
- skimage
- sklearn (sklearn.cluster.DBSCAN)
- I tested with virtualenv but ideally this should work without virtualenv.
- train_object_finder.py
- find_object.py
- README.md
- train_descriptors.npy (stores training ORB features)
- ./test/ (29 images out of 129 provided images)
- ./find_object/ (given training files)
To read help page:
- $ python train_object_finder.py -h
To train:
- $ python train_object_finder.py ./path/to/training_files
To test on single image as required:
- $ python find_object.py ./path/to/test.jpg
To test on multiple test images from ./test directory (make sure that train_on_full_data = False in training script so that training data does not include images from ./test)
- $ python find_object.py ./path/to/some_dummy_file_which_wont_be_tested_infact.jpg -t
- Test images will be close to what training images look in terms of size, scale, intensity of the object
Note: keypoint == object's location in 2D
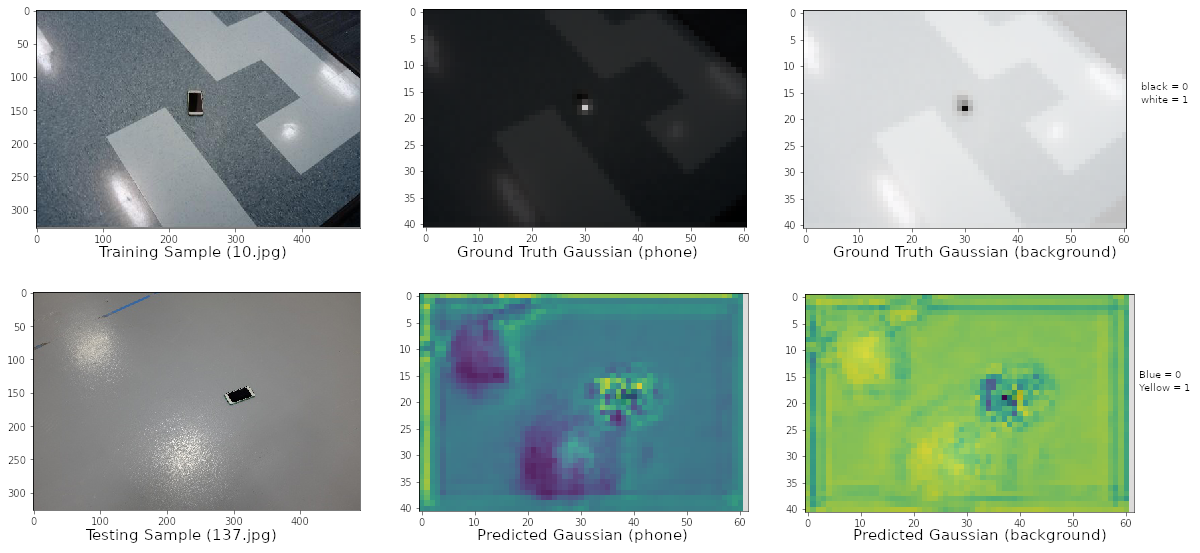
- Architecture similar to CMU's Realtime Multi-Person 2D Pose Estimation using Part Affinity Fields but with one stage and one branch (to only predict location of keypoints)
- Input: RGB images; Ground Truth: 2D Gaussian maps depicting the probability of keypoint being present
- Output: 2D Gaussian maps depicting the probability of keypoint being present. This is then fed through a non-max suppression algorithm to precisely predict and locate (pixel-level) the keypoint in a test image
- Please see the attached image (train_vs_test_cnn.png)
- Result: The predicted outputs were not strong enough for non-max suppression to work. So precise pixel-level location of object could not be found
- Extract ORB keypoints and feature descriptors from training images (but only around the ground truth keypoint i.e., location of the object). We will get 'n' ORB descriptors (stored in train_descriptors.npy). I used ORB because it is open-source and non-patented unlike SIFT.
- Find candidate keypoints in test image using match_descriptor of skimage.feature corresponding to those 'n' descriptors.
- From these candidate keypoints find the strongest spacial cluster of keypoints (with the assumption that keypoints in the test images should be close together around the object). Update the candidates keeping only the keypoints from the strongest cluster. Find the centroid of the cluster which will give the predicted object location. We will get 'n' such predictions.
- Finally, to use consensus across 'n' predictions, cluster these 'n' prediction to find the most dominant cluster. Final prediction is the centroid of this dominant cluster.
- I tested the second approach on 29 test images (last 29 from label.txt) set aside (in ./test). These test images were removed from the training set by using train_on_full_data = False flag in training script. So the training set was first 100 from label.txt
- Accuracy score in terms of Percentage of Correct Keypoint (PCK@0.05) i.e., @normalized_distance of 0.05 was 91.3% on the test set of 29.
The time for training grows linearly with the number of training samples.
The time for testing also grows linearly with the number of training samples because we store the ORB features for all the training images and compare them with the test image.
- Use modern feature extractors such as CNNs to make predictions more robust and in constant time.