Interactive Data Portal for Humanities Research Lab Summer 2021
Project Description.
The IDP is a flexible, real-time data visualization tool for historical research. The IDP was built for internal use at NYU Shanghai.
Team Leaders
Summer 2021:
Sarah Tahir and Alma Kapan are Full-stack developers leading the development cycle both on the front-end (ReactJS, UX Design) and back-end (ExpressJS). Tim Wu is leading the team on Data Visualization and Research, Data Mining
Fall 2021:
Sarah Tahir, Alma Kapan, Tim Wu, TBD
Team Members
Minimum Viable Product
The user will be able to query the database and vizualize selected data through six chart types: histogram, bar chart, boxplot, scatter pot, matrix, and line graph. The user will be able to save their session history and selected graphs to their profile for future use.
Contributing and More
If you would like to contribute to this project, please take a look at the CONTRIBUTING.md file and follow the instructions there.
Building and Testing
To build the project, please install the following software:
- Install Git to follow the git workflow specified for team members and external contributors.
- Install Node.js to contribute to and test the code.
- Install Visual Studio Code and recommended linter to standardize the formatting of the code.
To contribute to the project, please refer to the 'Rules for contributors' and 'Git workflow for team members' sections in the CONTRIBUTING.md file.
Run the project
To run the project, ensure all of the software above is installed. Then, complete the following steps:
Clone the repository. You can clone the repo using VS Code interface or type in the terminal the following command:
git clone (Repository link)
After, change your current directory to the project repository by running:
- cd (directory name)
Within the project folder, change the directory to front-end by doing the following command:
- cd front-end
Before starting the react-app run the following npm commands in the ./front-end path:
- npm install
To start the react-app:
- npm start
- Before starting the back-end server, navigate within the project folder in a different terminal and change the directory to back-end by doing the following command:
- cd back-end
Before starting the back-end server run the following commands in the ./back-end path:
- npm install
To start the server:
- npm start
Contribute to the project
Follow the steps outlined in the contributing guide for developers
Dependencies
To view the list of front-end dependencies, please refer to the file here and here.
To view the list of front-end dependencies, please refer to the file here.
A more detailed documentation of the react and express dependencies will be provided at the end of the project.
MongoDB Connection Setup
All members of the Interactive Portal were invited to access the MongoDb Atlas Database Cluster for Humanities Research Lab. To set up your account, please complete the following steps:
-
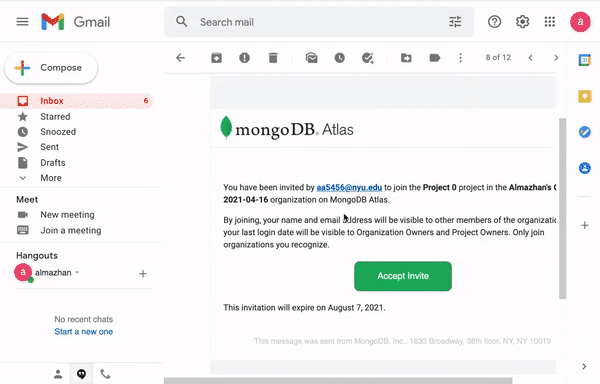
Accept invite in your email to access the HRL MongoDb Cluster
-
Sign up to MongoDb if you haven't yet (use your google nyu email).
-
Go to the Database Access tab and click on Add a new database user and register a new user - select a username and password and remember them for the future use. View the gif with instructions below.
-
Go to the back-end directory and create a file called .env. In that file, please include the following two lines with these changes - replace your_username with your username (e.g. alma) from step 3 and your_password with your password (e.g. asads123) from step 3. Refer to an example file here. Note that your file should be called .env

DB_USERNAME=your_username
DB_PASSWORD=your_password
MongoDB Data Upload
- Convert data from csv to json using the open source projects as this one. The mock data which is currently uploaded to the database is available in csv format here and json format here.
- Install MongoDB server (Community version) following the instructions here.
- To check if the MongoDB server is installed, please type the following command in the terminal:
mongo --version
You should see a version information. Otherwise, please try to reinstall MongoDB server.
-
In the MongoDB Atlas, go to the Cluster 0 and click on the primary cluster. In the newly opened tab, copy the name of the primary cluster, for example, cluster0-shard-00-02.cc5yp.mongodb.net:27017
-
Now go to the terminal and import your json file to the HRL Cluster. Please type the following command in the terminal:
mongoimport --host cluster_name --db new_database --type json --file ./myfile.json --jsonArray --authenticationDatabase admin --ssl --username your_username --password your_password
You should replace the following items in the command above:
- cluster_name is the name of the primary cluster that you retrieved in step 4. For example, cluster0-shard-00-02.cc5yp.mongodb.net:27017
- new_database is the name of the database where you would like to upload your data. You can view existing databases by clicking on your cluster (Cluster 0 for this project).
- ./myfile.json is the path to the json file that you would like to upload to the database.
- your_username is your MongoDB username for the working cluster (from step 3 in the MongoDB Connection Setup section above).
- your_password is your MongoDB password for the working cluster (from step 3 in the MongoDB Connection Setup section above).
-
To view the newly uploaded data, in the MongoDB Atlas, go to your Cluster (Cluster 0) and click on Collections - here you will be able to see the datasets. View the gif with instructions below.


Postman Setup
- Postman is a desktop app that allows you to trigger custom HTTP requests to your local development web server, which relieves you from having to write (and debug) front-end code while your focus is on perfecting the back-end.
- To set up a postman application download it here
- Once installed, get started by clicking the Create a request link on the Launchpad screen. Enter a route you have set up in express, such as http://localhost:4000/, and click the Send button.
- It is possible to save requests you want to run frequently so you can quickly test them as you work on the code.
- You can find a file called express-js-starter-app.postman_collection.json that can be imported into Postman to easily try out all these routes.
- The list of routes that you can test are in the back-end folder. For a more detailed explanation on the routes, please see the video tutorial on back-end routes.