The Social NoteWork is a multi-platform, note-taking application with a
social aspect.
Explore the docs »
View Demo (Coming Soon)
·
Report Bug
·
Request Feature
Table of Contents

This logo was AI Generated by Stable Diffusion Online.
Isn't this the fanciest sticky note you've ever seen? 📄
To learn more about the inspriation for this project see the blog post.
The Social NoteWork is a multi-platform, note-taking application with a social aspect. It has a Node.js runtime/server and 6 separate clients.
The clients:
- Android 🦾
- iOS 📱
- Web 🌐
- Linux 🐧
- Mac 🍏
- Windows 🪟
I figured why stop at only one when we can target so many platforms so quickly?
Clone the repo and fire it up to get started. 🚀
My Stack (MERN)
This project is built with all of the latest versions of various frameworks & libraries used to bootstrap the project. I'll list additional add-ons/plugins in the acknowledgements section below.
To set this project up locally and get a local copy up and running, follow these steps.
You will need the following installed and configured on your machine.
-
node.js (Required)
I recommend installing node with nvm
If you need help try this guidecurl -o- https://raw.githubusercontent.com/nvm-sh/nvm/v0.39.7/install.sh | bashor
wget -qO- https://raw.githubusercontent.com/nvm-sh/nvm/v0.39.7/install.sh | bash -
npm install -g pnpm
Another option is to install node & pnpm with this
npm install -g @pnpm/exe
-
pnpm add nx -D -w
Configure your verified commit siging key.
I recommend following these instructions to use your current SSH key for signing commits, if you havent already configured this.
If not, you could use these instructions to generate a separate SSH key, add it to your GitHub account as a signing key, and then use it for signing your commits.
Optionally, you could sign all of your commits with this.
git config --global commit.gpgsign trueIf you use 1Password this video and this guide could also be options.
You will need access to a Mongo database.
You have options:
Pick one or both options above, set it up and install the mongo-shell.
Once you've installed and set your prerequisites up you can run the following commands.
-
Start your Mongo Database Management System. 🌱
If you installed MongoDB with Homebrew,
you can use this command.brew services start mongodb-community@7.0
If the previous command gave you an error you can try this one.
brew services restart mongodb-community@7.0
-
Create a new database
Enter the mongo-shell.
You will need to install it if you don't already have it.mongosh
This creates and selects the database, making it active in your environment.
use <database name>
This exits you from the mongo-shell and returns you back to your normal shell (bash, zsh or others).
exit -
Clone the repo.
git clone git@github.com:HamiltonMultimedia/The-Social-NoteWork.git
-
Set up the backend's .env file.
cd The-Social-NoteWork/apps/backend/ && cp .env.example .env
If you installed MongoDB locally.
Edit your .env file to have this line. 👇🏾
Replacing <database name> with the name you chose.DB_HOST=mongodb://127.0.0.1:27017/<database name>
If you used MongoDB Atlas as your database.
Follow these instructions to connect to your cluster and add the connection URI to your .env file. -
Install NPM packages for the backend.
cd The-Social-NoteWork/apps/backend/ && pnpm install
-
Start your Express.js backend dev environment. ⚙️
pnpm nx dev tsn-gql-backend
If you get the error "Unable to create nodes for pnpm-lock.yaml using plugin nx-js-graph-plugin."
It's related to a known issue with nx.
Run the command below and try again.👇🏾touch node_modules/.modules.yaml
-
Now head over to the backend's GraphQL Playground address.
http://localhost:4000/api
-
Now we'll prepare the frontend's dev environment.
In a separate terminal window, run the following command to install the project's dependencies.
(assuming the repo is in your home folder)cd ~/The-Social-NoteWork/apps/react-tsn && pnpm install
-
Fire up your frontend dev environment. 🔥
pnpm nx serve react-tsn
-
Navigate to the frontend's server address.
http://localhost:4200/
-
Enjoy developing your FullStack JavaScript app! 🛠
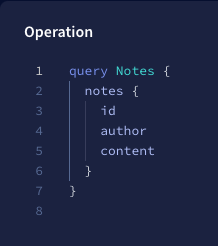
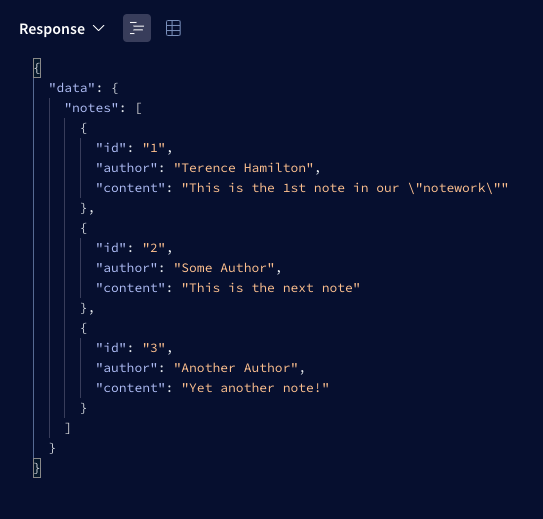
Once you've gone to the address mentioned in the previous section then you can test the resolver out in your browser.
These tests will be automated soon.
You can use the selector to draft your query request.
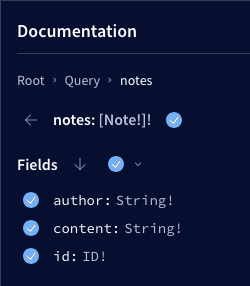
Create notes with the selector and select the fields you want, optionally.
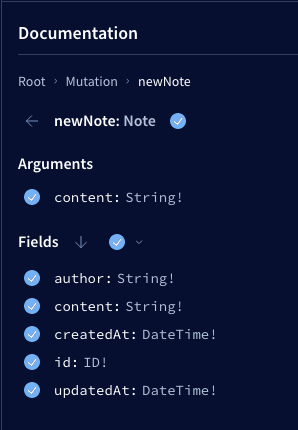
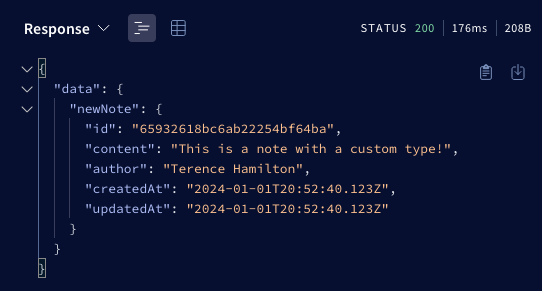
Create them with a custom request that contains a variable.
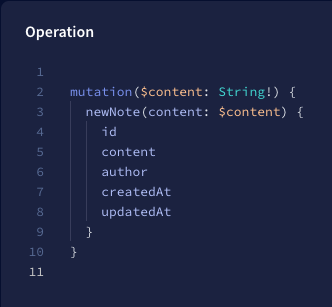
Create request with a custom variable.

Draft a note update request in the GUI.
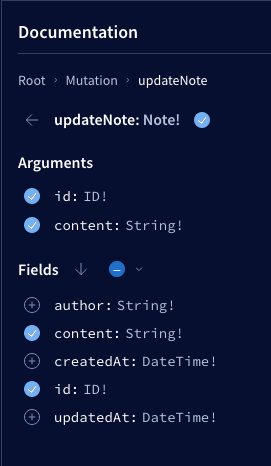
Update note with a custom mutation request.
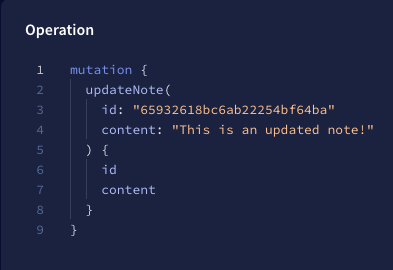
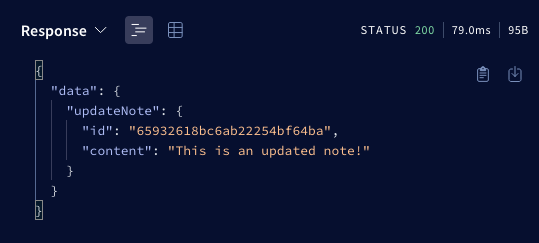
GraphQL responds with your updated note.
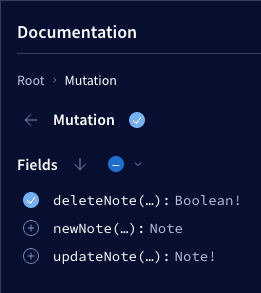
Delete your note with the GUI's request selector.
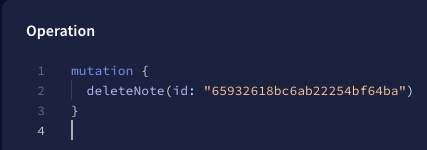
Delete your note with a customized request. (Note ID required)
See the response of your delete request.

More Documentation is coming soon
- Add MongoDB Database
- Add User Actions:
- Create Notes
- Read Notes
- Update Notes
- Delete Notes
- Mark Notes as Favorites
- Add User Accounts and Authentication
- User Sign up
- User Sign in
- User Sign out
- User Auth Tokens (JWT)
- Link Users to their Notes
- User Permissions for Updates & Deletes
- User Queries
- Nested Queries
- Toggling Note Favorites
- Added Details:
- Pagination
- Data limits
- Helmet Security
- Apollo 4's GraphQL Error Handlers
- Develop Mobile clients
- Develop Desktop clients
See the open issues for a full list of proposed features (and known issues), when I get some. 😆
Check out the change log for a full list of updates.
Contributions are what make the open source community such an amazing place to learn, inspire, and create. Any contributions you make are greatly appreciated.
If you have a suggestion that would make this better, please fork the repo and create a pull request. You can also simply open an issue with the tag "enhancement". Don't forget to give the project a star! Thanks again!
- Fork the Project
- Create your Feature Branch (
git checkout -b feature/AmazingFeature) - Lint pick your code (
pnpm nx run tsn-gql-backend:lint:production --skip-nx-cache) - Commit your Changes (
git commit -m 'Add some AmazingFeature') - Push to the Branch (
git push origin feature/AmazingFeature) - Open a Pull Request
Distributed under the MIT License. See LICENSE.txt for more information.
LinkedIn: in/terence-hamilton - Twitter: @Hamilton_TPJ
Project Link: The Social NoteWork
Here are some resources I found helpful and would like to give thanks and credit to.


