- Origin
- Authors:
- Heber Trujillo heber.trj.urt@gmail.com
- Montserrat Navarro montserrat.nvro.lpz@gmail.com
- Date of last README.md update: 18.06.2022
A startup called Sparkify wants to analyze the data they've been collecting on songs and user activity on their new music streaming app. The analytics team is particularly interested in understanding what songs users are listening to. Currently, they don't have an easy way to query their data, which resides in a directory of JSON logs on user activity on the app, as well as a directory with JSON metadata on the songs in their app.
This project aims to show Python capabilities for data modeling and ETL pipelines design using Postgres.
Mainly, this project will focus on:
- Define fact and dimension tables under the star schema optimized for OLAP.
- ETL pipeline design to transfer data from two local directories to a Postgres Data Base.
- PyEnv
- Poetry
In the terminal:
-
Update Homebrew and install it:
brew update
brew install pyenv
-
Set up the shell environment for PyEnv for ZSH:
echo 'export PYENV_ROOT="$HOME/.pyenv"' >> ~/.zshrc
echo 'command -v pyenv >/dev/null || export PATH="$PYENV_ROOT/bin:$PATH"' >> ~/.zshrc
echo 'eval "$(pyenv init -)"' >> ~/.zshrc
-
Install python 3.8.6 using PyEnv
pyenv install 3.8.6
pyenv global 3.8.6
-
Install poetry using the following command:
curl -sSL https://raw.githubusercontent.com/python-poetry/poetry/master/get-poetry.py | python - -
Add Poetry's bin directory to
PATHenvironment variable.source $HOME/.poetry/env
-
Set virtual env in project root.
poetry config virtualenvs.in-project true
-
Create python environment with all dependencies:
poetry install --no-root
-
Activate python environment:
source .venv/bin/activate
The project is structured as follows:
-
sql_queries.py: A Script containing all the hardcode queries; future versions will refactor this using an ORM.
-
create_tables.py: This drops and creates the DDBB Schema shown in the following section; future versions will use alembic.
-
etl.py: Extract, process, and load the data from the
./datadirectory to the Sparkify Data Base.
Hence, to process the JSON files, you have to run the following comands at the terminal:
python .\create_tables.py
python .\etl.pyThe available data consists of:
-
Song data: A subset of actual data from the Million Song Dataset. Each file is in JSON format and contains metadata
-
about a song and the artist.
-
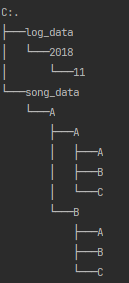
Log Dataset: log files in JSON format generated by this event simulator based on the songs in the dataset above. These simulate activity logs from a music streaming app based on specified configurations.
.\data\ tree
We use the star schema optimized to analyze which songs users are listening to, where we have:
-
Fact Table
- songplays - records in log data associated with song plays i.e. records with page NextSong.
-
Dimension Tables
- users - users in the app user_id, first_name, last_name, gender, level
- songs - songs in music database song_id, title, artist_id, year, duration
- artists - artists in music database.
- time - timestamps of records in songplays broken down into specific units.
All contributions, bug reports, bug fixes, documentation improvements, enhancements, and ideas are welcome.
All new features must reside in their own branch, which must be pushed to the remote repository. However, instead of branching from the master branch, feature branches use the develop branch as their parent branch. When a feature is finished, it is merged back into develop branch. Functions should never interact directly with the master branch.
- Check out to develop
git checkout develop- Pull latest changes from remote
git pull- Double check that you have all the dependencies installed in your virtual env from the new pyproject.toml
poetry install- Create your branch using the following notation feat/{your-name}, please note that {your-name} must be concise, like:
git checkout -b feat/pre-commit- Push your newly created branch to remote repository
git push --set-upstream origin feat/{your-name}- Regular commit your changes using the following logic
- Updating existing code:
git commit -m "[UPD] your message here"- New modules, classes, functions, etc:
git commit -m "[NEW] your message here"
Once you have the feature ready and tested, open a Pull Request to merge your branch into develop.
Fix, or hotfix branches are used to quickly fix production releases. They are very similar to feature branches, except that they use the master branch as their parent branch and not the develop branch. When the fix is done, it should be merged with master and develop branches, and master should be tagged with an updated version number.
- Check out to develop
git checkout develop- Pull latest changes from remote
git pull- Double check that you have all the dependencies installed in your virtual env from the new pyproject.toml
poetry install- Create your branch using the following notation fix/{your-name}, please note that {your-name} must be concise, like:
git checkout -b fix/logging-bug- Push your newly created branch to remote repository
git push --set-upstream origin fix/{your-name}- Regular commit your changes using the following logic
- Updating existing code:
git commit -m "[UPD] your message here"- New modules, classes, functions, etc:
git commit -m "[NEW] your message here"
Once you have the feature ready and tested, open a Pull Request to merge your branch into develop.

