A BOXHEAD game (also known as 《僵尸危机》 in Chinese) rebuilt with cocos2d-x-4.0 in C++.
Final project of course "Design Method and Develop Environment of Software"
Due to lack of artistic efforts, the user interface might not be fully coherent with the game. We apologize for that.
When the game ends, press  to go back to the title page.
Use W A S D to move, and J to fire.
Select your weapons with number keys above WASD.
1 for pistol (weak but with infinite ammunition)
2 for Uzi (a type of micro sub-machine gun)
3 for shotgun (boasts high power)
4 for barrels (explode when you shoot them; also hurts yourself)
It was quite a debate to set proper firepower for these weapons. Personally speaking, I think the fire rate of Uzi is too low, but that of shotgun goes too high.
Tip: repeatedly press J very rapidly instead of holding it to reach virtually unlimited fire rate.
Pick up red boxes to replenish ammo.
Your HP get recovered automatically but slowly as long as you do not get attacked.
Your score increases, not immediately but gradually, as you kill zombies. Kill a grey one in level 1 and wait a while to understand the mechanism.
It was too difficult for me, as a really unskilled player, even to beat level 2. That's why I made an official cheat to fully test the game (With the cheat I did find and fix a bug in callback functions about physical effects). So just press U while playing, to become invincible with unlimited ammo. Press U again to exit Invinci Mode. Currently no visual hint is offered in the game for Invinci Mode.
Follow this link to create public-private key on your workstation, and update your github account with the public key.
git clone --recurse-submodules git@github.com:Hecate2/Cpp_dev_final.git
git config --global submodule.recurse true
git config --global push.recurseSubmodules on-demand
(Well, we did not actually use submodules.)
Tip for Chinese users: if you find it difficult to clone this repository from github, try gitee which can import this repo from github and provide convenience for you to git clone.
Our environment:
Windows 10
cocos2d-x-4.0
CMake version 3.17.2
Python 2.7.17 (for cocos2d setup)
Visual Studio 2019
Reference:
https://blog.csdn.net/sunnyboychina/article/details/104711649/
https://www.cnblogs.com/Airplus/p/12771516.html
(Check that your Visual Studio has enough equipments for C++ desktop development. You may refer to the 2nd reference link)
First, download cocos2d-x-4.0 from http://cocos2d-x.org/filedown/cocos2d-x-v4.0 and unzip it. We would assume you put cocos2d at C:\cocos2d-x-4.0. In this way, there should be a file C:\cocos2d-x-4.0\setup.py.
And then install the latest version of CMake and Python 2. Remember to let cmake and python in your system Path.
Now
cd C:\cocos2d-x-4.0
and run
py -2 setup.py
which adds some user environment variables. Just press Enter when you are asked to provide Android NDK and SDK root. Then
cd C:\cocos2d-x-4.0\tools\cocos2d-console\bin
to prepare for creating a new project.
Now that your are at C:\cocos2d-x-4.0\tools\cocos2d-console\bin, just run the following:
py -2 cocos.py new HelloWorld -l cpp -d C:\cpp
The HelloWorld above stands for your new project name (you can use any name you like, but using the name of your game is recommended), and C:\cpp is the directory to store your new project. We will assume your project is placed at C:\cpp\HelloWorld.
Go to your new project and make a directory for a new Visual Studio project.
cd C:\cpp\HelloWorld
mkdir win32-build
cd win32-build
cmake .. -G"Visual Studio 16 2019" -Tv142 -A win32  # for VS2019
cmake .. -G"Visual Studio 15 2017" -Tv141 -A win32  # for VS2017
# No warranty for the VS2017 command to run correctly
# Note that cocos2d-x may not support x64 compilation
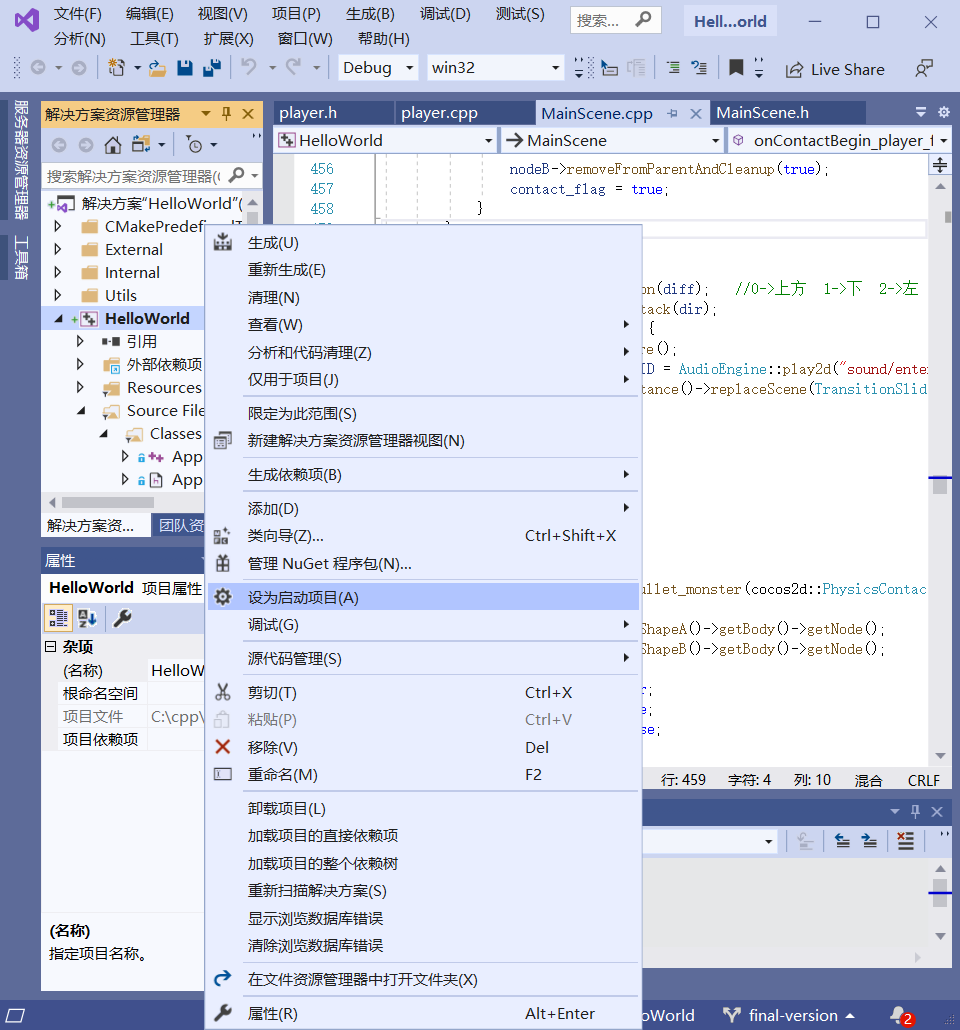
You may now open C:\cpp\HelloWorld\win32-build\HelloWorld.sln with Visual Studio. Right click on your solution HelloWorld and set it as the starting project. See the following screenshot:

Build and run the project if you would like to. You'll see the HelloWorld demo offered by cocos2d-x.
Clone this repository. We assume that you run
git clone --recurse-submodules git@github.com:Hecate2/Cpp_dev_final.git
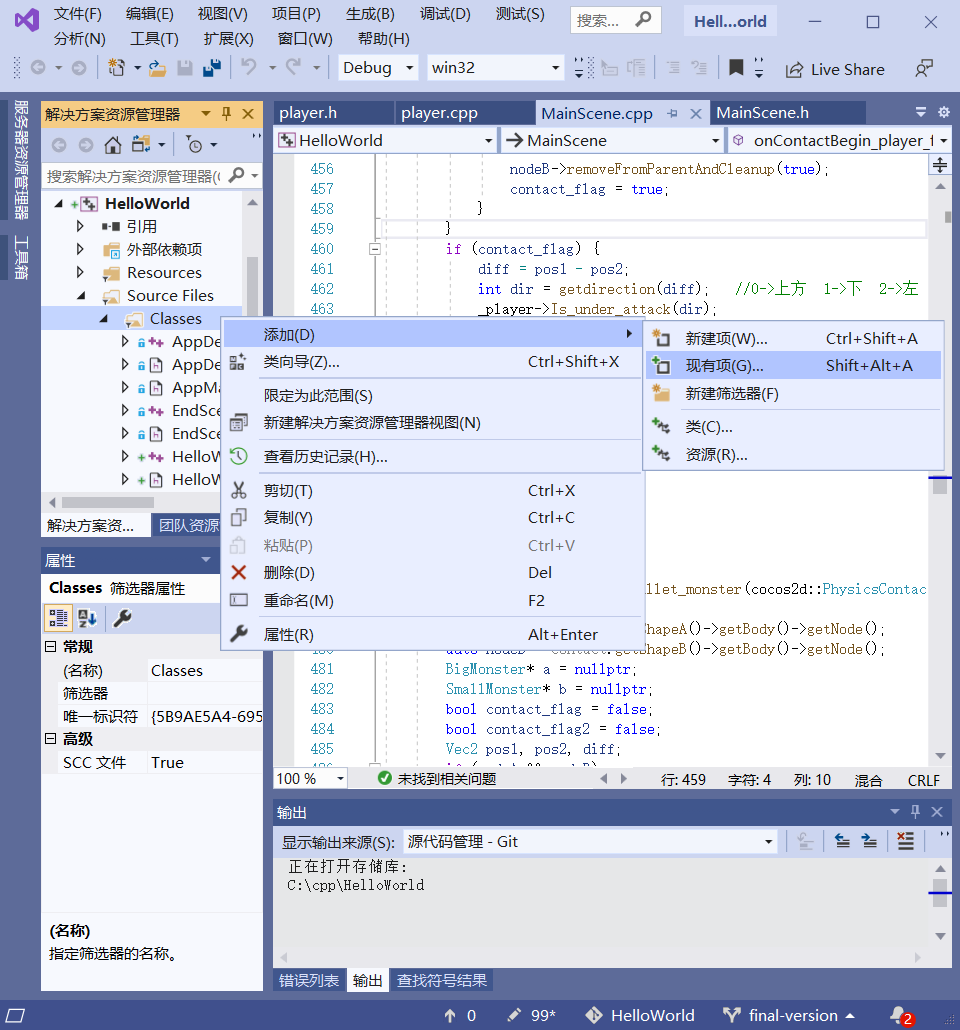
at C:\cpp. Move EVERYTHING INCLUDING .git BUT EXCEPT CMakeLists.txt to C:\cpp\HelloWorld\win32-build and replace every file. Then, in Visual Studio, right-click Classes in you solution HelloWorld, and add all the files in C:\cpp\HelloWorld\Classes to your Visual Studio solution. Similarly, add everything in C:\cpp\HelloWorld\proj.win32 and C:\cpp\HelloWorld\Resources respectively to proj.win32 and Resources in VS.

Build and enjoy! If there are compilation errors like unresolved external symbols, check your importing of items first.
Hints:
- It is not recommended that you replace
CMakeLists.txtwith our version, since yourcocos2dlibrary and VS project might have been placed in varied directories. A rough overwriting ofCMakeLists.txtcan lead to failure of compilation. - You may find thousands of files created by Visual Studio to be included when you want to
git addandcommitsome of them. Since your construction of developing environment can be different from ours, it is time-consuming to make a unified solution. So please help yourself to create a.gitignorefile and ignore unnecessary files.
Correct deployment is as important as elegant codes.
- Clone the on-line repository with command lines.
- Always use git! Please avoid downloading zip from github and committing through your browser in cooperated development.
- Before you are to start coding:
git pull origin masterfor ONLY ONCE. This command merges the on-line version into your local version, ensuring that your local repository does not fall too much behind the on-line updates.
And you may choose to write codes in a new branch.
- When coding:
Edit codes directly in your local repository. - Pushing your codes to the on-line repository:
Test your codes carefully to ensure that the online master branch still works after your commitment of codes!
Use a git GUI tool to commit your changes. The tool may also help you check or revert your changes. After committing, push your codes into a new remote branch by running:
git push origin your-local-branch:remote-branchfor example:
git push origin master:new-featureThen, open a pull request on github from the new remote branch (which refers to new-feature in the example above), and request a code review from your teammates.
When approved by teammates, help yourself to merge the pull request on github.
Please avoid using git push -f.
By the way, it's dangerous to execute git push origin :master, which, without a local branch name, deletes the remote master branch.
Different encoding leads to garbled text in code files; different end of line makes it impossible to check the difference between commits
Encoding: UTF-8
End of line: \r\n
If we are to use a same IDE on a same OS (e.g. Visual Studio on Windows) during the whole development, just follow the default settings of that IDE.
