You can also read a translated version of this file 中文版 or in Korean 한국어.
"AIO" means All in one, which aims to integrate as many functions as possible into Holocubic AIO firmware and insist on open source. At present, the firmware source code reaches 2W + line, and the upper computer source code reaches 4K line (all excluding font pictures). We sincerely invite you to jointly develop AIO firmware, upper computer and its periphery, so that the firmware can meet the needs of more people.
- The original author's project link https://github.com/peng-zhihui/HoloCubic
- Address of the project https://github.com/ClimbSnail/HoloCubic_AIO (latest version)
- Or https://gitee.com/ClimbSnailQ/HoloCubic_AIO
- AIO Framework Development and Some APP Writing: [ClimbSnail] (https://github.com/ClimbSnail)
- 2048 Game Application Development: [AndyXFuture] (https://github.com/AndyXFuture)
- New Weather Clock Application Development: [PuYuuu] (https://github.com/PuYuuu)
- BiliBili fan application development: [cnzxo] (https://github.com/cnzxo/)
- Memorial Day, Heartbeat App Development: [WoodwindHu] (https://github.com/WoodwindHu)
- Developers continue to join. . . .
Welcome to AIO internal test QQ discussion group
一群群号 755143193 二群群号 860112883 三群群号 676732387 四群群号 749207817
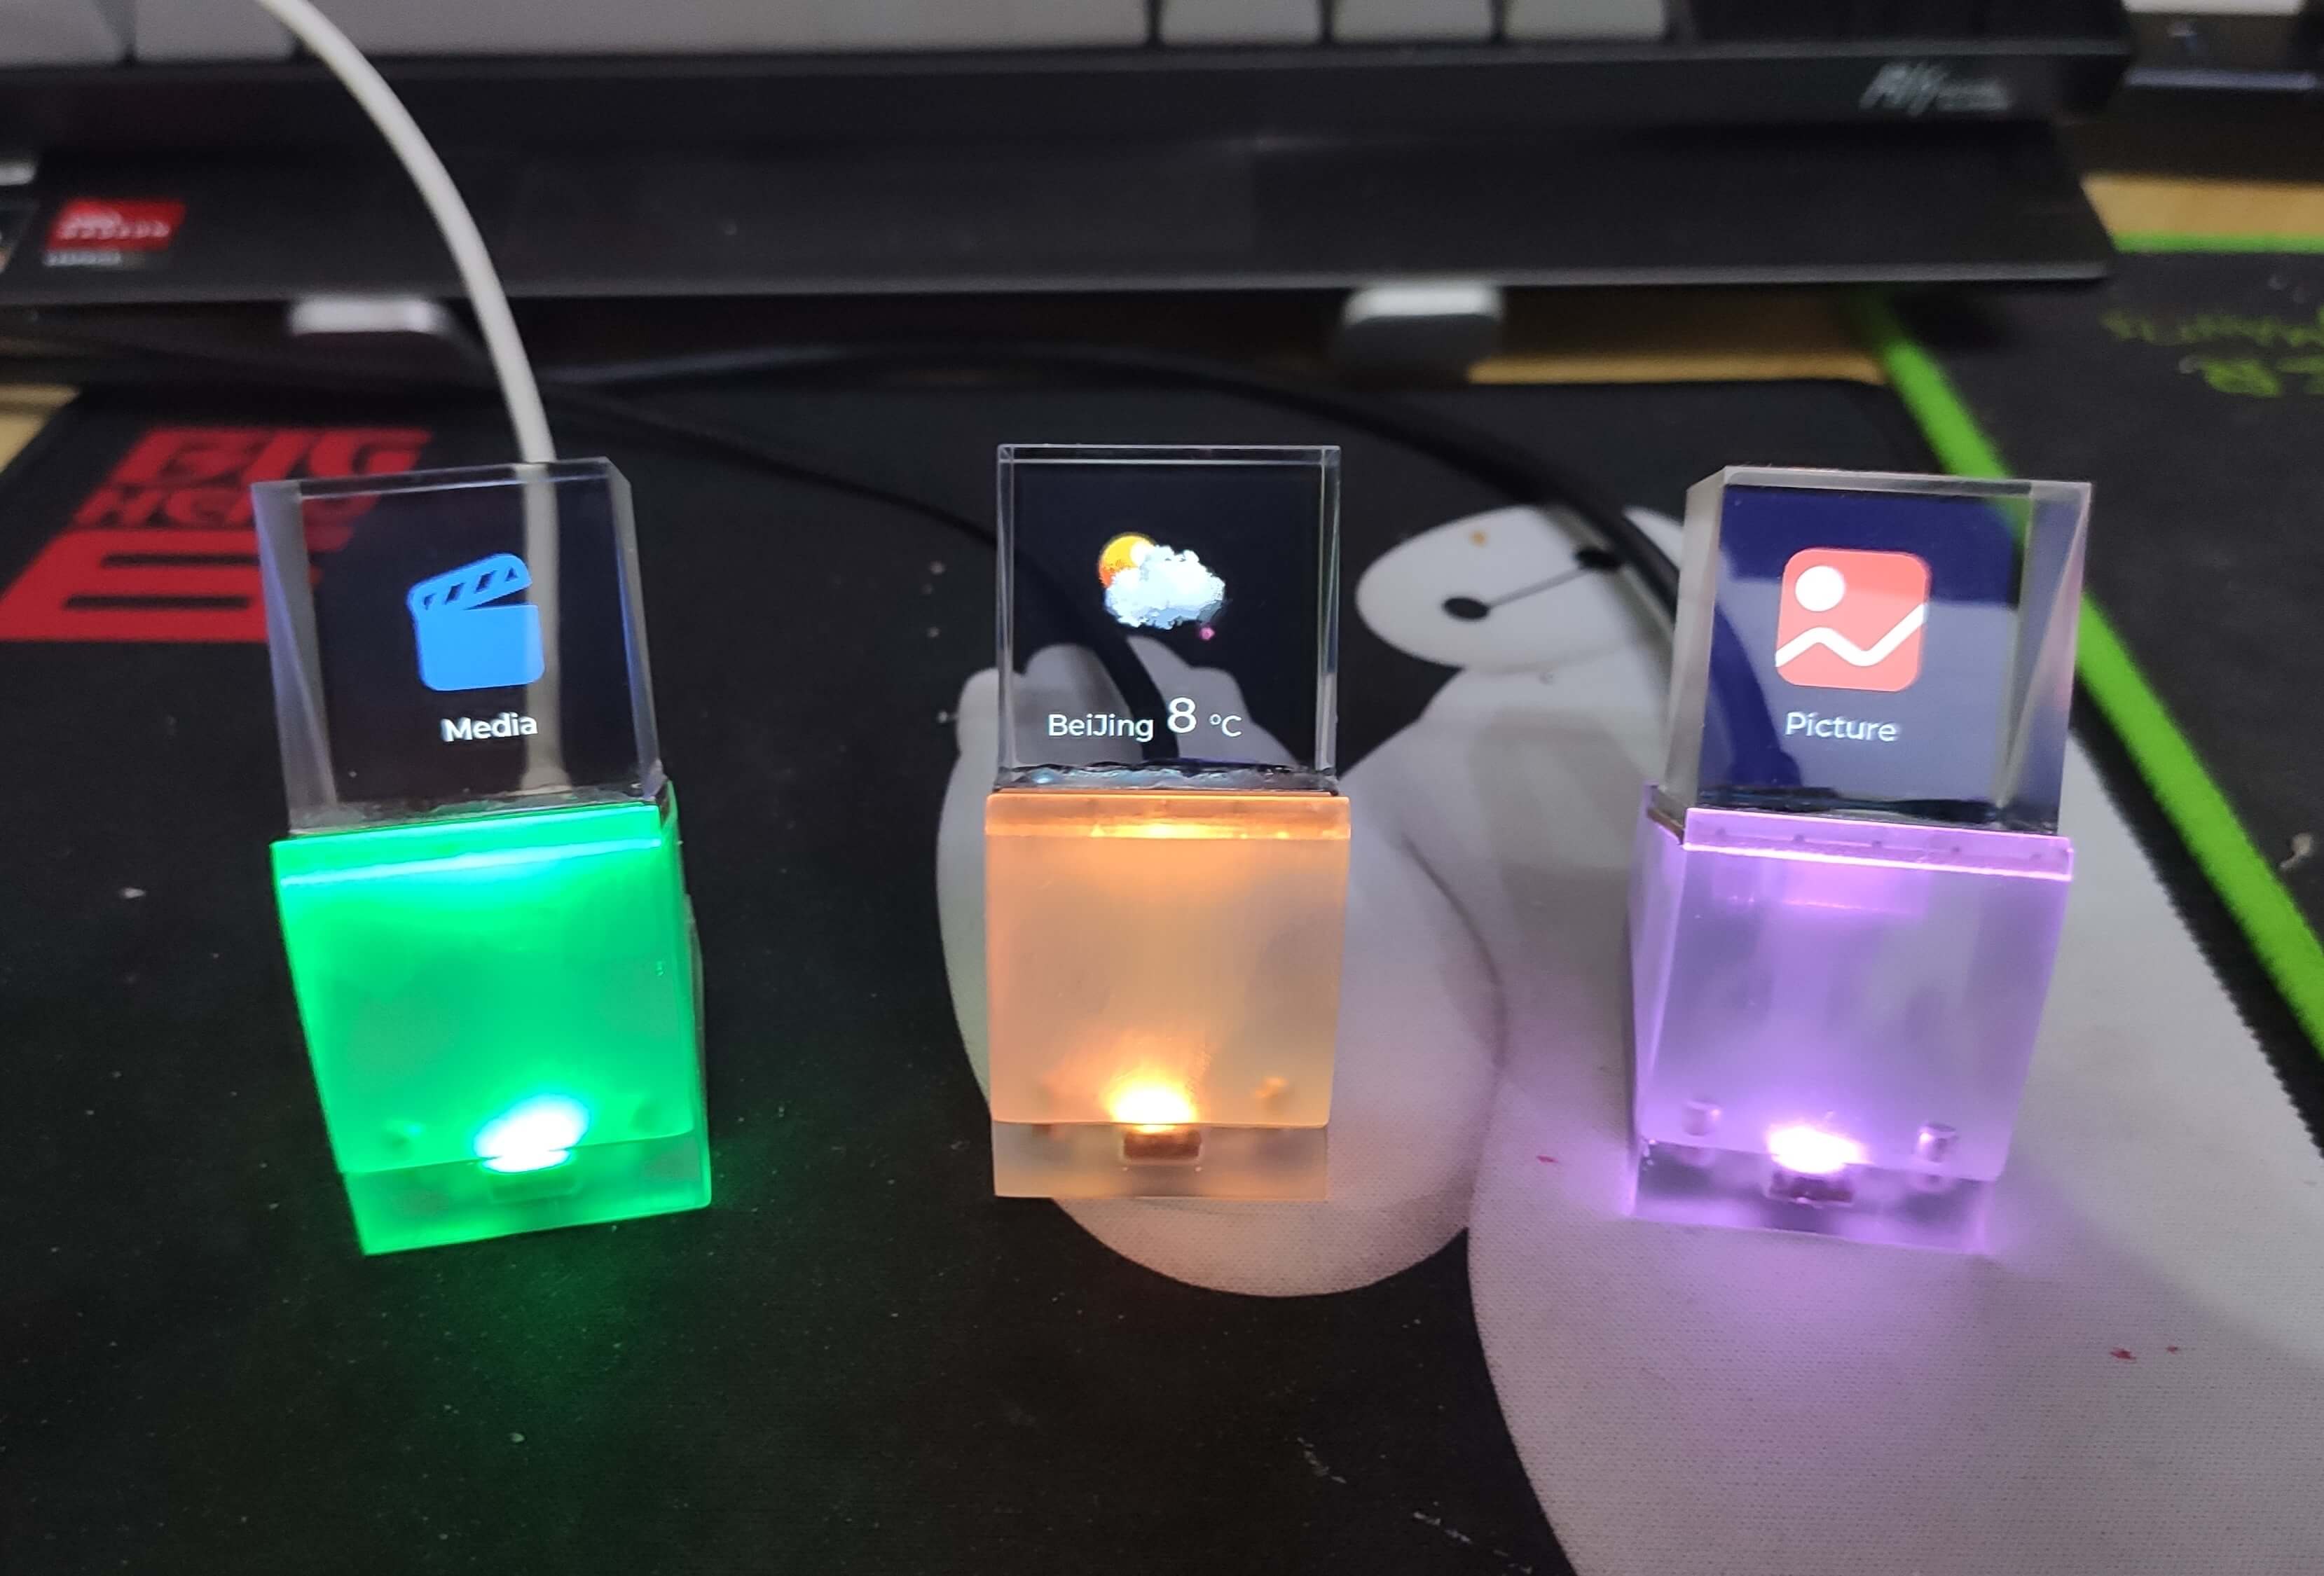
- Aggregate a variety of apps, with built-in weather, clock, photo album, special effects animation, video playback, computer screen projection, web settings and so on. (Reference manual for specific use of each APP)
- Whether tf card is plugged in or not, whether mpu6050 is welded normally, and whether wifi is connected (2.4 G wifi must be used) will not affect the system startup.
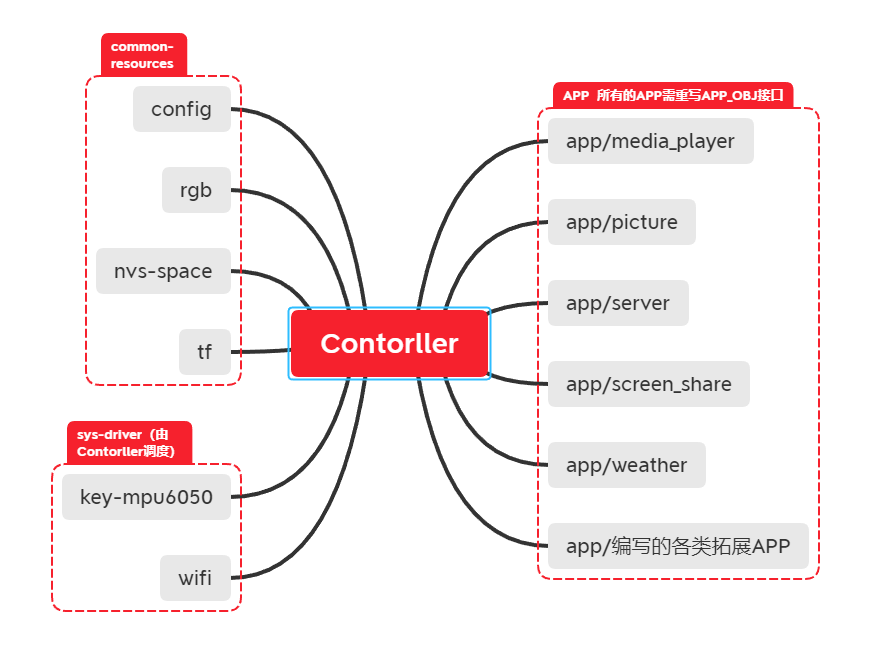
- The program is relatively modular and low coupling.
- Provide web interface for distribution network and other setting options. Note: Refer to
APP introductionfor specific operation - Provide web-side connection. Besides supporting ip access, it also supports domain name direct access http://holocubic (some browsers may not support it well)
- Provide web files to upload to SD card (including deletion), without unplugging SD to update pictures.
- Provide a complete set of upper computer software and open source upper computer source code. Https://github.com/ClimbSnail/HoloCubic_AIO_Tool
This firmware designs a set of low coupling framework, which is more conducive to the realization of multi-functions
Bilibili function operation demonstration video link https://www.bilibili.com/video/BV1wS4y1R7YF/
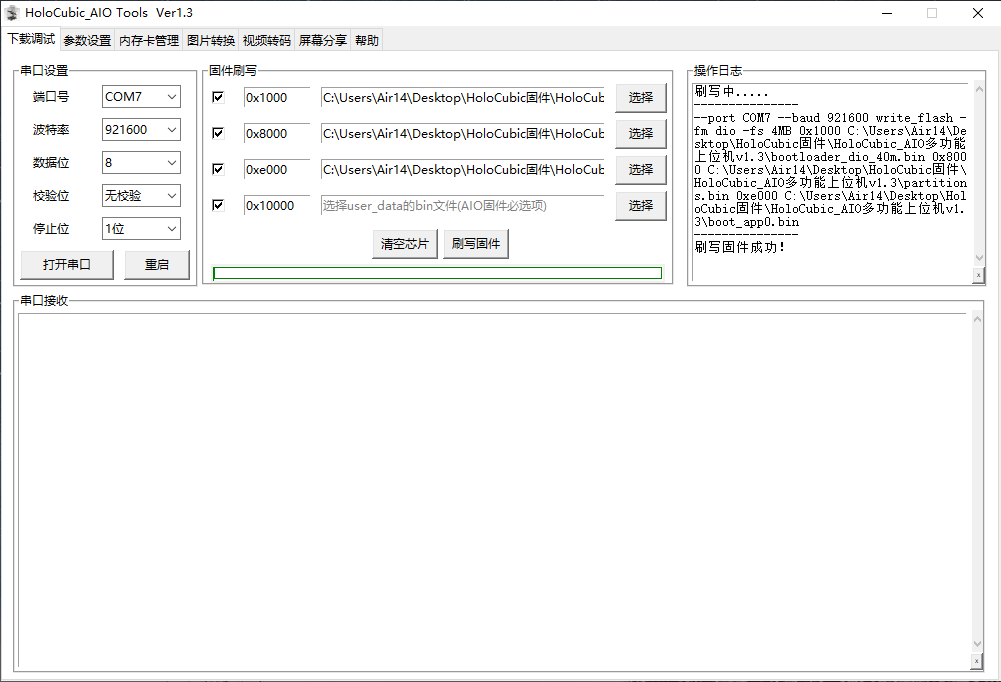
Download the upper computer in the group for brushing.
bootloader_dio_40m. binbootedbootloader.partitions.binpartition fileboot_app0.bin- Latest firmware
HoloCubic_AIO_XXX.bin
The HoloCubic_AIO_XXX. bin file is updated with each version update, and the other three files remain basically unchanged.
Put the first three files above in the same directory as CubicAIO_Tool. Exe, double-click to run CubicAIO_Tool. Exe, and select the latest firmware HoloCubic_AIO_XXX. bin in the software to brush the firmware.
Host computer operation demonstration video link https://b23.tv/5e6udh
Like AIO firmware, this host computer insists on open source, and its open source address is https://github.com/ClimbSnail/HoloCubic_AIO_Tool
Since the small TV uses MPU6050 gyroscope accelerometer, it is necessary to keep the small TV naturally (do not hold it in hand) 3 seconds before power-on, and wait for the sensor to initialize. After initialization, the RGB light will fully light up, and then it can operate normally. Inserting or not inserting the memory card will not affect the normal boot. If there is a problem with 6050 welding, the attitude reading will be disordered after initialization (phenomenon: the application will be continuously switched).
- The file system of the TF card is fat32. TF is non-essential hardware, but photo albums, video playback and other functions need to rely on this. If you are going to use the memory card, it is best to put all the files and folders in the directory of the memory card in this project in the root directory of the TF card before using the memory card.
- Plugging tf memory card or not will not affect boot, but will affect the functions of some apps (which will be explained in the introduction of each app).
- Shake from side to side to switch and select various apps.
- Tilt forward for 1s to enter the APP application on the current page, and more functions will be integrated in the future. Also, tilt back for 1s to exit the APP.
- Operating conditions: None. Note: WiFi and other information is stored in flash, memory card does not affect the connection of WiFi function.
- When enabled,
Web Sever Start 'is displayed. The small TV turns on AP mode, which is built onAP_IP(marked on the service interface of the screen). The hot spot of AP mode is calledHoloCubic_AIO ` without password. - Start using the computer in the same network environment (same network segment) as' HoloCubic '. If you haven't connected to WiFi before, you need to use your computer to connect to WiFi without password, which is a hot spot named
HoloCubic_AIOreleased by HoloCubic. - Enter
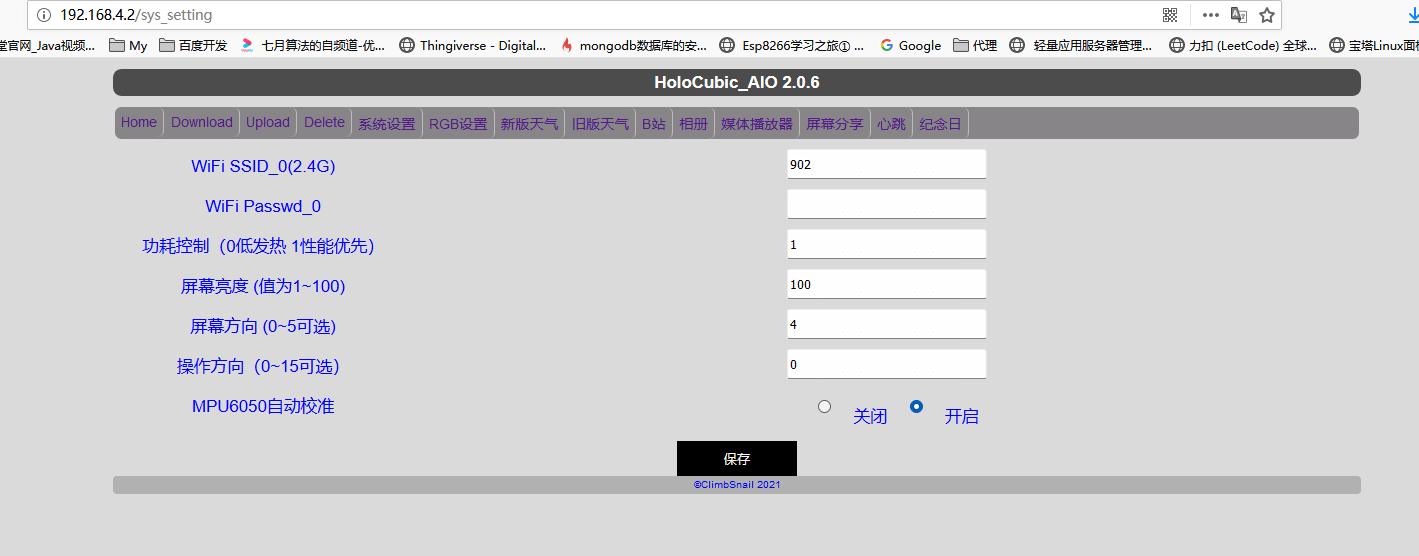
Local_IPorAP_IPin the browser address bar (http://192.168.4.2 also supports domain name direct access to http://holocubic) to enter the administrative settings background. It is recommended to useip addressaccess. - System parameters, weather APP parameters, photo album parameters, player parameters and so on can be set in the webpage.
- Because of the large number of apps at present, it is cumbersome to switch and find, so you can also configure the "self-starting app" in the "Web Server".
Function: Manage the files on the memory card through the wireless network.
- Run APP condition: WiFi must be configured normally. Memory card must be inserted. To avoid restarting due to insufficient power during WiFi connection, please ensure that the USB port is fully powered. At present, some functions are still under development.
- Entering the ` Holocubic 'file manager will automatically connect to the configured WiFi and display the IP address.
- Unfinished: Fill in your IP address of 'Holocubic' in the file manager software of the upper computer (the port can be changed without changing), and click Connect. Note: Currently the file manager temporarily uses windows explorer, and enter ftp://holocubic: aio @ 192.168. 123.241 in the address bar (192.168. 123.241 is the IP address displayed on my little TV, if prompted to turn on access, turn it on)
- Conditions for running APP: A memory card must be inserted, a
image/directory must exist under the root directory of the memory card (you can also use theWeb Server serviceAPP to upload photos through the browser), and a picture file (jpg or bin) must exist under theimage/directory. - Convert the pictures to be played into a certain format (. jpg or. bin), and then save them in the
image/directory. The file name of the pictures must be English characters or numbers. - After entering the photo album app with firmware, the picture file in the
image/directory will be read. - The web page side of
WebServercan set additional functions.
About picture conversion: Use the attached upper computer conversion (resolution is arbitrary, the software will automatically compress to the specified resolution).
- Common weather pictures, converted to C Array, format Indexed 16 colors, select C Array.
- Images that are not commonly used can be converted into (True color with alpha, select Binary RGB565) bin files and stored in SD cards, which can save some program storage space and increase functions. Conversion to jpg images is supported.
- Conditions for running APP: Memory card must be inserted, and
movie/directory must exist under the root directory of memory card. - Convert the video to be played (preferably 1: 1 aspect ratio) into a target file (mjpeg or rgb format) by using the conversion tool matched with this firmware, and store it in the
movie/directory. The video file name must be English characters or numbers. - After running the player app, the video files in the
movie/directory will be read. - Under the default power, it enters the low power consumption mode after 90 s without any action, and enters the second-level low power consumption mode after 120s, which is manifested by the decrease of the number of playing frames.
- The web page side of
WebServercan set additional functions.
- Conditions for running the app: No memory card is required, but you need to use the
Web Server Serviceapp to set your wifi password (make sure you can connect to the router). To avoid restarting due to insufficient power during WiFi connection, please ensure that the USB port is fully powered. - At present, the upper computer uses third-party software, and will independently write the projection upper computer in the later stage to improve the performance.
- The upper computer of this screen projection is the upper computer of [Daguai] (https://gitee.com/superddg123/esp32-TFT/tree/master).
- The web page side of
WebServercan set additional functions.
There are two weather clock apps
- PuYuuu
mimics Misakas clock interface in the new edition. Use the https://www.tianqiapi.com Weather API. - Conditions for running APP: It must be networked and set
tianqi_appid,tianqi_appsecret,tianqi city name (Chinese). - To use the new weather clock, you need to modify
tianqi_appid,tianqi_appsecretin the "Web Server" web service. (Application address https://www.yiketianqi.com/user/login)
- The old UI design mimics [CWEIB] (https://github.com/CWEIB)
- Conditions for running APP: It must be networked and set the location, weather_key. It works normally in most cases without inserting a memory card.
- Generally, it can work without inserting a memory card, but some weather icons are stored in the memory card (because the internal flash is not enough), so it is necessary to copy the
weather/folder attached to the firmware to the root directory of the tf card. - To use the old weather clock, you need to modify the "intimate weather city name" and "key" of intimate weather in the "Web Server" web service. (The application address is https://seniverse.com. The program uses the v3 version of api by default.)
Note: Even after the network is disconnected, the clock still runs. (It is best to connect WiFi when starting up, which will automatically synchronize the clock. Try to synchronize the clock intermittently during use)
- Run APP condition: None. Built-in special effects animation.
Note: Transplant the function of "Peter Pan", thank you here!
- The '2048' game was written and agreed by group friend 'AndyXFuture' and incorporated into AIO firmware by 'ClimbSnail'. The original project link is ` https://github.com/AndyXFuture/HoloCubic-2048-animm '
- Run APP condition: None. As long as the basic screen lights up.
- Operation Note: The game "up" and "down" operation because of the original "enter" and "exit" as the same action, the system has been operating for a differentiated action, the game "up" and "down" normal operation can be, "enter" and "exit" need to tilt 1 second before triggering.
- Run app condition: A folder named
bilibilimust be in the memory card. Wifi must be configured normally. To avoid restarting due to insufficient power during WiFi connection, please ensure that the USB port is fully powered. - 'UID' viewing method: Open bilibili on the computer browser and log in to the account. After that, the browser opens a blank page and pastes Enter this website https://space.bilibili.com/. A string of pure digital codes will automatically appear at the tail of the website, which is UID.
- Before using it for the first time, fill in the
UIDcode on the Web page of ` WebServer App '. - It is necessary to add a picture named
avatar.binown bilibili avatar in the folder namedbilibiliin the memory card, and abinfile with a resolution of100*100(it can be converted by AIO host computer).
Note: The program is written by cnzxo.
- Run APP condition: Networking status
- Before using it for the first time, you should fill in the name and date of the anniversary on the webpage of
WebServer App. At present, you can set up two anniversaries. The words supported by anniversaries arebirthday and graduation, raising small dinosaurs, planting potatoes, wife, girlfriend, parents, milk, siblings, brothers and sisters, wedding anniversary '. If the words contained in the anniversaries name are not within this range, please generate your own font file and replace thesrc\ app\ anniversaries\ msyhbd_24. cfile. Date format such as2022.5.8 ', if the year is set to 0, it is considered to be a repetitive anniversary (such as birthday) every year.
Note: Remembrance Day and Heartbeat are reproduced from the [LizCubic] (https://github.com/qingehao/LizCubic) project. The program is written by WoodwindHu
- Conditions for running APP: networked status (performance mode needs to be turned on), an mqtt server with open port 1883, and two HoloCubic.
- Before using it for the first time, fill in the configuration on the Web page of ` WebServer App '. Role can choose 0 and 1 to represent the two HoloCubic interactions, respectively. Client_id is the unique identification of the device. Please set the two Holocubic to the same QQ number here. Mqtt_server fills in its own mqtt server address, and port fills in the port number. The user name and password depend on the specific server configuration.
- After setting up the heartbeat APP, turn on the automatic networking and open the mqtt client. Automatically enter the APP after receiving another HoloCubic message. Entering the APP in the normal way automatically sends a message to another HoloCubic.
- Update free services from time to time in the group. You can ask the management or group friends for specific configuration parameters.
Note: Remembrance Day and Heartbeat are reproduced from the [LizCubic] (https://github.com/qingehao/LizCubic) project. The program is written by WoodwindHu
- Run APP condition: WiFi must be configured normally. To avoid restarting due to insufficient power during WiFi connection, please ensure that the USB port is fully powered.
- Before using it for the first time, modify the stock code you want on the Web page of WebServer App.
Note: The program is written by redwolf
- This project code is based on the ESP32-Pico Arduino platform of PlatformIO plug-in on vcode. Specific tutorials can be found in Bilibili. Recommended Tutorial [https://b23.tv/kibhGD] (https://b23.tv/kibhGD)
- Remember to modify the
upload_port 'field in theplatformio.ini' file under the project to correspond to its own COMM port. - At present, the latest version does not need to modify the SPI pins in the SPI library. A SPI library with modified SPI pins is placed separately under the
libof this project. The following are the actions of previous versions (negligible)
Then you need to modify an official library file to use it normally (otherwise, the memory card will fail to read):
Both PlatformIO and ArduinoIDE users need to install the Arduino firmware support package of ESP32 (Baidu has a large number of tutorials). Either way, you need to modify the MISO default pin in the SPI library to 26, such as the package path of the arduinoIDE to esp32\ hardware\ esp32\ 1.0. 4\ libraries\ SPI\ src\ SPI.cpp file, Modify the MISO to 26 in the following code:
    if(sck == -1 && miso == -1 && mosi == -1 && ss == -1) {
        _sck = (_spi_num == VSPI) ? SCK : 14;
        _miso = (_spi_num == VSPI) ? MISO : 12; // 需要改为26
        _mosi = (_spi_num == VSPI) ? MOSI : 13;
        _ss = (_spi_num == VSPI) ? SS : 15;
This is because two hardware SPIs are used to connect the screen and SD card on the hardware, in which the default MISO pin of HSPI is 12, and 12 is used to set the flash level when powering up in ESP32. Pulling up before powering up will cause the chip to fail to start, so we replace the default pin with 26.
AIO framework explanation link https://www.bilibili.com/video/BV1jh411a7pV?P=4
You can pay attention to the design of UI by yourself Edgeline, gui-guide and other tools.
PlatformIO Simulator https://github.com/lvgl/lv_platformio
Application Icon (128*128): You can download Ali Vector Map https://www.iconfont.cn/
Error location code during debugging: xtensa-esp32-elf-addr2line-pfiaC-e firmware name. elf Backtrace address information
Learn about LVGL: 'http://lvgl.100ask.org', 'http://lvgl.100ask.net'
Font generation for lvgl can be done using: LvglFontTool v0.4 already placed in the Doc directory
C file to extract all Chinese characters: You can use the project under the Script/get_font. py script extraction. Path to python get_font. py font. c file
- ESP32 Memory Distribution https://blog.csdn.net/espressif/article/details/112956403
- Video playback https://github.com/moononournation/RGB565_video
- FTP reference document https://blog.csdn.net/zhubao124/article/details/81662775
- ESP32 arduino running dual-core https://www.yiboard.com/thread-1344-1-1.html
- Mandatory Portal Authentication https://blog.csdn.net/xh870189248/article/details/102892766
- Thanks to the authors of the open source libraries used in the `lib 'directory


