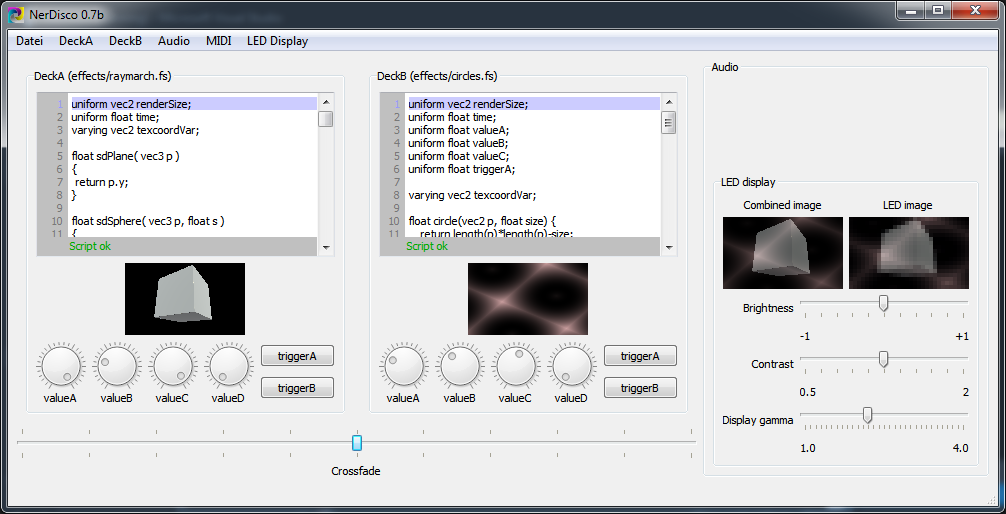
Is a simple VJ tool leveraging OpenGL / GLES2 / GLSL to provide live-editing functions and is meant to be connected to a Boblight display of the "Adalight" type via a serial port.
It was tested with an Arduino Pro connected to an LED strip using LPD8806 chips and WS2812B LEDs.
The code running on the Arduino was Adafruits' LPD8806 LEDstream sketch. A working sketch for WS2812B strips using the FastLED 3.x library can be found in LEDStream_WS2812B.ino.
The code was compiled and tested on a Windows 7 and Ubuntu 14.04 machine and may or may not work on other systems.
It is in parts inspired by the live shader-editing tool quint and uses the nice RtMidi library for MIDI controller input. So hats off to those guys...
Beginning with Qt 5.4 the OpenGL backend is now automatically switched between desktop OpenGL 2.1 and OpenGL ES 2.0. This makes it possible to run NerDisco on systems only supporting OpenGL ES, or on a Windows RDP session.
Planned features are some audio input facilities, so e.g. the music spectrum can be used in the scripts. Also for people without LED displays it would be nice to just use a second screen... Your ideas, comments and pull request are welcome.
BSD-2-Clause, see LICENSE.md.
For RtMidi, see the RtMidi readme.
For KissFFT, which is a clone of v1.3.0 from SourceForge, see COPYING.
Some of the icons are from or are based on icons from the Tango Icon Library v0.8.90, which seems to be PD. Thanks a bunch!
You can get the repository and all its submodules with:
git clone https://github.com/HorstBaerbel/NerDisco.git --recurse-submodules
To update the whole repository including submodules, use:
git pull --recurse-submodules
Use CMake
cd NerDisco
cmake . -DCMAKE_PREFIX_PATH=/lib/cmake/Qt5
make
The Qt framework version 5.4 or higher is required for OpenGL, GUI, audio and serial port functionality. You might need to additionally install the "qtmultimedia5-dev" package for audio input support.
If NerDisco does not find any audio devices your system might lack the Qt5 multimedia plugins. Install the "libqt5multimedia5-plugins" package.
Make sure your CMAKE_PREFIX_PATH is set to the proper Qt installation or use the CMake GUI to configure (actually simpler).
RtMidi is used for MIDI input support (thank you!). It should come to you as an external GIT submodule in the "\rtmidi" subfolder.
RtMidi uses Windows Multimedia (winmm) on Windows. On Linux ALSA (asound, pthread) is used. So these are needed too.
G++ 4.7 or higher (for C++11) will be needed to compile NerDisco. For installing G++ 4.7 see here.
The render scripts are actually GLSL fragment shaders (v1.20 when using OpenGL, v1.00 when using GLES2). Those ".fs" script files are read from the "effects" directory and should have the extension ".fs" to be found and displayed in the menu.
The dials A-D and the trigger button can be used in scripts via the float uniform variables "valueA", "valueB", "valueC", "valueD", "triggerA" and "triggerB". Values range from [0,1].
Also the built-in variables "uniform vec2 renderSize" (render area pixel resolution), "uniform float time" (script runtime in seconds) and "varying vec2 texcoordVar" (normalized screen-space coordinates in the range [0,1]) are available.
A good example is "rect.fs" in the effects sub directory:
uniform vec2 renderSize;
uniform float time;
uniform float valueA;
uniform float valueB;
uniform float valueC;
uniform float triggerA;

varying vec2 texcoordVar;

void main() {
	float l = texcoordVar.x > 0.2+0.1*sin(time) ? (texcoordVar.x < 0.8+0.2*sin(0.88*time+1.0) ? 1.0 : 0.0) : 0.0;
	l = texcoordVar.y > 0.2+0.1*sin(0.69*time) ? (texcoordVar.y < 0.8+0.2*sin(0.45*time) ? l.0 : 0.0) : 0.0;
	float r = l * valueA + 0.1 * triggerA;
	float g = l * valueB + 0.1 * triggerA;
	float b = l * valueC + 0.1 * triggerA;
	gl_FragColor = vec4(r, g, b, 1.0);
}
You can also set all built-in script variables (valueA-D, triggerA+B) to a custom value when the script is loaded. For that add a comment on top of the file. The line:
//valueA = 0.5

uniform float valueA;
...
will set valueA to 0.5. This is useful to make an effect "look good" when loading it.
NerDisco dynamically adds the proper #version and precision statements for OpenGL or OpenGLES2 for you, depending on the OpenGL backend used when starting the software.
If you want to learn about GLSL I recommend the Lighthouse3d GLSL tutorial and the GLSL cheat sheet.
The dials and trigger buttons in both decks, the crossfader and the image adjustment sliders can be controller via MIDI controllers. NerdDisco can learn a MIDI to GUI control mapping if you select a MIDI device and start capturing from it. Then select the "Learn MIDI->control mapping" menu entry. Turn the dial, push the trigger or move a fader you want to connect, then move the physical MIDI control element. The two should be connected and the GUI should follow the MIDI control. You can still choose a different GUI element or MIDI control until you select the menu option "Store learned connection" (to accept the current connection) or leave the learn mode again via "Learn MIDI->control mapping". When leaving learn mode all stored connections you have made before should work.
Q: I'm on linux and I can not access the serial port somehow...
A: You might need to add your USERNAME to the dialout group: sudo usermod -a -G dialout USERNAME.
The best way to report a bug or suggest something is to post an issue on GitHub. Try to make it simple, but descriptive and add ALL the information needed to REPRODUCE the bug. "Does not work" is not enough! If you can not compile, please state your system, compiler version, etc! You can also contact me via email if you want to.
