This repository will not be updated. I will check periodically for pull requests, but do not expect a quick response.
Read this in other languages: **語,日本語.
This project showcases the use of blockchain in insurance domain for claim processing. In this application, we have four participants, namely insurance, police, repair shop and the shop. Furthermore, each participant will own its own peer node. The insurance peer is the insurance company providing the insurance for the products and it is responsible for processing the claims. Police peer is responsible for verifying the theft claims. Repair shop peer is responsible for repairs of the product while shop peer sells the products to consumer. The value of running this network on the IBM Blockchain Platform is that you can easily customize the network infrastructure as needed, whether that is the location of the nodes, the CPU and RAM of the hardware, the endorsement policy needed to reach consensus, or adding new organizations and members to the network.
Note: This code pattern can either be run locally, or connected to the IBM Blockchain Platform. If you only care about running this pattern locally, please find the local instructions here.
Audience level : Intermediate Developers
When the reader has completed this code pattern, they will understand how to:
- Create a Kubernetes Cluster using the IBM Kubernetes Service
- Create an IBM Blockchain service, and launch the service onto the Kubernetes cluster
- Create a network, including all relevant components, such as Certificate Authority, MSP (Membership Service Providers), peers, orderers, and channels.
- Deploy a packaged smart contract onto the IBM Blockchain Platform by installing and instantiating it on the peers.
- Use the connection profile from IBM Blockchain Platform to create application admins, and submit transactions from our client application.
- View transaction details on our channel from IBM Blockchain Platform.
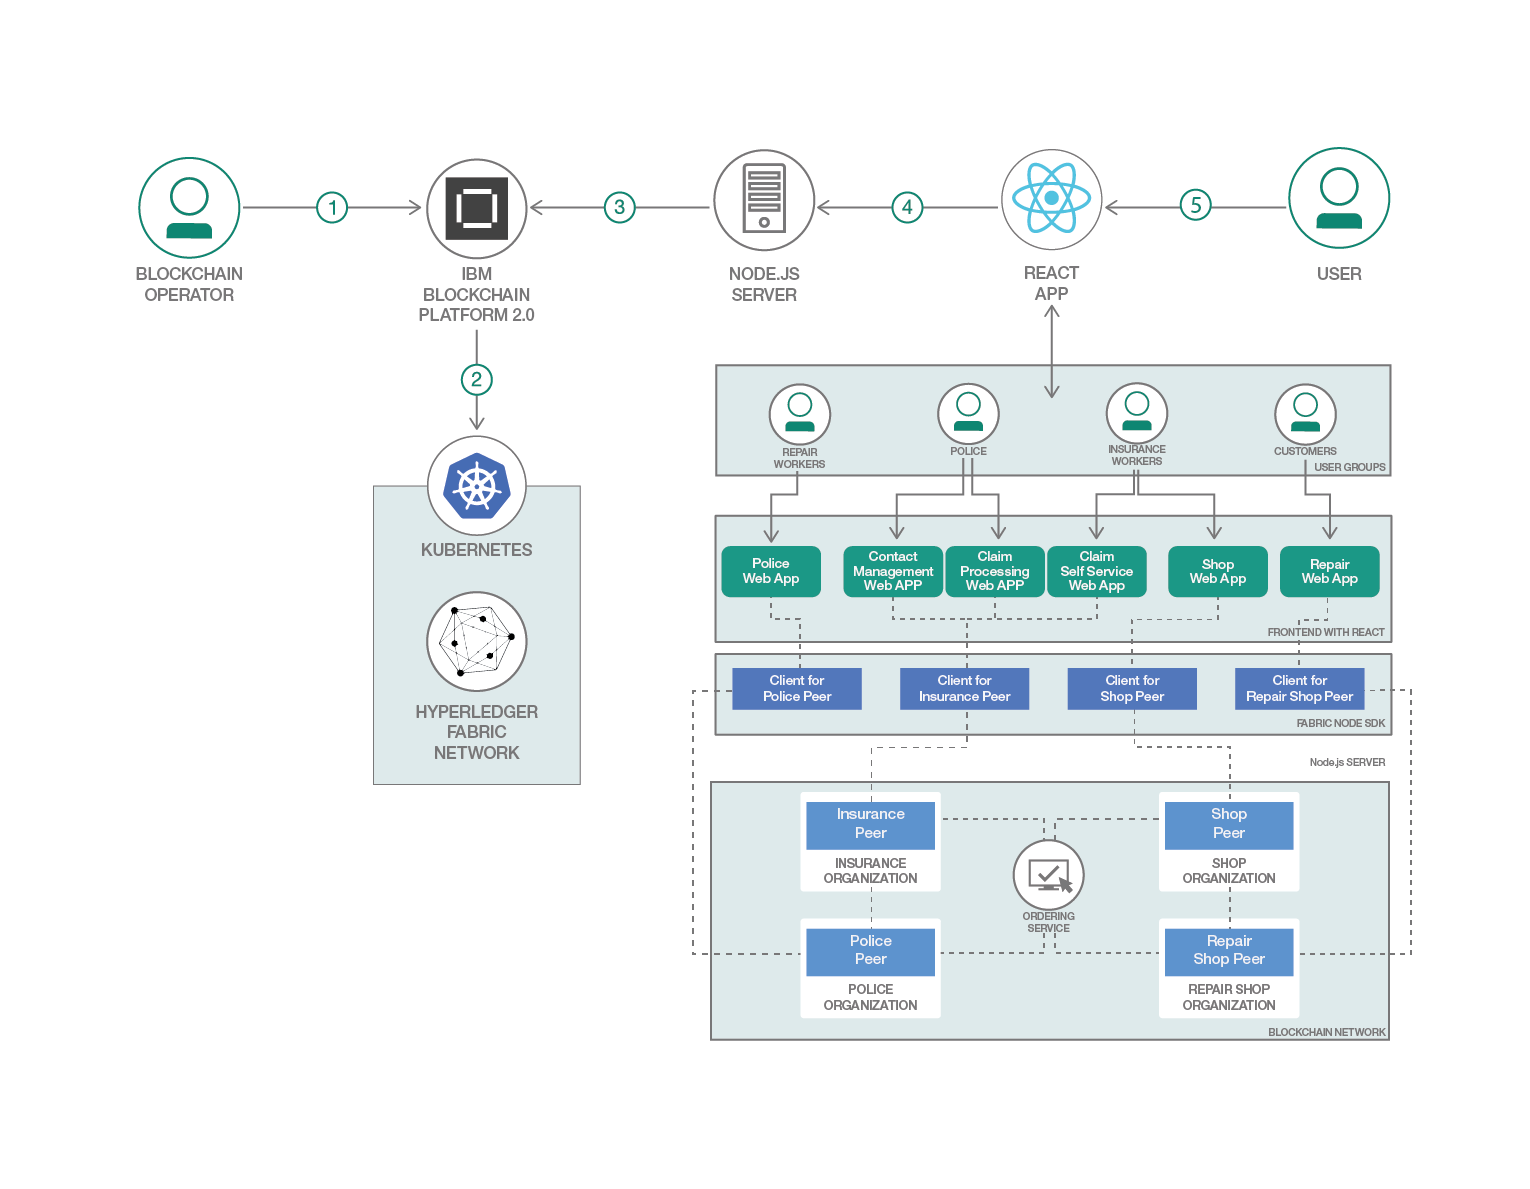
- The blockchain operator creates a IBM Kubernetes Service cluster (32CPU, 32RAM, 3 workers recommended) and an IBM Blockchain Platform 2.0 service.
- The IBM Blockchain Platform 2.0 creates a Hyperledger Fabric network on an IBM Kubernetes Service, and the operator installs and instantiates the smart contract on the network.
- The Node.js application server uses the Fabric SDK to interact with the deployed network on IBM Blockchain Platform 2.0.
- The React UI uses the Node.js application API to interact and submit transactions to the network.
- The user interacts with the insurance application web interface to update and query the blockchain ledger and state.
- IBM Blockchain Platform V2 Beta gives you total control of your blockchain network with a user interface that can simplify and accelerate your journey to deploy and manage blockchain components on the IBM Cloud Kubernetes Service.
- IBM Cloud Kubernetes Service creates a cluster of compute hosts and deploys highly available containers. A Kubernetes cluster lets you securely manage the resources that you need to quickly deploy, update, and scale applications.
- Hyperledger Fabric v1.4 is a platform for distributed ledger solutions, underpinned by a modular architecture that delivers high degrees of confidentiality, resiliency, flexibility, and scalability.
- Node.js is an open source, cross-platform JavaScript run-time environment that executes server-side JavaScript code.
- React A declarative, efficient, and flexible JavaScript library for building user interfaces.
- Docker Docker is a computer program that performs operating-system-level virtualization. It was first released in 2013 and is developed by Docker, Inc.
Watch the Video - IBM Blockchain Tutorial: Multiple Organization and Multiple Peer App Demo #2 - Build Nodes
We find that Blockchain can be finicky when it comes to installing Node. We want to share this StackOverflow response - because many times the errors you see with Compose are derived in having installed either the wrong Node version or took an approach that is not supported by Compose:
- IBM Cloud account
- Docker - latest
- Docker Compose - latest
- NPM - latest
- nvm - latest
- Node.js - Node v8.9.x
- Git client - latest
- Python - 2.7.x
- React - 15.6.1
To run a local network, you can find steps here
- Create IBM Cloud services
- Build a network - Certificate Authority
- Build a network - Create MSP Definitions
- Build a network - Create Peers
- Build a network - Create Orderer
- Build a network - Create and Join Channel
- Deploy Insurance Smart Contract on the network
- Connect application to the network
- Enroll App Admin Identities
- Run the application
Important Note: This pattern is more advanced because it uses four organizations. For this reason, you will likely have to get a paid kubernetes cluster to run this pattern on the cloud, since a free cluster will not have the CPU/storage necessary to deploy all of the pods that we need to run this pattern. There are other patterns that leverage a free Kubernetes cluster (and only two organizations), so if you want to try that one out first, go here.
-
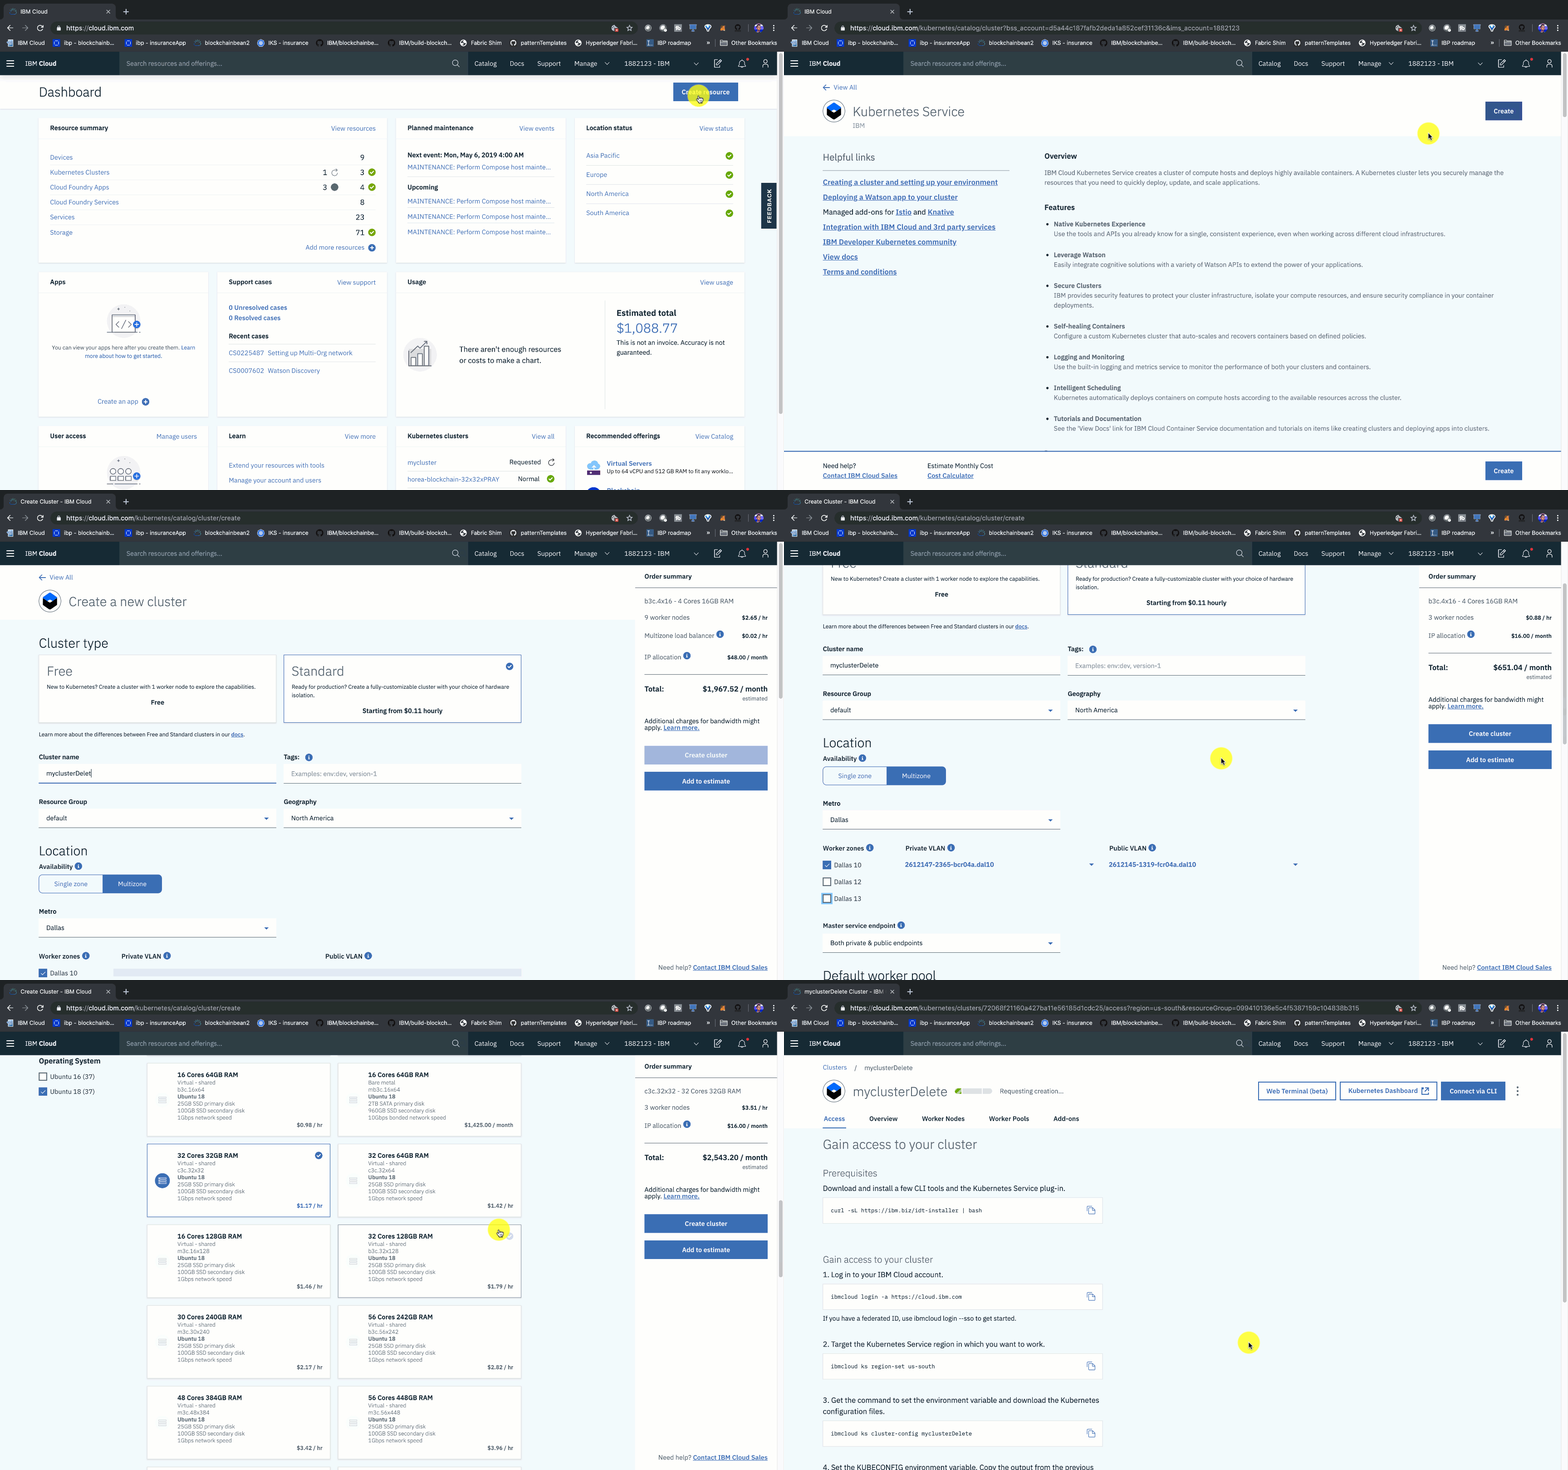
Create the IBM Cloud Kubernetes Service. You can find the service in the
Catalog. Note that for this code pattern, we need to use the 32CPU, 32GB RAM cluster. -
Once you reach the create a new cluster page you will need to do the following:
- Choose standard cluster type
- Fill out cluster name
- choose Geography: North America
- Choose Location and availability: Multizone
- Choose Metro: Dallas
- Choose Worker nodes: Dallas 10 only
- Choose Master service endpoint: Both private & public endpoints
- Choose Default worker pool: 1.12.7 (Stable, Default)
- Choose Master service endpoint: Both private & public endpoints
- Choose Flavor 32 Cores 32GB RAM, Ubuntu 18
- Choose Encrypt local disk Yes
- Choose Worker nodes 3
- Click on create cluster. The cluster takes around 15-20 minutes to provision, so please be patient!
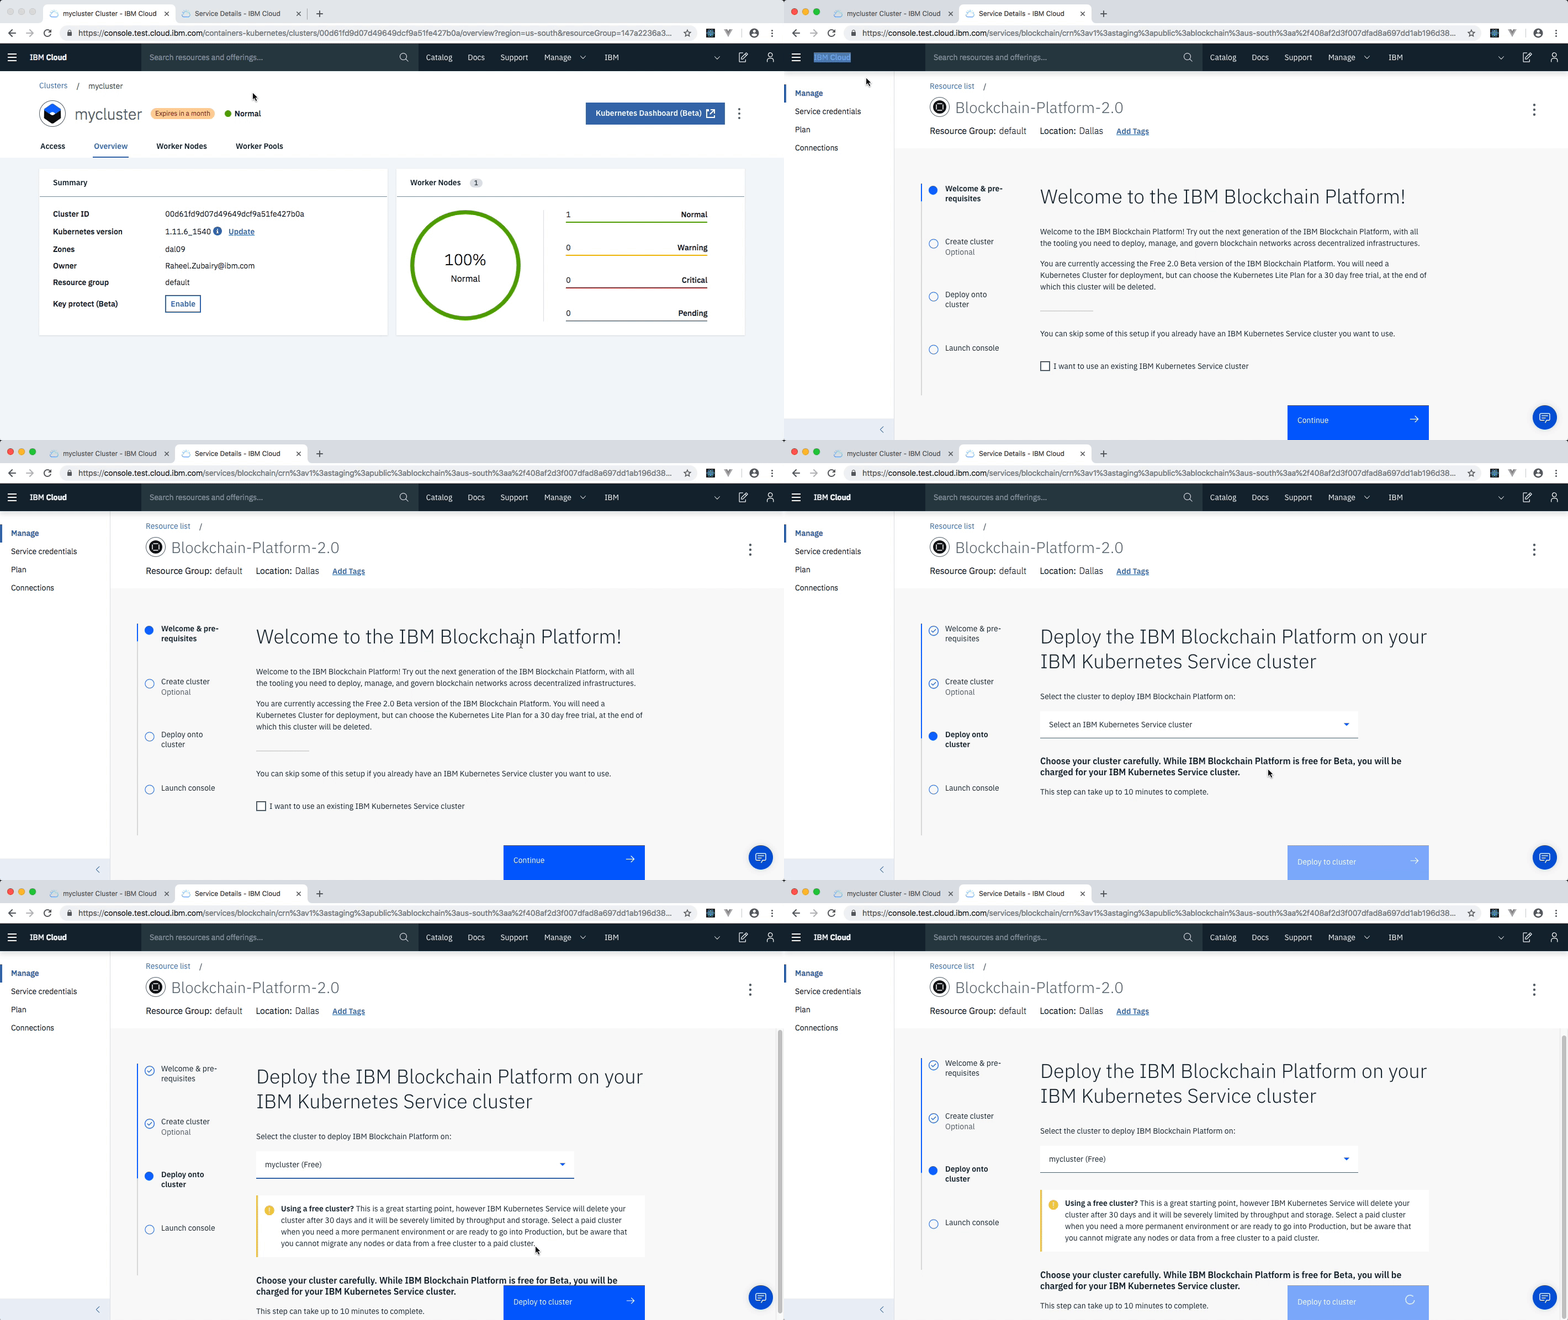
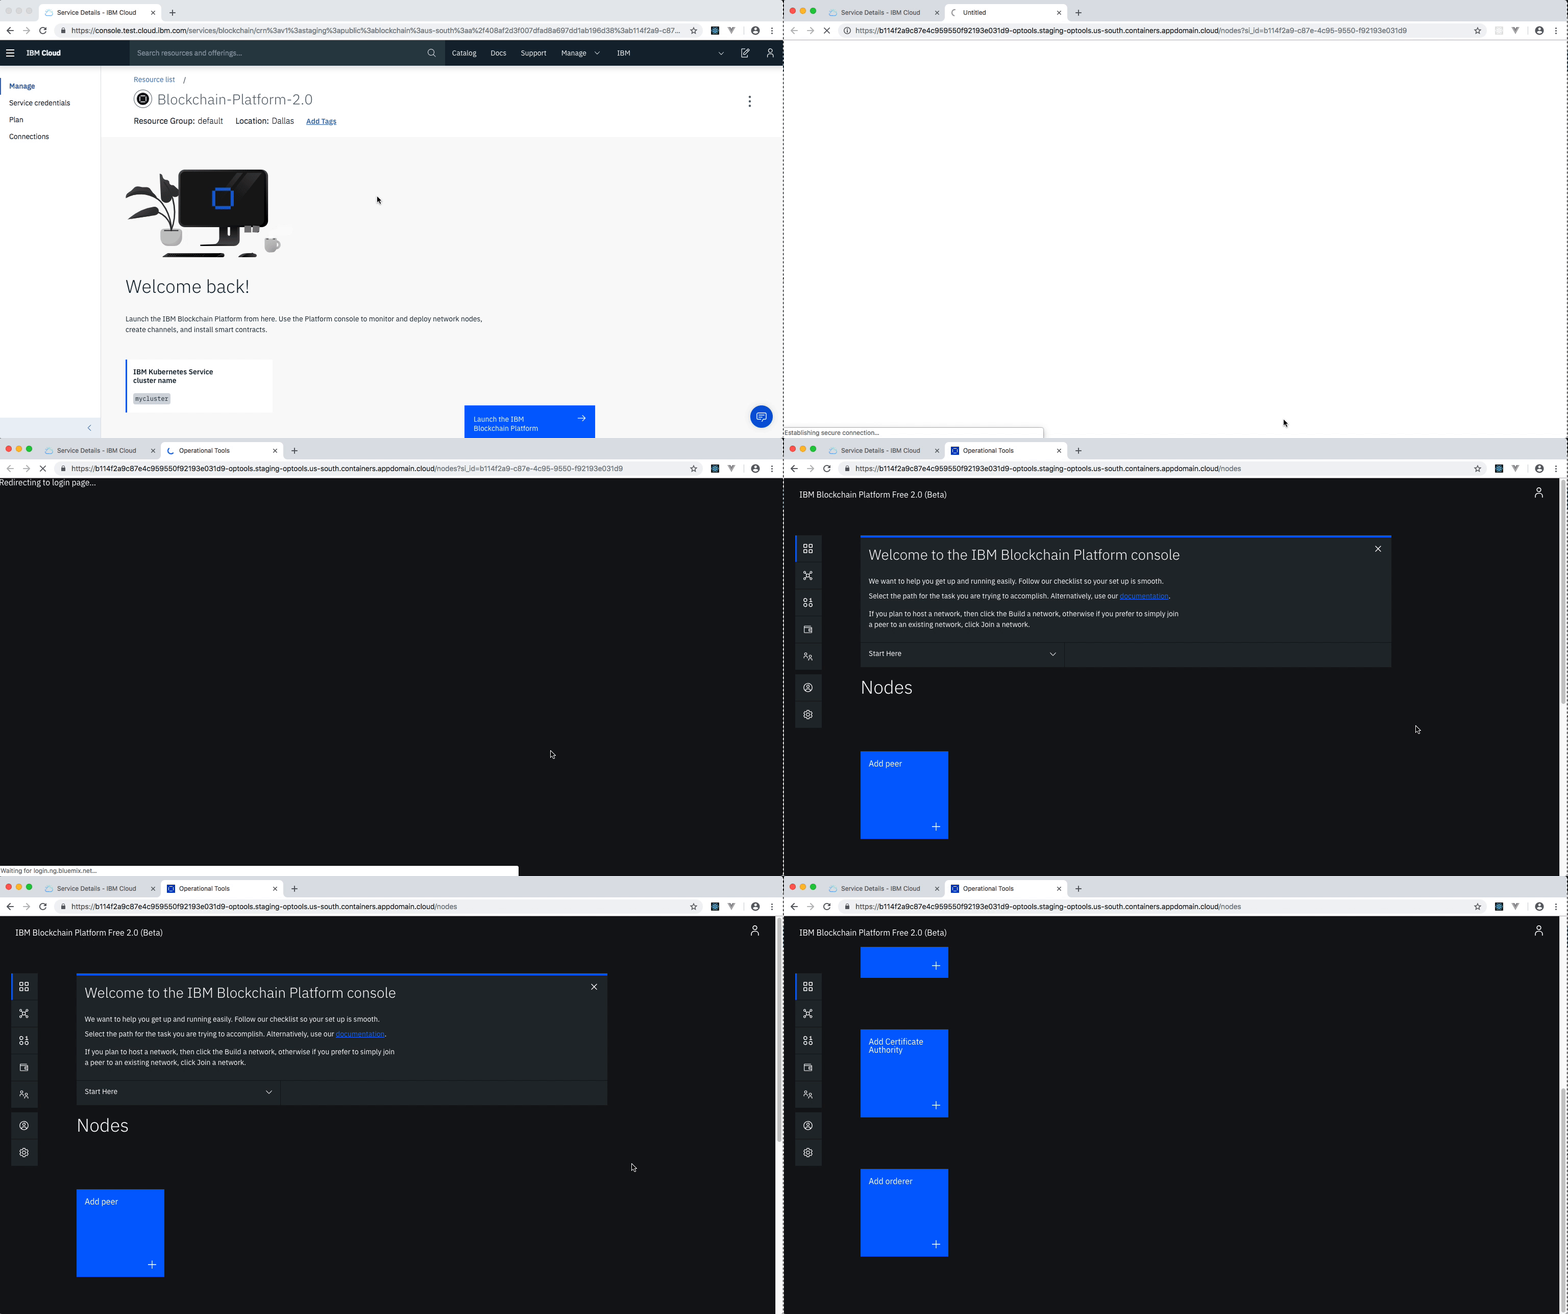
- After your kubernetes cluster is up and running, you can deploy your IBM Blockchain Platform V2 Beta on the cluster. The service walks through few steps and finds your cluster on the IBM Cloud to deploy the service on.
- Once the Blockchain Platform is deployed on the Kubernetes cluster, you can launch the console to start operating on your blockchain network.
We will build a network as provided by the IBM Blockchain Platform documentation. This will include creating a channel with a single peer organization with its own MSP and CA (Certificate Authority), and an orderer organization with its own MSP and CA. We will create the respective identities to deploy peers and operate nodes.
-
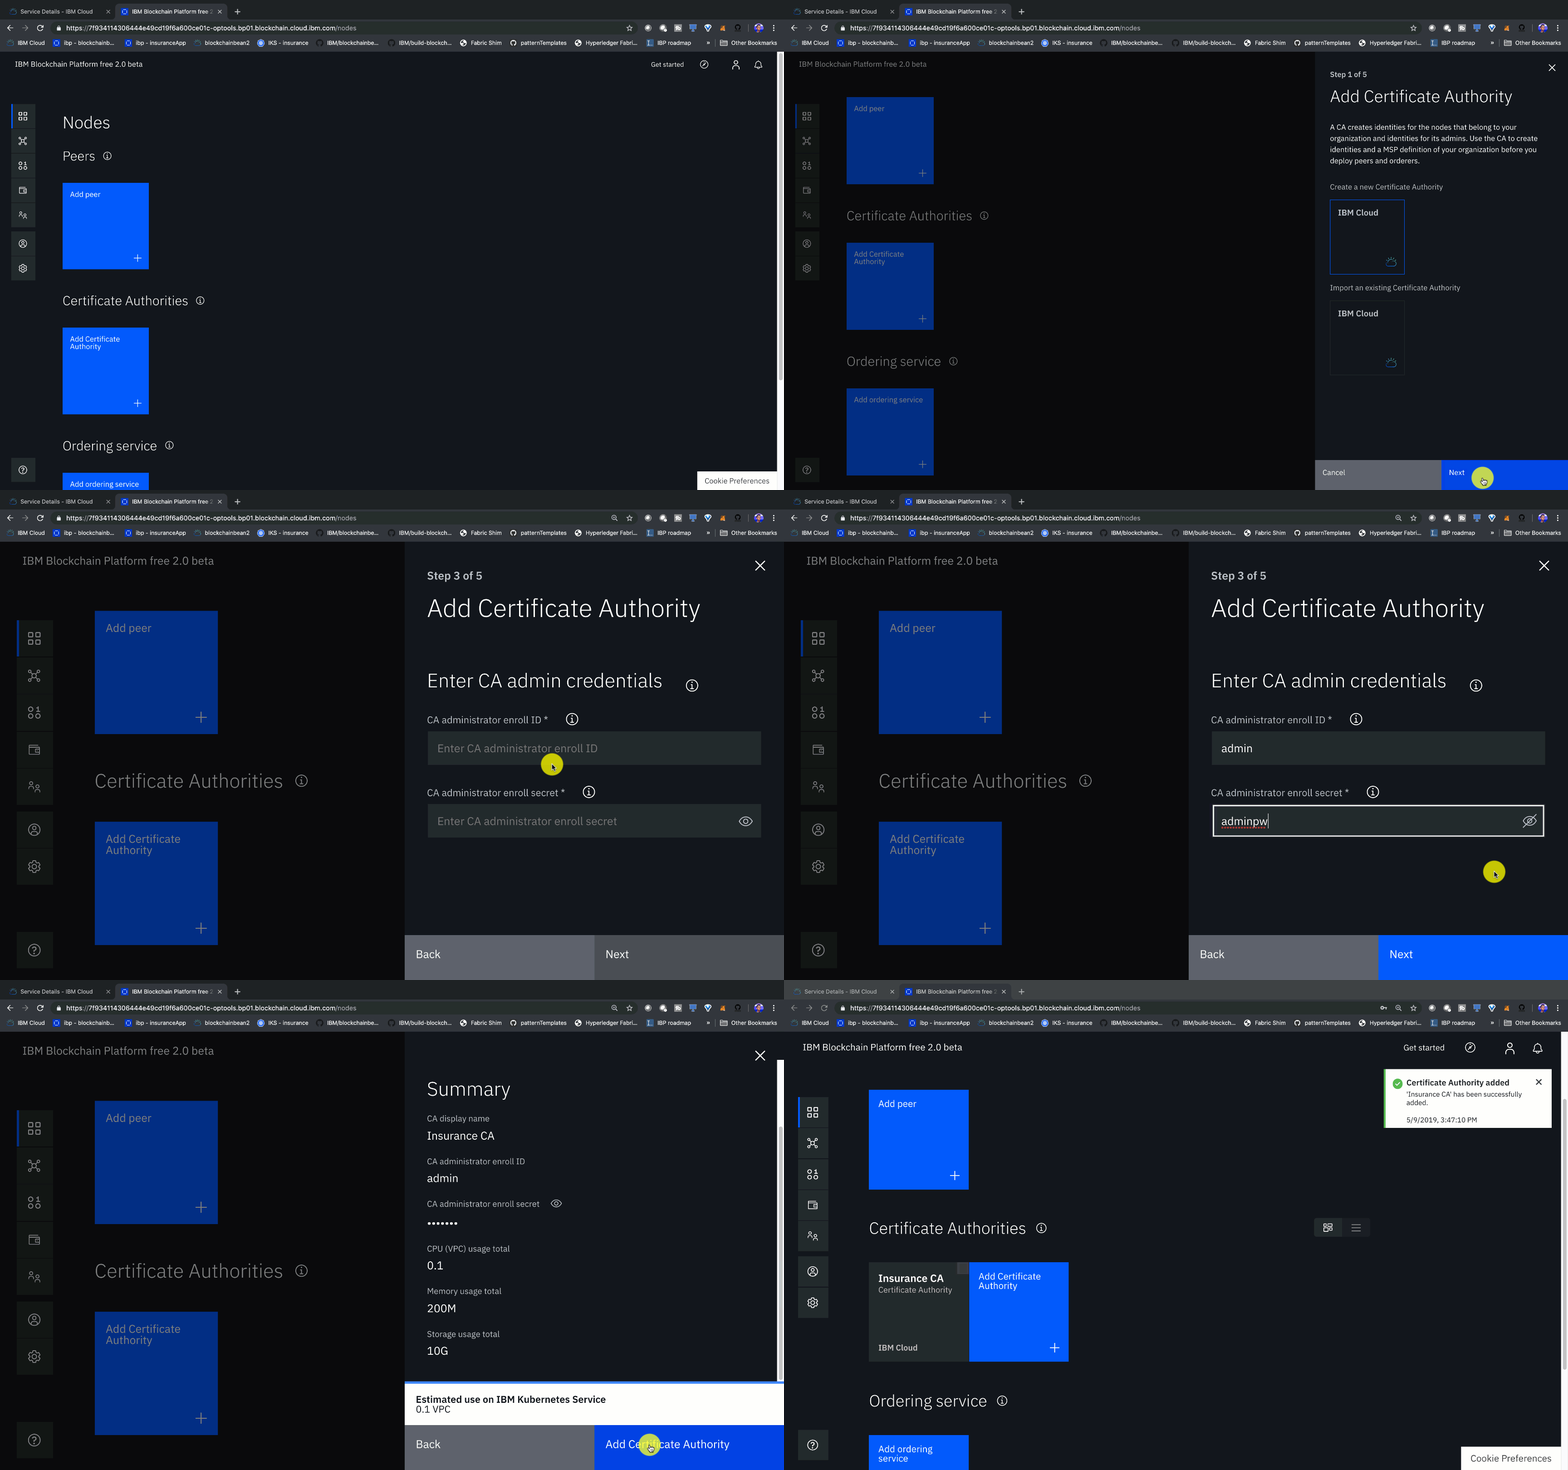
- Click Add Certificate Authority.
- Click IBM Cloud under Create Certificate Authority and Next.
- Give it a Display name of
Insurance CA. - Specify an Admin ID of
adminand Admin Secret ofadminpw.
-
- Click Add Certificate Authority.
- Click IBM Cloud under Create Certificate Authority and Next.
- Give it a Display name of
Shop CA. - Specify an Admin ID of
adminand Admin Secret ofadminpw.
-
- Click Add Certificate Authority.
- Click IBM Cloud under Create Certificate Authority and Next.
- Give it a Display name of
Repair Shop CA. - Specify an Admin ID of
adminand Admin Secret ofadminpw.
-
- Click Add Certificate Authority.
- Click IBM Cloud under Create Certificate Authority and Next.
- Give it a Display name of
Police CA. - Specify an Admin ID of
adminand Admin Secret ofadminpw.
-
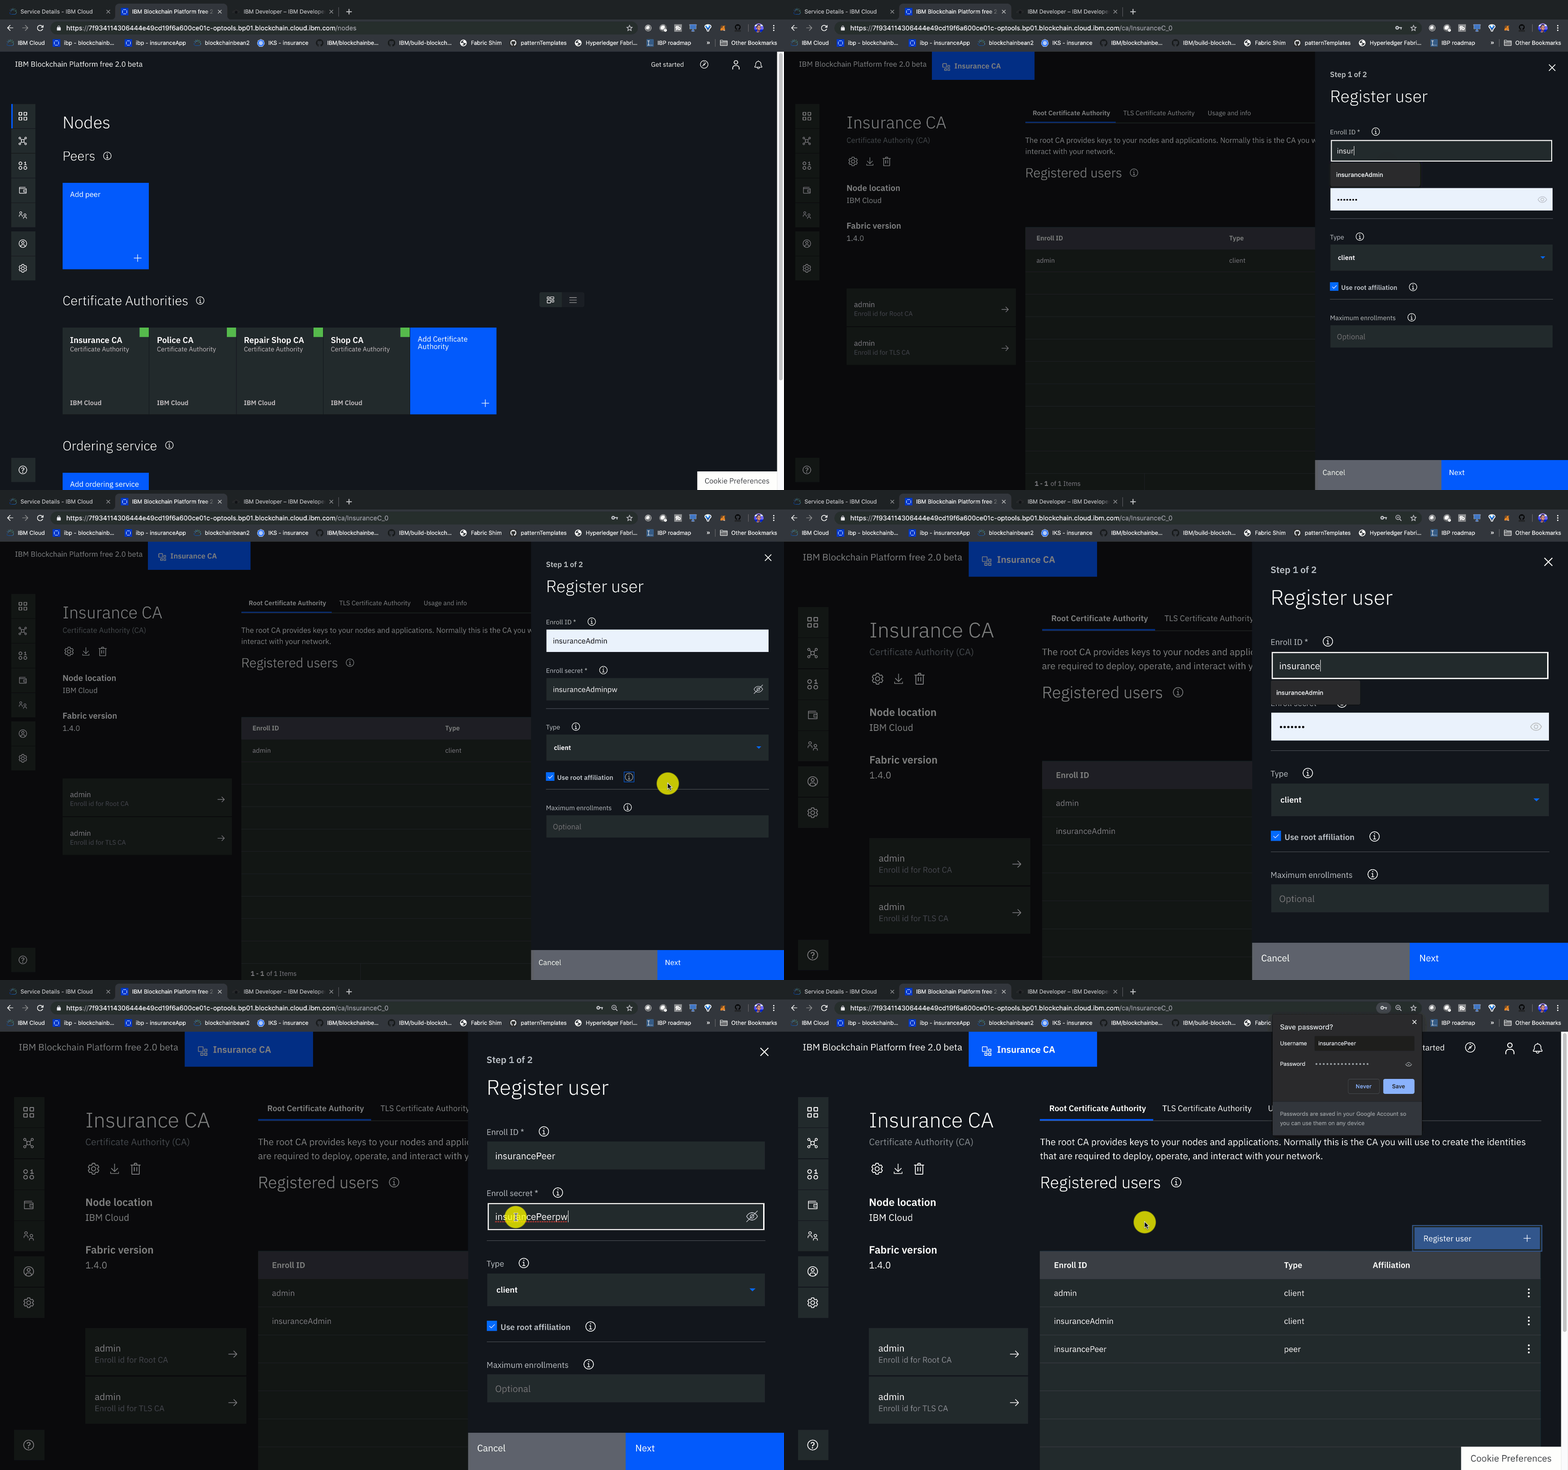
- Select the Insurance CA Certificate Authority that we created.
- First, we will register an admin for our Insurance Organization. Click on the Register User button. Give an Enroll ID of
insuranceAdmin, and Enroll Secret ofinsuranceAdminpw. Click Next. Set the Type for this identity asclientand selectorg1from the affiliated organizations drop-down list. We will leave the Maximum enrollments and Add Attributes fields blank. - We will repeat the process to create an identity of the peer. Click on the Register User button. Give an Enroll ID of
insurancePeer, and Enroll Secret ofinsurancePeerpw. Click Next. Set the Type for this identity aspeerand selectorg1from the affiliated organizations drop-down list. We will leave the Maximum enrollments and Add Attributes fields blank.
-
- Select the Shop CA Certificate Authority that we created.
- First, we will register an admin for our Insurance Organization. Click on the Register User button. Give an Enroll ID of
shopAdmin, and Enroll Secret ofshopAdminpw. Click Next. Set the Type for this identity asclientand selectorg1from the affiliated organizations drop-down list. We will leave the Maximum enrollments and Add Attributes fields blank. - We will repeat the process to create an identity of the peer. Click on the Register User button. Give an Enroll ID of
shopPeer, and Enroll Secret ofshopPeerpw. Click Next. Set the Type for this identity aspeerand selectorg1from the affiliated organizations drop-down list. We will leave the Maximum enrollments and Add Attributes fields blank.
-
- Select the Repair Shop CA Certificate Authority that we created.
- First, we will register an admin for our Insurance Organization. Click on the Register User button. Give an Enroll ID of
repairShopAdmin, and Enroll Secret ofrepairShopAdminpw. Click Next. Set the Type for this identity asclientand selectorg1from the affiliated organizations drop-down list. We will leave the Maximum enrollments and Add Attributes fields blank. - We will repeat the process to create an identity of the peer. Click on the Register User button. Give an Enroll ID of
repairShopPeer, and Enroll Secret ofrepairShopPeerpw. Click Next. Set the Type for this identity aspeerand selectorg1from the affiliated organizations drop-down list. We will leave the Maximum enrollments and Add Attributes fields blank.
-
- Select the Police CA Certificate Authority that we created.
- First, we will register an admin for our Insurance Organization. Click on the Register User button. Give an Enroll ID of
policeAdmin, and Enroll Secret ofpoliceAdminpw. Click Next. Set the Type for this identity asclientand selectorg1from the affiliated organizations drop-down list. We will leave the Maximum enrollments and Add Attributes fields blank. - We will repeat the process to create an identity of the peer. Click on the Register User button. Give an Enroll ID of
policePeer, and Enroll Secret ofpolicePeerpw. Click Next. Set the Type for this identity aspeerand selectorg1from the affiliated organizations drop-down list. We will leave the Maximum enrollments and Add Attributes fields blank.
-
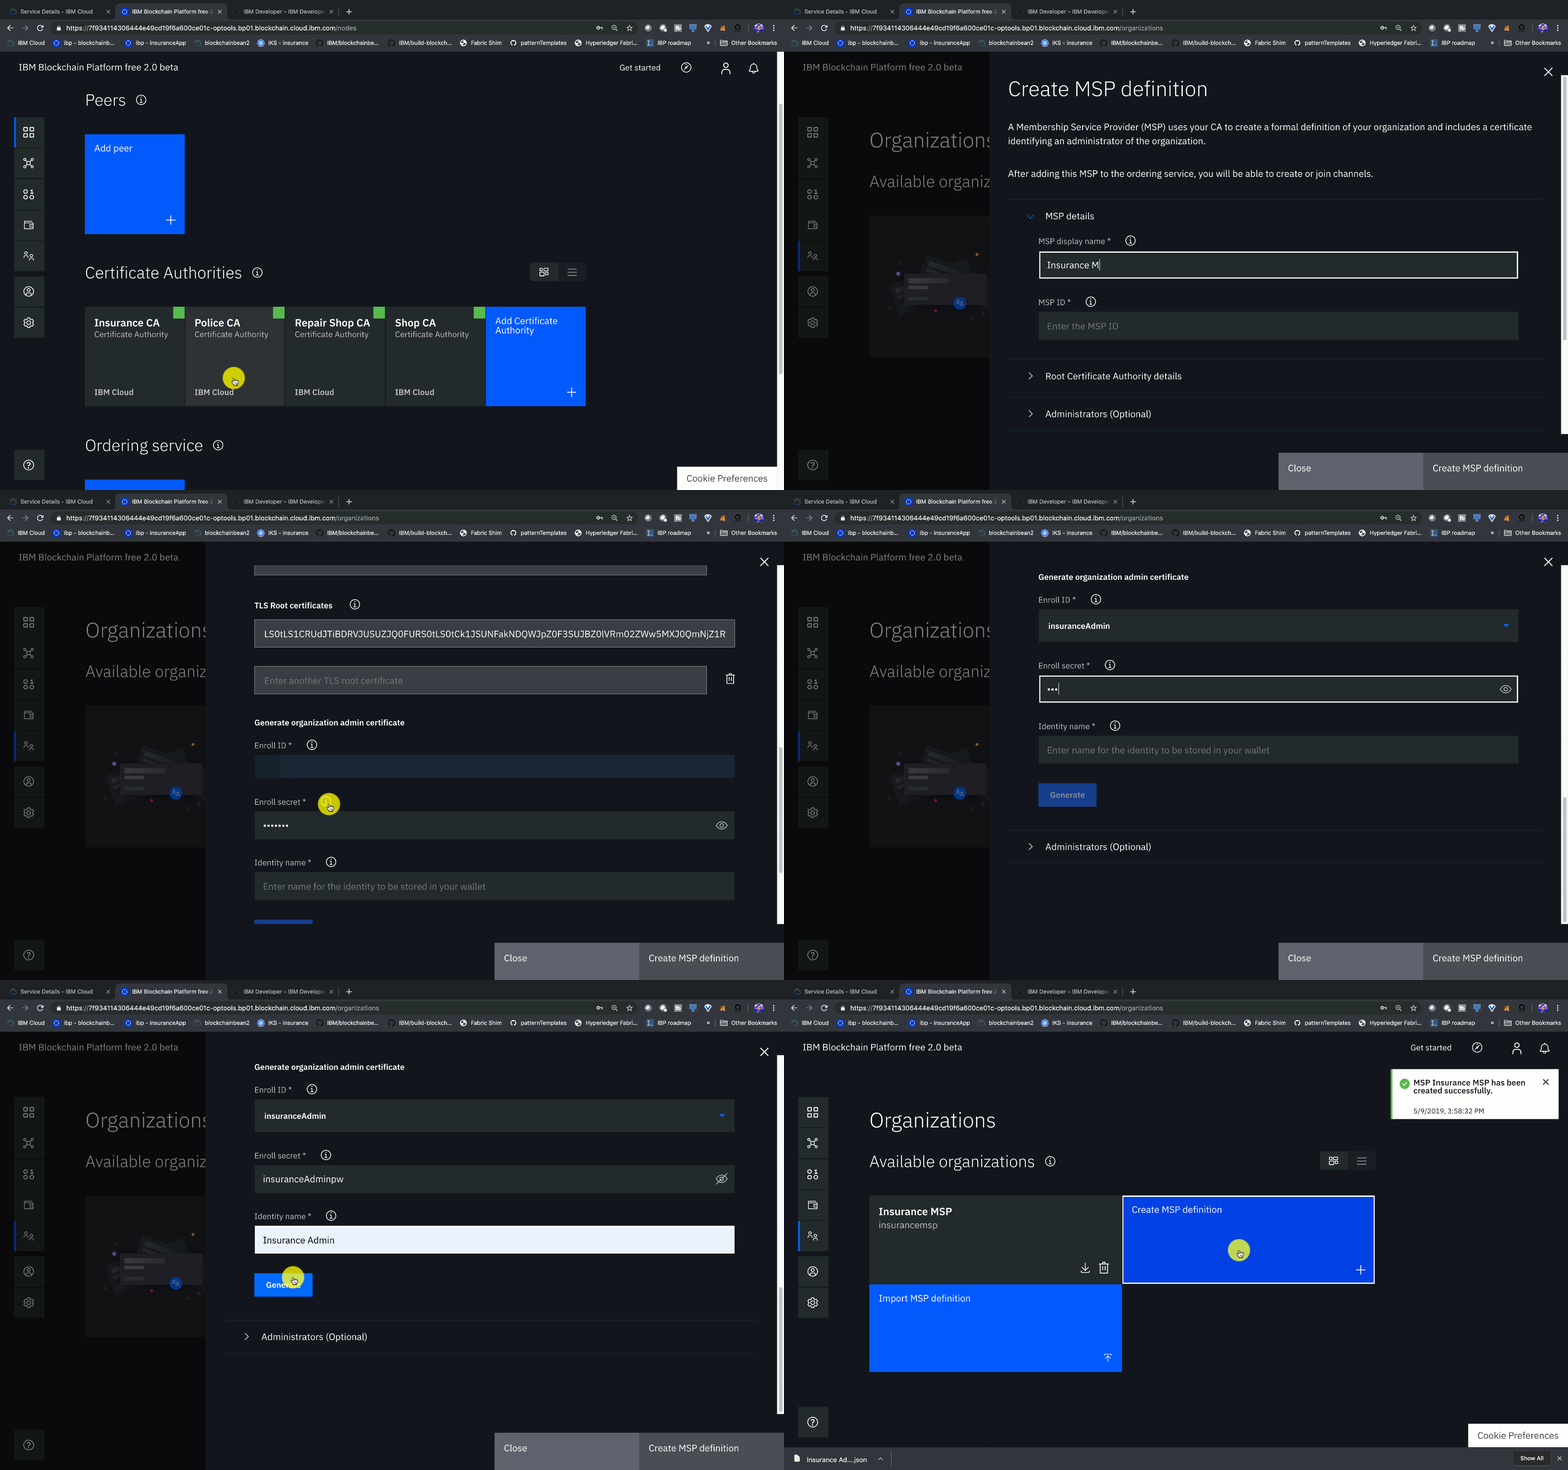
- Navigate to the Organizations tab in the left navigation and click Create MSP definition.
- Enter the MSP Display name as
Insurance MSPand an MSP ID ofinsurancemsp. - Under Root Certificate Authority details, specify the peer CA that we created
Insurance CAas the root CA for the organization. - Give the Enroll ID and Enroll secret for your organization admin,
insuranceAdminandinsuranceAdminpw. Then, give the Identity name,Insurance Admin. - Click the Generate button to enroll this identity as the admin of your organization and export the identity to the wallet. Click Export to export the admin certificates to your file system. Finally click Create MSP definition.
-
- Navigate to the Organizations tab in the left navigation and click Create MSP definition.
- Enter the MSP Display name as
Shop MSPand an MSP ID ofshopmsp. - Under Root Certificate Authority details, specify the peer CA that we created
Shop CAas the root CA for the organization. - Give the Enroll ID and Enroll secret for your organization admin,
shopAdminandshopAdminpw. Then, give the Identity name,Shop Admin. - Click the Generate button to enroll this identity as the admin of your organization and export the identity to the wallet. Click Export to export the admin certificates to your file system. Finally click Create MSP definition.
-
- Navigate to the Organizations tab in the left navigation and click Create MSP definition.
- Enter the MSP Display name as
Repair Shop MSPand an MSP ID ofrepairshopmsp. - Under Root Certificate Authority details, specify the peer CA that we created
Repair Shop CAas the root CA for the organization. - Give the Enroll ID and Enroll secret for your organization admin,
repairShopAdminandrepairShopAdminpw. Then, give the Identity name,Repair Shop Admin. - Click the Generate button to enroll this identity as the admin of your organization and export the identity to the wallet. Click Export to export the admin certificates to your file system. Finally click Create MSP definition.
-
- Navigate to the Organizations tab in the left navigation and click Create MSP definition.
- Enter the MSP Display name as
Police MSPand an MSP ID ofpolicemsp. - Under Root Certificate Authority details, specify the peer CA that we created
Police CAas the root CA for the organization. - Give the Enroll ID and Enroll secret for your organization admin,
policeAdminandpoliceAdminpw. Then, give the Identity name,Police Admin. - Click the Generate button to enroll this identity as the admin of your organization and export the identity to the wallet. Click Export to export the admin certificates to your file system. Finally click Create MSP definition.
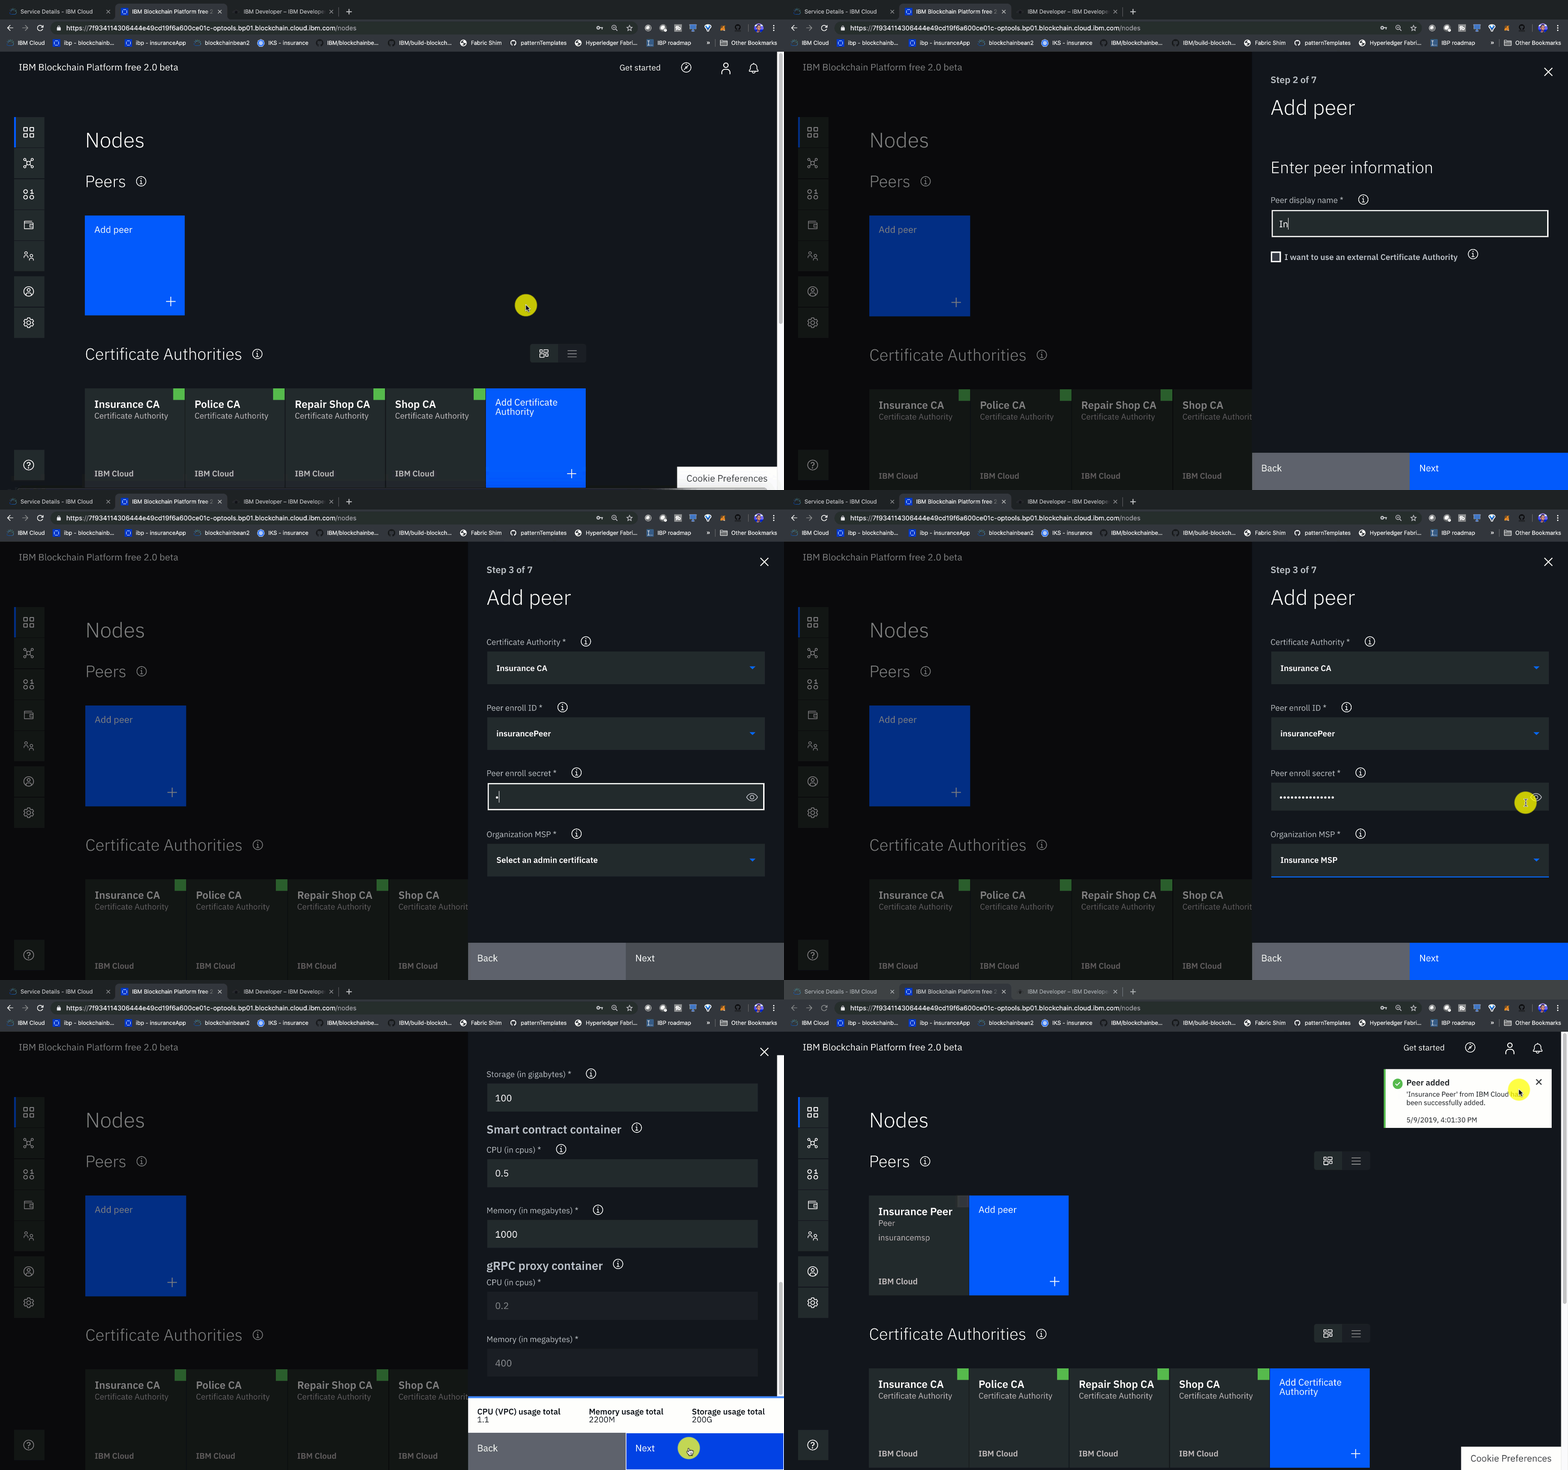
- Create an insurance peer
- On the Nodes page, click Add peer.
- Click IBM Cloud under Create a new peer and Next.
- Give your peer a Display name of
Insurance Peer. - On the next screen, select
Insurance CAas your Certificate Authority. Then, give the Enroll ID and Enroll secret for the peer identity that you created for your peer,insurancePeer, andinsurancePeerpw. Then, select the Administrator Certificate (from MSP),Insurance MSP, from the drop-down list and click Next. - Give the TLS Enroll ID,
admin, and TLS Enroll secret,adminpw, the same values are the Enroll ID and Enroll secret that you gave when creating the CA. Leave the TLS CSR hostname blank. - The last side panel will ask you to Associate an identity and make it the admin of your peer. Select your peer admin identity
Insurance Admin. - Review the summary and click Submit.
-
Create a shop peer (same process as shown in gif above)
- On the Nodes page, click Add peer.
- Click IBM Cloud under Create a new peer and Next.
- Give your peer a Display name of
Shop Peer. - On the next screen, select
Shop CAas your Certificate Authority. Then, give the Enroll ID and Enroll secret for the peer identity that you created for your peer,shopPeer, andshopPeerpw. Then, select the Administrator Certificate (from MSP),Shop MSP, from the drop-down list and click Next. - Give the TLS Enroll ID,
admin, and TLS Enroll secret,adminpw, the same values are the Enroll ID and Enroll secret that you gave when creating the CA. Leave the TLS CSR hostname blank. - The last side panel will ask you to Associate an identity and make it the admin of your peer. Select your peer admin identity
Shop Admin. - Review the summary and click Submit.
-
Create a repair shop peer (same process as shown in gif above)
- On the Nodes page, click Add peer.
- Click IBM Cloud under Create a new peer and Next.
- Give your peer a Display name of
Repair Shop Peer. - On the next screen, select
Repair Shop CAas your Certificate Authority. Then, give the Enroll ID and Enroll secret for the peer identity that you created for your peer,repairShopPeer, andrepairShopPeerpw. Then, select the Administrator Certificate (from MSP),Repair Shop MSP, from the drop-down list and click Next. - Give the TLS Enroll ID,
admin, and TLS Enroll secret,adminpw, the same values are the Enroll ID and Enroll secret that you gave when creating the CA. Leave the TLS CSR hostname blank. - The last side panel will ask you to Associate an identity and make it the admin of your peer. Select your peer admin identity
Repair Shop Admin. - Review the summary and click Submit.
-
Create a police peer (same process as shown in gif above)
- On the Nodes page, click Add peer.
- Click IBM Cloud under Create a new peer and Next.
- Give your peer a Display name of
Police Peer. - On the next screen, select
Police CAas your Certificate Authority. Then, give the Enroll ID and Enroll secret for the peer identity that you created for your peer,policePeer, andpolicePeerpw. Then, select the Administrator Certificate (from MSP),Police MSP, from the drop-down list and click Next. - Give the TLS Enroll ID,
admin, and TLS Enroll secret,adminpw, the same values are the Enroll ID and Enroll secret that you gave when creating the CA. Leave the TLS CSR hostname blank. - The last side panel will ask you to Associate an identity and make it the admin of your peer. Select your peer admin identity
Police Admin. - Review the summary and click Submit.
-
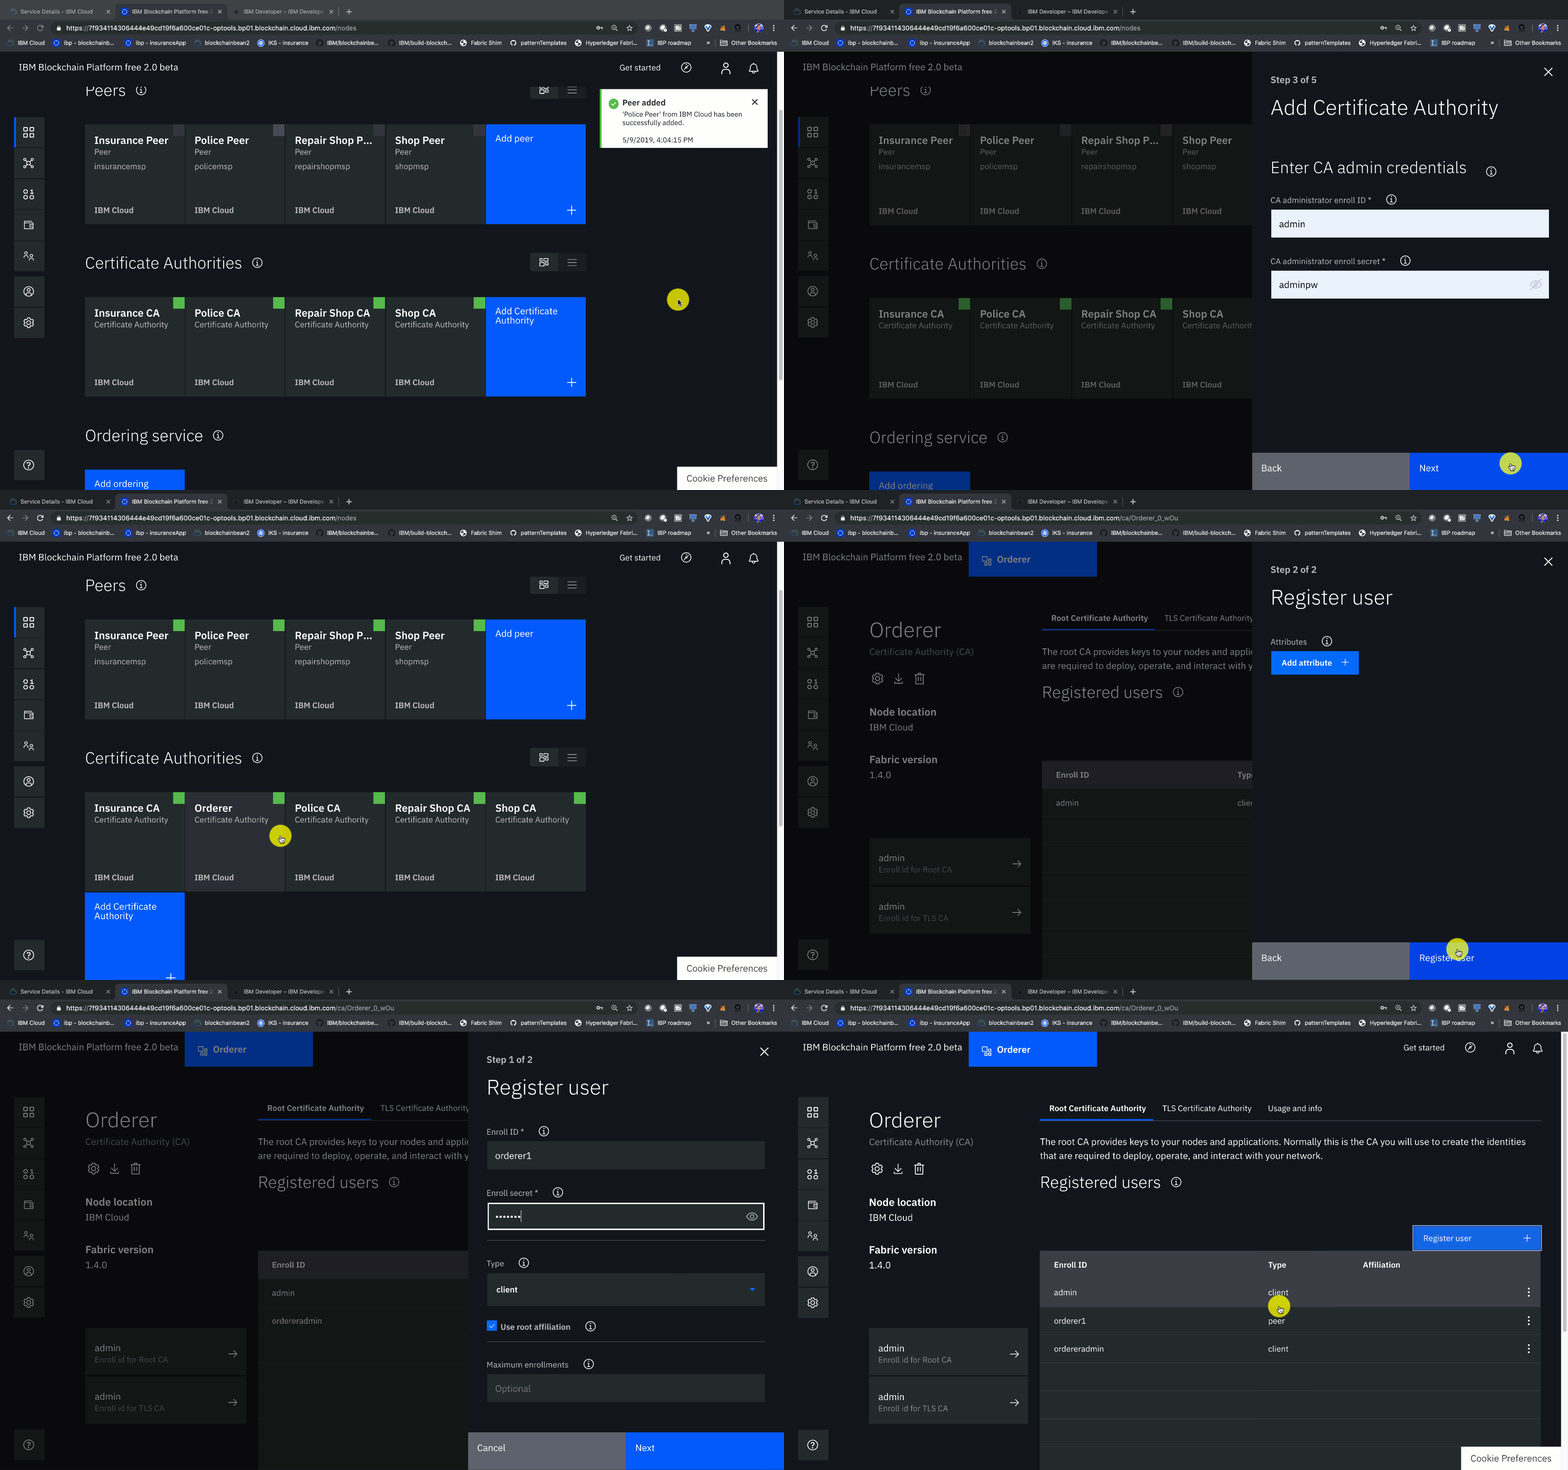
- Click Add Certificate Authority.
- Click IBM Cloud under Create Certificate Authority and Next.
- Give it a unique Display name of
Orderer CA. - Specify an Admin ID of
adminand Admin Secret ofadminpw.
-
- In the Nodes tab, select the Orderer CA Certificate Authority that we created.
- First, we will register an admin for our organization. Click on the Register User button. Give an Enroll ID of
ordereradmin, and Enroll Secret ofordereradminpw. Click Next. Set the Type for this identity asclientand selectorg1from the affiliated organizations drop-down list. We will leave the Maximum enrollments and Add Attributes fields blank. - We will repeat the process to create an identity of the orderer. Click on the Register User button. Give an Enroll ID of
orderer1, and Enroll Secret oforderer1pw. Click Next. Set the Type for this identity aspeerand selectorg1from the affiliated organizations drop-down list. We will leave the Maximum enrollments and Add Attributes fields blank.
-
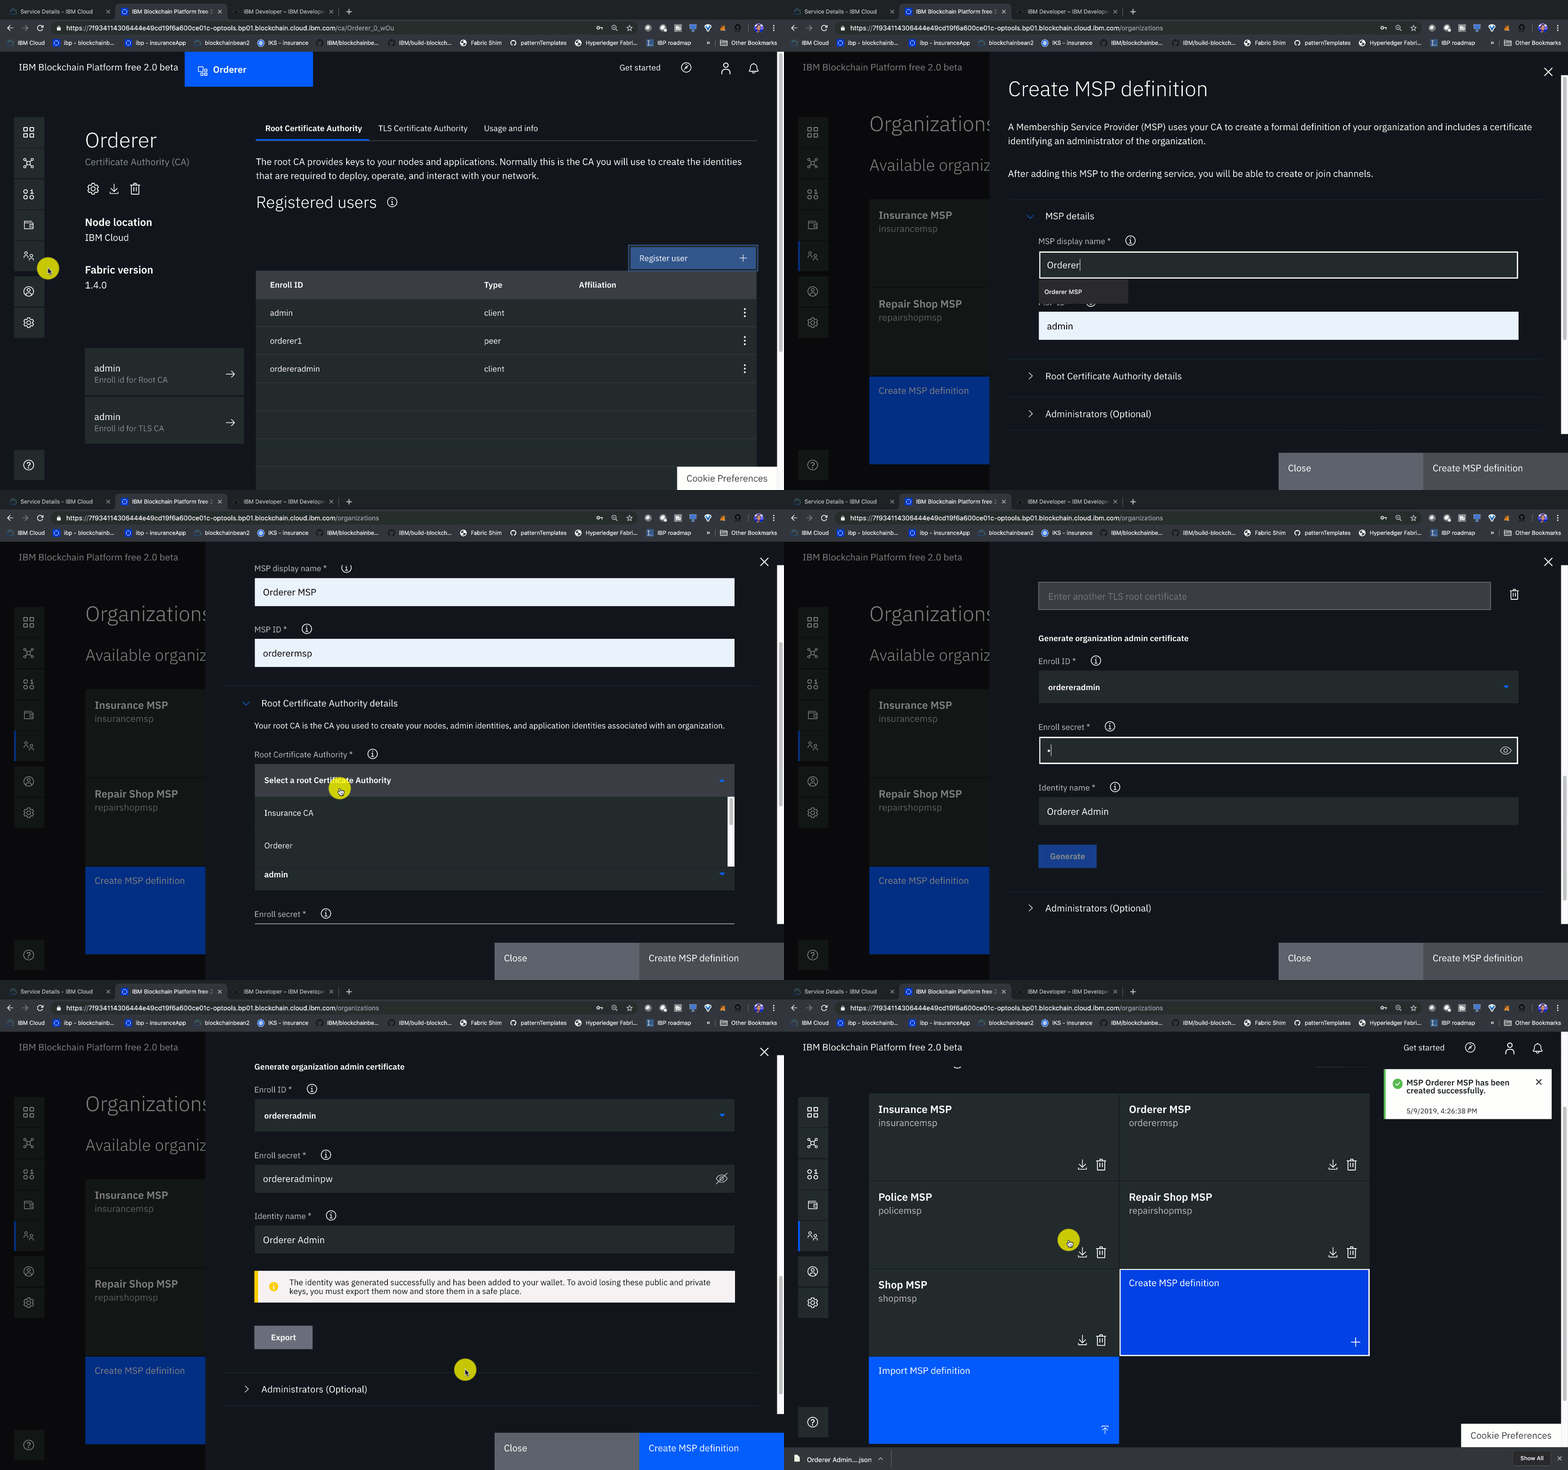
- Navigate to the Organizations tab in the left navigation and click Create MSP definition.
- Enter the MSP Display name as
Orderer MSPand an MSP ID oforderermsp. - Under Root Certificate Authority details, specify the peer CA that we created
Orderer CAas the root CA for the organization. - Give the Enroll ID and Enroll secret for your organization admin,
ordereradminandordereradminpw. Then, give the Identity name,Orderer Admin. - Click the Generate button to enroll this identity as the admin of your organization and export the identity to the wallet. Click Export to export the admin certificates to your file system. Finally click Create MSP definition.
-
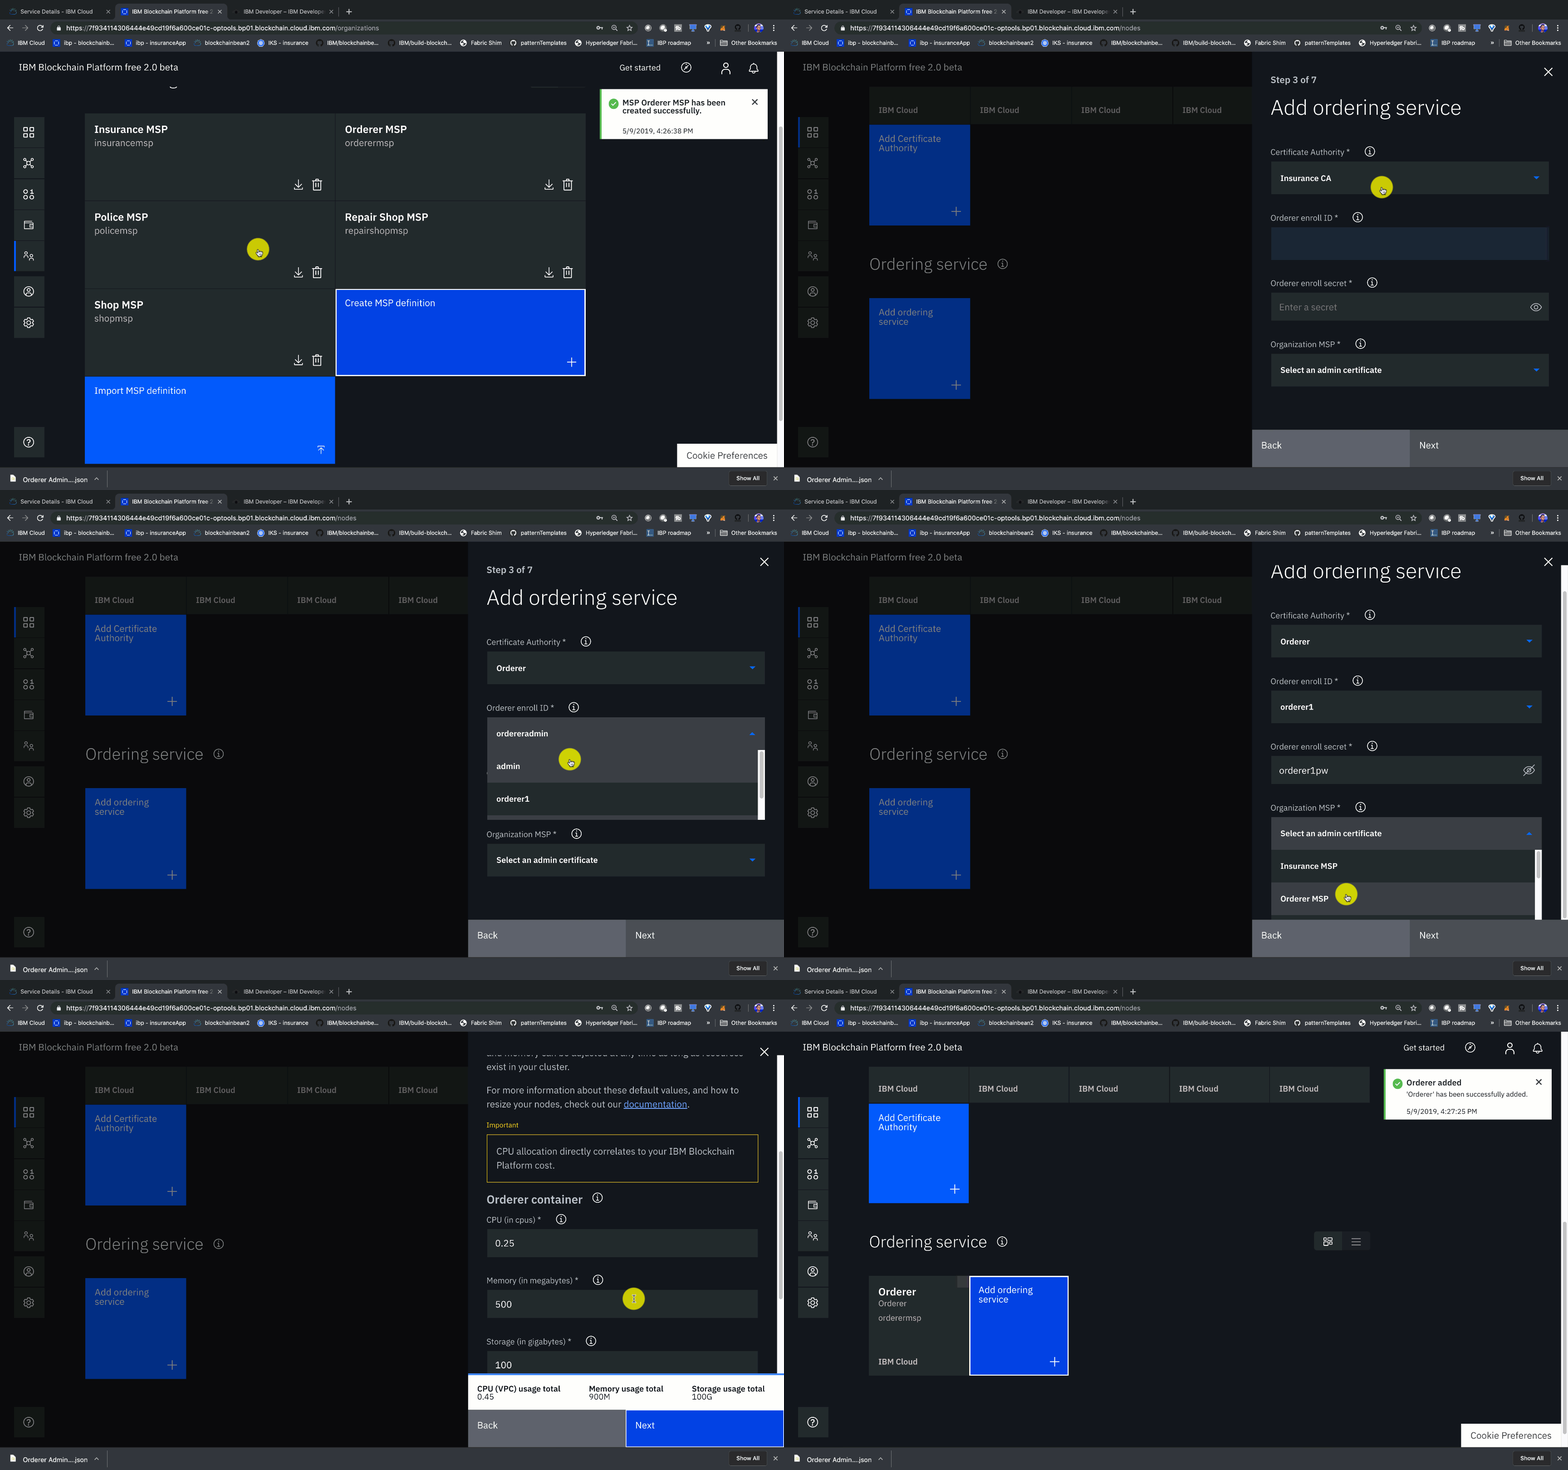
- On the Nodes page, click Add orderer.
- Click IBM Cloud and proceed with Next.
- Give your peer a Display name of
Orderer. - On the next screen, select
Orderer CAas your Certificate Authority. Then, give the Enroll ID and Enroll secret for the peer identity that you created for your orderer,orderer1, andorderer1pw. Then, select the Administrator Certificate (from MSP),Orderer MSP, from the drop-down list and click Next. - Give the TLS Enroll ID,
admin, and TLS Enroll secret,adminpw, the same values are the Enroll ID and Enroll secret that you gave when creating the CA. Leave the TLS CSR hostname blank. - The last side panel will ask to Associate an identity and make it the admin of your peer. Select your peer admin identity
Orderer Admin. - Review the summary and click Submit.
-
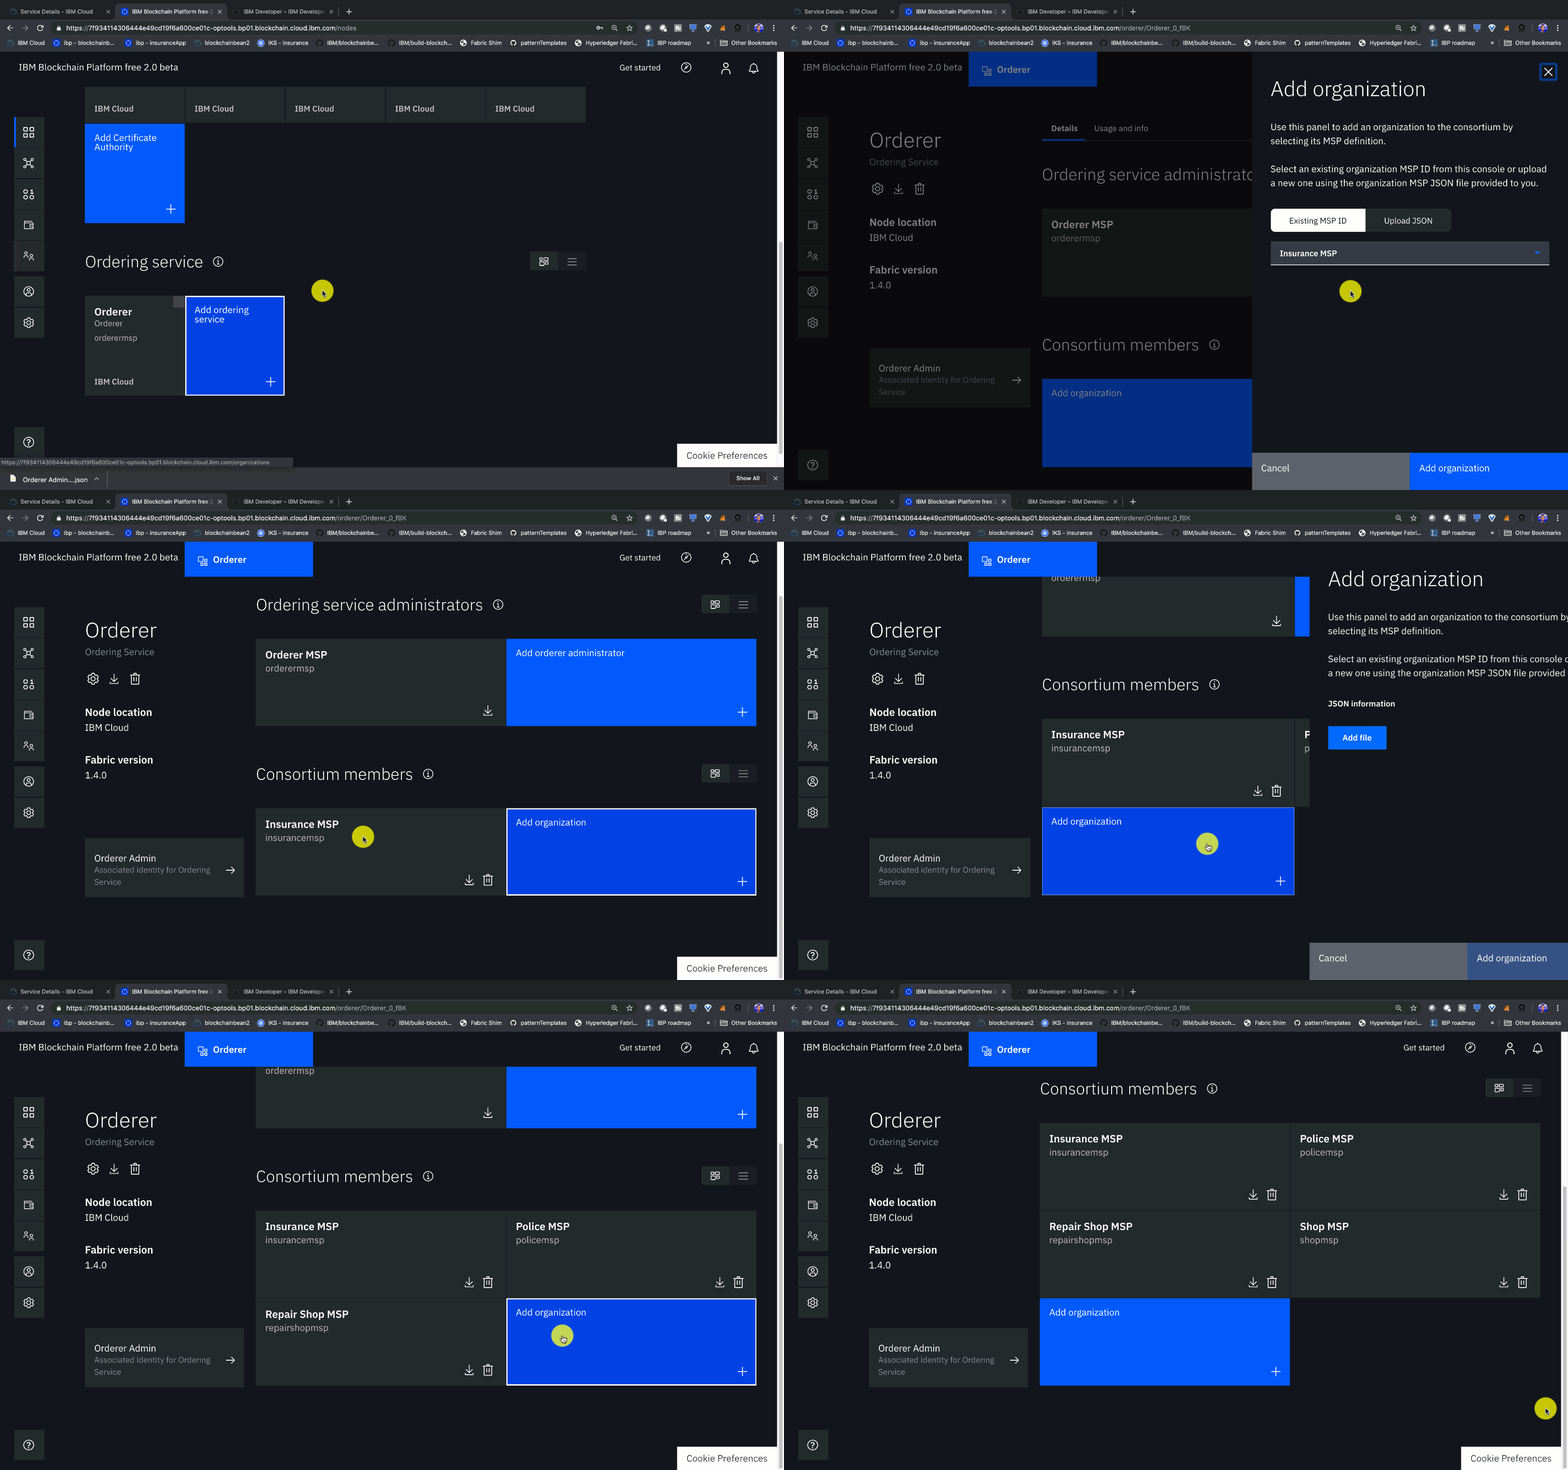
- Navigate to the Nodes tab, and click on the Orderer that we created.
- Under Consortium Members, click Add organization.
- From the drop-down list, select
Insurance MSP. - Click Submit.
- Repeat the same steps, but add
Shop MSP,Repair Shop MSP, andPolice MSPas well.
-
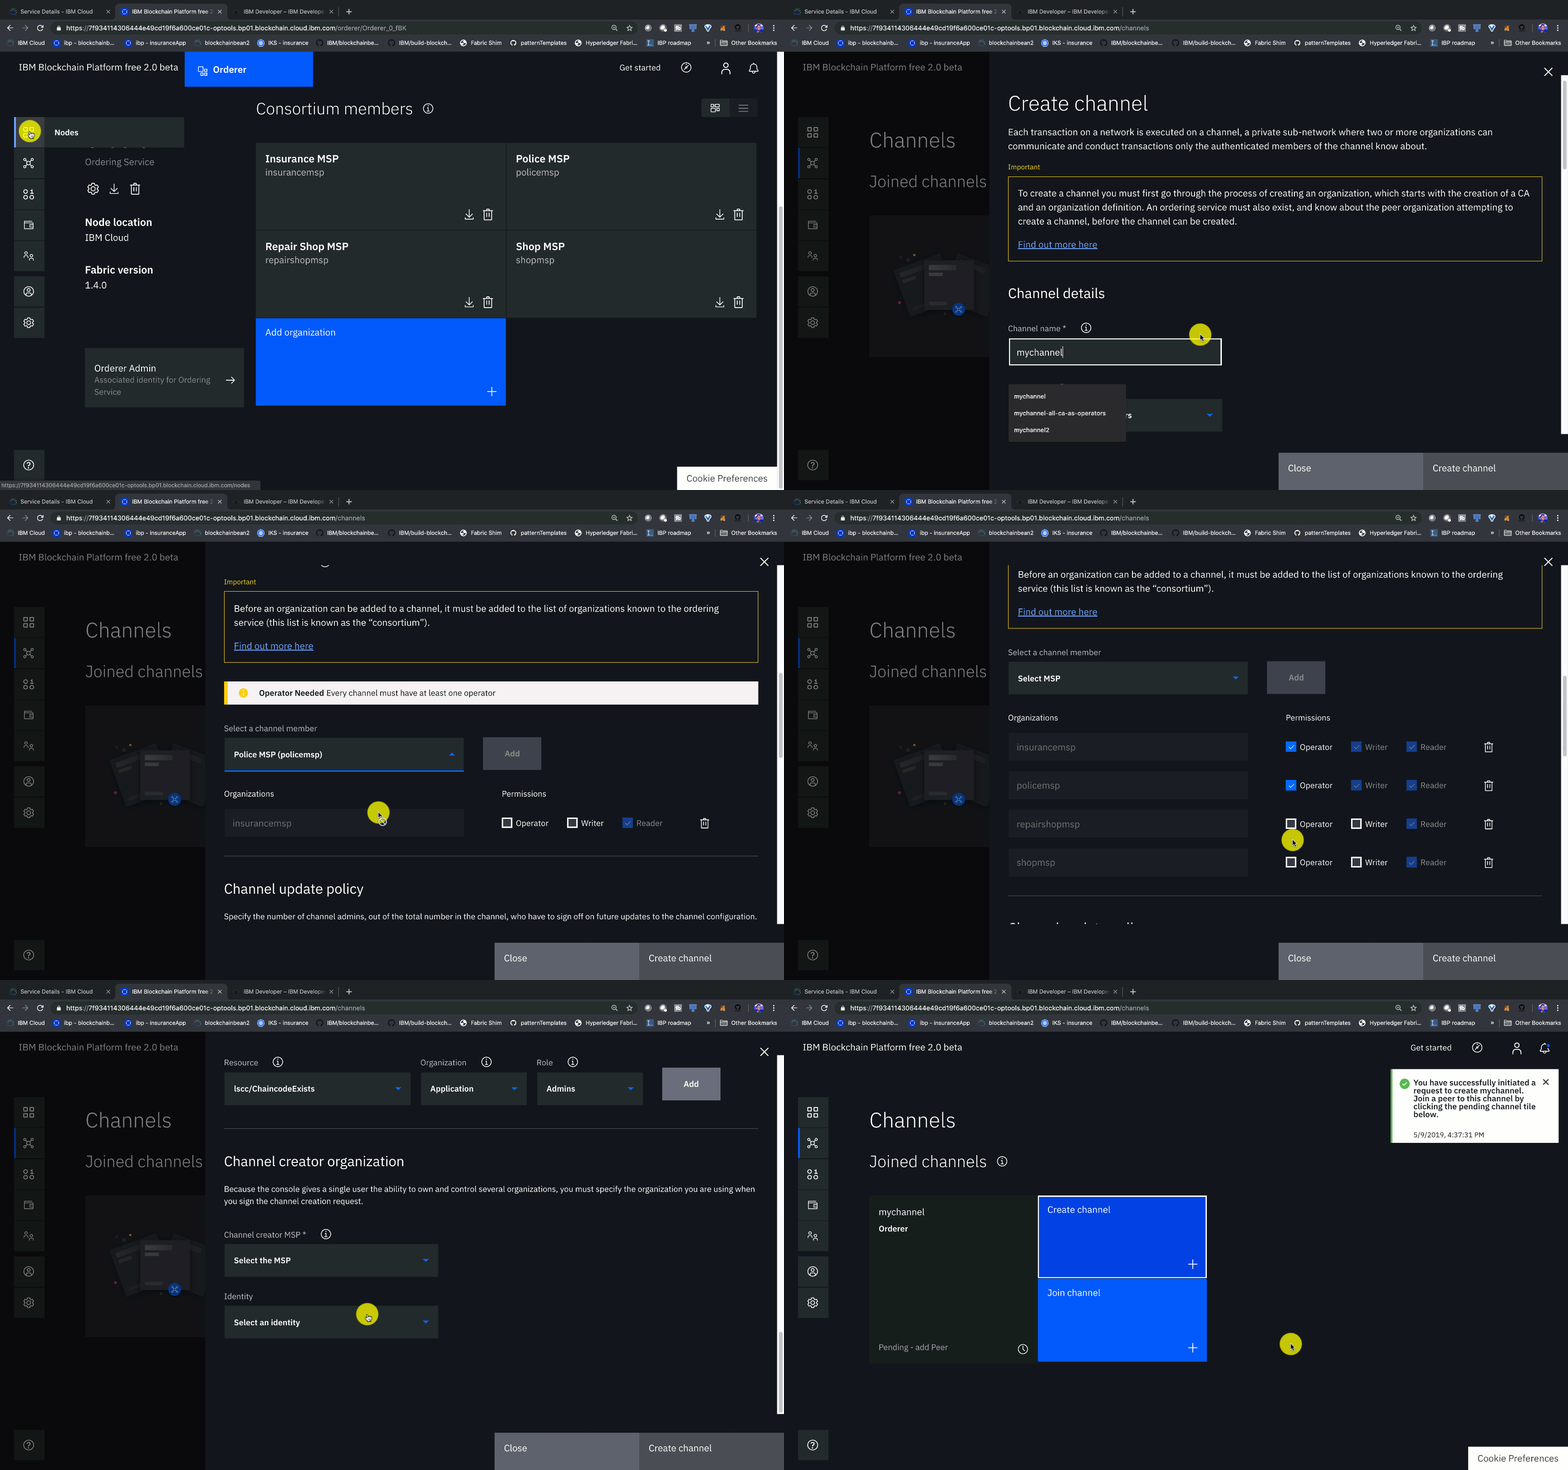
- Navigate to the Channels tab in the left navigation.
- Click Create channel.
- Give the channel a name,
mychannel. - Select the orderer you created,
Ordererfrom the orderers drop-down list. - Select the MSP identifying the organization of the channel creator from the drop-down list. This should be
Insurance MSP (insurancemsp). - Associate available identity as
Insurance Admin. - Click Add next to the insurance organization. Make the insurance organization an Operator.
- Click Add next to the shop organization. Make the shop organization an Operator.
- Click Add next to the repair shop organization. Make the repair shop organization an Operator.
- Click Add next to the police organization. Make the insurance organpoliceization an Operator.
- Click Create.
-
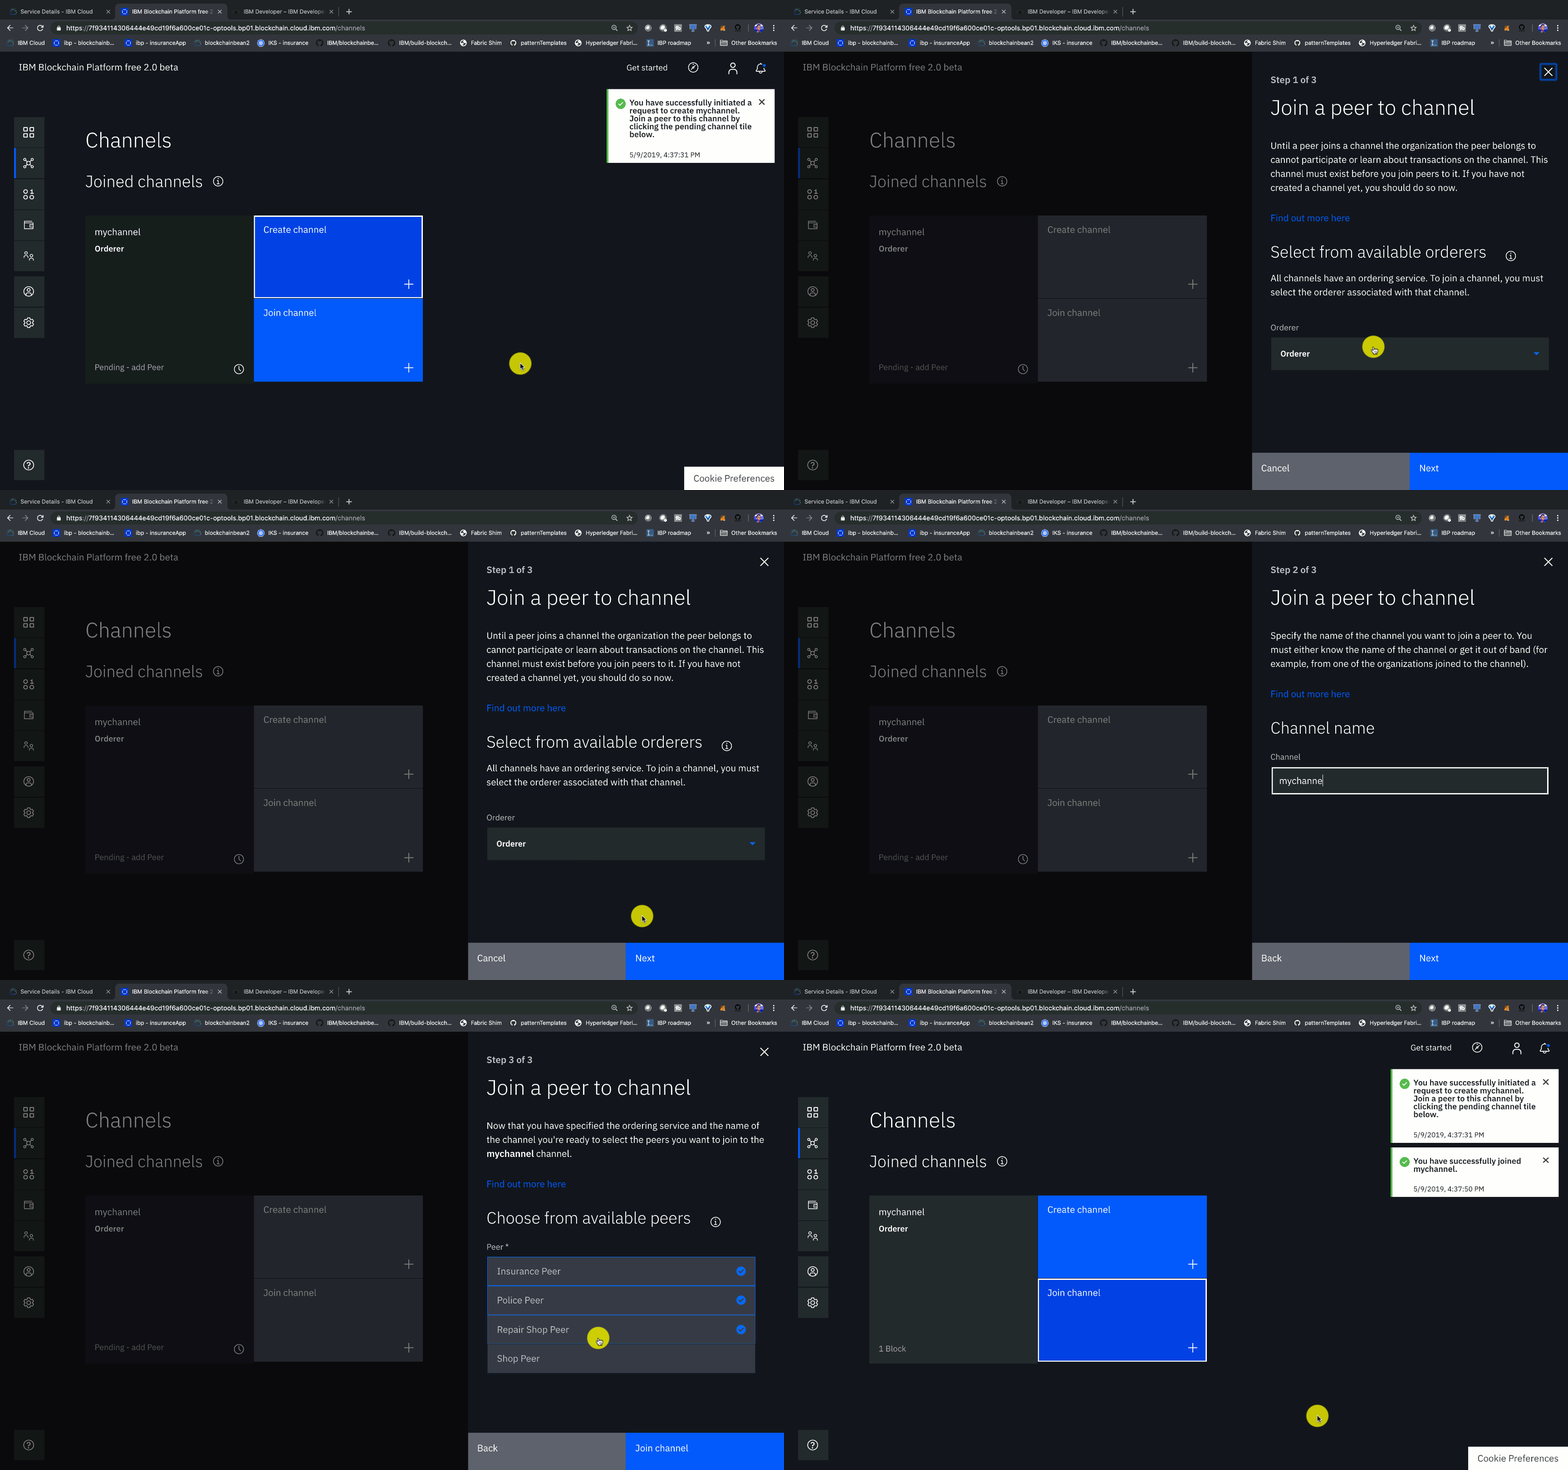
- Click Join channel to launch the side panels.
- Select your
Ordererand click Next. - Enter the name of the channel you just created.
mychanneland click Next. - Select which peers you want to join the channel, click
Insurance Peer,Shop Peer,Repair Shop Peer, andPolice Peer. - Click Submit.
-
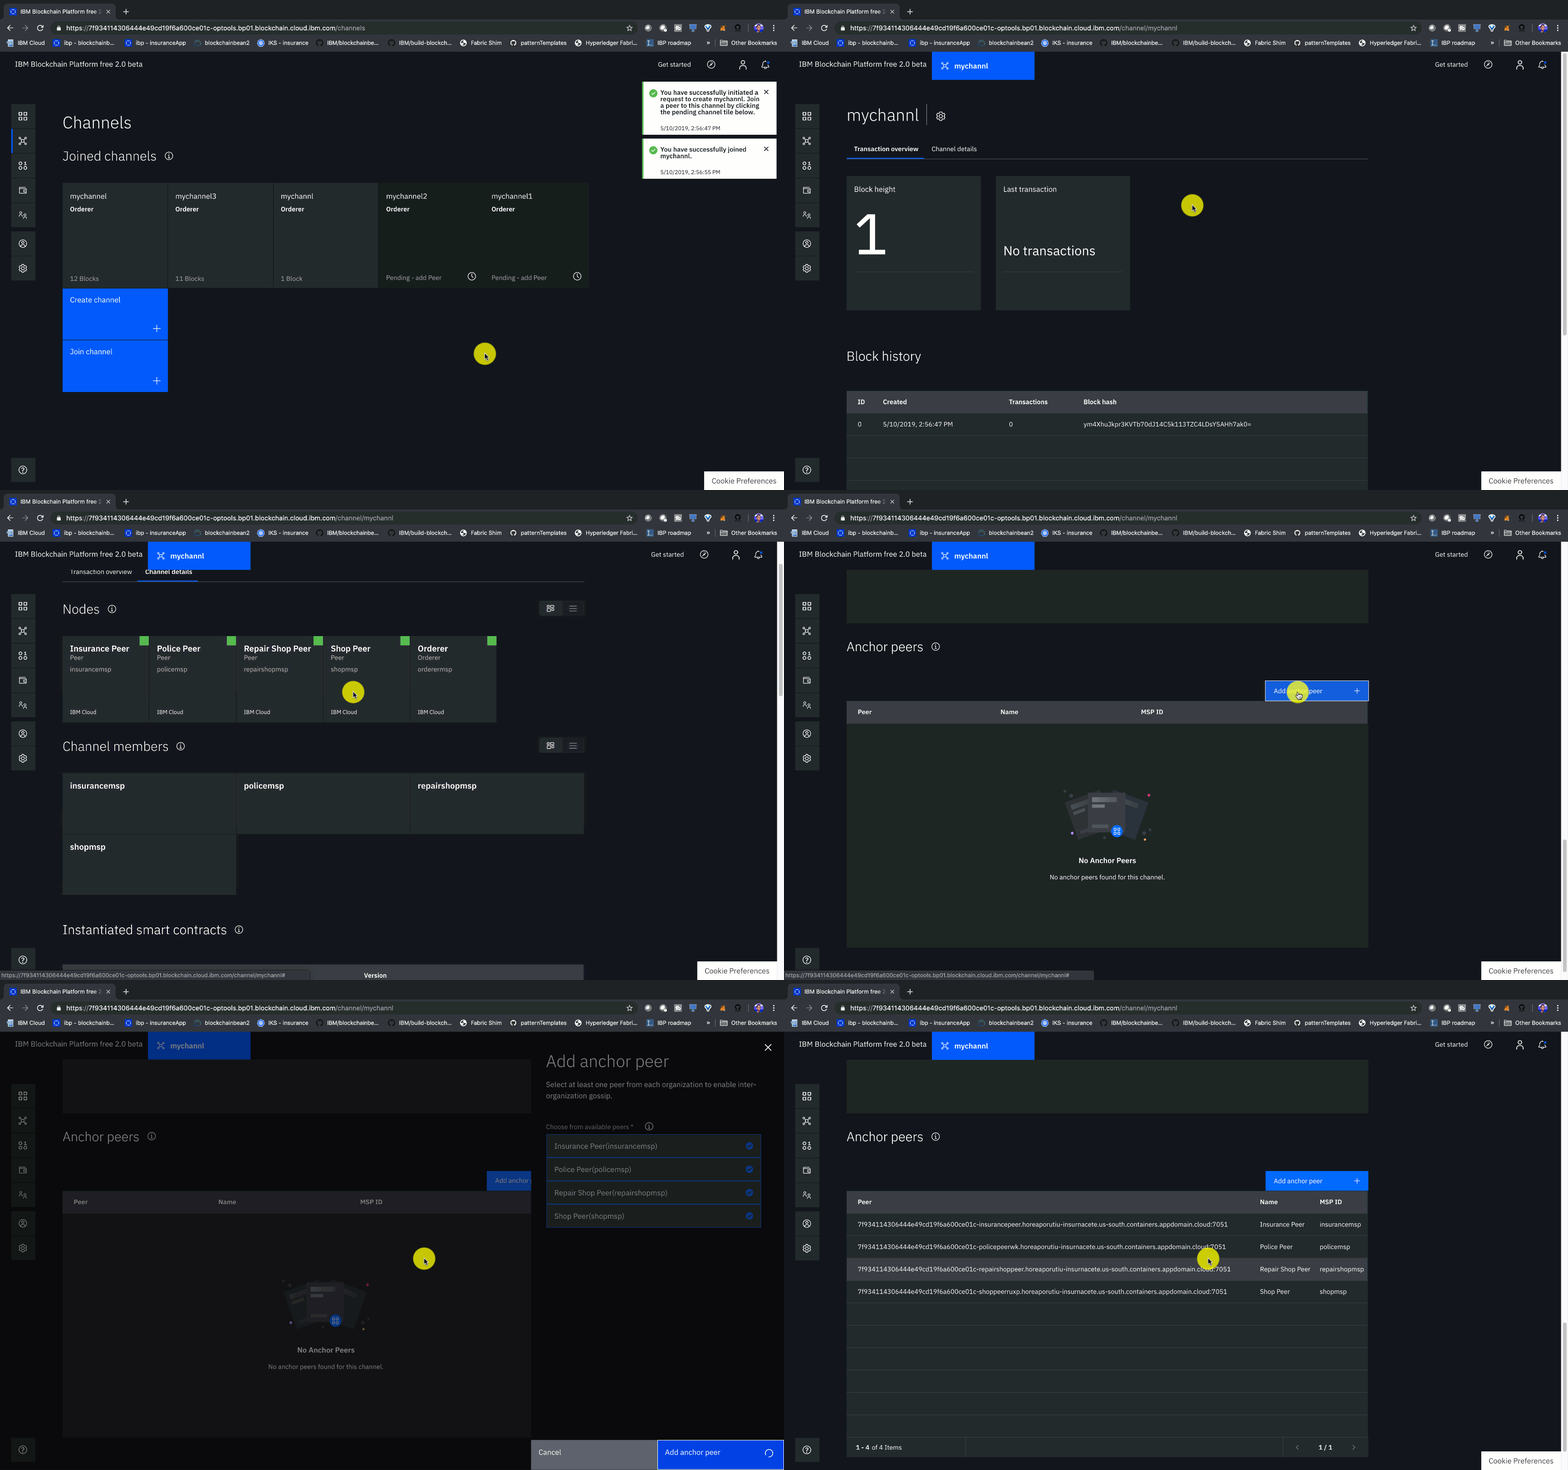
- In order to communicate between organizations, we need to enroll anchor peers.
- From the channels tab, click on the channel you have created,
mychannel. - From the channel overview page, click on
channel details. Scroll all the way down until you seeAnchor peers. - Click
Add anchor peerand add the Insurance, Police, Repair Shop, and Shop peers. - Select which peers you want to join the channel, click
Insurance Peer,Shop Peer,Repair Shop Peer, andPolice Peer. - Click Add anchor peer.
- If all went well, your channel Anchor peers should look like below:
- Clone the repository:
git clone https://github.com/IBM/build-blockchain-insurance-app
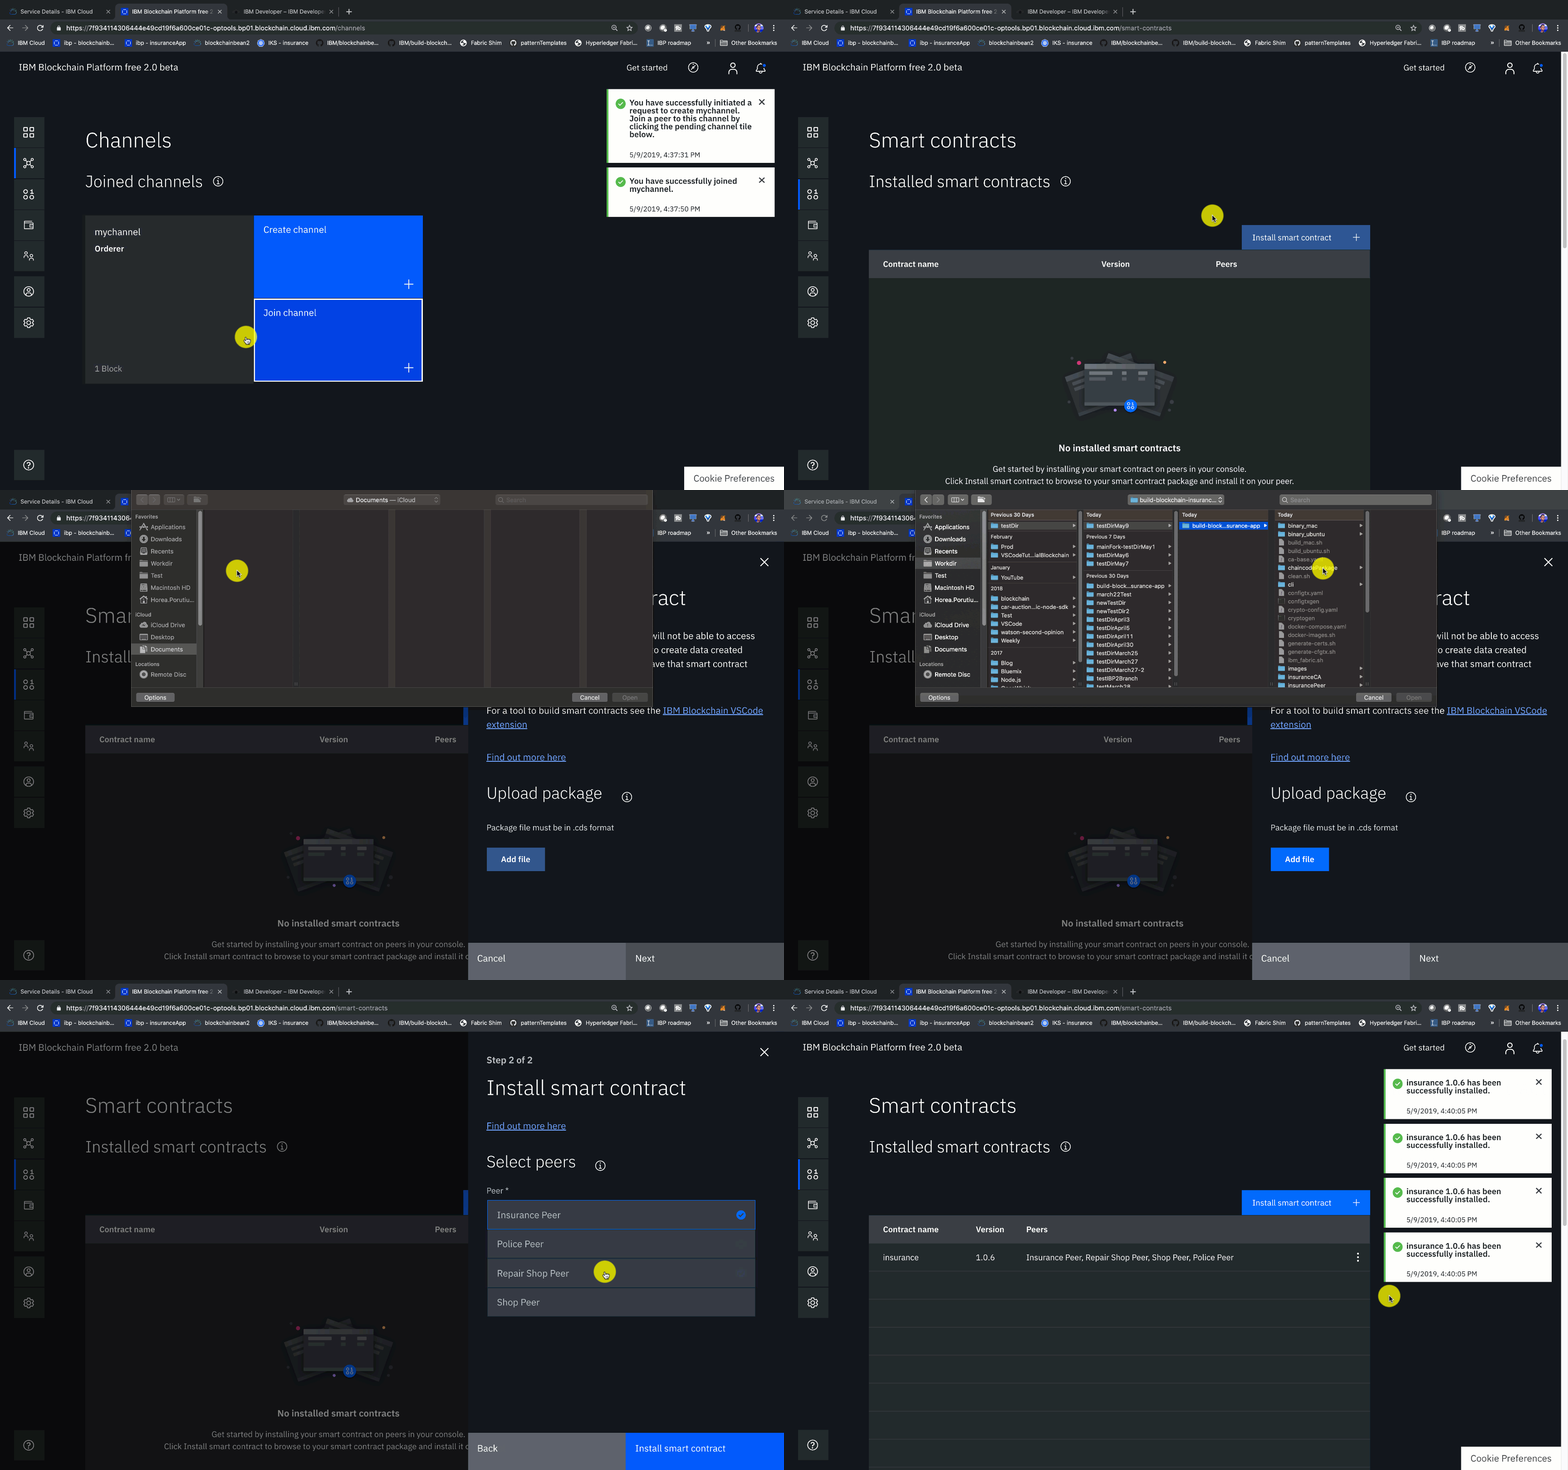
- Click the Smart contracts tab to install the smart contract.
- Click Install smart contract to upload the insurance smart contract package file.
- Click on Add file and find your packaged smart contract. It is the file in the
build-blockchain-insurance-app/chaincodePackagedirectory. - Select all peers - we need to install the contract on each peer.
- Once the contract is uploaded, click Install.
-
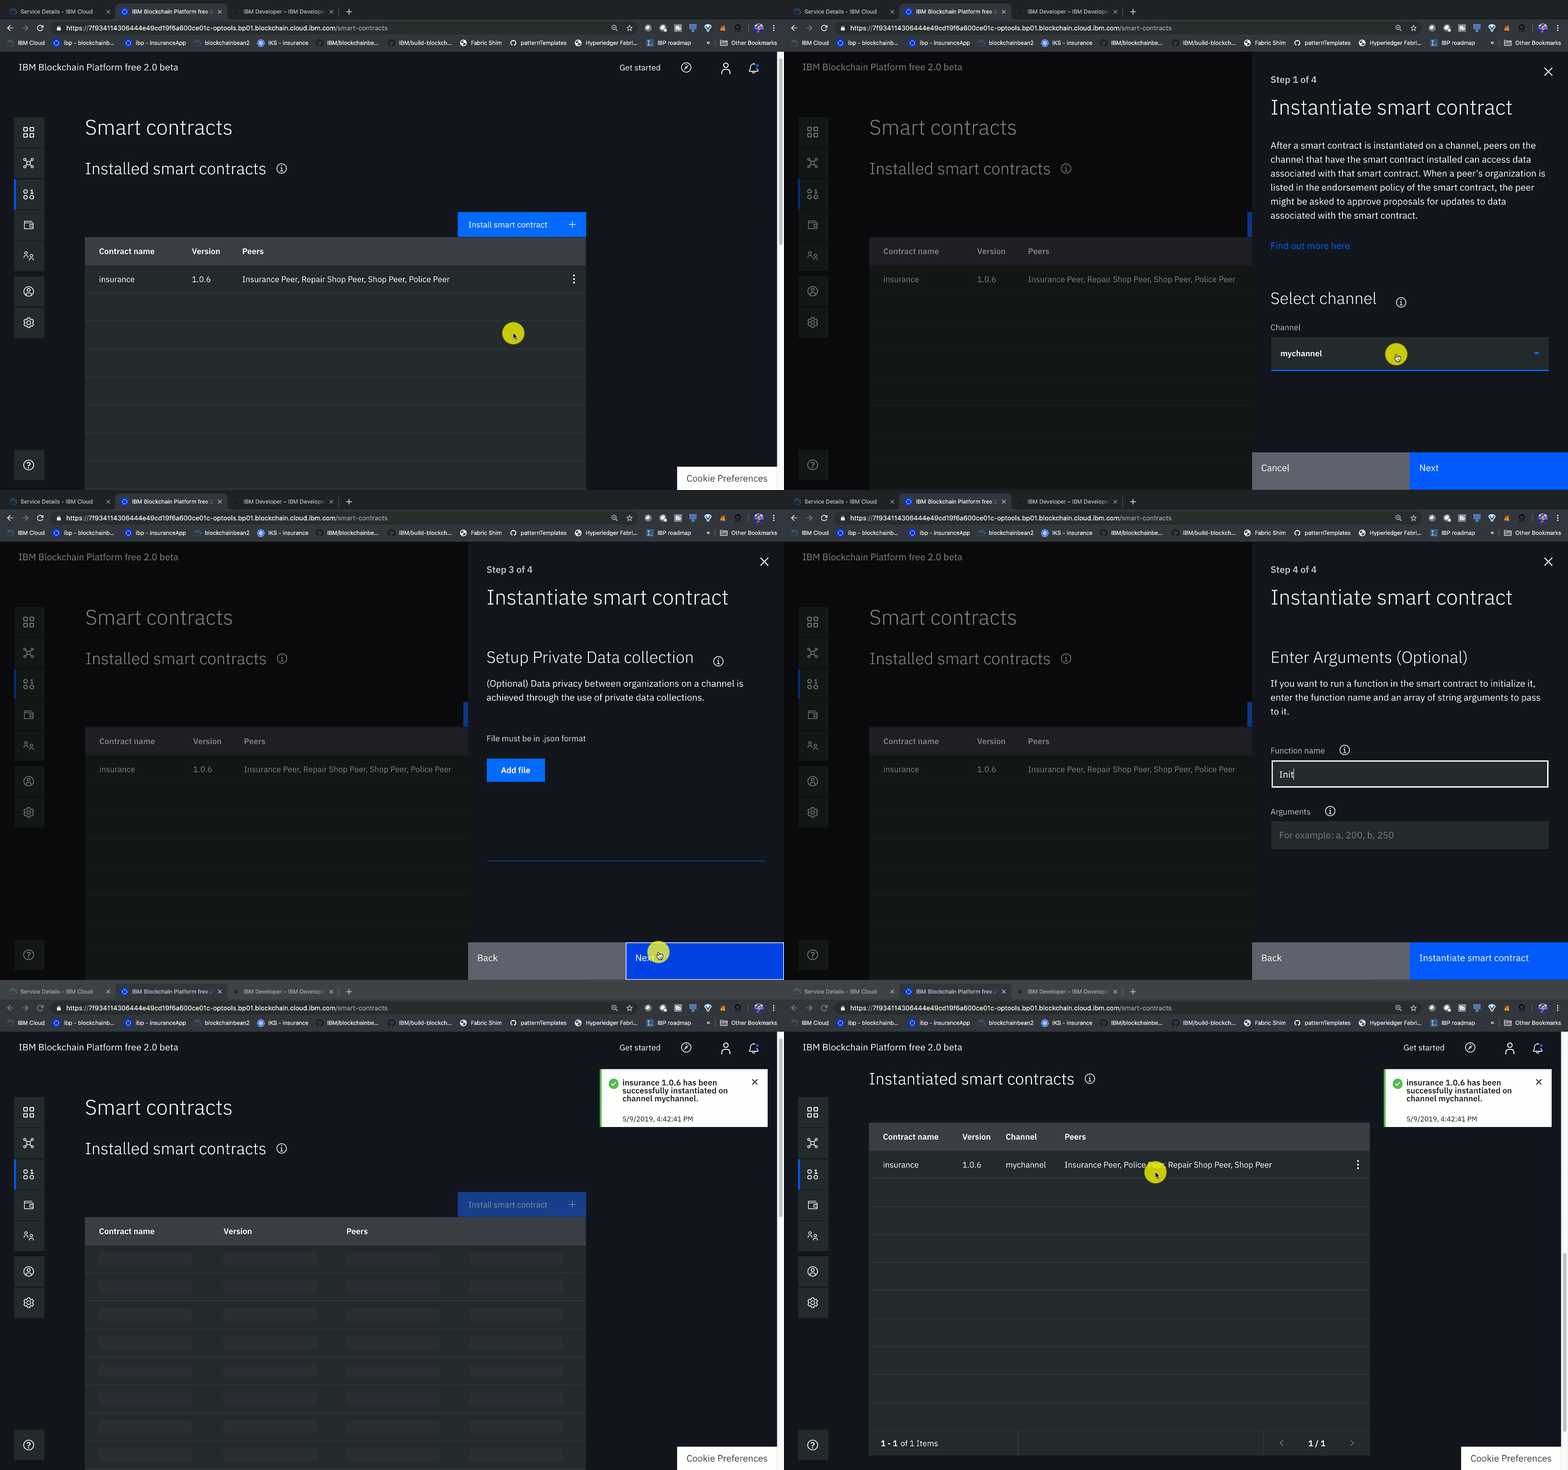
- On the smart contracts tab, find the smart contract from the list installed on your peers and click Instantiate from the overflow menu on the right side of the row.
- On the side panel that opens, select the channel,
mychannelto instantiate the smart contract on. Click Next. - Select the organization members to be included in the policy,
insurancemsp,shopmsp,repairshopmsp,policemsp. Click Next. - Give Function name of
Initand leave Arguments blank. - Click Instantiate.
-
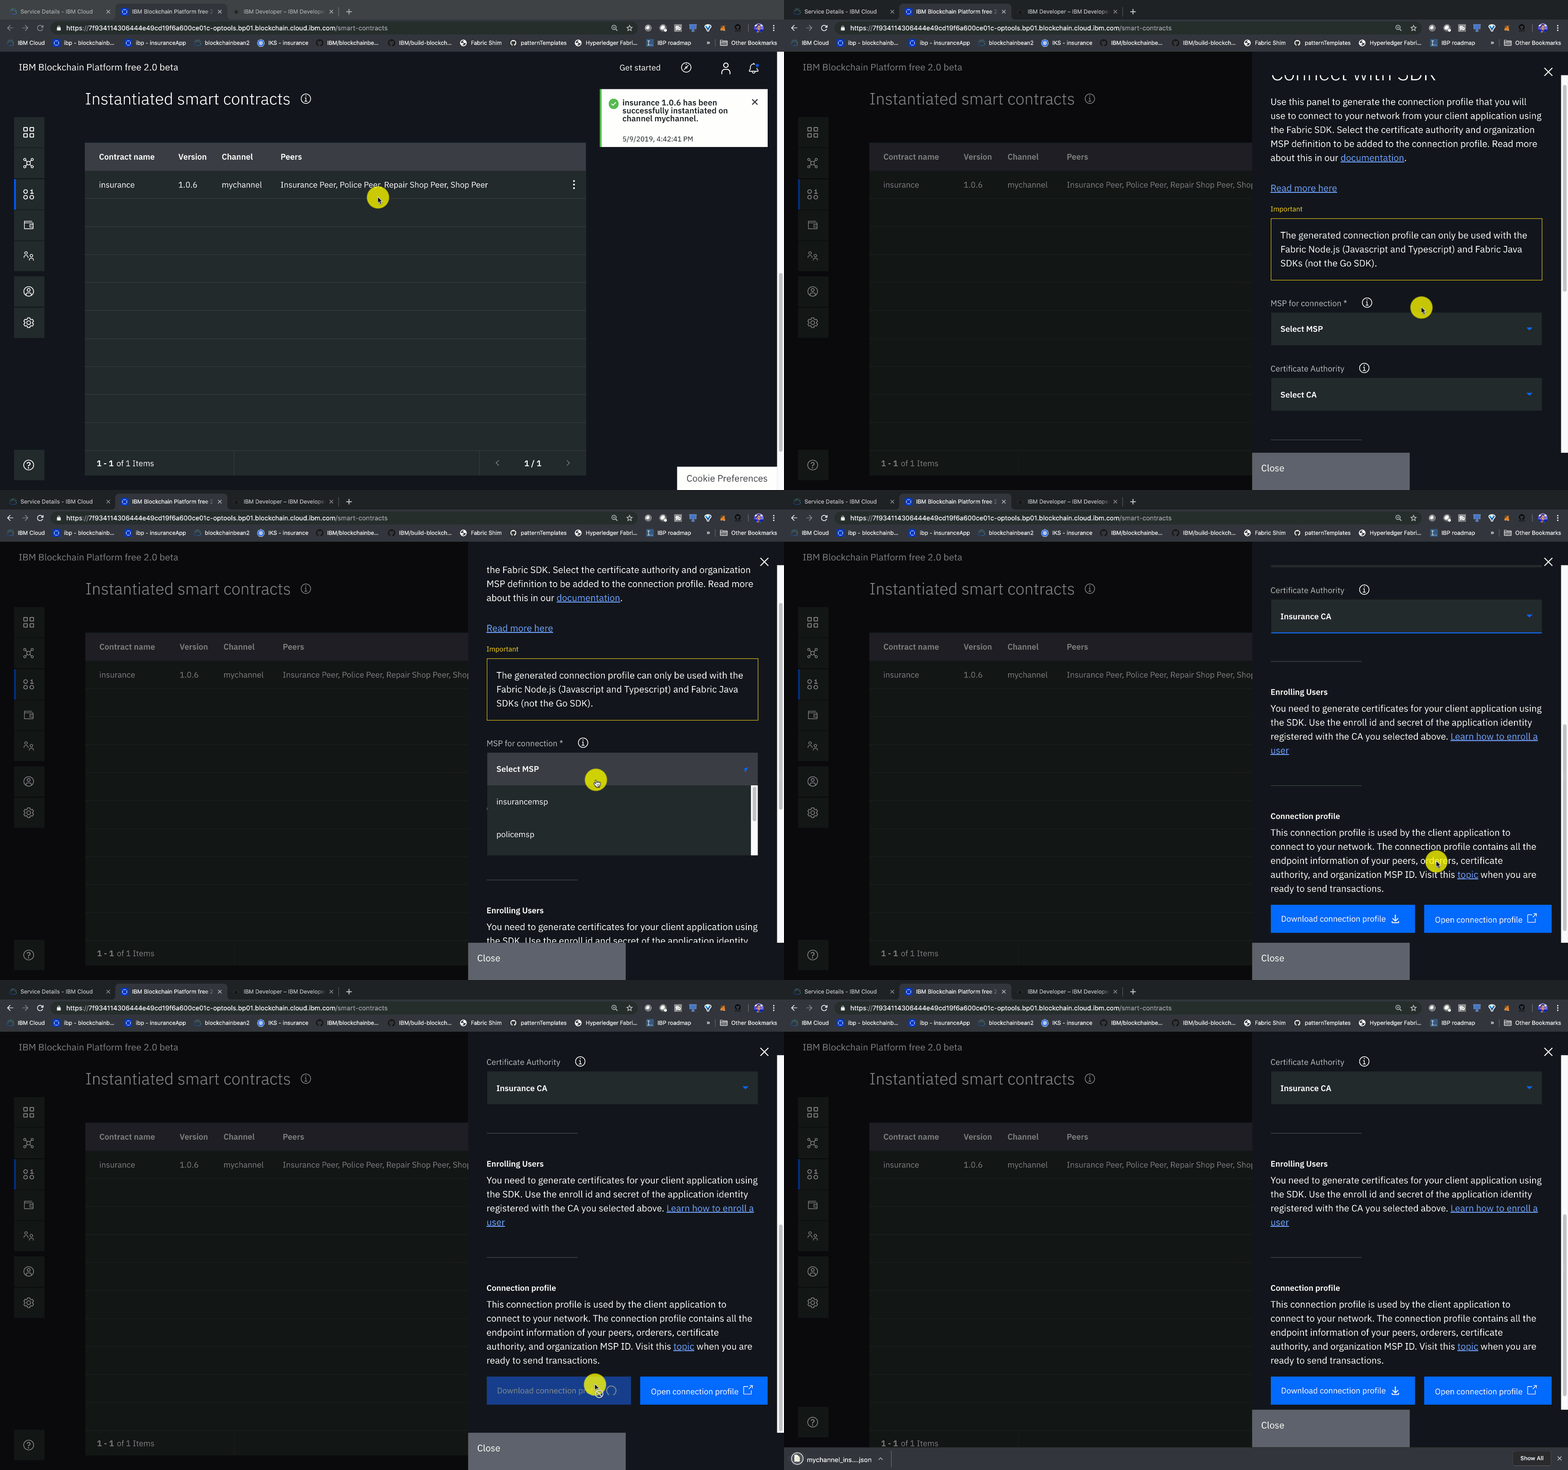
- Under the Instantiated Smart Contract, click on
Connect with SDKfrom the overflow menu on the right side of the row. - Choose from the dropdown for MSP for connection,
insurancemsp. - Choose from Certificate Authority dropdown,
Insurance CA. - Download the connection profile by scrolling down and clicking Download Connection Profile. This will download the connection json which we will use soon to establish connection.
- You can click Close once the download completes.
- Under the Instantiated Smart Contract, click on
-
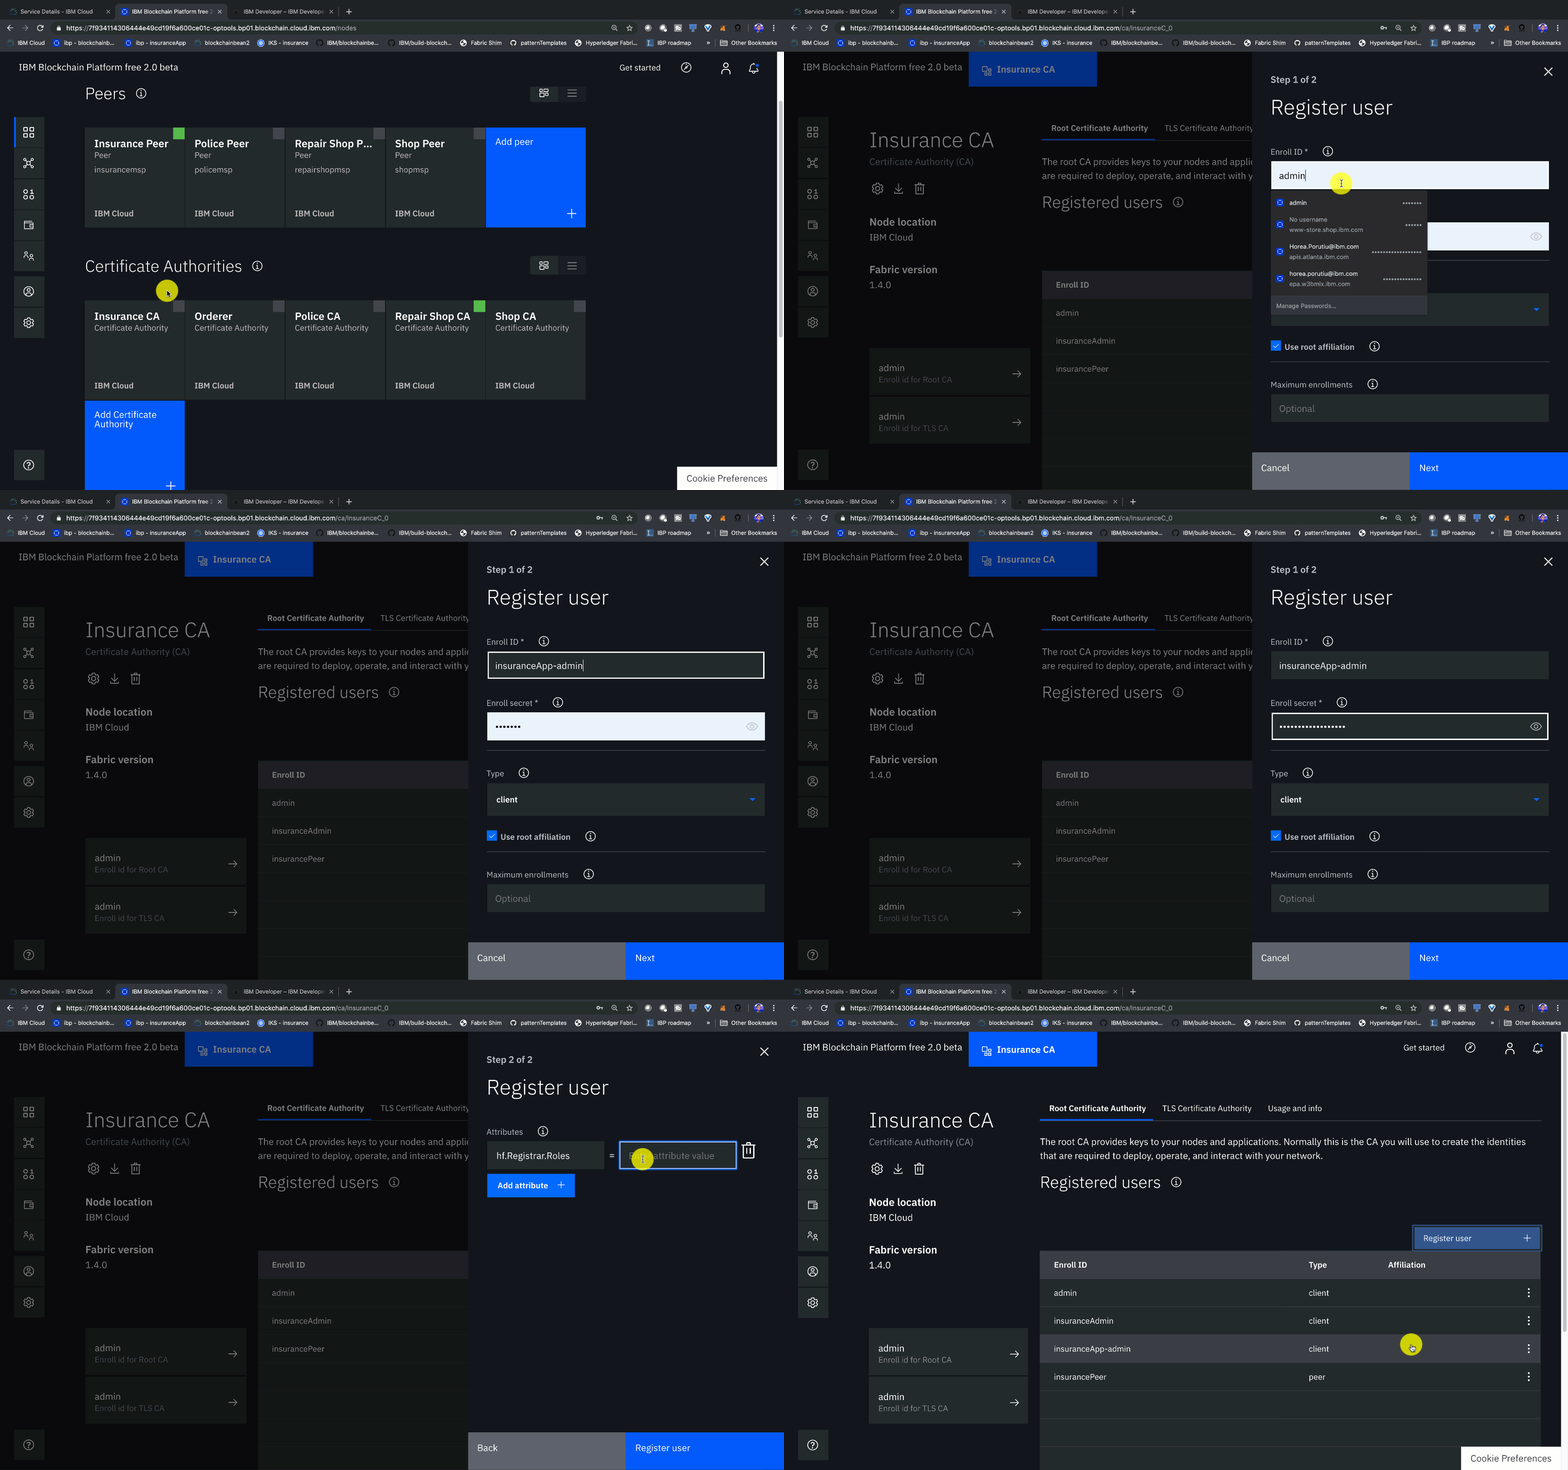
- Go to the Nodes tab on the left bar, and under Certificate Authorities, choose your Insurance CA.
- Click on Register user.
- Give an Enroll ID and Enroll Secret to administer your application users,
insuranceApp-adminandinsuranceApp-adminpw. - Choose
clientas Type. - You can leave the Use root affiliation box checked.
- You can leave the Maximum enrollments blank.
- Under Attributes, click on Add attribute. Give attribute as
hf.Registrar.Roles=*. This will allow this identity to act as registrar and issues identities for our app. Click Add-attribute. - Click Register.
-
- Go to the Nodes tab on the left bar, and under Certificate Authorities, choose your Shop CA.
- Click on Register user.
- Give an Enroll ID and Enroll Secret to administer your application users,
shopApp-adminandshopApp-adminpw. - Choose
clientas Type. - You can leave the Use root affiliation box checked.
- You can leave the Maximum enrollments blank.
- Under Attributes, click on Add attribute. Give attribute as
hf.Registrar.Roles=*. This will allow this identity to act as registrar and issues identities for our app. Click Add-attribute. - Click Register.
-
- Go to the Nodes tab on the left bar, and under Certificate Authorities, choose your Repair Shop CA.
- Click on Register user.
- Give an Enroll ID and Enroll Secret to administer your application users,
repairShopApp-adminandrepairShopApp-adminpw. - Choose
clientas Type. - You can leave the Use root affiliation box checked.
- You can leave the Maximum enrollments blank.
- Under Attributes, click on Add attribute. Give attribute as
hf.Registrar.Roles=*. This will allow this identity to act as registrar and issues identities for our app. Click Add-attribute. - Click Register.
-
- Go to the Nodes tab on the left bar, and under Certificate Authorities, choose your Police CA.
- Click on Register user.
- Give an Enroll ID and Enroll Secret to administer your application users,
policeApp-adminandpoliceApp-adminpw. - Choose
clientas Type. - You can leave the Use root affiliation box checked.
- You can leave the Maximum enrollments blank.
- Under Attributes, click on Add attribute. Give attribute as
hf.Registrar.Roles=*. This will allow this identity to act as registrar and issues identities for our app. Click Add-attribute. - Click Register.
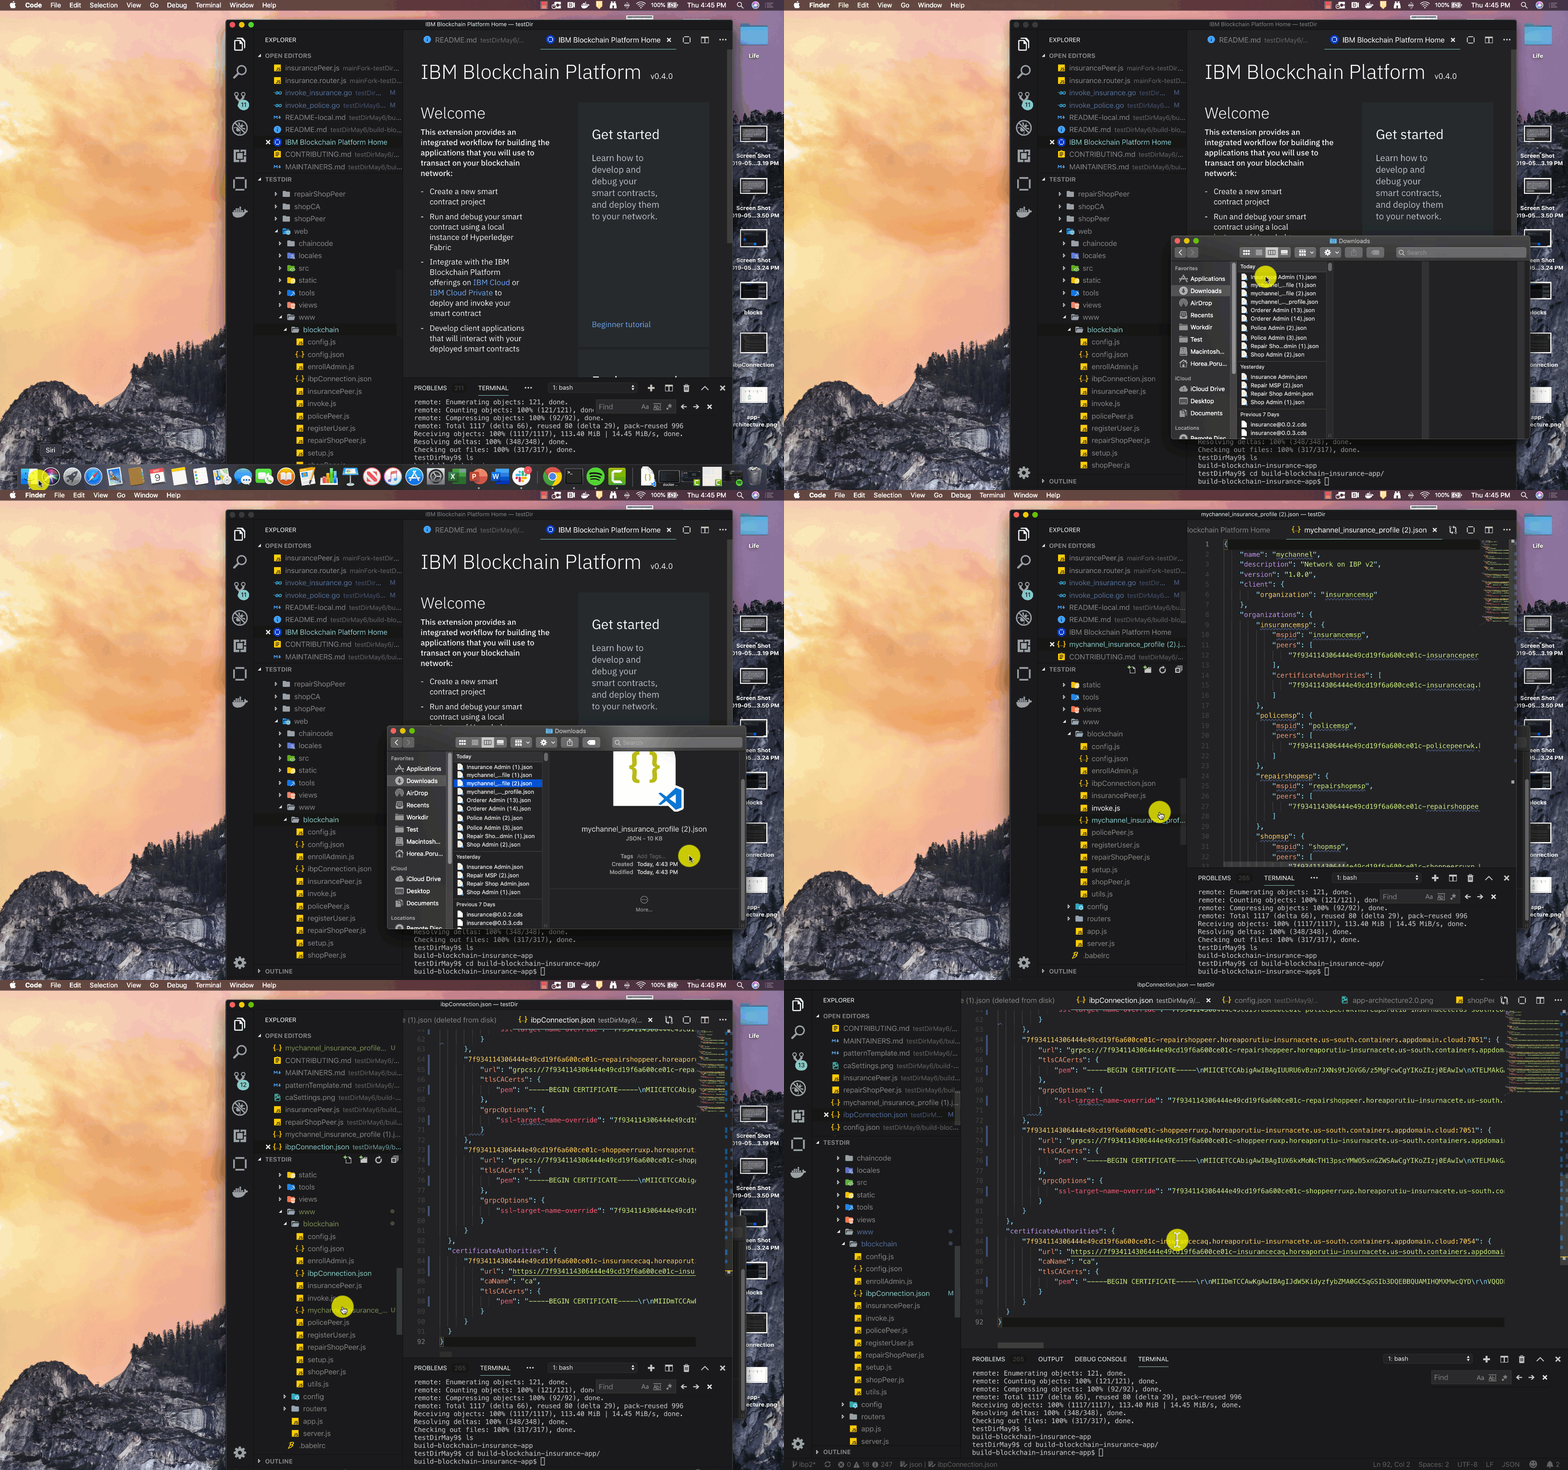
- Copy the connection profile you downloaded into the
web/www/blockchaindirectory. - Copy and paste everything in the connection profile, and overwrite the ibpConnection.json.
-
-
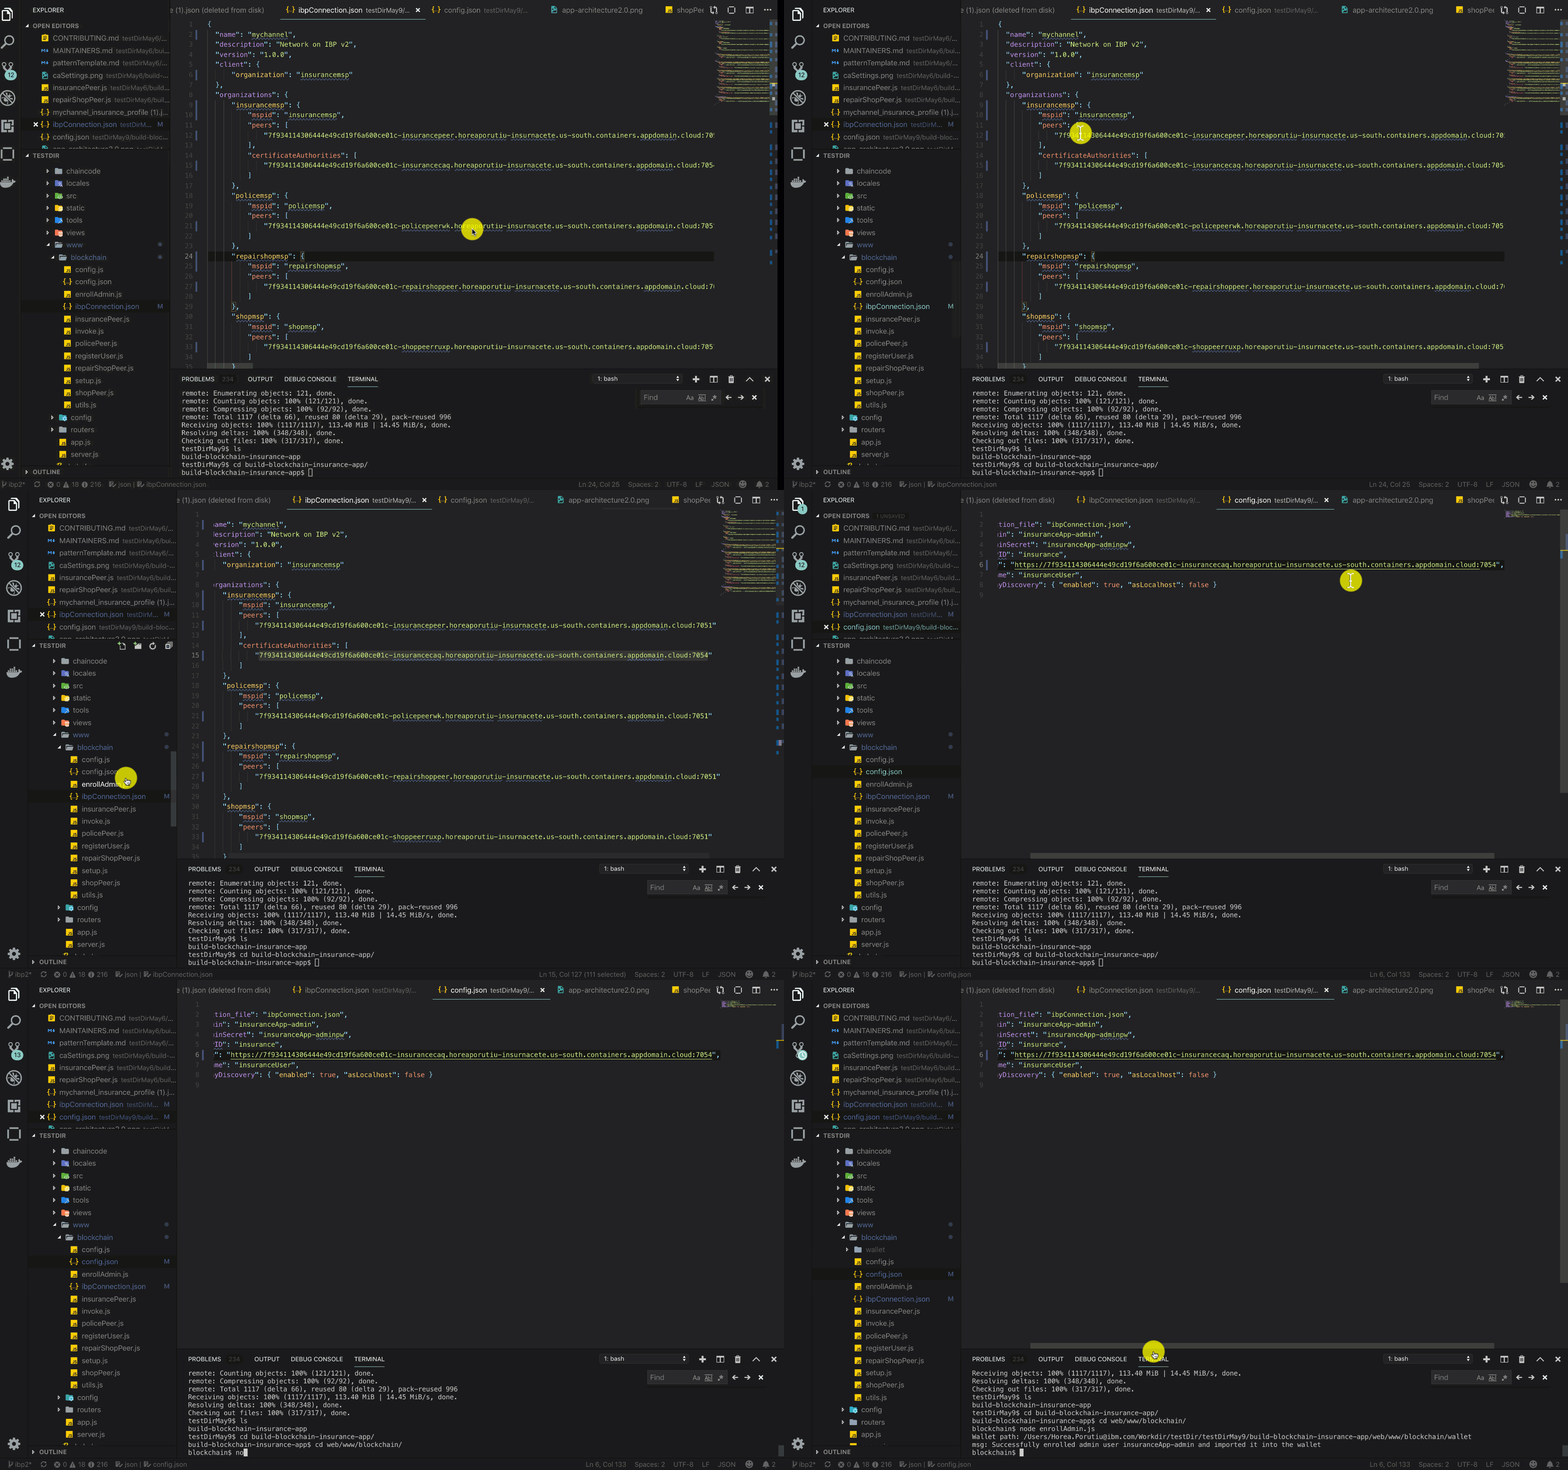
First, navigate to the
web/www/blockchaindirectory.cd web/www/blockchain/ -
Open the
config.jsonfile, and update the caName with the URL of the insurance certificate authority from youribpConnection.jsonfile. Save the file. -
Run the
enrollAdmin.jsscriptnode enrollAdmin.js
-
You should see the following in the terminal:
msg: Successfully enrolled admin user insuranceApp-admin and imported it into the wallet
-
- Enroll shopApp-admin
-
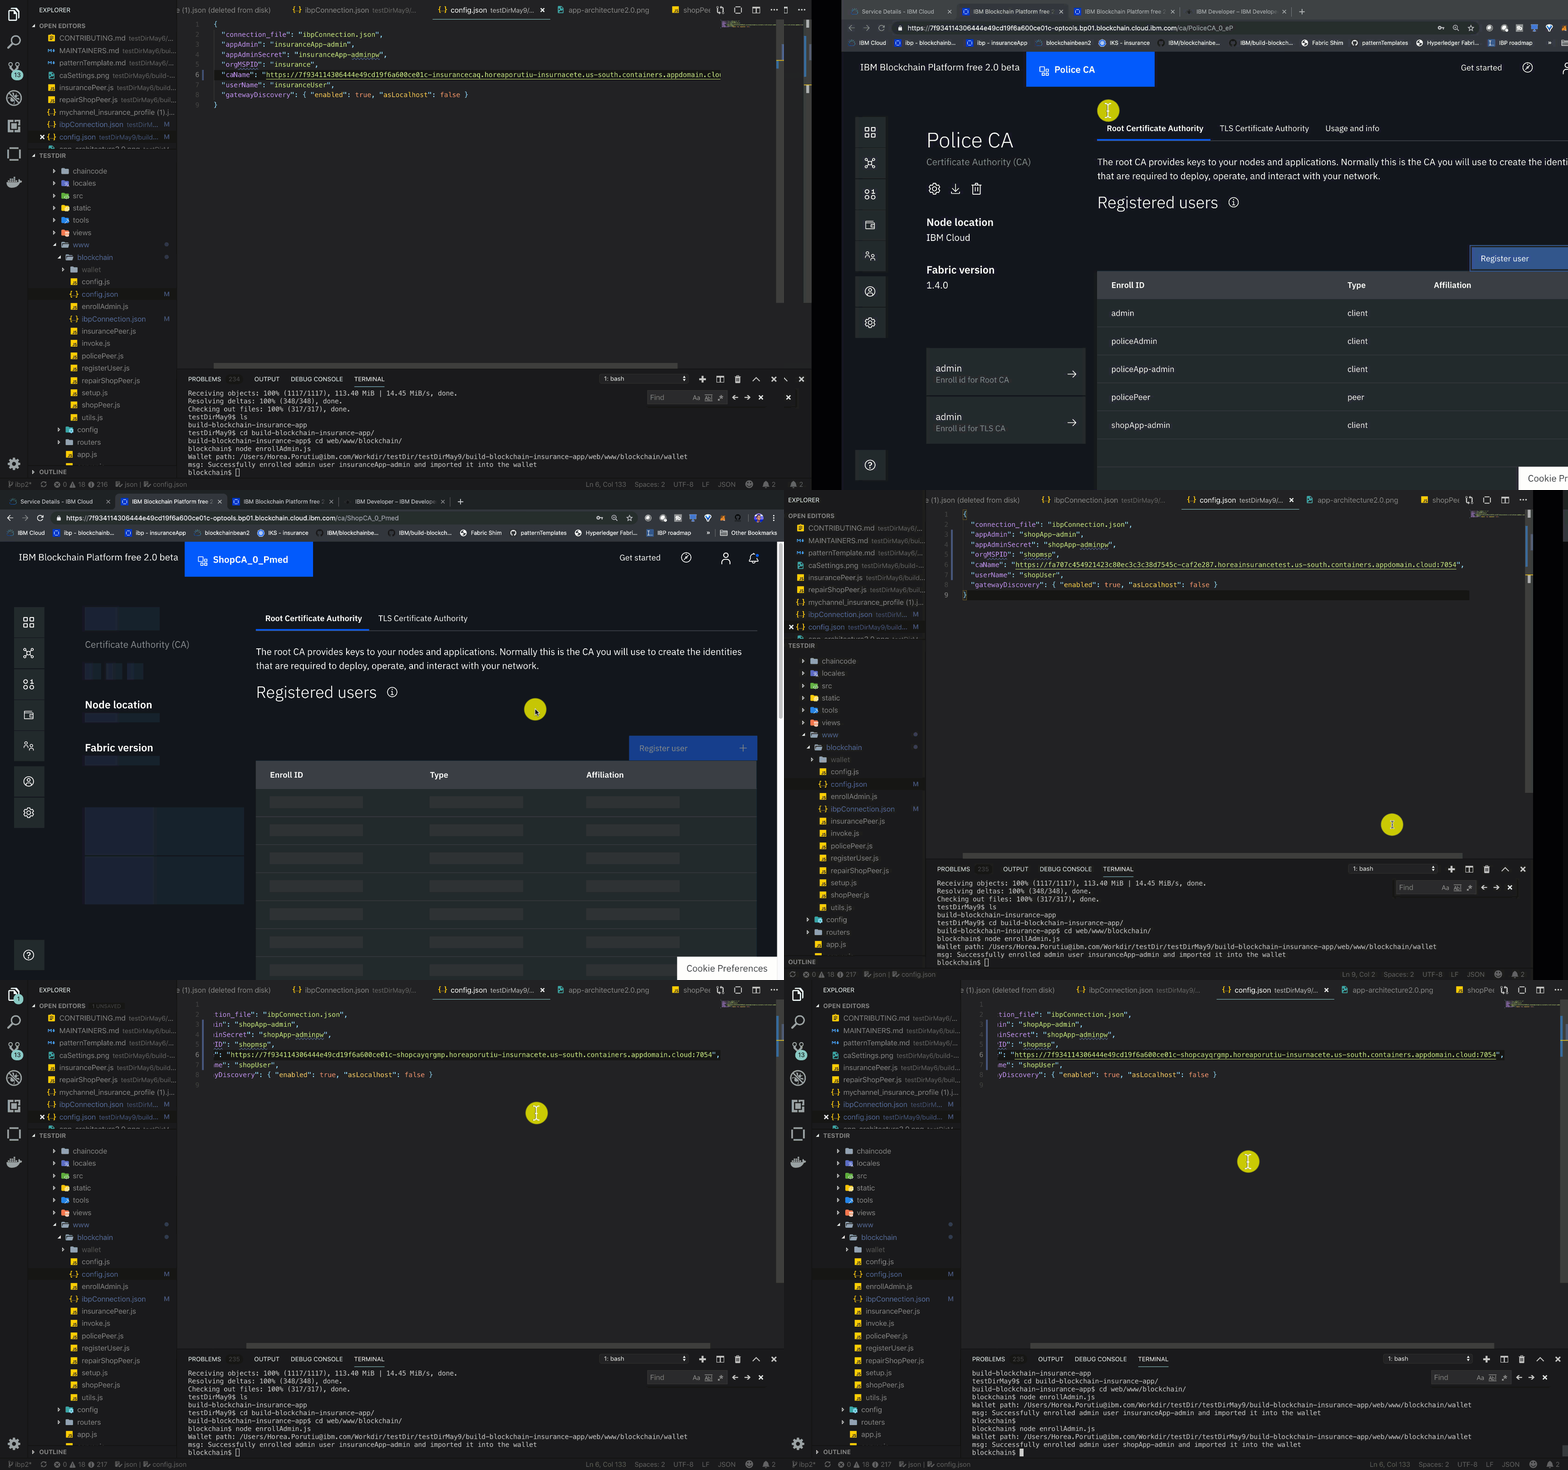
First, change the appAdmin, appAdminSecret, and caName properties in your
config.jsonfile, so that it looks something like this (your caName should be different than mine):{ "connection_file": "ibpConnection.json", "appAdmin": "shopApp-admin", "appAdminSecret": "shopApp-adminpw", "orgMSPID": "shopmsp", "caName": "https://fa707c454921423c80ec3c3c38d7545c-caf2e287.horeainsurancetest.us-south.containers.appdomain.cloud:7054", "userName": "shopUser", "gatewayDiscovery": { "enabled": true, "asLocalhost": false } }
-
To find the other CA urls, you will need to click on the
Nodestab in IBM Blockchain Platform, then on the Shop CA, and on the settings cog icon at the top of the page. That will take you to the certificate authority settings, as shown in the picture below, and you can copy that endpoint URL into yourconfig.jsoncaName field.
-
-
Run the
enrollAdmin.jsscriptnode enrollAdmin.js
-
You should see the following in the terminal:
msg: Successfully enrolled admin user shopApp-admin and imported it into the wallet
-
-
First, change the appAdmin, appAdminSecret, and caName properties in your
config.jsonfile, so that it looks something like this (your caName should be different than mine):{ "connection_file": "ibpConnection.json", "appAdmin": "repairShopApp-admin", "appAdminSecret": "repairShopApp-adminpw", "orgMSPID": "repairshopmsp", "caName": "https://fa707c454921423c80ec3c3c38d7545c-caf2e287.horeainsurancetest.us-south.containers.appdomain.cloud:7054", "userName": "repairUser", "gatewayDiscovery": { "enabled": true, "asLocalhost": false } }
-
Run the
enrollAdmin.jsscriptnode enrollAdmin.js
-
You should see the following in the terminal:
msg: Successfully enrolled admin user repairShopApp-admin and imported it into the wallet
-
-
-
First, change the appAdmin, appAdminSecret, and caName properties in your
config.jsonfile, so that it looks something like this (your caName should be different than mine):{ "connection_file": "ibpConnection.json", "appAdmin": "policeApp-admin", "appAdminSecret": "policeApp-adminpw", "orgMSPID": "policemsp", "caName": "https://fa707c454921423c80ec3c3c38d7545c-caf2e287.horeainsurancetest.us-south.containers.appdomain.cloud:7054", "userName": "policeUser", "gatewayDiscovery": { "enabled": true, "asLocalhost": false } }
-
Run the
enrollAdmin.jsscriptnode enrollAdmin.js
-
You should see the following in the terminal:
msg: Successfully enrolled admin user policeApp-admin and imported it into the wallet
-
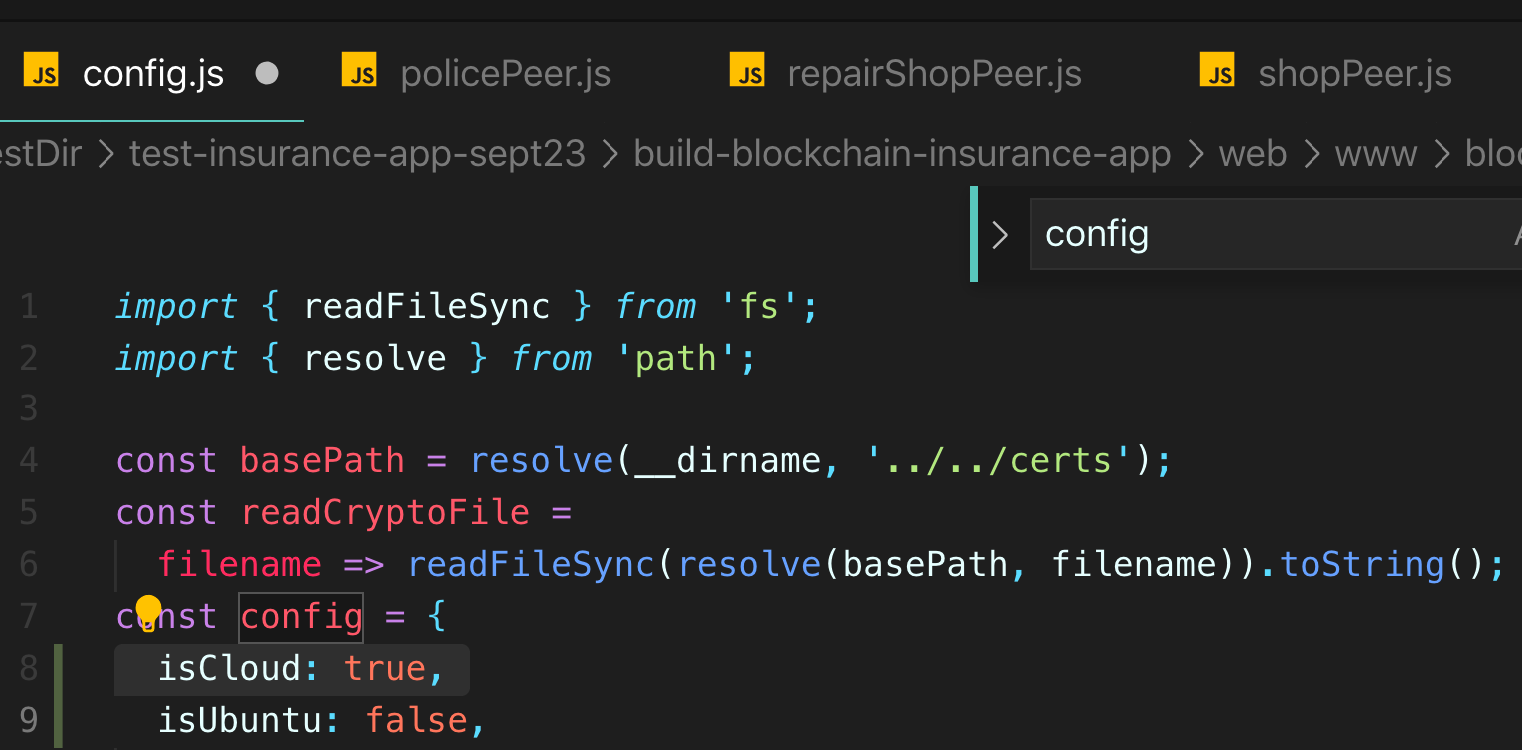
Navigate to the directory blockchain directory which contains the config.js file:
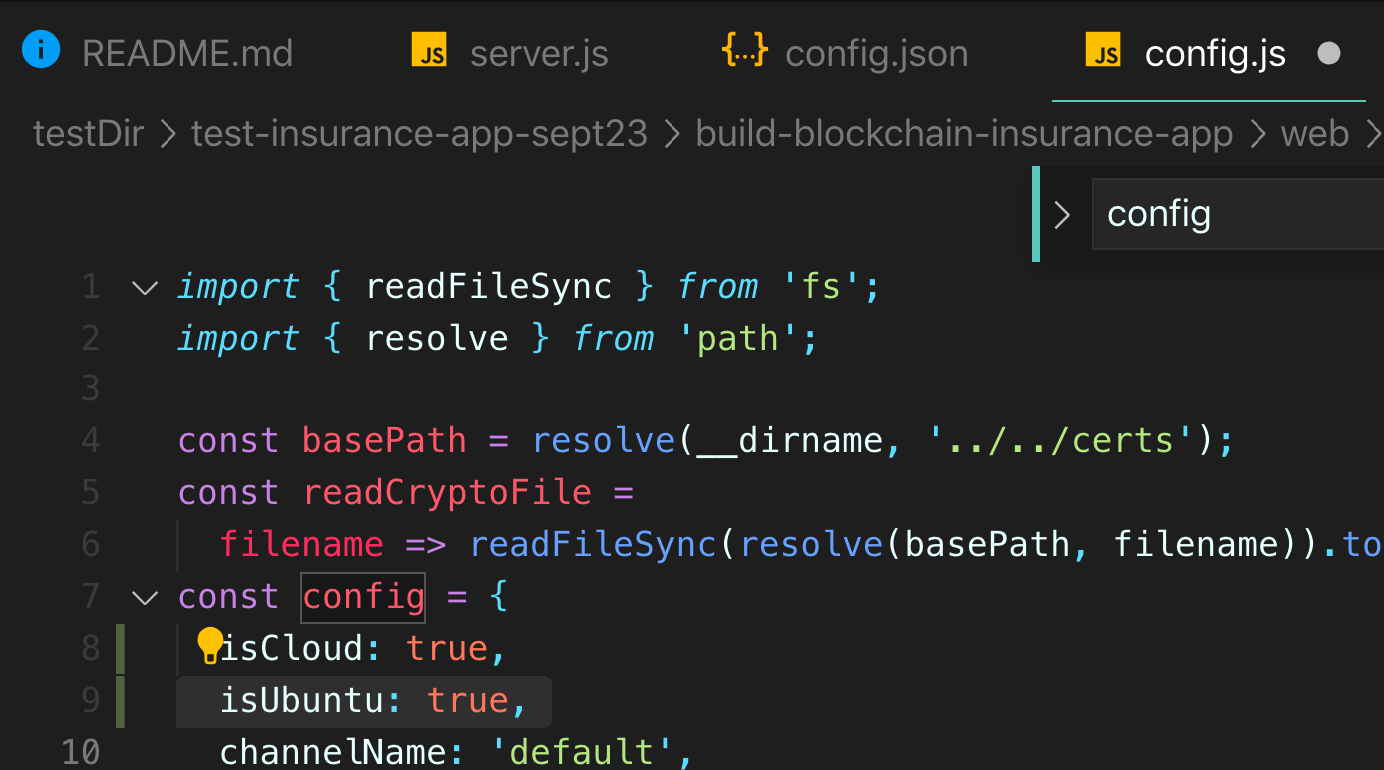
cd build-blockchain-insurance-app/web/www/blockchain/In the editor of choice, change line 8 of the config.js file to isCloud: true as
shown in the image below:
If you are using Mac, save the changes. Otherwise, if you are using an Ubuntu system, change
line 9 of config.js file to isUbuntu: true as shown in the image below:
Next, from the blockchain directory navigate to the root project directory:
blockchain$ cd ../../../
build-blockchain-insurance-app$
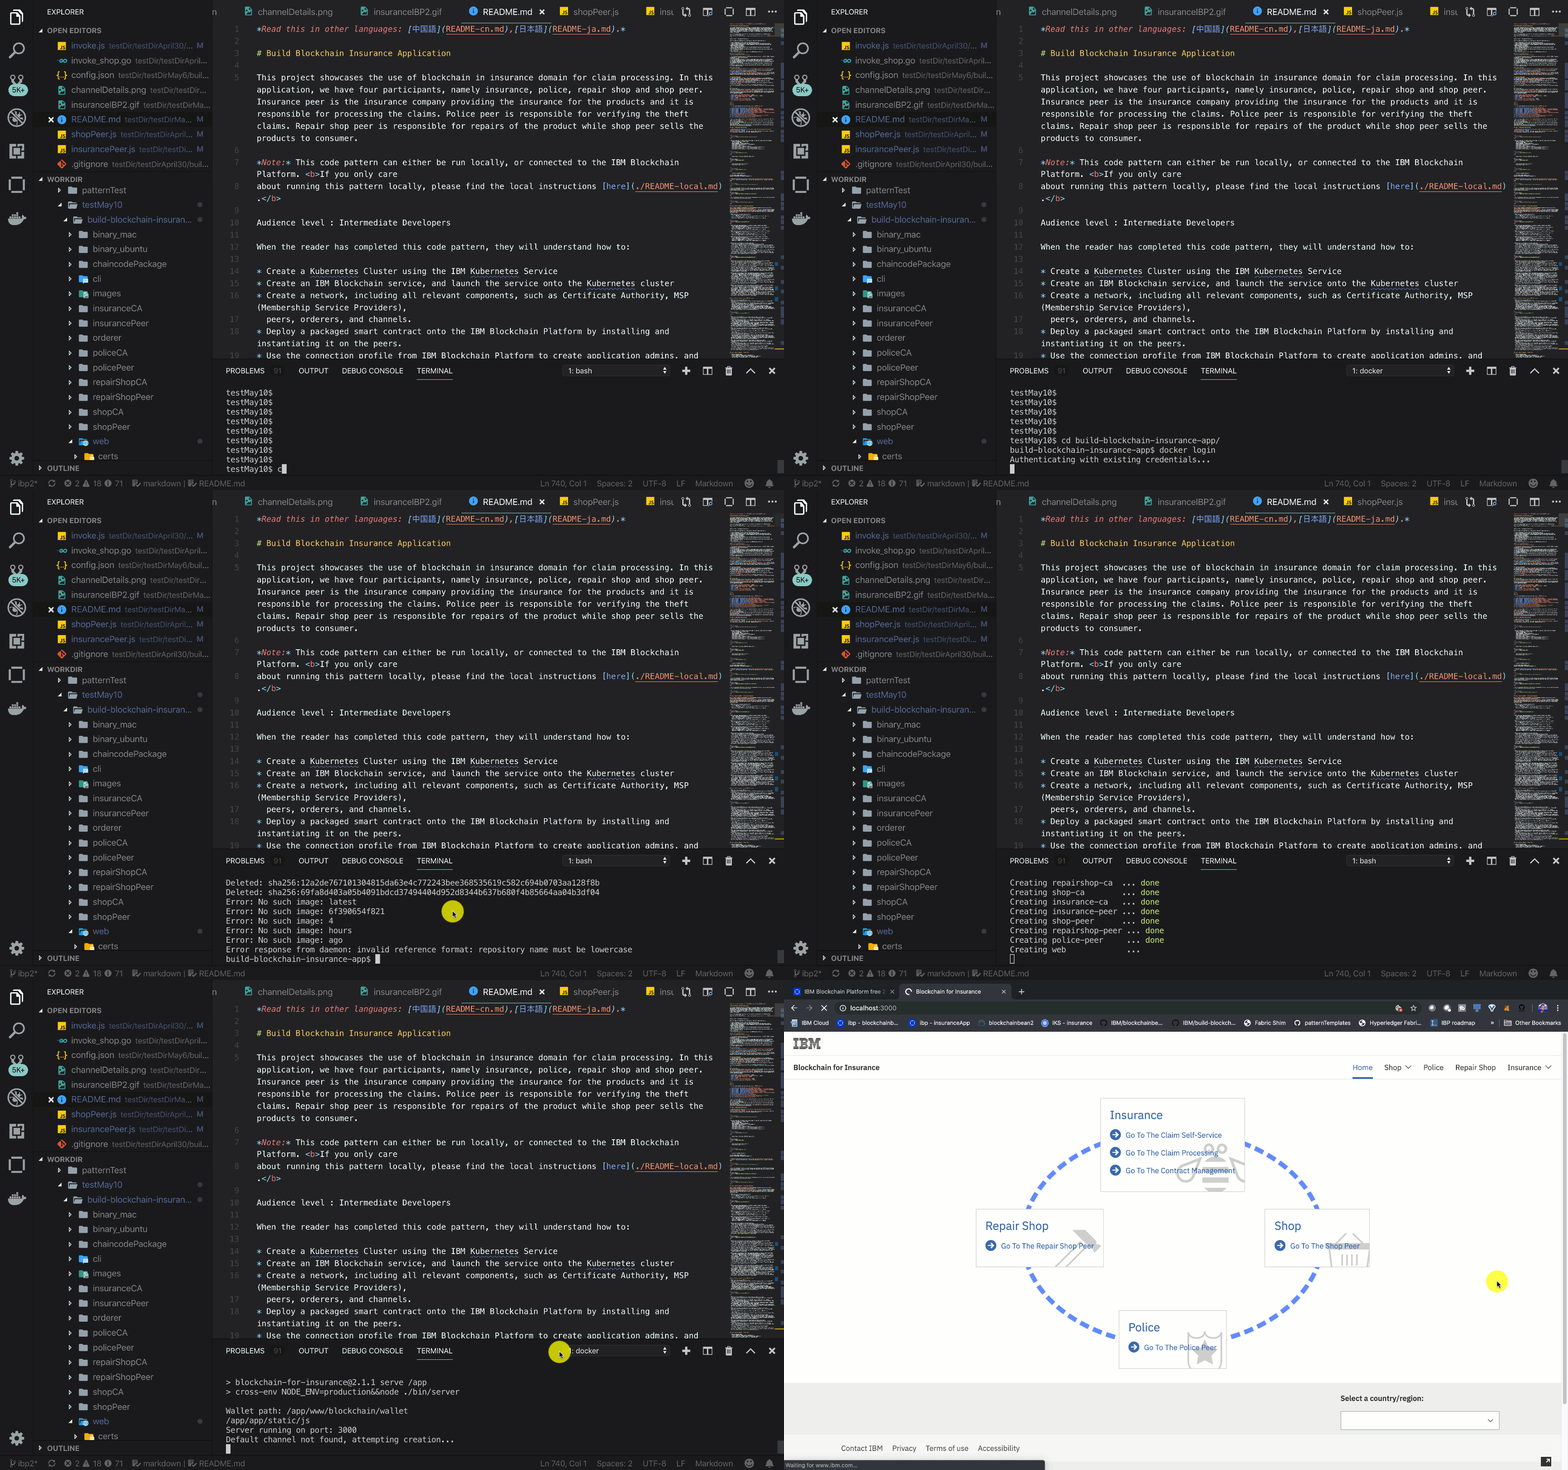
Login using your docker hub credentials.
docker loginRun the build script to download and create docker images for the orderer, insurance-peer, police-peer, shop-peer, repairshop-peer, web application and certificate authorities for each peer. This will run for a few minutes.
For Mac user:
cd build-blockchain-insurance-app
./build_mac.sh
For Ubuntu user Make sure isUbuntu:true is saved in the line 9 of config.js:
cd build-blockchain-insurance-app
./build_ubuntu.sh
You should see the following output on console:
Creating repairshop-ca ...
Creating insurance-ca ...
Creating shop-ca ...
Creating police-ca ...
Creating orderer0 ...
Creating repairshop-ca
Creating insurance-ca
Creating police-ca
Creating shop-ca
Creating orderer0 ... done
Creating insurance-peer ...
Creating insurance-peer ... done
Creating shop-peer ...
Creating shop-peer ... done
Creating repairshop-peer ...
Creating repairshop-peer ... done
Creating web ...
Creating police-peer ...
Creating web
Creating police-peer ... done
Wait for few minutes for application to install and instantiate the chaincode on network
Check the status of installation using command:
docker logs webOn completion, you should see the following output on console:
> blockchain-for-insurance@2.1.0 serve /app
> cross-env NODE_ENV=production&&node ./bin/server

/app/app/static/js
Server running on port: 3000
Default channel not found, attempting creation...
Successfully created a new default channel.
Joining peers to the default channel.
Chaincode is not installed, attempting installation...
Base container image present.
info: [packager/Golang.js]: packaging GOLANG from bcins
info: [packager/Golang.js]: packaging GOLANG from bcins
info: [packager/Golang.js]: packaging GOLANG from bcins
info: [packager/Golang.js]: packaging GOLANG from bcins
Successfully installed chaincode on the default channel.
Successfully instantiated chaincode on all peers.
Use the link http://localhost:3000 to load the web application in browser.
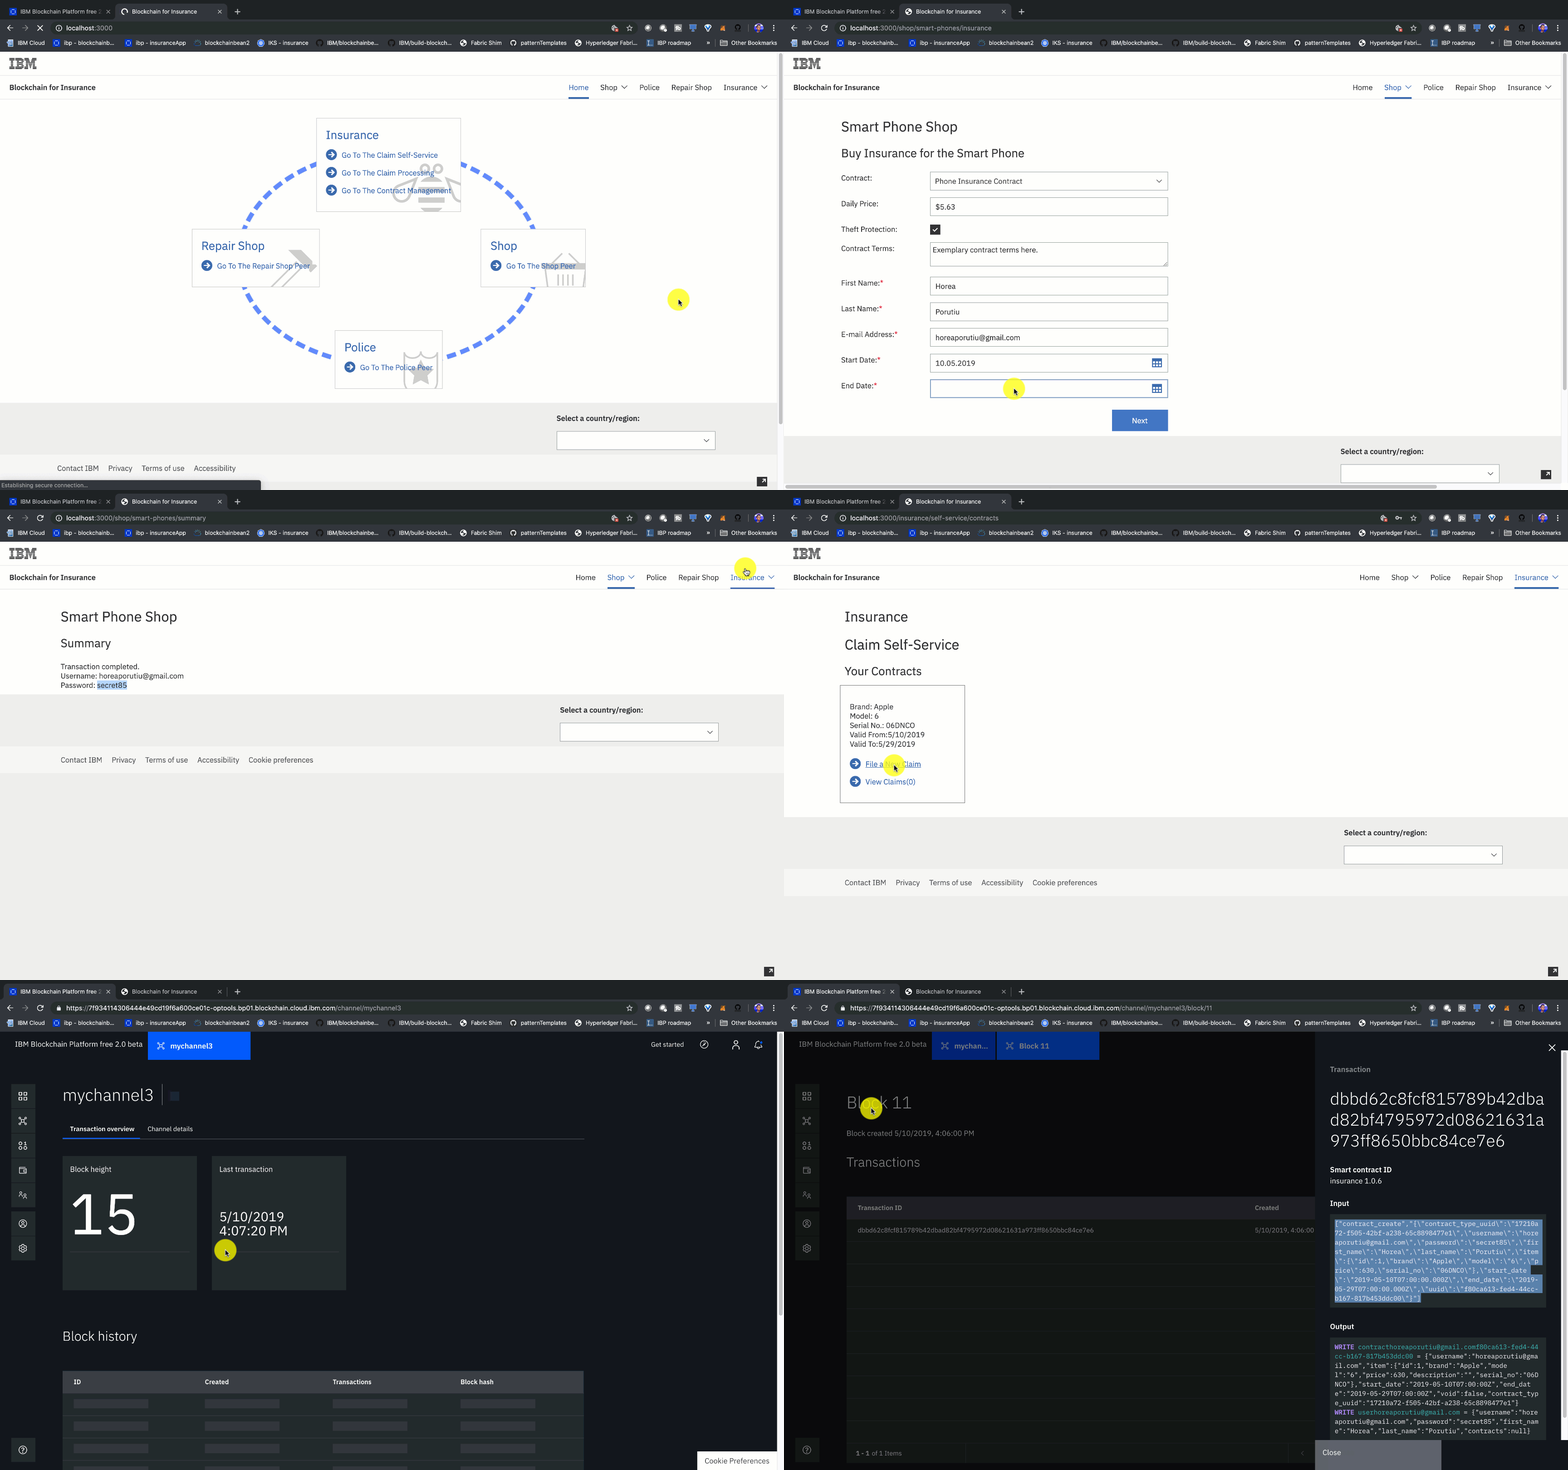
The home page shows the participants (Peers) in the network. You can see that there is an Insurance, Repair Shop, Police and Shop Peer implemented. They are the participants of the network.
Imagine being a consumer (hereinafter called “Biker”) that wants to buy a phone, bike or Ski. By clicking on the “Go to the shop” section, you will be redirected to the shop (shop peer) that offers you the following products.
You can see the three products offered by the shop(s) now. In addition, you have insurance contracts available for them. In our scenario, you are an outdoor sport enthusiast who wants to buy a new Bike. Therefore, you’ll click on the Bike Shop section.
In this section, you are viewing the different bikes available in the store. You can select within four different Bikes. By clicking on next you’ll be forwarded to the next page which will ask for the customer’s personal data.
You have the choice between different insurance contracts that feature different coverage as well as terms and conditions. You are required to type-in your personal data and select a start and end date of the contract. Since there is a trend of short-term or event-driven contracts in the insurance industry you have the chance to select the duration of the contract on a daily basis. The daily price of the insurance contract is being calculated by a formula that had been defined in the chaincode. By clicking on next you will be forwarded to a screen that summarizes your purchase and shows you the total sum.
The application will show you the total sum of your purchase. By clicking on “order” you agree to the terms and conditions and close the deal (signing of the contract). In addition, you’ll receive a unique username and password. The login credentials will be used once you file a claim. A block is being written to the Blockchain.
note You can see the block by clicking on the black arrow on the bottom-right.
At this point, you should be able to go into your IBM Blockchain Platform console, click on the channels, and then be able to see the contract_create block being added.
For additional steps on how to file more claims, and use the rest of the application, please go here.
Congratulations! You've successfully connection your React app to the IBM Blockchain Platform! Now each time you submit transactions with the UI, they will be logged by the blockchain service.
Following is a list of additional blockchain resources:
- Run
clean.shto remove the docker images and containers for the insurance network.
./clean.shThis code pattern is licensed under the Apache Software License, Version 2. Separate third party code objects invoked within this code pattern are licensed by their respective providers pursuant to their own separate licenses. Contributions are subject to the Developer Certificate of Origin, Version 1.1 (DCO) and the Apache Software License, Version 2.
