Read this in other languages: ** - Español.
This Code Pattern will guide you through installing Keras and Tensorflow, downloading data of Yelp reviews and training a language model using recurrent neural networks, or RNNs, to generate text.
This code pattern was inspired from a Hacknoon blog post and made into a notebook. The approach for generating text is similar to the Keras text generation demo with a few changes to suit this scenario.
Using deep learning to generate information is a hot area of research and experimentation. In particular, the RNN deep learning model approach has seemingly boundless amounts of areas it can be applied to, whether it be to solutions to current problems or applications in budding future technologies. One of these areas of application is text generation, which is what this Code Pattern introduces. Text generation is used in language translation, machine translation and spell correction. These are all created through something called a language model. This Code Pattern runs through exactly that: a language model using a Long Short Term Memory (LSTM) RNN. For some context, RNNs use networks with hidden layers of memory to predict the next step using the highest probability. Unlike Convolutional Neural Networks (CNNs) which use forward propagation, or rather, move forward through its pipeline, RNNs utilize backpropogation, or circling back through the pipeline to make use of the "memory" mentioned above. By doing this, RNNs can use the text inputed to learn how to generate the next letters or characters as its output. The output then goes on to form a word, which eventually ends up as a collection of words, or sentences and paragraphs. The LSTM part of the model allows you to build an even bigger RNN model with improved learning of long-term dependencies, or better memory. This means an improved performance for those words and sentences we're generating!
This model is relevant as text generation is increasingly in demand to solve translation, spell and review problems across several industries. In particular, fighting fake reviews plays a big role in this area of research. Fake reviews are a very real problem for companies such as Amazon and Yelp, who rely on genuine reviews from users to vouch for their products and businesses which are featured on their sites. As of writing this, it is very easy for businesses to pay for fake, positive reviews, which ultimately end up elevating their sales and revenue. It is equally as easy to generate negative reviews for competing businesses. Unfortunately this leads users to places and products fraudulently and can potentially lead to someone having a negative experience or worse. In order to combat these abuses and illegal activity, text generation can be used to detect what a review looks like when it is generated versus a genuine review written by an authentic user. This Code Pattern walks you through the steps to create this text generation at a high level. We will run through how to approach the problem with a small portion of Yelp review data, but afterwards you can apply it to a much larger set and test what output you get!
The original Yelp data used in this Code Pattern can be found on Kaggle and as a zip file in this repository.
If you've clicked on this Code Pattern I imagine you range from a deep learning intermediate to a beginner who's interested in learning more. Wherever you are on the spectrum, you probably think machine learning and deep learning are awesome (which I agree with) and have probably been exposed to some examples and terminology. You probably also understand some python and the fact that deep learning is a subset of machine learning (which is a subset of artificial intelligence as a whole). With those assumptions in mind, I can explain that Tensorflow is an open-source software library for machine learning, which allows you to keep track of all of your models and also see them with cool visualizations.
Keras is a deep learning library that you can use in conjunction with Tensorflow and several other deep learning libraries. Keras is very user-friendly in that it allows you to complete a model (for example using RNNs) with very few lines of code, which makes every data scientist's (including myself) life much easier! This project highlights exactly that feature with its relatively small amount of code. Keras also allows you to switch between libraries depending on what you're trying to do, saving you a great deal of headache and time. Let's get started shall we?
- After installing the requisites, Keras and Tensorflow, the user executes the notebook.
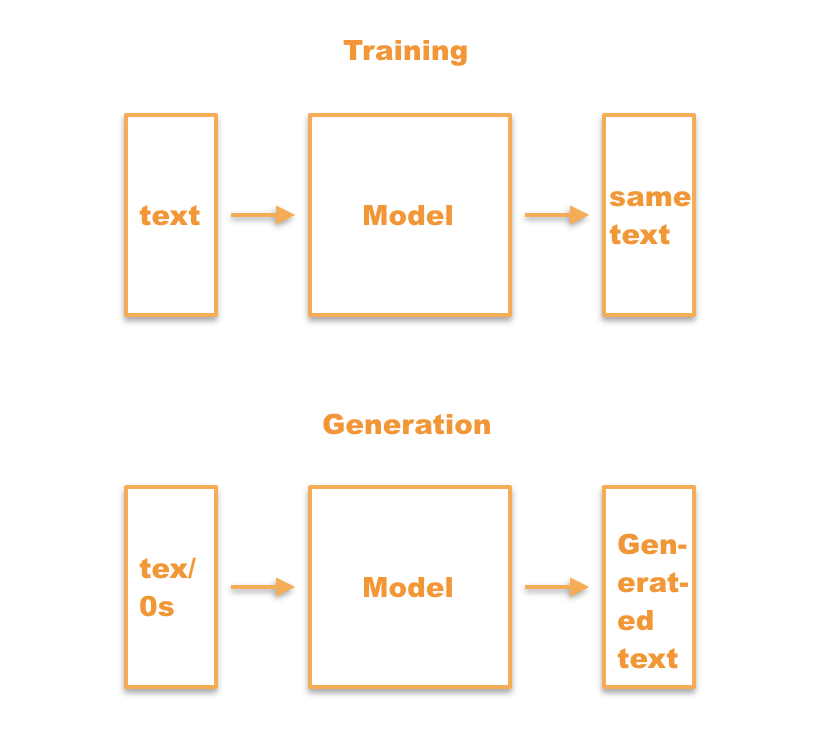
- The training data is used to train a language model.
- New text is generated based on the model and returned to the user.
- Keras: The Python Deep Learning library.
- Tensorflow: An open-source software library for Machine Intelligence.
- Cloud: Accessing computer and information technology resources through the Internet.
- Data Science: Systems and scientific methods to analyze structured and unstructured data in order to extract knowledge and insights.
- Python: Python is a programming language that lets you work more quickly and integrate your systems more effectively.
-
Ensure Python 3.0 or greater is installed.
-
Ensure the following system libraries are installed:
-
Ensure the following Python libraries are installed:
This pattern runs through the steps below. Check out the notebook for the code!
-
Install TensorFlow.
See the TensorFlow install documentation for directions on how to install TensorFlow on all supported operating systems. In most cases, a simple
pip install tensorflowwill install the TensorFlow python library. -
Install Keras.
See the Keras install documentation for directions on how to install Keras on all supported operating systems. In most cases, a simple
pip install keraswill install the Keras python library.
- Clone this repository and change into the new directory:
git clone https://github.com/IBM/deep-learning-language-model
cd deep-learning-language-model
A few things to mention about the contents of the repository:
- transfer_learn.ipynb: This is the notebook we will be running.
- yelp_test_set.zip: A complete data set that contains reviews from Yelp! from Kaggle
- yelp_100_3.txt: A snippet of the above data set.
- transfer weights: A model that we will use as a basis for this exercise.
- indices_char.txt and char_indices.txt: These two text files define how letters and punctuation correspond to each other.
A quick note about the test data: This data allows us to use authentic Yelp reviews as input to our language model. This means that our model will iterate over the reviews and generate similar Yelp reviews. If a different dataset was used, like a novel by Hemingway, we would then generate text that was similar stylistically to Hemingway. The model we build in the notebook will consider certain features and their relevance to the English language and how those features contribute to building reviews. Once the reader feels familiar enough with the notebook, they can use the entire dataset.
A quick note about the transfer weights model: The weights are what allow us to fine tune the model and increase accuracy as our model learns. You won't have to worry about adjusting the weights here as the model will automatically do it when it saves to transfer_weights after it runs. Now let's get to training the model.
- Make sure you collect all of the files that you downloaded into the same folder.
- Run
transfer_learn.ipynbby running the cell with the code in it. - Once you've executed you should see TensorFlow start up and then various epochs running on your screen followed by generated text with increasing diversities.
The figure above shows a user running the notebook locally
To help understand what's going on here, in the file transfer_learn.ipynb we use a Keras sequential model of the LSTM variety, mentioned earlier. We use this variety so that we can include hidden layers of memory to generate more accurate text. Here the maxlen is automatically set to none. The maxlen refers to the maximum length of the sequence and can be none or an integer. We then use the Adam optimizer with categorical_crossentropy and begin by loading our transfer_weights. We define the sample with a temperature of 0.6. The temperature here is a parameter than can be used in the softmax function which controls the level of newness generated where 1 constricts sampling and leads to less diverse/more repetitive text and 0 has completely diverse text. In this case we are leaning slightly more towards repetition, though, in this particular model, we generate multiple versions of this with a sliding scale of diversities which we can compare to one another and see which works best for us. You'll also see the use of enumerate, which ultimately allows us to create an automatic counter and loop over information. We then train the model and save our weights into transfer_weights. Every time you train the model, you will save your learned weights to help improve the accuracy of your text generation.
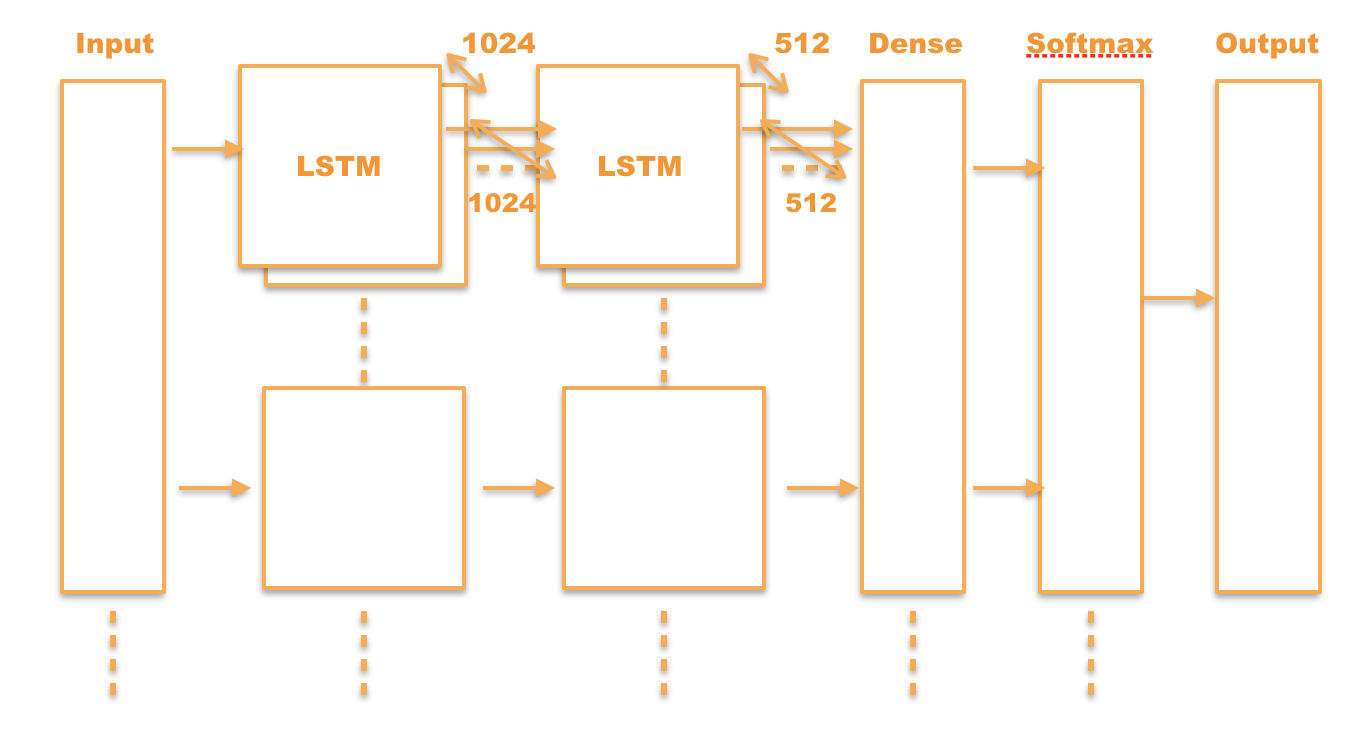
As you can see in the diagram above, the inputed text is sent through several layers of the LSTM model (forward and backward) and then sent through a dense layer followed by a softmax layer. This considers information and iterates over the data at a character level. This means it considers context such as the previous characters to determine the next characters, ultimately forming words and then sentences to generate an entire review.
As you can see in the image below, you should expect to see text being generated with different diversities and then saved back into the weights. By this output you can see what different outputs are based on different diversities of text (more diverse vs less/more repetitive).
The figure above shows the result of running the notebook, a generated Yelp! review.
Congrats! Now you've learned how to generate text based on the data you've given it. Now you can challenge yourself by trying out the entire yelp dataset or other text data! You got this!
- Watson Studio
- Jupyter Notebook: An open source web application that allows you to create and share documents that contain live code, equations, visualizations, and explanatory text.
- Keras: The Python Deep Learning library.
- Tensorflow: An open-source software library for Machine Intelligence.
- Data Analytics Code Patterns: Enjoyed this Code Pattern? Check out our other Data Analytics Code Patterns
- AI and Data Code Pattern Playlist: Bookmark our playlist with all of our Code Pattern videos
- Watson Studio: Master the art of data science with IBM's Watson Studio
- Spark on IBM Cloud: Need a Spark cluster? Create up to 30 Spark executors on IBM Cloud with our Spark service
This code pattern is licensed under the Apache Software License, Version 2. Separate third party code objects invoked within this code pattern are licensed by their respective providers pursuant to their own separate licenses. Contributions are subject to the Developer Certificate of Origin, Version 1.1 (DCO) and the Apache Software License, Version 2.


