IBM WebSphere Automation Think 2021 Lab instructions
-
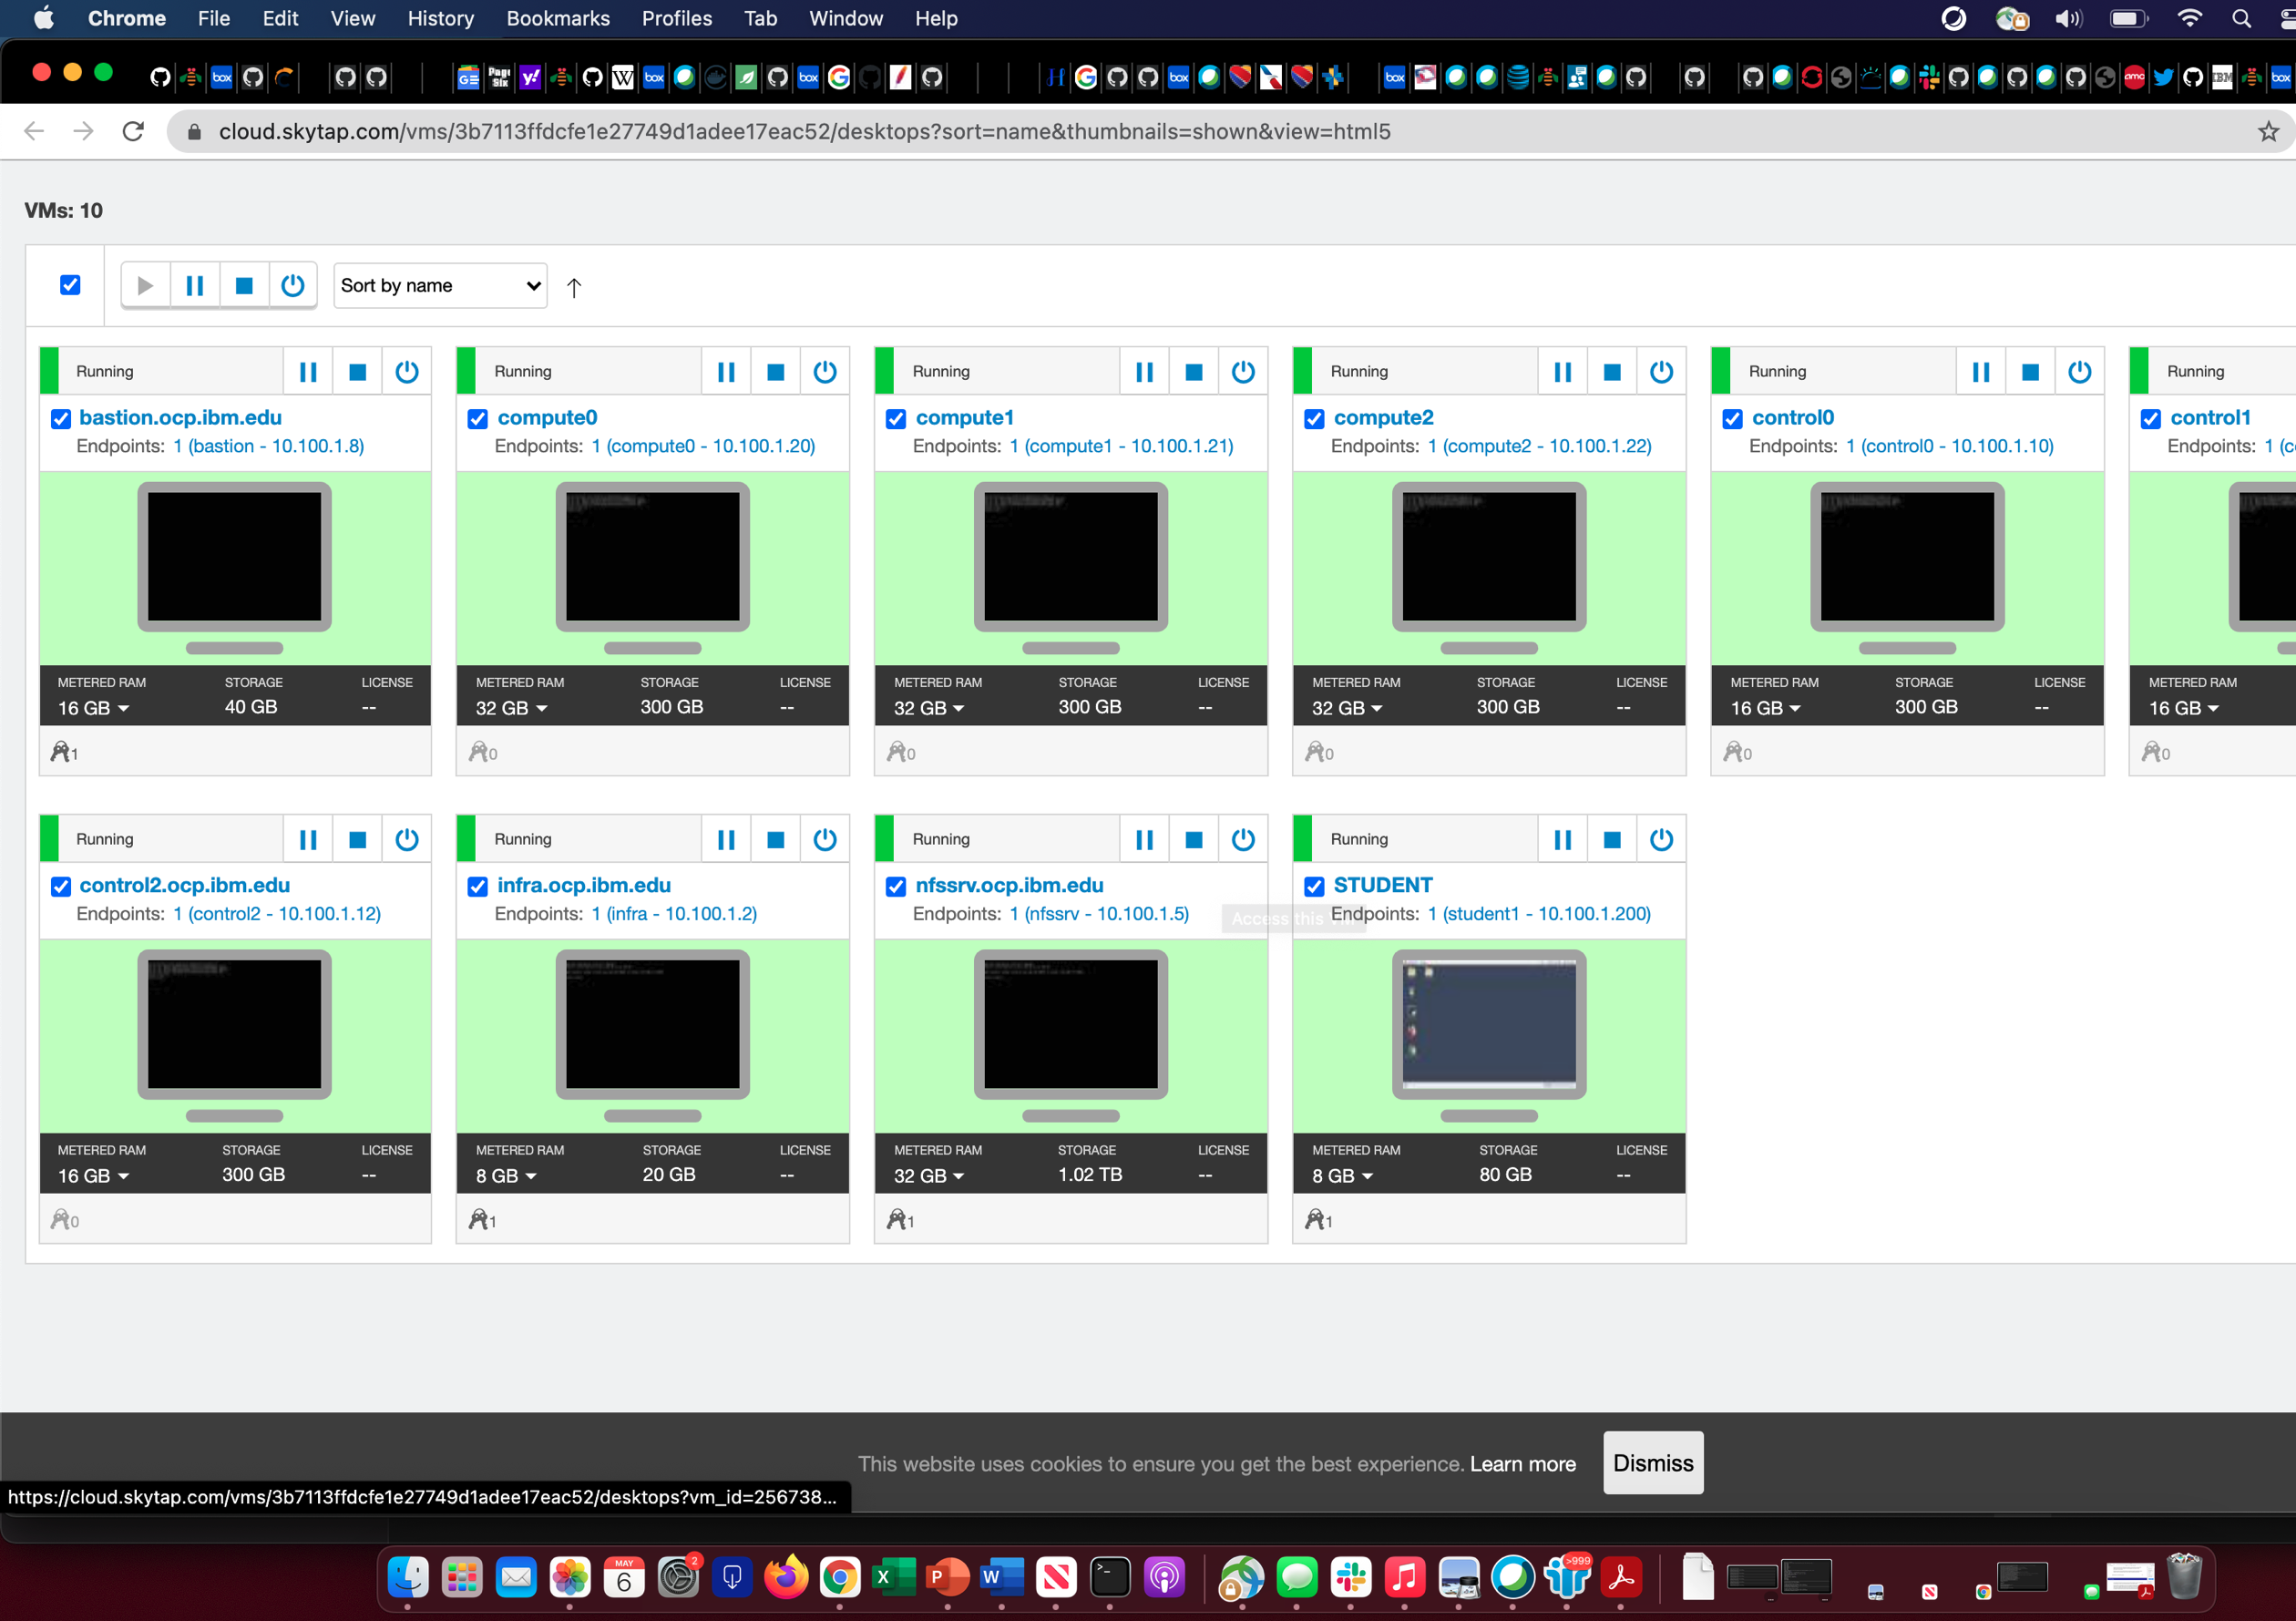
Once you log in, you will see 10 VMs (virtual machines)
- 3 are for lab infrastructure
- 3 for OCP (OpenShift) controllers
- 3 for OCP workers/compute
- 1 for the lab (Student VM)
-
WebSphere Automation is pre-installed in the OCP cluster hosted on the VMs.
-
You will be working on the Student VM only.
- This VM is installed with OCP client (oc) and all thee scripts and files you need for the lab.
- All the WebSphere images and iFixes required for the lab are pre-installed
- /opt/IBM/WebSphere/Liberty200012/
- /opt/IBM/WebSphere/Liberty20009/
- /opt/IBM/WebSphere/AppServer9057/
- /opt/IBM/WebSphere/AppServer9056/
-
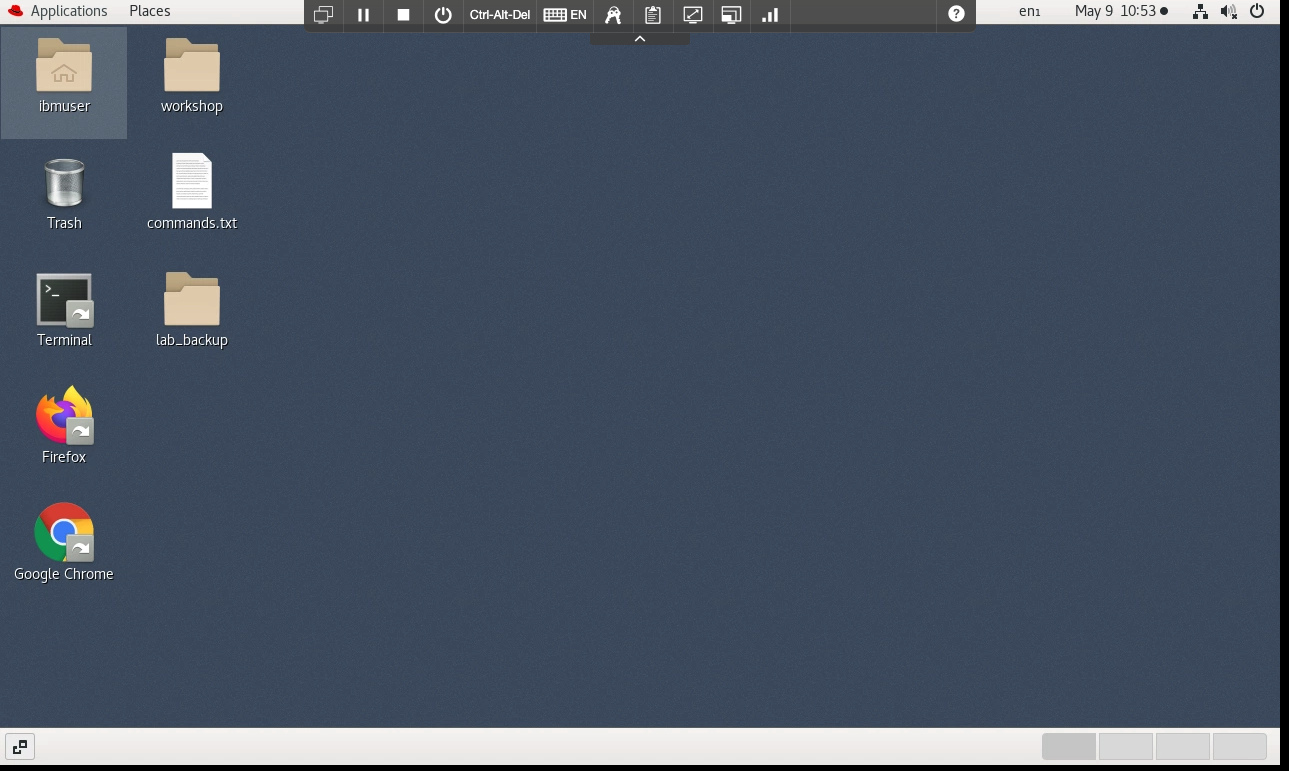
Once you log in to the Student VM you will see the Desktop, which contains all the programs that you will be using (browsers, terminal, etc.)
-
The best way to copy and paste from slides is by using the clipboard at the top middle
- Keyboard keys (like Ctrl ^C, Ctrl ^V) are not supported, so you have to highlight the text to copy and paste.
- Sometimes you might have to copy it twice to make this work.

- Keyboard keys (like Ctrl ^C, Ctrl ^V) are not supported, so you have to highlight the text to copy and paste.
- Step 1: Log in to WebSphere Automation GUI and configure your email to receive vulnerability notifications
- Step 2: Log in as root on the Student VM and to OpenShift using OCP client (oc)
- Step 3: Get the usageMetering configuration parameters (api-key, URL, server cert)
- Step 4: Configure Liberty Server version 20.0.0.12 to register to WebSphere Automation
- Step 5: Configure Liberty Server version 20.0.0.9 to register to WebSphere Automation
- Step 6: Configure traditional WebSphere(tWAS) version 9.0.5.6 to WebSphere Automation
- Step 7: Configure traditional WebSphere(tWAS) version 9.0.5.7 to WebSphere Automation
- Step 8: Update Liberty server version 20.0.0.9 to fix the vulnerability
- Step 9: Update tWAS server version 9.0.5.7 to fix the vulnerability
- Step 10: Update tWAS server version 9.0.5.7 to introduce the vulnerability back (optional)
Step 1 – Log in to WebSphere Automation GUI and configure your email to receive vulnerability notifications
- WebSphere Automation is pre-installed on an OCP cluster.
- Each of you have access to your individual WebSphere Automation installation.
- Click the Student VM.
- Open a browser and enter the following URL:
https://cpd-websphere-automation.apps.ocp.ibm.edu- Accept all the warnings and certificates. Depending on your browser, you might have to scroll down to permit access.
-
This is the initial landing page for IBM automation
- Under Log in to IBM Automation -> Select your authentication type: click OpenShift authentication
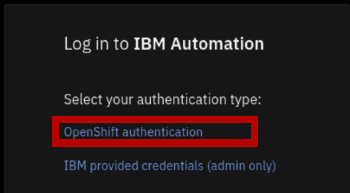
- Enter the following credentials
- UserName : ocadmin
- Password : ibmocp46
-
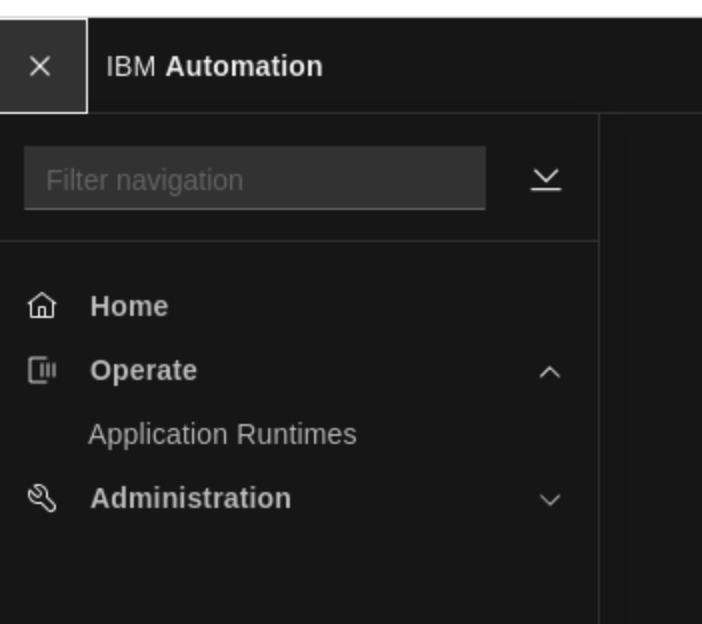
Click the Navigation/Hamburger Menu on the left.
-
Click Operate.
- You should now see Application Runtimes. Click that.
-
It will take you to the WebSphere Automation GUI.
- There should be no data since no WebSphere servers are registered/configured yet.
-
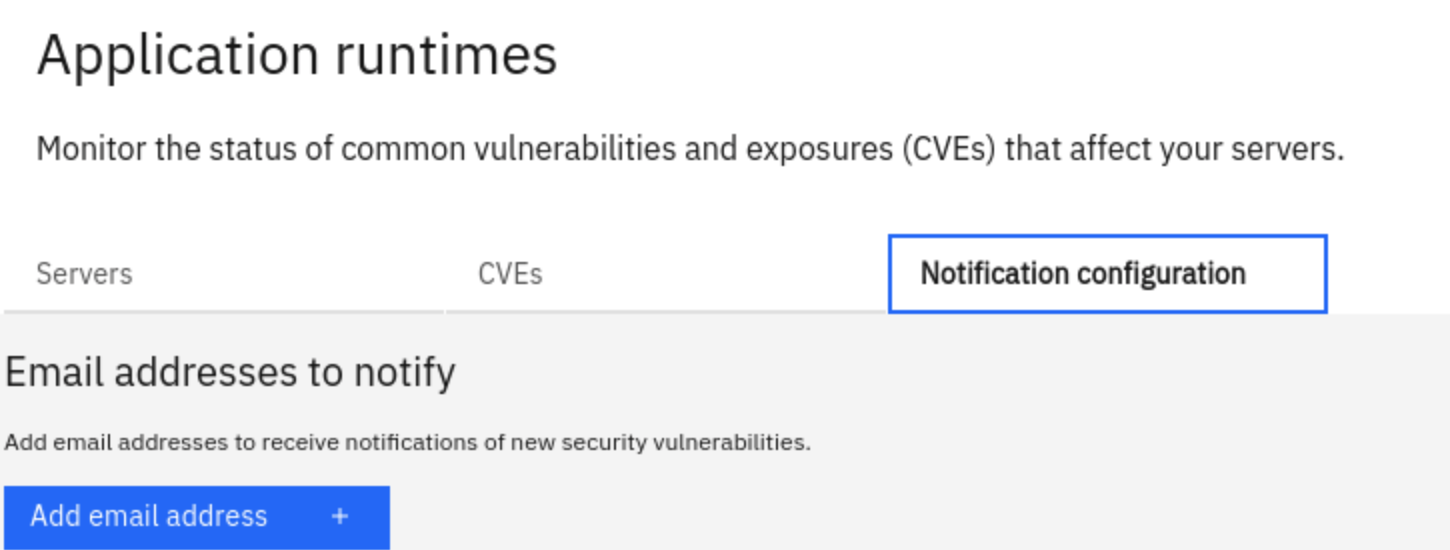
On the console, go to Notification Configuration and enter your email address where you want to be notified about CVEs by clicking add email address button
- The mail server is pre-configured for this lab. You only need to enter your email address to get notified.
- Go back to the desktop and open 2 terminals. Log in as root in both:
su root
- Enter the following password when prompted:
1bm2021rhjb
- Log in to the OCP cluster (in each terminal)
oc login --username=ocadmin --password=ibmocp46 --insecure-skip-tls-verify=true --server=https://api.ocp.ibm.edu:6443
- Make sure that the project you are working on is websphere-automation:
oc project websphere-automation
- Get the URL for usage-metering and save it in a file:
echo https://$(oc get route cpd -n websphere-automation -o jsonpath='{.spec.host}')/websphereauto/meteringapi > /opt/IBM/WebSphere/metering-url.txt
- Get the api-key and save it in a file.
oc -n websphere-automation get secret automation-secure-metering-apis-encrypted-tokens -o jsonpath='{.data.automation-secure-metering-apis-sa}' | base64 -d > /opt/IBM/WebSphere/api-key.txt; echo >> /opt/IBM/WebSphere/api-key.txt
- Get the Server certificate and save it in a file.
oc get secret external-tls-secret -n websphere-automation -o jsonpath='{.data.cert\.crt}' | base64 -d > /opt/IBM/WebSphere/cacert.pem
- Create the Liberty server version 20.0.0.12:
/opt/IBM/WebSphere/Liberty200012/bin/server create Liberty_200012_server
- Configure the server to use TLS/SSL using the provided server_tls.xml file:
\cp -f /home/ibmuser/Desktop/lab_backup/liberty200012/server_tls.xml /opt/IBM/WebSphere/Liberty200012/usr/servers/Liberty_200012_server/server.xml
- Note the above command occasionally fails on the VM. Ensure that the two files are the same.
cmp /home/ibmuser/Desktop/lab_backup/liberty200012/server_tls.xml /opt/IBM/WebSphere/Liberty200012/usr/servers/Liberty_200012_server/server.xml && echo "files are the same, proceed to the next step"
- Start the Liberty server
/opt/IBM/WebSphere/Liberty200012/bin/server start Liberty_200012_server
- Update the DefaultKeyStore with the server certificate to trust the server for https connection:
keytool -import -trustcacerts -file /opt/IBM/WebSphere/cacert.pem -keystore /opt/IBM/WebSphere/Liberty200012/usr/servers/Liberty_200012_server/resources/security/key.p12 -storetype PKCS12 -storepass th1nkpassword -noprompt
- Edit the server.xml file (using vi, vim, or gedit) to add the
usageMetering-1.0feature to the existing features in the<featureManager>element:
vi /opt/IBM/WebSphere/Liberty200012/usr/servers/Liberty_200012_server/server.xml
<feature>usageMetering-1.0</feature>
- Add the usageMetering element and replace the
<metering-url>and the<api-key>values as shown below:
<usageMetering url="<metering-url>" apiKey="<api-key>" sslRef="defaultSSL"/>
- Replace
<metering-url>above with the output of the following cat command.Use the second terminal to run the cat command:
cat /opt/IBM/WebSphere/metering-url.txt
- Replace
<api-key>above with the output of the following cat command.Use the second terminal to run the cat command:
cat /opt/IBM/WebSphere/api-key.txt
-
Save the server.xml file.
-
Confirm that the Liberty server is registered to WebSphere Automation:
https://cpd-websphere-automation.apps.ocp.ibm.edu/websphereauto/secvul/ -
This version of Liberty server is not vulnerable to any known CVEs
- No email will be sent because there are no vulnerabilities
- Create the Liberty server version 20.0.0.9:
/opt/IBM/WebSphere/Liberty20009/bin/server create Liberty_20009_server
- Since you have already configured usageMetering feature for Liberty version 20.0.0.12, we have a provided couple of server.xml files to make the configuration simpler. First copy the tls configuration:
\cp -f /home/ibmuser/Desktop/lab_backup/liberty20009/server_tls.xml /opt/IBM/WebSphere/Liberty20009/usr/servers/Liberty_20009_server/server.xml
- Note the above command occasionally fails on the VM. Ensure that the two files are the same.
cmp /home/ibmuser/Desktop/lab_backup/liberty20009/server_tls.xml /opt/IBM/WebSphere/Liberty20009/usr/servers/Liberty_20009_server/server.xml && echo "files are the same, proceed to the next step"
- Start the Liberty server:
/opt/IBM/WebSphere/Liberty20009/bin/server start Liberty_20009_server
- Update the DefaultKeyStore with the server certificate to trust the server for https connections:
keytool -import -trustcacerts -file /opt/IBM/WebSphere/cacert.pem -keystore /opt/IBM/WebSphere/Liberty20009/usr/servers/Liberty_20009_server/resources/security/key.p12 -storetype PKCS12 -storepass th1nkpassword -noprompt
- Copy the server.xml that contains the usageMetering feature and properties (url, api-key):
\cp -f /home/ibmuser/Desktop/lab_backup/liberty20009/server_configured.xml /opt/IBM/WebSphere/Liberty20009/usr/servers/Liberty_20009_server/server.xml
- Note the above command occasionally fails on the VM. Ensure that the two files are the same.
cmp /home/ibmuser/Desktop/lab_backup/liberty20009/server_configured.xml /opt/IBM/WebSphere/Liberty20009/usr/servers/Liberty_20009_server/server.xml && echo "files are the same, proceed to the next step"
- Confirm that the Liberty server is registered to WebSphere Automation
https://cpd-websphere-automation.apps.ocp.ibm.edu/websphereauto/secvul/
-
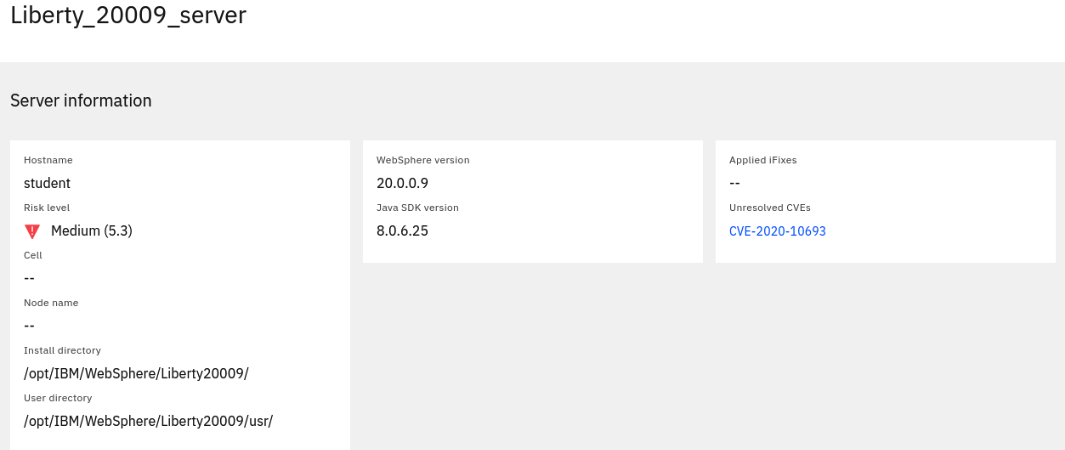
The console shows that this server is vulnerable for CVE-2020-10693
-
Check your email. A mail notification (if configured) will be sent indicating the vulnerability:
-
In the email message, there will be a link that would redirect to the console to show more details on the vulnerability. Because of network restrictions in the lab environment, this link will not work.
-
The image below is where the link would have redirected to.
-
- Start the tWAS 9.0.5.6 server:
/opt/IBM/WebSphere/AppServer9056/bin/startServer.sh tWAS_9056_server
- Configure usage-metering:
/opt/IBM/WebSphere/AppServer9056/bin/wsadmin.sh -f /api-usagemetering/scripts/configuretWasUsageMetering.py url=$(cat /opt/IBM/WebSphere/metering-url.txt) apiKey=$(cat /opt/IBM/WebSphere/api-key.txt) trustStorePassword=th1nkpassword
- Confirm that the tWAS server is registered to WebSphere Automation
https://cpd-websphere-automation.apps.ocp.ibm.edu/websphereauto/secvul/
-
You should see that this server is vulnerable to 8 CVEs
-
Check your email. A mail notification (if configured) will be sent showing the vulnerability
- Start the tWAS 9.0.5.7 server:
/opt/IBM/WebSphere/AppServer9057/bin/startServer.sh tWAS_9057_server
- Configure usage-metering:
/opt/IBM/WebSphere/AppServer9057/bin/wsadmin.sh -f /api-usagemetering/scripts/configuretWasUsageMetering.py url=$(cat /opt/IBM/WebSphere/metering-url.txt) apiKey=$(cat /opt/IBM/WebSphere/api-key.txt) trustStorePassword=th1nkpassword
- Confirm that the tWAS server is registered to WebSphere Automation:
https://cpd-websphere-automation.apps.ocp.ibm.edu/websphereauto/secvul/
-
You should see that this server is vulnerable to 1 CVE (CVE-2021-26296)
-
Check your email. A mail notification (if configured) will be sent showing the vulnerability
- Liberty 20.0.0.9 is impacted by CVE-2020-10693. This is because it configures the beanValidation-2.0 feature.
See CVE-2020-10693 for more info.
- We should resolve this by applying the iFix. However, for the lab, we can also do a quick test by unconfiguring this feature:
vi /opt/IBM/WebSphere/Liberty20009/usr/servers/Liberty_20009_server/server.xml
or
gedit /opt/IBM/WebSphere/Liberty20009/usr/servers/Liberty_20009_server/server.xml
- Comment out the feature:
<!-- <feature>beanValidation-2.0</feature> -->
-
Save the server.xml file.
-
Go to console to make sure that the Liberty 20.0.0.9 server does not show any vulnerabilities. The update is picked up automatically.
https://cpd-websphere-automation.apps.ocp.ibm.edu/websphereauto/secvul/
- Instead of removing the beanValidationFeature-2.0, the correct process is to apply the appropriate iFix to get rid of the vulnerability:
vi /opt/IBM/WebSphere/Liberty20009/usr/servers/Liberty_20009_server/server.xml
or
gedit /opt/IBM/WebSphere/Liberty20009/usr/servers/Liberty_20009_server/server.xml
- Uncomment out the feature:
<feature>beanValidation-2.0</feature>
-
Save the server.xml file.
-
Make sure the vulnerability shows up again. An email will also be sent out.
https://cpd-websphere-automation.apps.ocp.ibm.edu/websphereauto/secvul
- Stop the server:
/opt/IBM/WebSphere/Liberty20009/bin/server stop Liberty_20009_server
- Apply the iFix:
/iFix/PH29942/imcl_ifix_install.sh 20009
- Start the server:
/opt/IBM/WebSphere/Liberty20009/bin/server start Liberty_20009_server
- Now, in your console you should notice that the CVE was removed:
https://cpd-websphere-automation.apps.ocp.ibm.edu/websphereauto/secvul/
-
Notice in the console that tWAS 9.0.5.7 is vulnerable to CVE-2021-26296. We will fix it by applying the appropriate iFix.
-
First, stop the server, wait until it has stopped:
/opt/IBM/WebSphere/AppServer9057/bin/stopServer.sh tWAS_9057_server
- Run the following script to install the iFix:
/iFix/PH34711/imcl_ifix_install.sh 9057
- Start the server once the installation has completed:
/opt/IBM/WebSphere/AppServer9057/bin/startServer.sh tWAS_9057_server
- Go back to the console. Notice that there are no more CVEs under tWAS 9.0.5.7.Also, you can see on the right under "Applied iFixes" there are 4 applied fixes.
https://cpd-websphere-automation.apps.ocp.ibm.edu/websphereauto/secvul/
-
You can remove the iFix that was applied to confirm that the CVE-2021-26296 shows up in the unresolved CVE list
-
Stop the server:
/opt/IBM/WebSphere/AppServer9057/bin/stopServer.sh tWAS_9057_server
- Uninstall the iFix:
/iFix/PH34711/imcl_ifix_uninstall.sh 9057
- Start the server:
/opt/IBM/WebSphere/AppServer9057/bin/startServer.sh tWAS_9057_server
- Go back to the console. Notice that there is now again 1 CVE under the tWAS 9.0.5.7 server:
https://cpd-websphere-automation.apps.ocp.ibm.edu/websphereauto/secvul/
- Check your email. A mail notification (if configured) will be sent showing the vulnerability.