IoT-platform-for-agriculture.
Jade Gröli & David González León
- 1. Architecture
- 2. Sensors used
- 3. Setup
- 4. Development Steps
- 5. Deployment
- 6. Cost estimation
- 7. Repository of the project
1. Architecture
- Module Plug & Sense
- Récupère les données des capteurs
- Envoie packets à The Thing Network à travers LoRaWAN
- The thing Network
- Formate les packets reçus avec une fonction javascript
- Envoie à Azure functions à travers Webhook
- Azure
- Azure functions
- Récupère les données de The Thing Network
- Effectue les insertions dans la base de donnée InfluxDB
- InfluxDB Azure
- Hébergé sur Azure
- Récupère les données envoyées par Azure functions et les mets à disposition de Grafana
- Azure Managed Grafana
- Récupère les données de InfluxDB Azure
- Affiche les données du Module Plug & Sense
- Azure functions
Le schéma de l'architecture est le suivant:
2. Sensors used
- Temp, humidity, pressure : port F
- Water sensor : port C
- Soil temp : port D
3. Setup
Voici notre montage :
4. Development Steps
4.1. Plug and Sense
Create the code for the Plug and Sense module to gather data from the sensors and send them to The Thing Network.
4.1.1. Documentation
Code example : https://development.libelium.com/plug-and-sense/code-examples
Sensors sockets map : https://development.libelium.com/plug-and-sense-technical-guide/models
4.2. The Thing Network
At first we need to create the application and link the device to it
- Add the gateway to The Thing Network to monitor incoming packets
- Create a new application on The Thing Network
- Create an end device for our mote, and generate :
- Device EUI
- Application EUI
- Application Key
- Add the three values to the code for the Plug and Sense module
- Select LoRaWAN version 1.0.0
Once this is done, we receive the messages from the Plug and Sense module on The Thing Network. We now need to decode them. We setup a payload formatter function using a custom javascript function. This allows us to decode the messages and format them in a way that is easier to read and manipulate.
4.3. Azure
4.3.1. Azure functions
We created a function in Azure that receives the payloads from The Thing Network through a http webhook and inserts the data into the InfluxDB database. The function is written in python using python version 3.9. We first developed the function locally and tested it on a local InfluxDB database. Once we were sure it worked, we deployed it to Azure.
To create the function in Azure we used the Azure VS code extension. The deployement is done using the same extension.
4.3.2. InfluxDB Azure
To test the function, we used a local InfluxDB database. We used the following docker command to start the database :
docker run -d -p 8086:8086 --name influxdb -v influxdb:/var/lib/influxdb influxdbOnce the database was running, we set up the database and created a bucket for our data. We then created a token to allow our function to write to the database. We then tested the function locally by sending data to it in the following format :
{
    "name": "as.up.data.forward",
    "time": "2022-11-11T10:14:04.752484373Z",
    "identifiers": [
        {
            "device_ids": {
                "device_id": "eui-70b3d57ed0056e9f",
                "application_ids": {
                    "application_id": "testdavidgl17"
                },
                "dev_eui": "70B3D57ED0056E9F",
                "join_eui": "1702199819021998",
                "dev_addr": "260BE779"
            }
        }
    ],
    "data": {
        "@type": "type.googleapis.com/ttn.lorawan.v3.ApplicationUp",
        "end_device_ids": {
            "device_id": "eui-70b3d57ed0056e9f",
            "application_ids": {
                "application_id": "testdavidgl17"
            },
            "dev_eui": "70B3D57ED0056E9F",
            "join_eui": "1702199819021998",
            "dev_addr": "260BE779"
        },
        "correlation_ids": [
            "as:up:01GHK2XA6CZ0N6H6S1Z9Q4DA5W",
            "gs:conn:01GHK08H2VWTY2DF4MG0HNTJHB",
            "gs:up:host:01GHK08H30MFVC17QZT84GT8GE",
            "gs:uplink:01GHK2X9ZZC8NXW31BVBKP3PGV",
            "ns:uplink:01GHK2X9ZZ21G9C69XW4RCXY14",
            "rpc:/ttn.lorawan.v3.GsNs/HandleUplink:01GHK2X9ZZXCEZ19E3SBZRXFAD",
            "rpc:/ttn.lorawan.v3.NsAs/HandleUplink:01GHK2XA6CXVANXV9J2KCQANN5"
        ],
        "received_at": "2022-11-11T10:14:04.748313907Z",
        "uplink_message": {
            "session_key_id": "AYRmLl9Cmj9oRfPWvS3y8g==",
            "f_port": 3,
            "frm_payload": "PD0+hgYjMTE1ODQ0RTgxOTYyM0NDQiNBMiMwI0JBVDo1I1NPSUwxOjAuMDAjU09JTFRDOjI2LjA2I1RDOjI0LjE1I0hVTTo0NS4wI1BSRVM6OTg2MDkuMDkj",
            "decoded_payload": {
                "batteryLevel": "5",
                "humidity": "45.0",
                "messageNumber": "0",
                "pressure": "98609.09",
                "temperatureAir": "24.15",
                "temperatureSoil": "26.06",
                "time": {
                    "": {
                        "": null,
                        "int64": 0,
                        "string": ""
                    },
                    "int64": 63803758444,
                    "uint64": 751000000
                },
                "waspMoteId": "42",
                "watermark": "0.00"
            },
            "rx_metadata": [
                {
                    "gateway_ids": {
                        "gateway_id": "raspbery-2",
                        "eui": "B827EBFFFED3E95A"
                    },
                    "time": "2022-11-11T10:14:04.527308Z",
                    "timestamp": 2727373579,
                    "rssi": -13,
                    "channel_rssi": -13,
                    "snr": 11,
                    "uplink_token": "ChgKFgoKcmFzcGJlcnktMhIIuCfr//7T6VoQi9bBlAoaDAjswLibBhD3te+CAiD4xYihsE8=",
                    "channel_index": 1,
                    "received_at": "2022-11-11T10:14:04.542890743Z"
                }
            ],
            "settings": {
                "data_rate": {
                    "lora": {
                        "bandwidth": 125000,
                        "spreading_factor": 7,
                        "coding_rate": "4/5"
                    }
                },
                "frequency": "868300000",
                "timestamp": 2727373579,
                "time": "2022-11-11T10:14:04.527308Z"
            },
            "received_at": "2022-11-11T10:14:04.543644020Z",
            "consumed_airtime": "0.174336s",
            "network_ids": {
                "net_id": "000013",
                "tenant_id": "ttn",
                "cluster_id": "eu1",
                "cluster_address": "eu1.cloud.thethings.network"
            }
        }
    },
    "correlation_ids": [
        "as:up:01GHK2XA6CZ0N6H6S1Z9Q4DA5W",
        "gs:conn:01GHK08H2VWTY2DF4MG0HNTJHB",
        "gs:up:host:01GHK08H30MFVC17QZT84GT8GE",
        "gs:uplink:01GHK2X9ZZC8NXW31BVBKP3PGV",
        "ns:uplink:01GHK2X9ZZ21G9C69XW4RCXY14",
        "rpc:/ttn.lorawan.v3.GsNs/HandleUplink:01GHK2X9ZZXCEZ19E3SBZRXFAD",
        "rpc:/ttn.lorawan.v3.NsAs/HandleUplink:01GHK2XA6CXVANXV9J2KCQANN5"
    ],
    "origin": "ip-10-100-7-94.eu-west-1.compute.internal",
    "context": {
        "tenant-id": "CgN0dG4="
    },
    "visibility": {
        "rights": ["RIGHT_APPLICATION_TRAFFIC_READ"]
    },
    "unique_id": "01GHK2XA6GHDF9PHADVB0AHTPP"
}
This payload is an example of what the azure function receives from The Thing Network. The payload is decoded by the function and the data is sent to the database.
We then tested using the web interface of the database to check if the data was correctly inserted.
4.3.3. Azure Managed Grafana
Once the database was correctly configured, we started working on the Grafana dashboard. We created a new Grafana instance using docker :
docker run -d -p 3000:3000 --name grafana grafana/grafana-enterpriseTo allow Grafana to connect to the influxdb container, we had to create a network for both instances :
docker network create mynet
docker network connect mynet influxdb
docker network connect mynet grafana
This only need to be done locally, on Azure the instances are already connected.
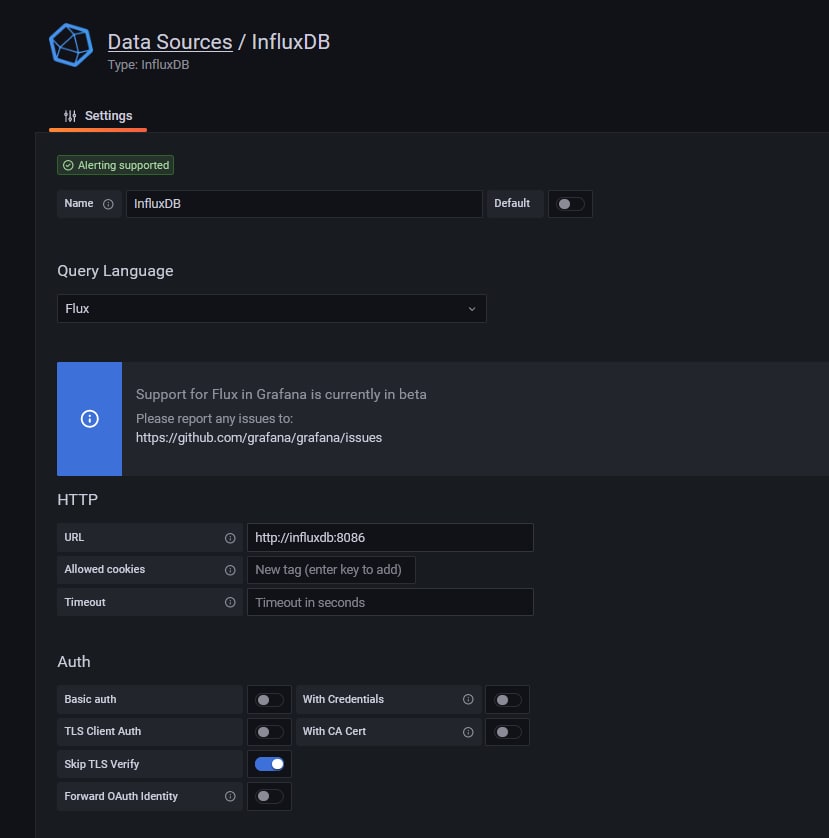
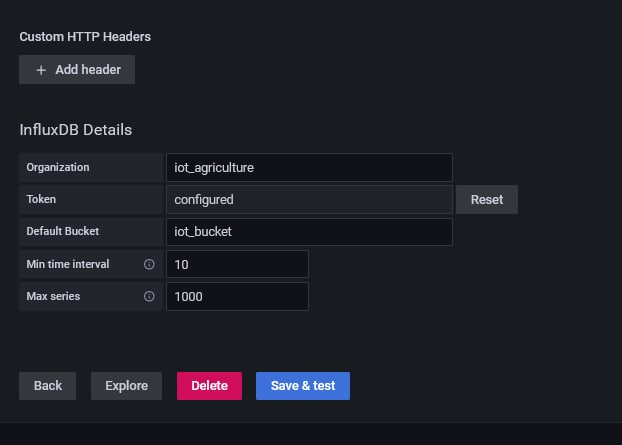
We then added the influxdb datasource to the Grafana instance. We used the following configuration :
We had to specifically set the url to the name of the container, as the default "localhost" url was not working.
Once the datasource was configured, we created a new database and started adding panels. We added the following panels :
- A panel to display the battery level of the mote
- A panel to display the temperature of the air and the temperature of the soil
- A panel to display the humidity
- A panel to display the pressure
- A panel to display the watermark
For each panel we queried the data using the following query :
from(bucket: "iot_bucket")
  |> range(start: v.timeRangeStart, stop:v.timeRangeStop)
  |> filter(fn: (r) =>
    r._measurement == "measures_agribots" and
    r._field == "batteryLevel"
  )
We adapted the query to get the correct field depending on the panel.
Once all the panels were created, we saved the dashboard and exported it to a json file so that we could easily import it in the future.
5. Deployment
Nous avons déployé les 3 composants sur Azure :
- Influx DB : Nous avons déployé la base de données InfluxDB sur Azure en utilisant le service de container d'Azure. Nous voulions utiliser le service InfluxDB Azure mais nous n'avons pas réussi à le faire fonctionner car nous ne pouvions pas prendre un abonnement SaaS en tant qu'étudiant.
- Grafana : pour les même raisons qu'InfluxDB, nous avons déployé Grafana sur Azure en utilisant le service de container d'Azure.
- Azure function : nous avons effectué le déploiement depuis notre machine locale en utilisant l'addon VS Code d'Azure. Avant d'effectuer le déploiement nous avons modifié l'adresse IP dans le code afin qu'elle référence celle du container InfluxDB, et avons rajouté le bon token pour la connection. Nous avons ensuite vérifié sur la dashboard Azure que le déploiement s'était bien effectué et que la fonction était active.
Une fois les 3 composants déployés nous avons configuré InfluxDB et Grafana pour qu'ils puissent communiquer ensemble. Nous avons ensuite importé le dashboard que nous avions créé localement dans Grafana.
Nous avons ensuite connecté TheThingNetwork au webhook de notre Azure function. Nous avons ensuite testé le fonctionnement de notre système en connectant le mote Plug and Sense. Nous avons pu voir que les données étaient bien reçues par TheThingNetwork et envoyées à notre Azure function. Nous avons ensuite pu voir que les données étaient bien insérées dans InfluxDB et que le dashboard Grafana était bien mis à jour.
5.1. Deployement steps
- InfluxDB
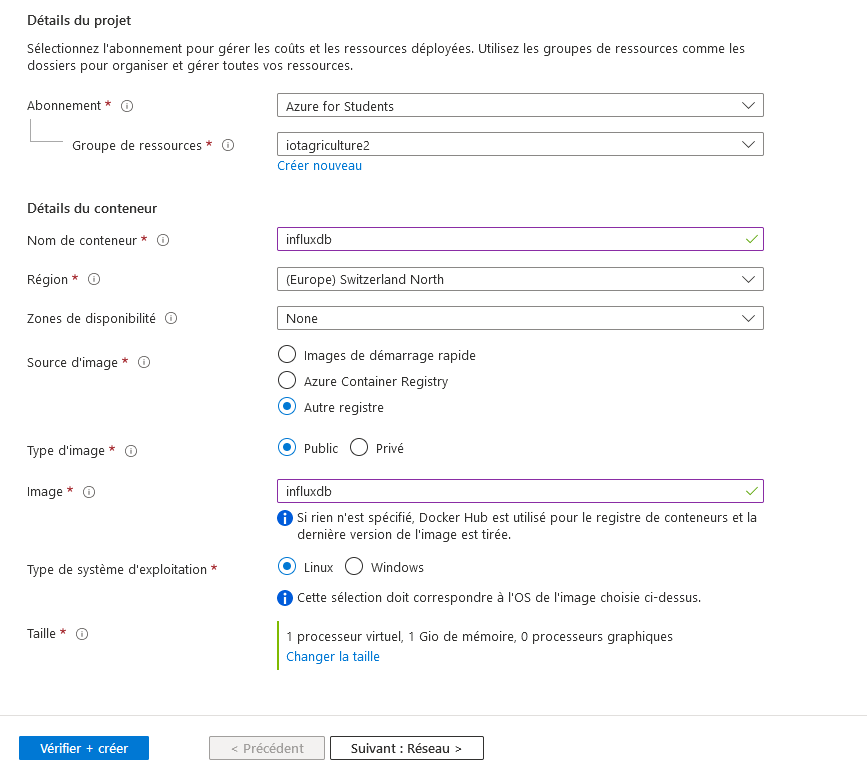
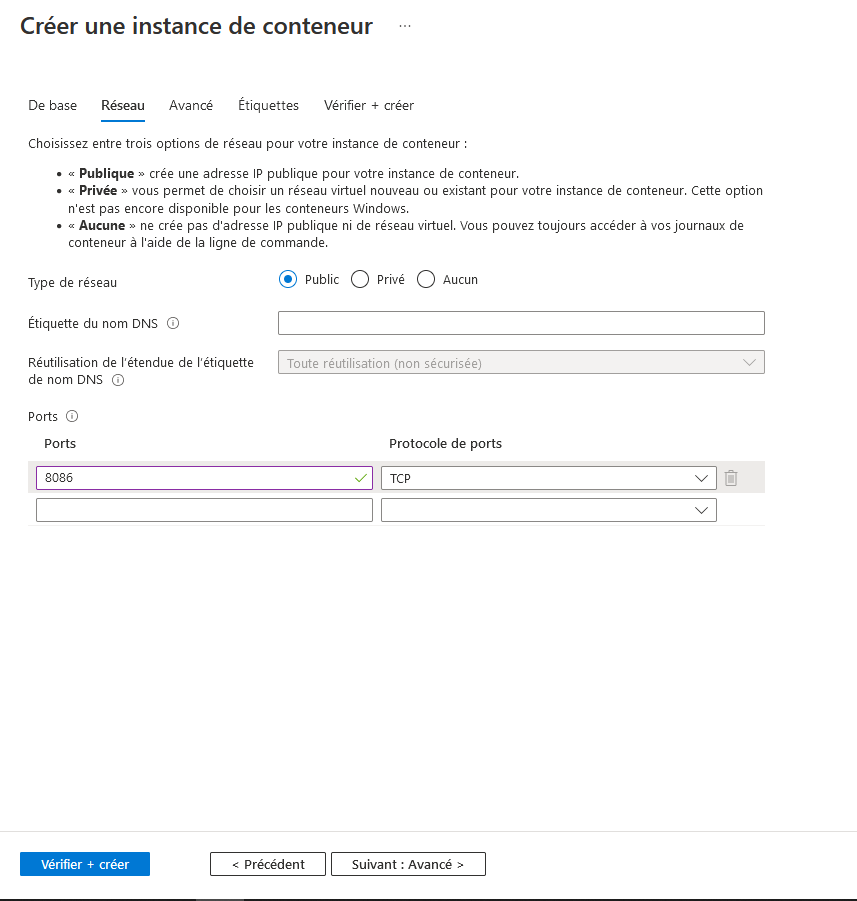
On crée un nouveau container au sein du groupe de ressources Azure. On lui fournit les informations suivantes :
Une fois le container deployé, on peut se connecter à l'interface web de InfluxDB en utilisant l'adresse IP du container et le port 8086. Une fois connecté, il faut configurer la base de données en créant une organisation et un bucket correspondant aux noms présents dans la fonction Azure (iot_agriculture et iot_bucket dans notre cas). Il faut ensuite créer un nouveau token pour donner les droits d'écriture à la fonction Azure et Grafana. On copie le token dans le champs dédié de la fonction Azure.
- Grafana
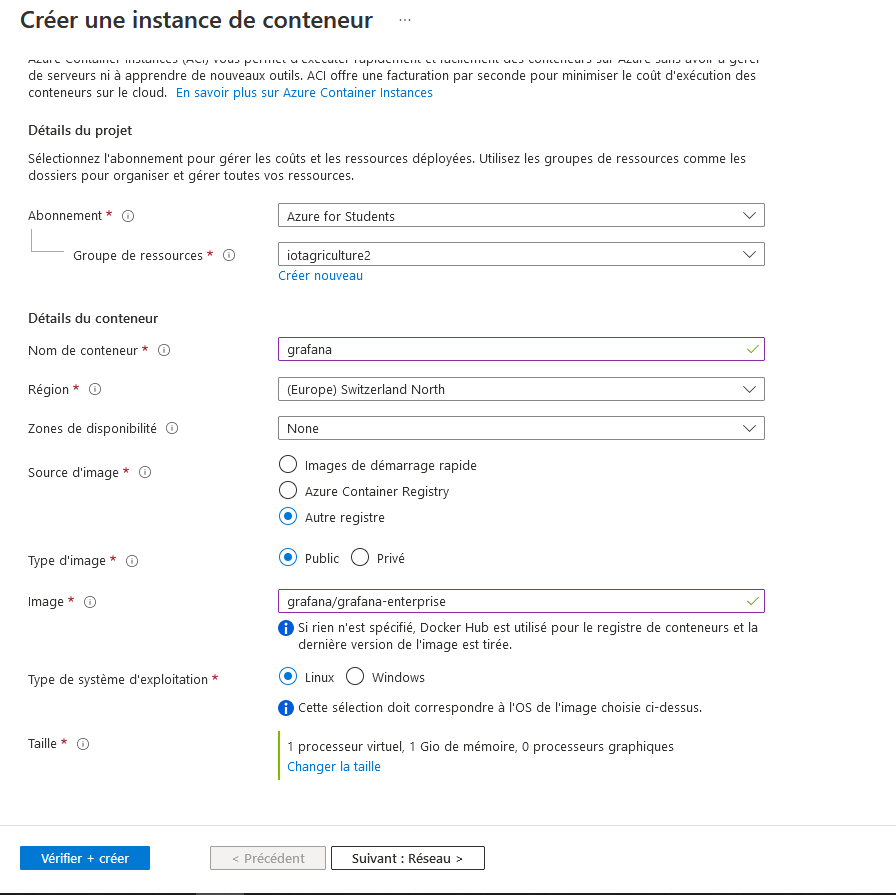
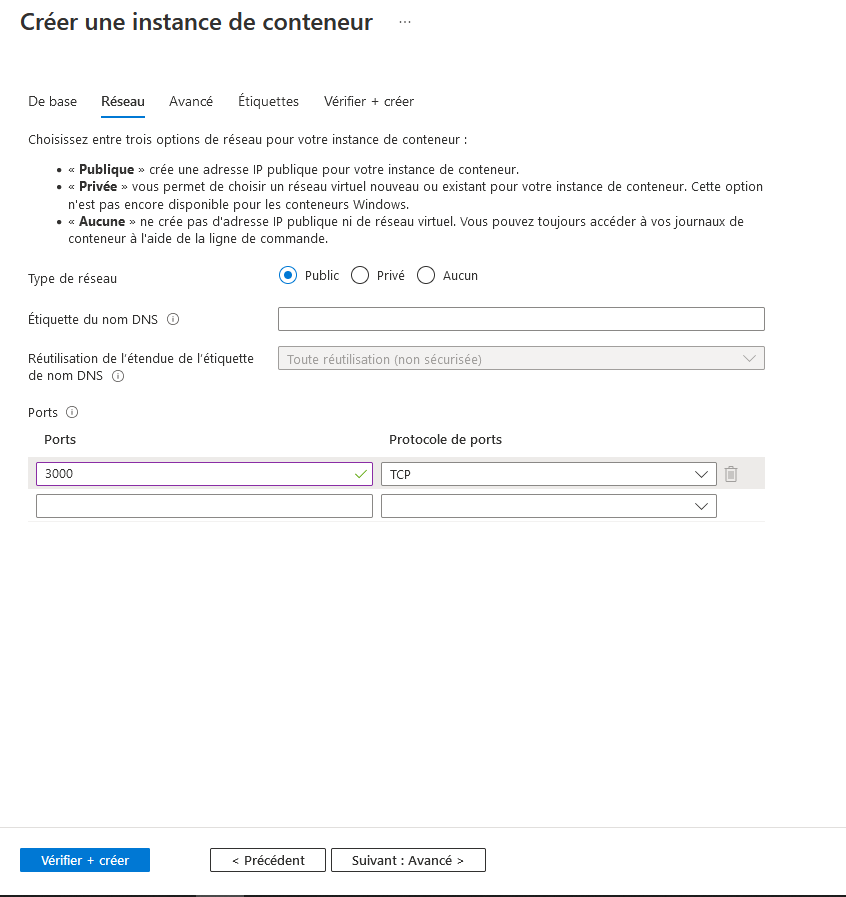
On crée un nouveau container au sein du groupe de ressources Azure. On lui fournit les informations suivantes :
Une fois le container deployé, on peut se connecter à l'interface web de Grafana en utilisant l'adresse IP du container et le port 3000. On se connecte avec le compte admin/admin. On ajoute ensuite la source de données InfluxDB en utilisant les informations suivantes avec l'adresse IP du container InfluxDB :
Une fois ceci effectué, on importe la dashboard à l'aide du fichier json fourni.
- Azure function
Dans un premier temps, on vérifie que les informations sont bien complétées : token et URL.
On déploie ensuite la fonction en utilisant l'addon VS Code d'Azure. On vérifie ensuite que la fonction est bien active sur la dashboard Azure. On récupère ensuite l'URL de la fonction pour pouvoir configuer plus tard le webhook de The Things Network :
- The Things Network
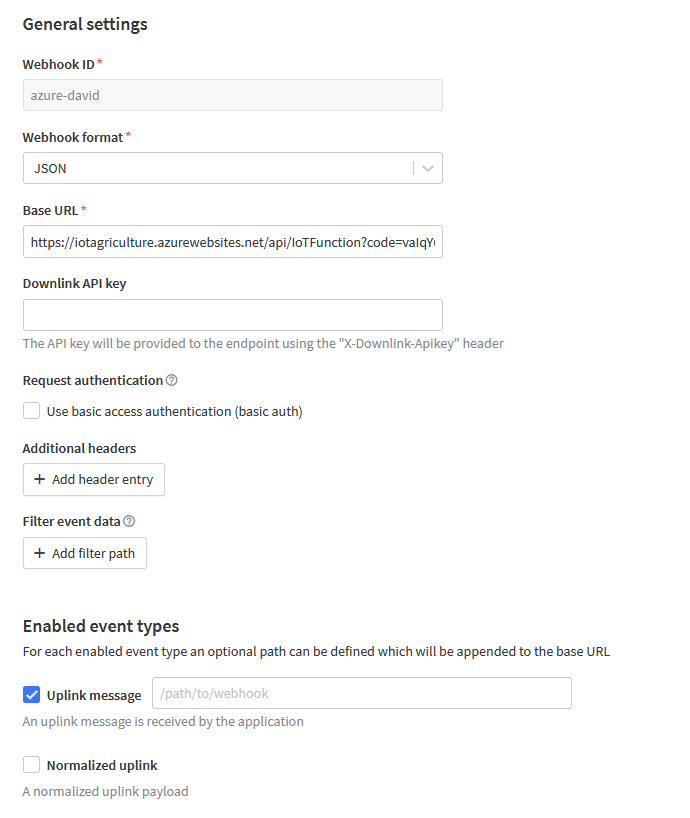
On retourne sur l'application créée précédemment et on crée un webhook (Integrations->Webhooks) :
Dans la catégorie "Enabled event types" on ne coche que l'option "Uplink message".
On sauvegarde la configuration. Les messages sont maintenant redirigés vers la fonction Azure et le déploiement est terminé.
5.2. Result on the Grafana dashboard
Une fois le déploiement terminé et quelques données reçues, on observe le résultat suivant sur le dashboard Grafana :
6. Cost estimation
Nous avons estimé les coûts du déploiement de la fonction et des instances de containers sur Azure.
La fonction ne coûte rien avant les 1 million d'exécutions. Nous avons estimé avoir 8064 exécutions par mois ce qui nous donne 10 ans avant de dépasser le quota gratuit.
Cette estimation est calculé à l'aide de l'outil officiel de calcul d'Azure : https://azure.microsoft.com/en-us/pricing/calculator/
7. Repository of the project
The repository of the project is available here :
https://github.com/IE-Norway-2021/IoT-platform-for-agriculture.git


