Enhanced testing and tooling for Eclipse CDT C/C++ plug-in projects.
The plugins contained in ch.hsr.ifs.cdttesting are grouped into four
features that are all available via
https://www.cevelop.com/cdt-testing/<eclipse-codename>/ where you need to
substitute <eclipse-codename> for the codename of the eclipse release you are
using (e.g neon). So if you are using Eclipse Neon, you would use this
URL:
https://www.cevelop.com/cdt-testing/neon/
To access unstable development builds, use:
https://www.cevelop.com/cdt-testing/development/
NOTE: These plugin-features are designed to be used by developers an we closely track the current release of Eclipse CDT. Older versions might work but the only supported version is the current release.
This feature is designed to be added to the Target Platform Definition of a plug-in project. It contains org.eclipse.cdt.tests which provides the basic functionality to run Junit4 based plug-in test for Eclipse CDT plug-ins. It also contains extensions that enable:
- re-running a single test
- automatic setup of the Eclipse CDT index
- inclusion of external resources (headers, etc.)
- testing against other referenced projects
- testing of C (non-C++) projects.
This feature can be used in Eclipse PDE to ease creating tests for a plug-in. It includes Showoffset - a plugin that allows you to find specific offsets in a file as well as getting offset-information from a selection -, pASTa (Painless AST Analysis) - a plugin that enables you to explore the Abstract Syntax Tree (AST) of a C++ source file - and the Testfileeditor - an editor designed to assist in the creation of Eclipse CDT RTS test files.
This plugins makes it easy to find specific offsets in files as well as to obtain an offset from a selection. This is especially useful when you need to check exact position information in you plug-in tests. The plug-in add two new button to the main Eclipse toolbar:
The left button allows you to enter the offset as well as the length of a selection and jumps to the newly created selection, while the right button converts a selection into a tuple of offset and length.
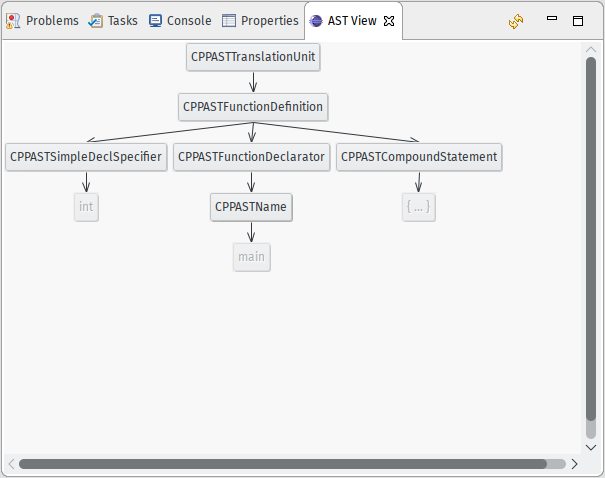
pASTa (from painless AST analysis) is a plugin that allows you to explore the Eclipse CDT AST of C++ translation units. In addition to providing a tree based view of your source-code, it also provides a detail inspector for AST nodes.
NOTE: pASTa is also available as a separate feature to make it easy to install in Eclipse CDT.
The pASTa AST View enables you to explore the AST of a C++ translation unit in the same way it is represented in Eclipse CDT. The nodes of the tree use the exact names of the actual classes you would use in you plug-in since pASTa is indeed a one-to-one mapping of the AST.
To enable the pASTa AST View, use the menu Window -> Show View -> Other. Alternatively, you can use the Keyboard shortcut Shift+Alt+Q Q. In the dialog that opens, you can either search for AST View or navigate to the folder Painless AST Analysis. Simply double-click the entry AST View to open the pASTa AST View in your workbench. You can move around the pASTa AST View as any other view in your Eclipse workbench.
NOTE: When changing the to another file, you need to refresh the pASTa AST View by clicking on the refresh button in the upper right hand corner of the pASTa AST View.
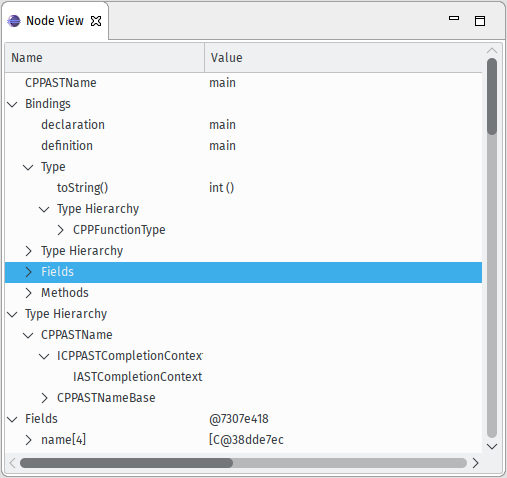
The pASTa Node View provides you with information about the currently selected tree node. It completes your view of the Eclipse CDT AST by giving you information about the inheritance structure, fields, methods, etc. of any given node.
This is an indispensable feature for people that are new to developing with the Eclipse CDT AST as well as seasoned developers. To enable the pASTa Node View, use the menu Window -> Show View -> Other. Alternatively, you can use the keyboard shortcut Shift+Alt+Q Q. In the dialog that opens, you can either search for Node View or navigate to the folder Painless AST Analysis. Simply double-click the entry Node View to open the pASTa Node View in you workbench. You can move around the pASTa Node View as any other view in your Eclipse workbench.
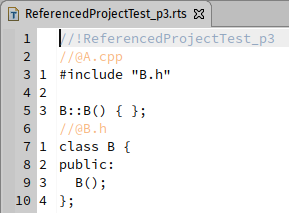
The Testfileeditor is an editor that was specifically designed to ease the creation of Eclipse CDT RTS test files. Once installed, the Testfileeditor will automatically be associated with all RTS test files and provide:
- RTS syntax highlighting
- virtual-file-relative line numbers
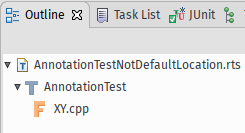
- an outline of you test file
- the ability to jump to specific tests from the JUnit page
Eclipse CDT uses its own description language for test files called RTS. This language makes use of C-Style comments to mark the different sections of test file. This allows you to easily define which C/C++ source files the testing framework shall generate, as well as defining before-and-after sections for refactoring tests and selection for selection based actions. Since these test files can contain as many test as you like, they tend to become long and hard to handle. Testfileeditor aids you in handling large test files by providing syntax highlighting for the Eclipse CDT RTS language as well as line number that are relative to each virtual file contained in a test file. These feature greatly ease navigation in large test files as well as determining on which virtual line a marker is expected when testing Codan based checker plugins.
To make you even faster in navigating large test files, Testfileeditor comes with support for outlining your test files in the Eclipse standard outline page. Simply double click on a test, virtual file or before-and-after section to jump directly to the associated position in the test file.
The Eclipse CDT RTS test execution environment does not detect is there are multiple definitions for the same test. Instead, it simply picks one of them and runs it, while the other definitions will be silently ignored. This can lead to the false believe, that all tests have run successfully, since there is no way, using the standard tools provided by Eclipse PDE, to detect this situation.
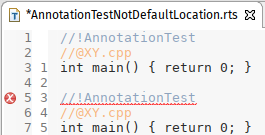
This is where the Testfileeditor comes into play. It scans your currently open file for duplicate test definitions and marks them directly in the editor, using a marker similar to the ones you are used to from Eclipse CDT/PDE/JDT.
In addition to the markers in the currently open editor, you can also access the problems via the built-in Problems view. From there, you can jump directly to the offending definition.
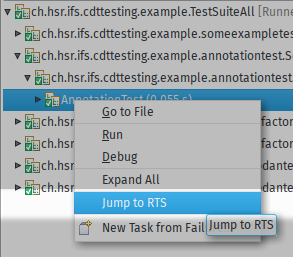
When tests fail in large test files it is often cumbersome to find the description of the failing test. Testfileeditor augments the Eclipse built-in JUnit page by adding a context menu entry called Jump to RTS that allows you to jump directly to the definition of the failing test.
This feature contains an example project to familiarize yourself with the Eclipse CDT testing infrastructure. You can import the example code via the File->Import... wizard. Simply search for Plug-ins and Fragments in the wizard or navigate to the Plug-in Development folder. On the next page, make sure to select Project with source folders in the Import as group. Click Next and select the plug-in ch.hsr.ifs.cdttesting.example for import.
After the import has finished, you can run the example unit tests by right-clicking the TestSuiteAll.java file in the ch.hsr.ifs.cdttesting.example package and selecting Run as... -> JUnit Plug-in Test. You can find the associated test files in the resources folder of the project.

