This repository contains required scripts and instructions for setting up, running and maintaining CodeChecker server.
- Setup server
- Setup authentication
- Changing permissions
- Providing credentials to the CI runners
- Suggested user and group setup
- Creating new products - Codechecker integration in East
- Relevant documentation
- Install Docker Engine:
./scripts/install_docker.sh
- Start CodeChecker server.
./scripts/start_server.sh
- Run the commands below to see the logs generated by the
start_server.shscript to get the randomly generated superuser name and password.
docker ps -a
Above command will print information about running containers:
CONTAINER ID   IMAGE                                COMMAND                  CREATED         STATUS         PORTS                                       NAMES
d3d3c749c5fb   codechecker/codechecker-web:latest   "/tini -- /usr/local…"   3 minutes ago   Up 3 minutes   0.0.0.0:8001->8001/tcp, :::8001->8001/tcp   irnas-codechecker-software-codechecker-1
Note the CONTAINER ID of the codechecker/codechecker-web:latest container
and run
docker logs <CONTAINER_ID>
Note the superuser credentials somewhere safe.
- Test if you can access the server via
8001. If you are running this on a local development machine you can try opening127.0.0.0:8001url address in your browser. If you are running this on some AWS or Azure instance you will need to expose the IP and port.
After first server run a workspace folder with default configuration files is
created inside the project's root directory. This folder will later also contain
database files created by CodeChecker.
Authentication is handled in the workspace/server_config.json file.
-
Open it and set
authentication.enabledtotrue. Do the same for theauthentication.method_dictionary.enabled. -
Restart server for changes to take effect:
./scripts/stop_server.sh
./scripts/start_server.sh
- Try opening the same IP address as before. A login will be required. You can login as superuser with previously printed credentials.
The authentication.method_dictionary contains a plaintext username:password
credentials for authentication. If the user's login matches any of the
credentials listed, the user will be authenticated.
Groups are configured in a map which maps to each username the list of groups the user belongs to.
For example, below snippet adds two users, admin and user which have
passwords admin_pass and user_pass respectively. admin belongs to a groups
admin and guest, while user only belongs to the guest group.
"method_dictionary": {
  "enabled" : true,
  "auths" : [
      "admin:admin_pass",
      "user:user_pass"
  ],
  "groups" : {
      "admin" : ["admin", "guest"],
      "user" : ["guest"]
  }
}Important: When choosing passwords, use either 1Password generator, or some other password generator.
Any CodeChecker commands that are accessing the server require login.
To perform that you need to run:
CodeChecker cmd login --url <server_url>
# or this if using east
east codechecker bypass cmd login --url <server_url>
User and group permissions are managed via Web UI. EDIT GLOBAL PERMISSIONS is
visible to the superuser and users with elevated permissions.
Codechecker provides a way to specify credentials via file. This is a desired method for the GitHub Action Runners.
Steps:
- Create a new
user:passwordpair inworkspace/server_config.jsonfile. - Create two new secrets in the repository. Name them
CODECHECKER_SERVER_URLandCODECHECKER_CREDENTIALS. - Set
CODECHECKER_SERVER_URLto contain full url of the Codechecker server.
<url_to_server>
- Set
CODECHECKER_CREDENTIALSto contain whitespace-removed JSON string contains credential data.
{"client_autologin":true,"credentials":{"<url_to_server>":"<username>:<password>"}}
See below snippet on how to access the secrets in GitHub Actions.
steps:
  - name: Prepare CodeChecker password file
    env:
      CODECHECKER_CREDENTIALS: ${{ secrets.CODECHECKER_CREDENTIALS }}
    run: |
      echo $CODECHECKER_CREDENTIALS > ~/.codechecker.passwords.json

  - name: Login to CodeChecker server
    env:
      CODECHECKER_SERVER_URL: ${{ secrets.CODECHECKER_SERVER_URL }}
    run: |
east codechecker bypass cmd login --url "$CODECHECKER_SERVER_URL"Below setup is sufficient, if all users are allowed to access all projects stored on the CodeChecker server. Permissions can then be managed per group basis.
"method_dictionary": {
  "enabled" : true,
  "auths" : [
      "admin:admin_pass",
      "user_1:user1_pass",
      "user_2:user2_pass",
      "ci_runner:ci_runner_pass"
  ],
  "groups" : {
      "admin" : ["admin"],
      "user_1" : ["users"],
      "user_2" : ["users"],
      "ci_runner" : ["ci_runners"]
  }
}- Admin is the only one with elevated permissions, he can create new products.
- Users can view projects.
- CI runners have store and access permissions.
To create a new product navigate to your CodeChecker server and login.
Note
For the IRNAS server URL and password, check 1Password by searching
irnas_user.
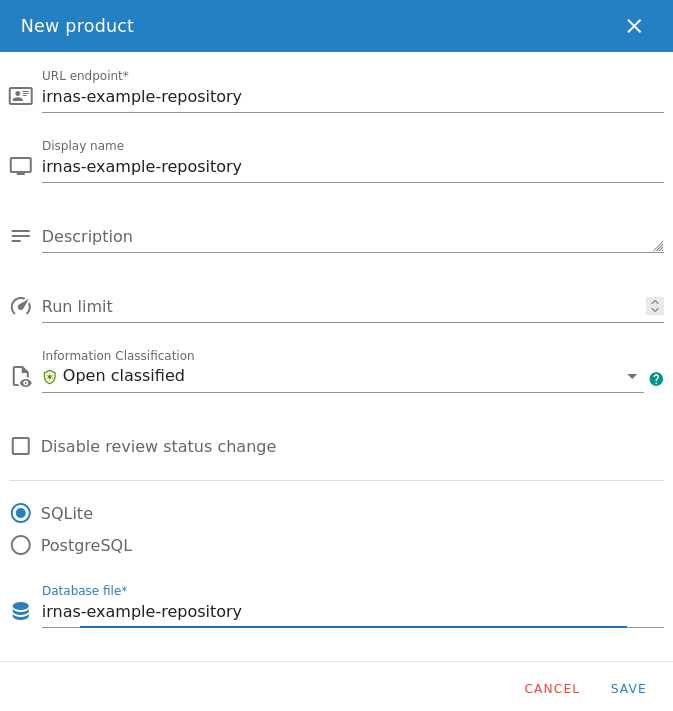
- Click on the New Product button and fill in the fields URL endpoint,
Display name with the name of the repository. For example, if the name of
the repository is
irnas-example-repository, then both fields should match it (see screenshot below). - Set Information Classification to Open classified.
- Select the SQLite database type and name your database the same as URL endpoint and Display name fields. Click Save.
Note
Make sure that the URL endpoint of the product matches the exact name
of the git repository. This is needed as the east codechecker store command
finds out the name of the git repository and uploads any analyses to the
<server_url>/<git_respository> endpoint.
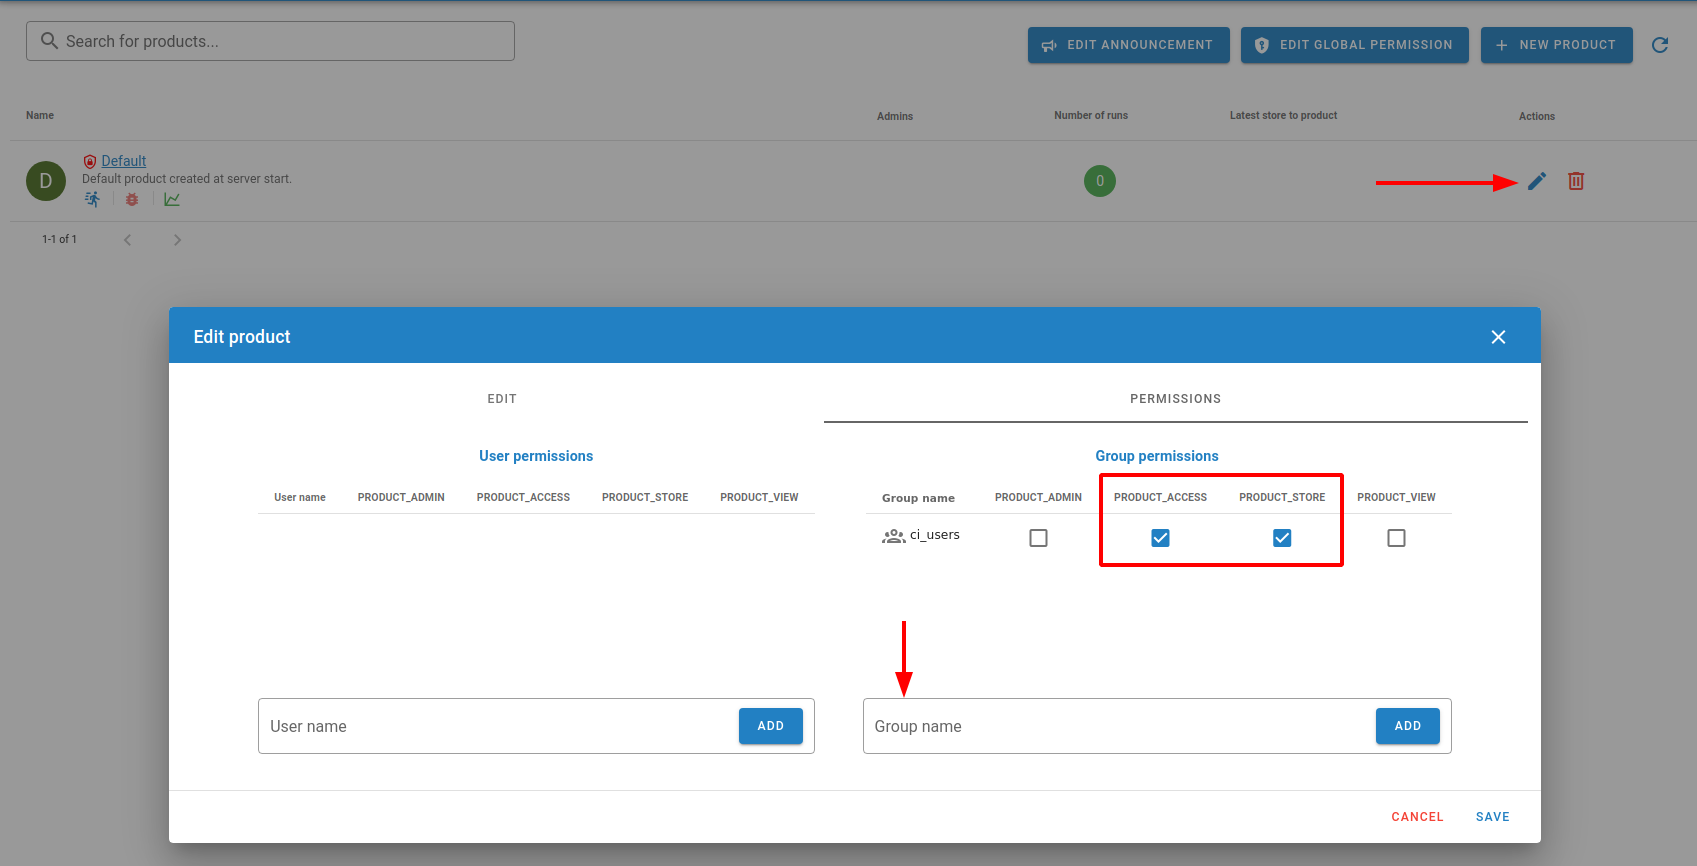
You must give product permissions whenever you need user to access that product. This can be done by clicking on the pencil icon on the right side of the product row and selecting the PERMISSIONS tab.
You can assign permissions on the user level or group level. For bot users (usually CI accounts) is enough to have PRODUCT_ACCESS and PRODUCT_STORE permissions.
Note
For the GitHub Actions developed by IRNAS is required to give group
ci_users PRODUCT_ACCESS and PRODUCT_STORE permissions. See image below.

