This project is built with Expo, an open source toolchain for building React Native projects for Android and iOS.
- Working expo-installation
- iOS and Android device, either physical or an emulator.
The app will request some permissions, which has to be granted for it to run properly.
If you’re using an iOS device:
Settings -> Privacy -> Motion & Fitness -> Make sure Fitness Tracking is enabled.
Run the project with expo start
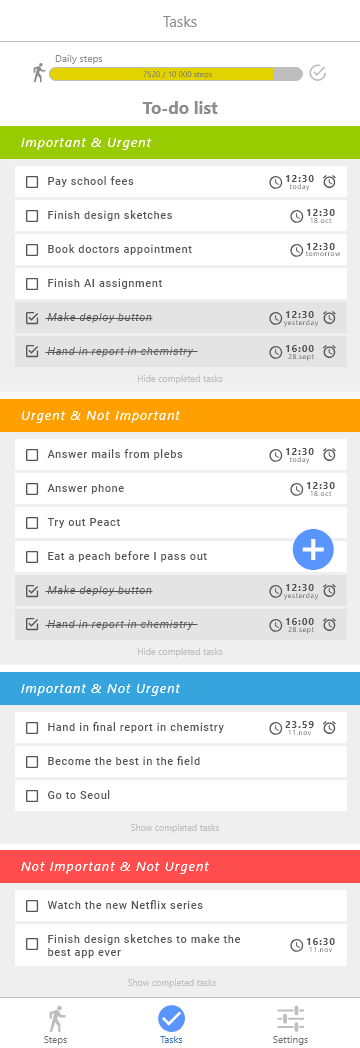
We wished to make an app with an unusual approach to task management. The system allows a user to sort pending tasks based on importance and urgency. It is based on the Eisenhower Matrix, which filters tasks into one of four possible categories: “Important & Urgent”, “Important & Not Urgent”, “Urgent & Not Important” and “Not Important & Not Urgent”.
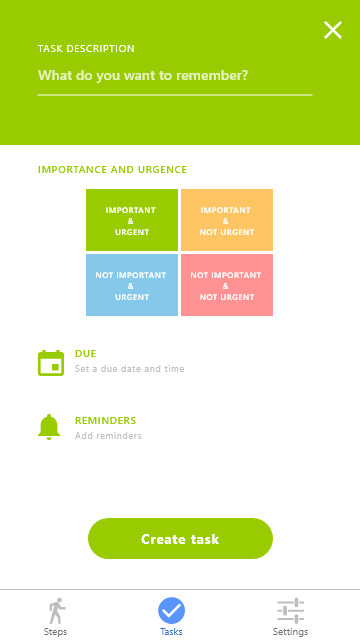
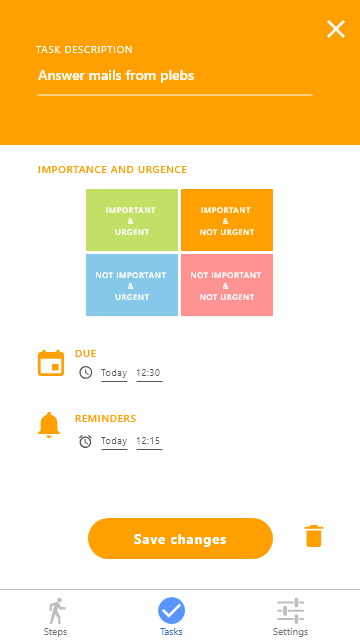
As with any task management app, it is possible to add, edit and delete tasks. For each task the user specifies a due date and time, and if the app should give the user a reminder in the form of a notification on their device. We limited the scope of the project since it is only intended as a simple prototype for this kind of app. Were it a real project it would have been natural to expand the project scope.
- Dynamic reordering of task categories. Whenever a task approaches its due date, it should be moved to either the “Important & Urgent”, or the “Urgent & Not Important” categories.
- Enhanced Reminder configuration. At the current version, the app only allows the user to pick a reminder 1, 2 or 3 hours before the task is due. It would be natural to provide functionality to pick more varied reminders spanning a larger time frame, and even provide the opportunity to create custom reminders with self-defined timeslots.
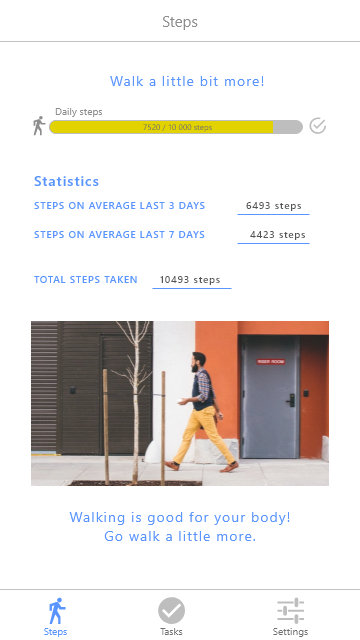
Another prominent feature of our project is the use of the pedometer in the Step screen. Here, the users may see some basic statistics on their activity, and track their progress towards their daily Step-count goal. To motivate the users to walk a certain amount of steps each day we implemented a progress bar to help visualize the progress towards their daily goal. When the goal is reached, the check icon turns blue and the motivational quotes change. The user is given a notification upon reaching their daily goal.
Features we would have implemented if the project was not intended as a prototype:
- Change the daily goal. The current version of the app does not allow users to set their own goals.
- Statistics visualization. Implement graphs to better communicate the relevant statistics to the user.
- Daily Goal Streak. A streak for every consecutive day the daily step goal is reached by the user. This would be a feature intended to motivate the user to reach their daily step goal.
- Connect tasks reminders to notifications
- Expand the notification feature by adding inactivity alerts, and custom notifications defined by the user.
In our first group meeting, we decided on which functionality we wanted to include in our app. The next step was to create some design sketches:
The design sketches are a powerful tool in the early stages of the project as they allow us to accurately communicate our ideas and views to each other. Ensuring the whole team is on the same page regarding the development. They also simplified the initial task of setting up the Github repo as they allowed us to systematically define relevant development issues for the git issue board. By defining concrete issues of an appropriate scope early on in the project we could delegate tasks effectively to allow the team to work independently when we did not have the opportunity to meet up. The design sketches do not have to be as detailed or polished as ours; our initial sketches were on pen and paper. We highly recommend the use of any kind of sketches early on, whether they are visual or structural in nature.
Our project structure is modelled around being simple, intuitive and efficient. Our components are divided into “components” and “containers” following this pattern described by Dan Abramov pattern. We did not have time to sort our components 100% correct.
- Images and fonts are gathered in the
assetsfolder - Mock-files are in the
mockfolder - The
constantsfolder is used for gathering constant values in one place. This allows us to change things like colors from one place in the code, and it will automatically propagate throughout the project. - The files in the
screensfolder are the main views the user can navigate between. - The navigation is done by the files in the
navigationfolder. - The
utilityfolder is meant for general utility functions, like AsyncStorage. - All the tests can be found in
__tests__folders.
This section contains a description of the various technologies, libraries and APIs we used to build this project.
React Native is a relatively new framework for building native apps using JavaScript and React. Apps built with React Native are real apps indistinguishable from apps built using Objective-C or Java as React Native uses the same fundamental UI building blocks as regular iOS and Android apps. Read more about React Native here
Expo is a free open source toolchain built around React Native. It is simple and straightforward to get started with. You can get started with Expo here.
The Expo Pedometer is an Expo API that uses Core Motion (iOS) or Google Fit (Android) to get pedometer information from the device. It was pretty easy to integrate as I as a developer did not have to take into account whether the user was on an android or iOS device. The documentation can be found here.
- To get started,
import { Pedometer } from "expo"in your React component. - To determine whether the device has a pedometer available you can write
Pedometer.isAvailableAsync()which will return a boolean. As far as I understood, this will only tell if the device has a pedometer available, and not if the user has permitted it. - If the user has permitted the use of step tracking on the device, it is possible to extract the step count between a period of time start - end by using
Pedometer.getStepCountAsync(start, end). - In order for the pedometer to update when the user takes some steps after opening the app we need to have a function that watches the stepcount, which can be done by using
Pedometer.watchStepCount(Callback). And inside the callback you put what you want to update when more steps are taken.
AsyncStorage is an asynchronous key-value storage system. The use of AsyncStorage allows the app to persistently retain data whenever it’s closed and restarted. You can read more about AsyncStorage As per the recommendations we have used an abstraction on top of AsyncStorage. Our abstraction supports the operations: getItem, setItem and deleteItem.
When you use AsyncStorage it is important to be mindful about the asynchronous property. Failing to account for this will result in promise objects getting passed around your app, leading to error.
As AsyncStorage only supports datavalues of type: String, we use JSON.stringify and JSON.parse to ensure our objects are passed to AsyncStorage as strings, and retrieved from AsyncStorage as objects.
As this is code not clearly associated with any component, we added it as a pure javascript file in the utility folder.
To see how we implemented AsyncStorage; navigate to PIMM/utility/LocalAsyncStorage.js and PIMM/containers/Tasks.context.js.
Notifications are useful when you want the app to get the users attention outside of the app. Expo has built-in support for notification, which makes it simple to implement. For our project we only use notifications whenever a user has reached their daily-step--count goal.
To use notifications you simply need to import { Notifications } from "expo", and use it as described in the expo docs
To see how we used Notifications; navigate to PIMM/containers/ProgressBarContainer.js
The react native Context API provides a way to pass data through the component tree without having to pass props down manually at every level.
There are some nuances as to when context is an appropriate solution. We highly recommend reading through the docs before proceeding.
Context works around pairs of providers and consumers. Rendering a consumer will cause react to read the current context value from the closest matching provider above the consumer in the context tree.
- To see how we used Context providers; navigate to
/PIMM/containers/Task.context.js. - To see how we used Context consumers; navigate to
/PIMM/components/taskItem.js
The react-native-modal-datetime-picker exposes a cross-platform interface for showing the native date- and time-picker inside a modal. It eliminates the necessity for coding a platform dependant solution using DatePickerIOS and DatePickerAndroid.
The library, along with an extensive list of its available props can be found here.
The library is available on npm, making the setup process simple. Navigate to your project folder and run the terminal command:
npm install --save react-native-modal-datetime-picker or yarn add react-native-modal-datetime-picker depending on which package manager you are currently using.
There are three types of methods you will need if you want the date-picker to function properly:
- A method to show the date-picker
- A method to hide the date-picker
- A method to handle a picked date
To see how we implemented this; navigate to
PIMM/components/DateSelector.js
The react-native-material-menu is a pure JavaScript material menu component for React Native which is cross-platform compatible. It shows a menu whenever a clickable object of choice is pressed.
You can find it here, along with a list of supported props.
To install simply run either:
npm install --save react-native-material-menu or yarn add react-native-material-menu in your terminal of choice.
To use it you will need the following methods:
- A defined menu and a method to set the menu ref
- A method to hide the menu
- A method to show the menu
- A method to handle a menu-item selection. In our project we extended the functionality of MenuItem to have a simpler way of knowing which menu-item was chosen.
To see how we implemented the material menu, and how we extended the menu-item component; navigate to PIMM/components/ReminderSelector.js and PIMM/components/MenuFilterItem.js
“Moment.js provides a wrapper for the native JavaScript date object. In doing this, Moment.js extends the functionality and also accounts for several deficiencies in the JavaScript object.” - Momentjs.com
In this project we have used Moment.js for formating our datetime strings and to perform simple datetime-arithmetic. An important thing to note if you wish to perform datetime-arithmetic on Moment-formatted datetime-strings is that the datetime format of your choosing needs to be ISO-compliant. You should also pay attention to the timezone in which you’re in.
e.g:
In moment(chosenTime).add(time, type).toISOString(), the .toISOString() method will make it ISO-compliant and remove any warnings of deprecated stuff.
To see an example of how we used Moment.js; navigate to PIMM/components/DisplayDateTime.js
Jest is a zero configuration testing platform for testing JavaScript code. This also includes React applications. It automatically runs files in __test__ folders, files that end with spec.js and files that end with test.js.
Jest supports testing of asynchronous code, UI snapshot testing and testing using mockups.
To get started with jest testing we highly recommend reading the jest introduction found in the jest docs.
jest-expo is a preset for testing expo apps. Some groups experienced problems when trying to use jest-expo due to setup issues.
- Navigate to the project in a terminal window
- Run the command
npm install --save-dev jestto installjest. - Run the command
npm i jest-cli --globalto installjest-cli, use sudo if necessary. - Run the command
npm i jest-expo --save-devto installjest-expo - Use the command
jestto run the tests
Ionicons is an open source library where icons can be found and easily used in React projects. To use an icon simply select the desired icon on https://ionicons.com/ and paste the component code to your project. Read more about how to use ionicons here Ionicons are implemented using expo icons
We have used github actively in our development. For project planning, we decomposed our scope into tasks and defined them as issues on git. To make it easier to get an overview we categorised the issues by labels such as user story, sub task and technical task. We agreed on naming conventions for branches and made sure to reference affected issues in the commit messages. We have used code reviews for some of the pull request to give each other feedback on the code, which has been very useful. We can definitely do even more of that.
Following feedback on the last project, we decided to try using a dedicated development branch in this project. The purpose of separating the master and dev branches is to ensure that untested code is never pushed to master, while still enabling the team to share code continuously. For a project of this (small) size, we find it a bit unnecessary to use a dev branch, but we definitely see the benefits it has on a bigger project where one always need to have a working product in master.
Our test process includes both manual testing and unit and snapshot testing with jest.
To run the jest tests write jest or npm test in the terminal. To see test coverage, run jest --coverage and go to PIMM/coverage/lcov-report/ and open index.html.
We have systematically tested a few of the components, containers and screens. The code coverage is not that high yet, but would be higher if we added more similar tests. We figured this wasn't necessary as it would be a lot of duplication of the existing test code. The following React components have a snapshot test:
TextIcon, StatisticsItem, ProgressBar
ProgressBarContainer, StatisticsContainer
Stepscreen
To test the LocalAsyncStorage functions we used mocking extensively. The files used in the test are located in PIMM/mock/. Since the AsyncStorage is asynchronous it is necessary to explicitly handle it as described here. To find the AsyncStorage test; navigate to PIMM/__tests__/AsyncStorageTest.js
Throughout our development we have tested the code manually. These tests have been based around manually checking if the app behaviour is as expected, both visually and functionally. The testing has been performed on both iOS and Android devices of varying sizes. This has been an ongoing systematic process used for all the components we have written.
- Eisenhower matrix: https://www.eisenhower.me/eisenhower-matrix/
- Progress bar: https://codedaily.io/screencasts/46/Create-a-Responsive-Animated-Progress-Bar-in-React-Native
- Pedometer expo: https://docs.expo.io/versions/latest/sdk/pedometer


