Cardiovascular diseases (CVDs) are the number 1 cause of death globally, taking an estimated 17.9 million lives each year, which accounts for 31% of all deaths worldwide. To goal of this project is to predict mortality by heart failure. In this project we are going to use The Heart Failure Datasets(1). People with cardiovascular disease or who are at high cardiovascular risk (due to the presence of one or more risk factors such as hypertension, diabetes, hyperlipidemia, or already established disease) need early detection to save their lives.
In this project, we are going to train using Azure AutoML as well as Hyperdrive. From the experiment, the best model will be deployed
We are using ML Azure Studio. There first we need to create computer instance. When the instance is ready, we have option to launch the Jupyter notebook
In this project we are going to use The Heart Failure Dataset and this datasets can be found in Kaggle.
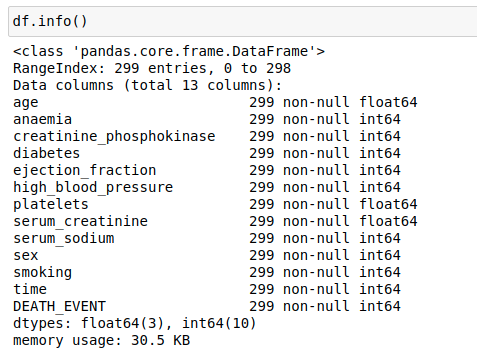
The Heart failure dataset has total 13 columns
- age
- anaemia
- creatinine_phosphokinase
- diabetes
- ejection_fraction
- high_blood_pressure
- platelets
- serum_creatinine
- serum_sodium
- sex
- smoking
- time
- DEATH_EVENT
Here is the datasets, information
we need to classify DEATH_EVENT based on the other 12 features. So, It's a classification task.
To access this datasets, we upload into the Github account, and using the file link, we can easily access the file. Here is the code snippets
from azureml.data.dataset_factory import TabularDatasetFactory

url = "https://raw.githubusercontent.com/Iamsdt/Udacity-ML-Azure-Capstone/master/datasets/heart_failure_clinical_records_dataset.csv"

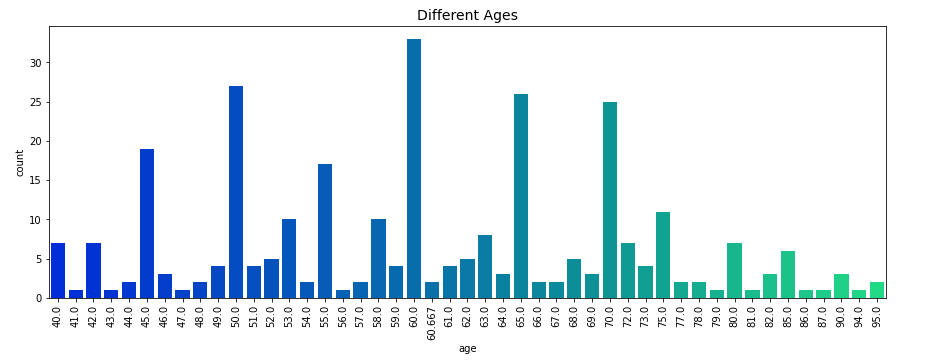
dataset = Dataset.Tabular.from_delimited_files(url) - First, I check the available ages in the datasets
In AutoML, we used following parameters
| No. | Title | Value |
|---|---|---|
| 1. | Task | Classification |
| 2. | Primary Metric | Accuracy |
| 3. | Number of cross validations | 5 |
| 4. | Experiment Time out minutes | 20 |
here is the code
automl_settings = {
    "n_cross_validations": 5,
    "primary_metric": 'accuracy',
    "enable_early_stopping": True,
    "max_concurrent_iterations": 5,
}

# automl config
automl_config = AutoMLConfig(task = 'classification',
                            experiment_timeout_minutes=20,
                            compute_target = compute_target,
                            training_data = dataset,
                            label_column_name = 'DEATH_EVENT',
                            featurization= 'auto',
                            path = project_folder,
                            debug_log = "automl_errors.log",
                            **automl_settings)
Here,
-
task -> classificaion, we want to determine value of DEATH_EVENT based on the other 12 features
-
primary_metric -> accuracy, we choose accuracy as our primary metrics
-
max_concurrent_iterations -> 5, in our cluster, we have maximum 6 nodes, so we can use 5
-
experiment_timeout_minutes = 20, we wan to run this experiments for 20 minutes
-
n_cross_validations => 5, Here we don't specify validation data, so we set 5 cross validations will perform during the experiment.
-
featurization -> auto, we want featurization step should be done automatically. So that column type is automatically detected. Based on the detected column type featurization is done as follows:
Categorical: Target encoding, one hot encoding, drop high cardinality categories, impute missing values.

Numeric: Impute missing values, cluster distance, weight of evidence.

DateTime: Several features such as day, seconds, minutes, hours etc.

Text: Bag of words, pre-trained Word embedding, text target encoding.
** Reference MS Azure Doc
-
enable_early_stopping -> True , If the score is not improving in the short term, we want to stop this experiment
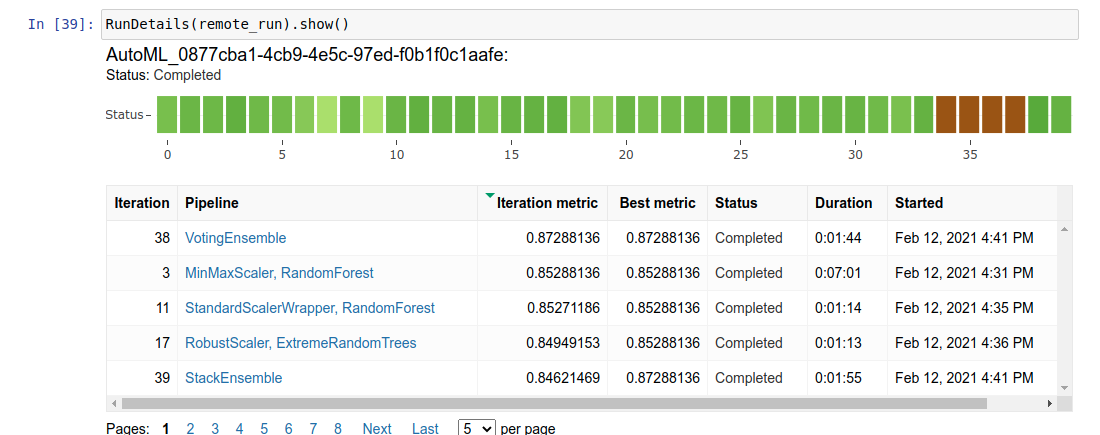
When the experiment is completed, we can see the model details, with RunDetails Widget. (Here remote_run is our submitted experiment)
RunDetails(remote_run).show()
Output:
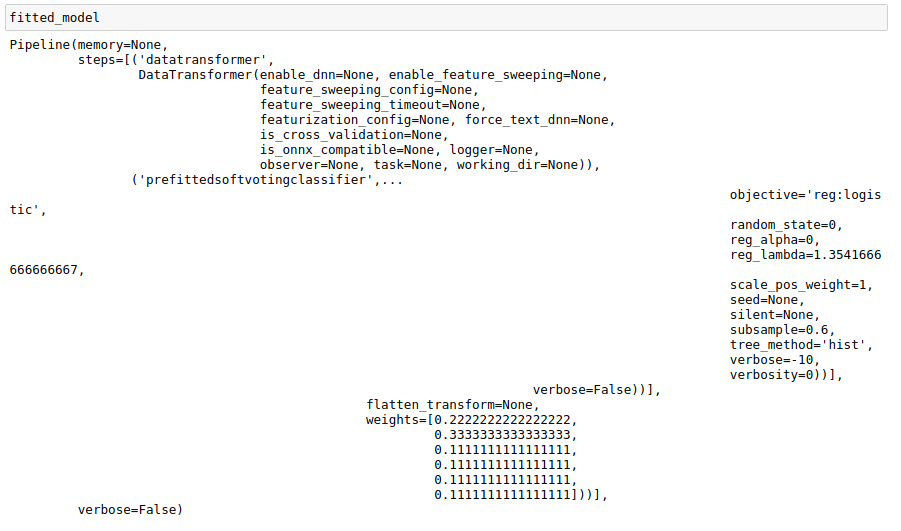
Voting ensemble with 87.29 % accuracy. We can also extract the best fitted model details by simply print the model
Now we can check the metrics of the best model, here is the best metrics
{'average_precision_score_micro': 0.9172347849082338,
 'recall_score_micro': 0.8728813559322035,
 'precision_score_macro': 0.8732482337353845,
 'norm_macro_recall': 0.67421788482835,
 'average_precision_score_weighted': 0.92263382495822,
 'AUC_micro': 0.9148604487854703,
 'AUC_weighted': 0.9096312292358804,
 'balanced_accuracy': 0.8371089424141751,
 'AUC_macro': 0.9096312292358804,
 'f1_score_micro': 0.8728813559322035,
 'recall_score_weighted': 0.8728813559322035,
 'log_loss': 0.3940637252605644,
 'f1_score_macro': 0.8444862091746149,
 'precision_score_weighted': 0.8817217472748613,
 'accuracy': 0.8728813559322035,
 'f1_score_weighted': 0.8684072721538373,
 'matthews_correlation': 0.7078786213911282,
 'precision_score_micro': 0.8728813559322035,
 'average_precision_score_macro': 0.899940232663685,
 'weighted_accuracy': 0.8967612729744958,
 'recall_score_macro': 0.8371089424141751,
 'accuracy_table': 'aml://artifactId/ExperimentRun/dcid.AutoML_0877cba1-4cb9-4e5c-97ed-f0b1f0c1aafe_38/accuracy_table',
 'confusion_matrix': 'aml://artifactId/ExperimentRun/dcid.AutoML_0877cba1-4cb9-4e5c-97ed-f0b1f0c1aafe_38/confusion_matrix'}
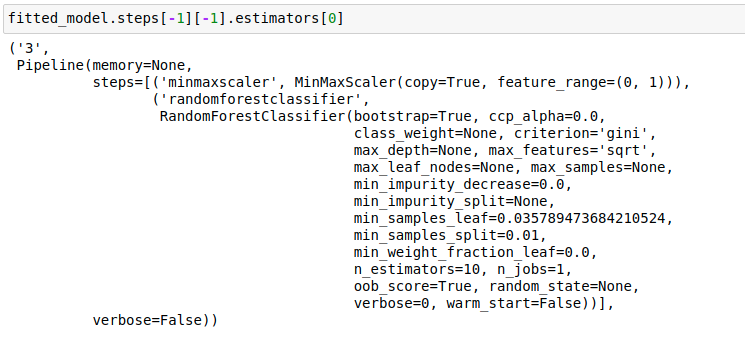
And Voting ensemble model works by combining the predictions from multiple models(estimators). We can also extract some estimator from the best model, here I extract the parameters of RandomForestClassifier.
best_run, fitted_model = remote_run.get_output()
fitted_model.steps[-1][-1].estimators[0]
Output:
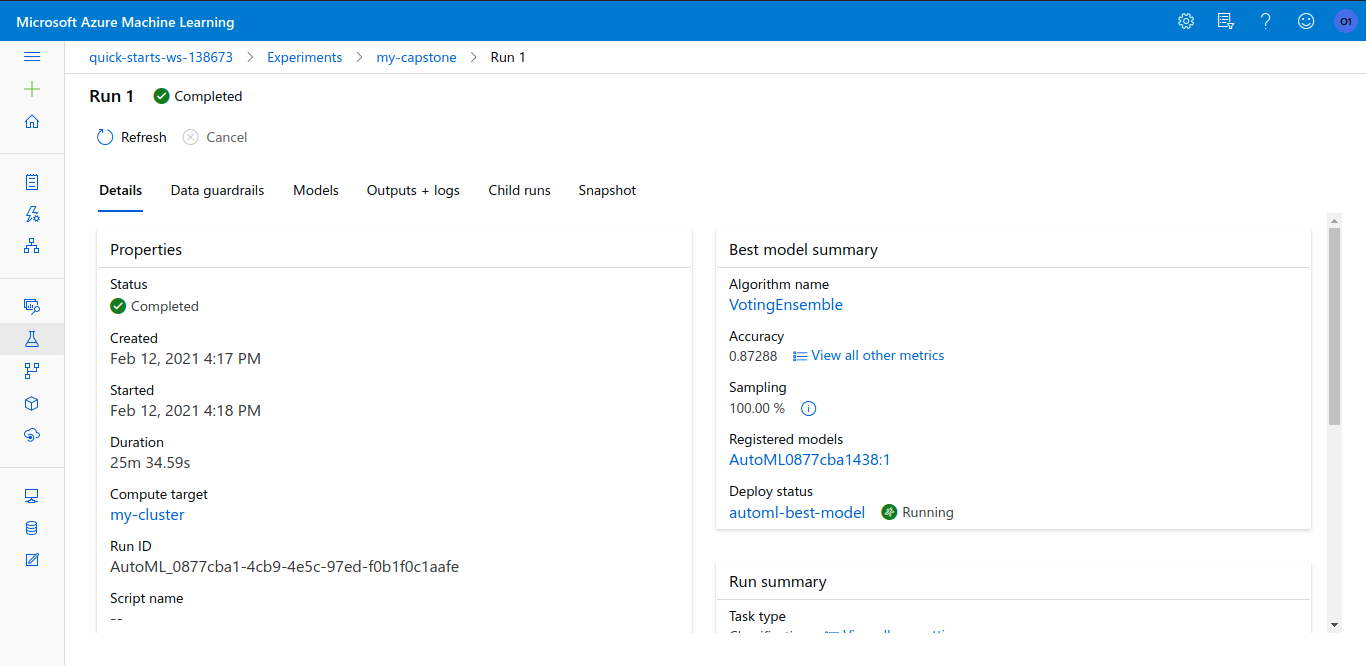
Even we can get all the information from the ML studio.
Here is the screenshot of run completed with best model
If we navigate into the models section, we can find more models
For this experiment, we chose LogisticRegression model to predict the value of the dependent variable. LogisticRegression can perform better in classification task. To Find the best Scitkit learn model, we used below parameters
For hyper parameter sampling: we used discrete values
Inverse of regularization strength = [0.001,0.01,0.1,1,10,20,50,100]
Maximum number of iterations = [25,50,100,200]
we used Inverse of regularization strength 'C'. The default value is 1.0. we choose some values that are less than the default value and great than the default value. And we want to find the best the regularization strength using Random Parameter Sampling.
we also want to tune the maximum number of iterations taken for the solvers to converge, here the default value is 100. So we choose some values that are less than the default value and great than the default value. And we want to find the best the maximum number of iterations using Random Parameter Sampling.
For Policy:
evaluation_interval=2
slack_factor=0.1
Hyper parameters
| No. | Title | Value |
|---|---|---|
| 1. | Hyper parameter Sampling | RandomParameterSampling |
| 2. | Primary metric name | Accuracy |
| 3. | Primary metric goal | PrimaryMetricGoal.MAXIMIZE |
| 4. | Policy | BanditPolicy |
| 5. | Max Total Runs | 20 |
| 6. | Max Concurrent Runs | 5 |
SK Learn Model: Logistic Regression
In this experiment, we choose Random Parameter Sampling which faster, efficient, time-saving, and works perfectly. On the other hand Grid Parameter Sampling is exhaustively searched over the search space and takes usually long times and required more computation time and power.
For this experiment, we chose the Bandit Policy with following parameters:
policy = BanditPolicy(evaluation_interval=2, slack_factor=0.1)
evaluation_interval: The frequency for applying the policy. (docs)
slack_factor: The ratio used to calculate the allowed distance from the best performing experiment run. (docs)
In this policy, any run that doesn't fall within the slack factor or slack amount of the evaluation metric with respect to the best performing run will be terminated. So by using this policy, it will retain only similar or better performance models.
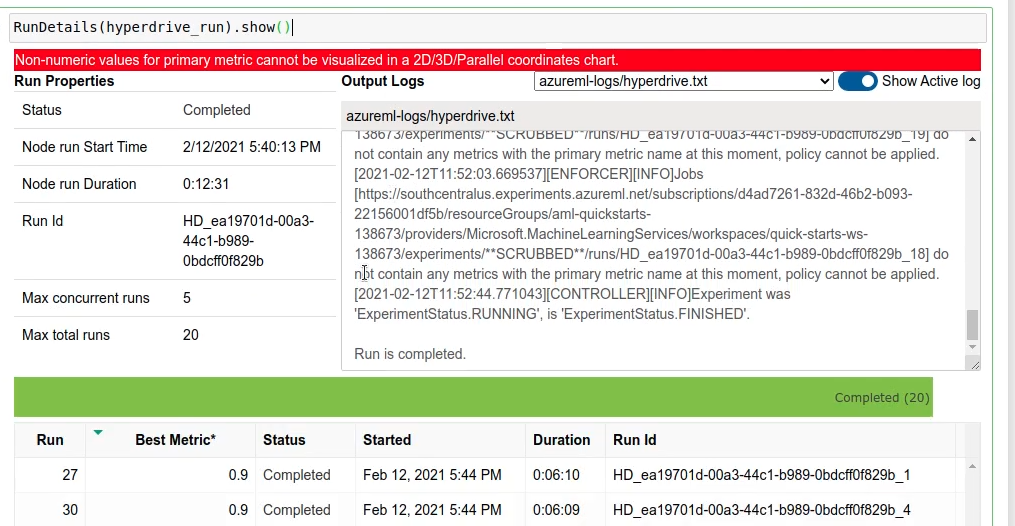
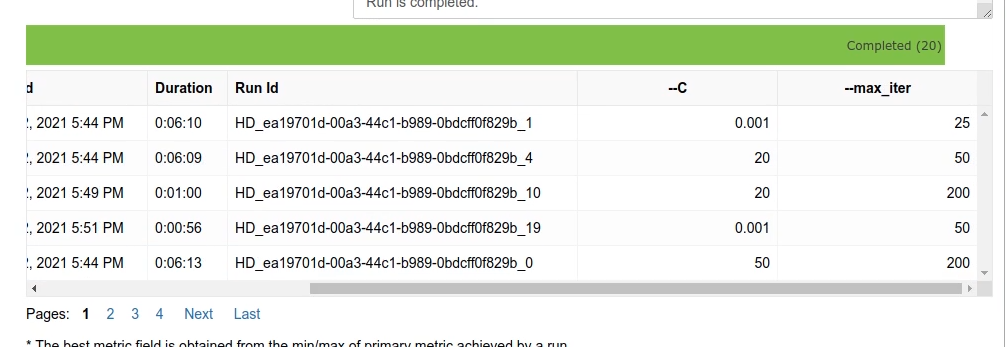
When the experiment is done, we can get the best parameters along with accuracy from RunDetails Widgets
So, here the best model parameters
hyperdrive_run.get_best_run_by_primary_metric()
best_run.get_metrics()
Output:
{'Regularization Strength:': 0.001, 'Max iterations:': 25, 'Accuracy': 0.9}
We decided to deploy the best model generated by auto ML.
aci_config = AciWebservice.deploy_configuration(cpu_cores=2, memory_gb=1, auth_enabled=True, enable_app_insights=True)

deployed_service = Model.deploy(workspace=ws,
                       name='automl-best-model',
                       inference_config=inference_config,
                       deployment_config=aci_config,
                       models=[mymodel])
For deployment purpose, we use
- Cpu Cores -> 2
- Memory -> 1 GB
When the deployment is ready we can send the request to the web service.
That's means our model is deployed. Even we can the model deployment status from ML studio
We can get rest end point, api key and swagger json
Using the swagger json, we can get the information about the http data, we need to pass in the request
Now lets, navigate in to the consume tab, to get the api_key, and also there is code snipt available, by using the provided code snipts we can test our api quickly. we can send request to the server using following code (copied from ml studio)-
import urllib.request
import json
import os
import ssl

def allowSelfSignedHttps(allowed):
    # bypass the server certificate verification on client side
    if allowed and not os.environ.get('PYTHONHTTPSVERIFY', '') and getattr(ssl, '_create_unverified_context', None):
        ssl._create_default_https_context = ssl._create_unverified_context

allowSelfSignedHttps(True) # this line is needed if you use self-signed certificate in your scoring service.

data = {
    "data":
    [
        {
            'age': "0",
            'anaemia': "0",
            'creatinine_phosphokinase': "0",
            'diabetes': "0",
            'ejection_fraction': "0",
            'high_blood_pressure': "0",
            'platelets': "0",
            'serum_creatinine': "0",
            'serum_sodium': "0",
            'sex': "0",
            'smoking': "0",
            'time': "0",
        },
    ],
}

body = str.encode(json.dumps(data))

url = 'http://8aac4f9f-3244-4acf-8aef-634a43a637ad.southcentralus.azurecontainer.io/score'
api_key = 'yitQxuYWREfCAJ7Fa24rDB9C6aoloBKw' # Replace this with the API key for the web service
headers = {'Content-Type':'application/json', 'Authorization':('Bearer '+ api_key)}

req = urllib.request.Request(url, body, headers)

try:
    response = urllib.request.urlopen(req)

    result = response.read()
    print(result)
except urllib.error.HTTPError as error:
    print("The request failed with status code: " + str(error.code))

    # Print the headers - they include the requert ID and the timestamp, which are useful for debugging the failure
    print(error.info())
    print(json.loads(error.read().decode("utf8", 'ignore')))
Output:
b'"{\\"result\\": [1]}"'
Here, 1 means death event
- Screen Recording available into Youtube
To improve the auto ML model, we can allow more time to train this automl by changing this parameters
experiment_timeout_minutes=20
-
By Changing Sampling parameters:
- We can change the sampling parameters into Grid Parameter Sampling, it should take more time, it's can produce better results
-
Using Sophisticated ML model
- In this project, we used Logistic regression which is a very simple model, we can use more sophisticated model like XGBoost, RandomForest, LightGBM
-
Using Deep Learning
- We can use Deep Learning to improve further.
- we plan to convert the model into ONNX format, and the Using ONNX Tensorflow library we can convert the model into tensorflow model, and use this model as on device ML model in mobile app using Flutter framework.
- Davide Chicco, Giuseppe Jurman: Machine learning can predict survival of patients with heart failure from serum creatinine and ejection fraction alone. BMC Medical Informatics and Decision Making 20, 16 (2020). (link)

