Easy Keycloak setup for Angular applications.
This library helps you to use keycloak-js in Angular > v4.3 applications providing the following features:
- A Keycloak Service which wraps the keycloak-js methods to be used in Angular, giving extra functionalities to the original functions and adding new methods to make it easier to be consumed by Angular applications.
- Generic AuthGuard implementation, so you can customize your own AuthGuard logic inheriting the authentication logic and the roles load.
- A HttpClient interceptor that adds the authorization header to all HttpClient requests. It is also possible to disable this interceptor or exclude routes from having the authorization header.
- This documentation also assists you to configure the keycloak in your Angular applications and with the client setup in the admin console of your keycloak installation.
npm i --save keycloak-angularSince keycloak-angular v.7.0.0, the keycloak-js dependency became a peer dependency. This change allows greater flexibility for choosing the keycloak-js adapter version and follows the project documentation recommendation.
npm i --save keycloak-js@versionThe keycloak-js adapter documentation recommends to use the same version of your Keycloak / RH-SSO (Red Hat Single Sign On) installation.
A best practice is to load the JavaScript adapter directly from Keycloak Server as it will automatically be updated when you upgrade the server. If you copy the adapter to your web application instead, make sure you upgrade the adapter only after you have upgraded the server.
The following topics explain two different ways to bootstrap the library and configure keycloak-angular. The first one is by using the APP_INITIALIZER token and the second option uses ngDoBootstrap. You will have to choose one of them.
The KeycloakService can be initialized during the application loading, using the APP_INITIALIZER token.
import { NgModule, APP_INITIALIZER } from '@angular/core';
import { KeycloakService, KeycloakAngularModule } from 'keycloak-angular';
import { initializer } from './utils/app-init';

@NgModule({
  imports: [KeycloakAngularModule],
  providers: [
    {
      provide: APP_INITIALIZER,
      useFactory: initializer,
      multi: true,
      deps: [KeycloakService]
    }
  ]
})
export class AppModule {}This function can be named and placed in the way you think is most appropriate. In the
underneath example it was placed in a separate file app-init.ts and the function was called
initializer.
import { KeycloakService } from 'keycloak-angular';

export function initializer(keycloak: KeycloakService): () => Promise<any> {
  return (): Promise<any> => keycloak.init();
}The KeycloakService can be initialized before the application loading. When the Keycloak initialization is successful the application is bootstrapped.
This has two major benefits.
- This is faster because the application isn't fully bootstrapped and
- It prevents a moment when you see the application without having the authorization.
import { NgModule, DoBootstrap, ApplicationRef } from '@angular/core';
import { KeycloakAngularModule, KeycloakService } from 'keycloak-angular';

const keycloakService = new KeycloakService();

@NgModule({
  imports: [KeycloakAngularModule],
  providers: [
    {
      provide: KeycloakService,
      useValue: keycloakService
    }
  ],
  entryComponents: [AppComponent]
})
export class AppModule implements DoBootstrap {
  ngDoBootstrap(appRef: ApplicationRef) {
    keycloakService
      .init()
      .then(() => {
        console.log('[ngDoBootstrap] bootstrap app');

        appRef.bootstrap(AppComponent);
      })
      .catch(error => console.error('[ngDoBootstrap] init Keycloak failed', error));
  }
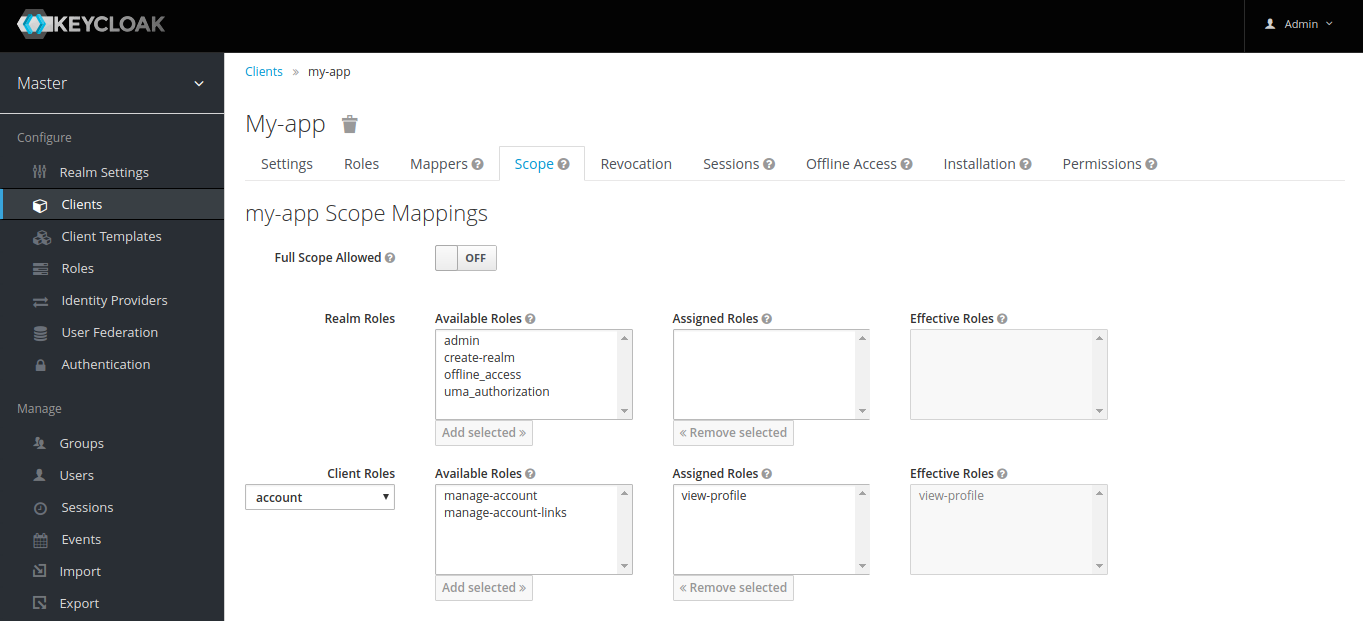
}Besides configuring the keycloak lib in your application it is also necessary to setup the access - scope for the account client.
In this documentation we assume that you already installed and configured your Keycloak instance, as well created the client app.
Hint: If you need to create an environment for testing purposes, try out the Keycloak demo or the official keycloak docker image.
When requesting the method to get the User's Profile, the client app should have the scope and access to the account view-profile role. To do it, access Clients ➡️ My-app ➡️ Scope. Select the account app in Client Roles and assign the view-profile role.
Please be aware that when accessing the https://keycloak/auth/realms/REALM/account endpoint, if this role is not configured, a misleading No 'Access-Control-Allow-Origin' error might show up. If that happens, this role should be enough to fix it, no changes in the Web Origin of the account client is needed.
A generic AuthGuard, KeycloakAuthGuard, was created to help you bootstrap your security configuration and avoid duplicate code. This class already checks if the user is logged in and get the list of roles from the authenticated user, provided by the keycloak instance. In your implementation you just need to implement the desired security logic.
Example:
import { Injectable } from '@angular/core';
import { CanActivate, ActivatedRouteSnapshot, RouterStateSnapshot, Router } from '@angular/router';
import { KeycloakAuthGuard, KeycloakService } from 'keycloak-angular';

@Injectable({
  providedIn: 'root'
})
export class CanAuthenticationGuard extends KeycloakAuthGuard implements CanActivate {
  constructor(protected router: Router, protected keycloakAngular: KeycloakService) {
    super(router, keycloakAngular);
  }

  isAccessAllowed(route: ActivatedRouteSnapshot, state: RouterStateSnapshot): Promise<boolean> {
    return new Promise((resolve, reject) => {
      if (!this.authenticated) {
        this.keycloakAngular.login()
          .catch(e => console.error(e));
        return reject(false);
      }

      const requiredRoles: string[] = route.data.roles;
      if (!requiredRoles || requiredRoles.length === 0) {
        return resolve(true);
      } else {
        if (!this.roles || this.roles.length === 0) {
          resolve(false);
        }
        resolve(requiredRoles.every(role => this.roles.indexOf(role) > -1));
      }
    });
  }
}By default all HttpClient requests will add the Authorization header in the format of: Authorization: Bearer TOKEN.
There is also the possibility to exclude a list of URLs that should not have the authorization header. The excluded list must be informed in the keycloak initialization. For example:
try {
  await keycloak.init({
    config: {
      url: 'http://localhost:8080/auth',
      realm: 'your-realm',
      clientId: 'client-id'
    },
    initOptions: {
      onLoad: 'login-required',
      checkLoginIframe: false
    },
    enableBearerInterceptor: true,
    bearerExcludedUrls: ['/assets', '/clients/public']
  });
  resolve();
} catch (error) {}Mauricio Gemelli Vigolo |
Frederik Prijck |
Jonathan Share |
jmparra |
Marcel Német |
Raphael Alex Silva Abreu |
|---|
If you want to contribute to the project, please check out the contributing document.
keycloak-angular is licensed under the MIT.
keycloak-js is licensed under the Apache 2.0.


