A Java program to listen to other accompaniment accompanied by the lyrics. In the guitar code of 4/4 time, the user collects the lyrics and the code for each word and completes one song.
(This project was my first object-orinted programming class in 2012. After I quitted my 3-years experience in Java programmer, I tried to take a lot of classes such as OOP, Data Structure, Algorithms and so on. Although this project has a bad GUI, I remember it was quite a good project for learning the OOP's default concept as well as some design patterns.)
Because this program is implemented in Java, you need a Java compiler based on JDK1.7 to compile. The program is distributed as an executable jar file that can be easily executed in a batch file format on Windows. Alternatively, you can run the command java -jar lyrics2music.jar in the console window.
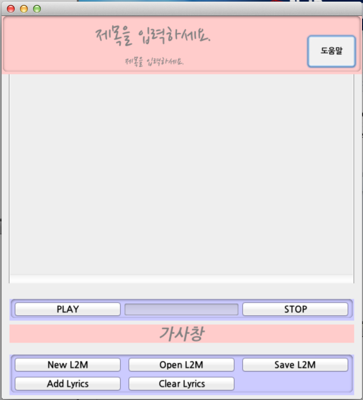

When you run the program, the main screen will appear as above. The main screen consists of four parts. [Title / Artist Info Window], [Playback Button], [Lyrics Window], [Save, Add Lyrics Button]. When you run the first program, press New L2M to enter the desired song information.


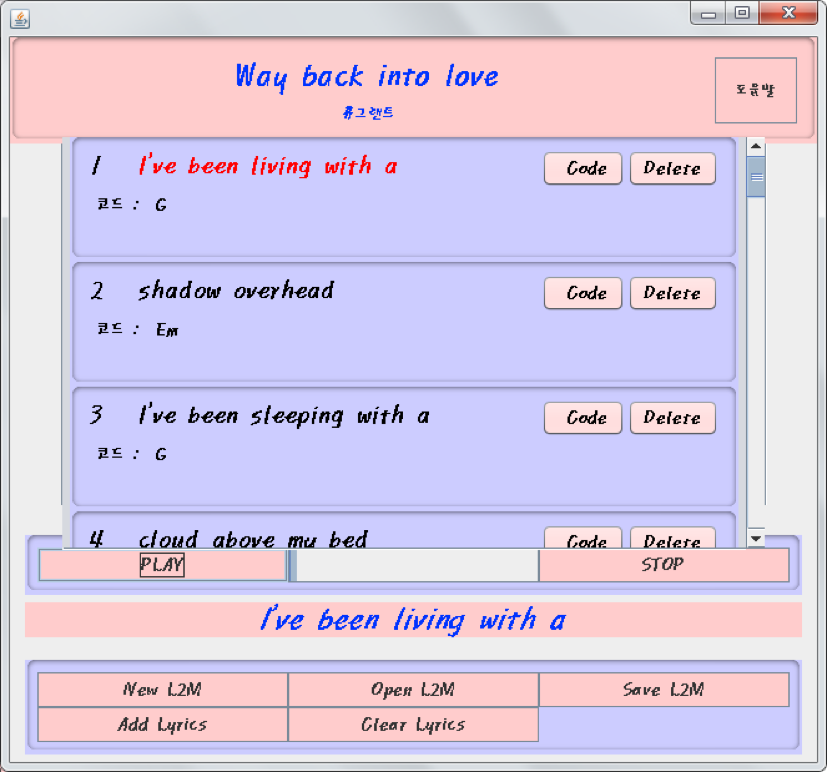
Then the title / artist window will display the above information. After the information is displayed, all we have to do is add the lyrics. To add the lyrics add the lyrics by pressing the add Lyrics button on the Save, Add Lyrics panel.


Then the lyrics are added as above. If you add multiple lyrics, you can select the code by pressing the Code button so that you can select the code you want.
First, inside the model package, within the CCode class are String codeName, String filename (mp3 file name), and int codeType (minor), and there are setters and getters accordingly.
public class CCode  implements Serializable{
    private static final long serialVersionUID = 1L;
    private String codeName;    // Code Name
    private String fileName;    // mp3 file name
    private int codeType;       //   1 : normal 2 : major code 3 : minor code

    public CCode() {
        codeName = "";
        fileName = "";
        codeType = -1;
    }

    public CCode(String codeName, String fileName){
        this.codeName = codeName;
        this.fileName = fileName;
    }
    public String getCodeName() {
        return codeName;
    }

    public void setCodeName(String codeName) {
        this.codeName = codeName;
    }

    public String getFileName() {
        return fileName;
    }

    public void setFileName(String fileName) {
        this.fileName = fileName;
    }

    public int getCodeType() {
        return codeType;
    }

    public void setCodeType(int codeType) {
        this.codeType = codeType;
    }


}
Within the CLyrics class are int num, lyse lyrics, CCode code, and there are setters and getters accordingly.
public class CLyrics implements Serializable {
   private static final long serialVersionUID = 2L;
   private int num;
   private String lyrics;
   private CCode code;

   public CLyrics() {

   }

   public int getNum() {
       return num;
   }

   public void setNum(int num) {
       this.num = num;
   }
   public CLyrics(int num, String lyrics, CCode code){
       this.lyrics = lyrics;
       this.code = code;
       this.num = num;
   }

   public String getLyrics() {
       return lyrics;
   }

   public void setLyrics(String lyrics) {
       this.lyrics = lyrics;
   }

   public CCode getCode() {
       return code;
   }

   public void setCode(CCode code) {
       this.code = code;
   }
}
The CMusic class imports an ArrayList, with String title, String artist, ArrayList arrLyrics (containing CLyrics array-lyric), and also a setter and getter.
public class CMusic implements Serializable {
   private static final long serialVersionUID = 3L;
    private String title; //  제목
    private String artist; // 아티스트

    public CMusic() {
        title = "";
        artist = "";
    }

    public void setMusicInfo(String title, String artist) {
        this.title = title;
        this.artist = artist;
    }

   public String getTitle() {
       return title;
   }

   public void setTitle(String title) {
       this.title = title;
   }

   public String getArtist() {
       return artist;
   }

   public void setArtist(String artist) {
       this.artist = artist;
   }

}
The view package implements various swing-based UIs such as AddBitWindow, AddCodeWindow, AddLyricsWindow, and receives input values such as title, singer, lyrics, and code.
The MusicController class calls the L2MWindow of the View Package to show the start screen to the user and implement various UI and input functions.
// View
   private HelpWindow helpWindow = new HelpWindow(this);
   private AddBitWindow addBitWindow = new AddBitWindow(this);
   private AddLyricsWindow addLyricsWindow = new AddLyricsWindow(this);
   private AddCodeWindow addCodeWindow = new AddCodeWindow(this);
   private AddMusicWindow addMusicWindow = new AddMusicWindow(this);
   private L2MWindow l2mWindow = new L2MWindow(this);

   // Manager
   private MusicManager musicManager = new MusicManager();
   private ArrayList<LyricsPanel> arrLyricsPane = new ArrayList<LyricsPanel>(); // 가사정보 패널

   //
   int cIndex = -1;
   int nowKey = 0;
   boolean isPlay = false;

   // Engines
   private ArrayList<MP3Engine> arrMp3 = new ArrayList<MP3Engine>(); // MP3
   public HelpWindow getHelpWindow();
   public void setHelpWindow(HelpWindow helpWindow);
   public AddBitWindow getAddBitWindow();
   public void setAddBitWindow(AddBitWindow addBitWindow);
   public AddLyricsWindow getAddLyricsWindow();
   public void setAddLyricsWindow(AddLyricsWindow addLyricsWindow);
   public AddCodeWindow getAddCodeWindow();
   public void setAddCodeWindow(AddCodeWindow addCodeWindow);
   public AddMusicWindow getAddMusicWindow();
   public void setAddMusicWindow(AddMusicWindow addMusicWindow);
   public MusicManager getMusicManager();
   public void setMusicManager(MusicManager musicManager);
   public L2MWindow getL2mWindow();
   public void setL2mWindow(L2MWindow l2mWindow);
   public void addNewMusic(String title, String artist);
   public void addLyricsWindow();
   public void addLyricsPanel(LyricsPanel lyricsPanel, String lyrics);
   public void addLyricsPanel(LyricsPanel lyricsPanel,CLyrics lyrics);
   public void setCode1(int index);
   public void setCode2(String codeName);
   public ArrayList<LyricsPanel> getArrLyricsPane();
   public void setArrLyricsPane(ArrayList<LyricsPanel> arrLyricsPane);
   public void play();
   public boolean isIsPlay();
   public void setIsPlay(boolean isPlay);
   public int getcIndex();
   public void setcIndex(int cIndex);
   public ArrayList<MP3Engine> getArrMp3();
   public void setArrMp3(ArrayList<MP3Engine> arrMp3);
   public void stop();
   public void Save();
   public void Load();
   public void deleteLyrics(LyricsPanel tlyricsPanel);
   public void updateLyricsNum();
   public void changeLyrics(LyricsPanel tlyricsPanel);
   public void clearAll();
   public void loadMusic();
public void changeNowLyrics(int key);We used a Subversion for efficient team work. This allows us to create and modify each part to commit, and other vendors to update according to the version. So we were able to finish the project more efficiently.

(Figure: Update for SVN)
The overall structure will be explained later in the diagram, but in the main run, we created a controller to connect the view package to the model package and apply the input values. UI used net beans. net Beans is a program that allows you to implement swing.JFrame more efficiently. It was not familiar with Net Beans for the first time, but it was easier to use than expected and I was able to adapt quickly.

(Figure: Class diagram)

(Figure: use-case Diagram)

(Figure: Program Main Screen)

(Figure: Title Insertion Screen)

(Figure: Lyrics Insertion Screen)


(Figure: Code Insertion Screen)
(Figure: Playing the song)

(Figure: Data and action flow diagram of the overall program)
The overall structure of our program uses MVC (Model-View-Controller). What we focused on was the OOP concept, which facilitated scalability and minimized the use of objects. Most of all, we think that the most problematic thing when writing a Java program is an abuse of an object. In fact, we tried to approach the interface and abstraction at first, but we understand that the whole data type, that is, the CCode or CLyrics part we created, It is difficult to attach an OOP element. In the case of the first program, there is a separate controller for the code and a class for processing all the logic. There were six logic classes.

(Figure: Concrete diagram of the model used in the program)
Also, because we did not manage the objects separately, we tried to create the objects themselves in all view or logic processing classes and tried to pass these data through the copy constructor, etc., but the source was twisted. In fixing the old source, we went back to the beginnings and thought about the essential nature of OOP. Polymorphism, inheritance, ADT. There were not many usable parts here. However, we decided not to be a "key" element in OOP, but to consider why OOP should be used in practice and how to use it in real life.
Based on these considerations, we have come to learn about design patterns that are somewhat out of our subject, but which have expanded the concept of OOP, that is, patterns of OOP. Here we learned about the Singleton pattern and thought that the Singleton pattern would solve our problem. Based on this centralized pattern, various program models can be applied to our program. Among them, we decided to think about the abandoned MVC pattern and try to use it in our first team project, student management program.
Before applying the MVC pattern, we designed one more time for the general data we wanted to use. We tried to use the codes that are commonly used in our program at the top level of the interface and inherit the code such as G, C, A, etc. as code, but in fact, this caused waste of resources. So we focused on the "lyrics" that the user typed, designed a loop structure called Music > Lyrics > Code, and designed an abstract data object called MusicManager as shown below.
In fact, abstract entities are more extensible, for example using abstract classes or interfaces, but we have not used them. The reason is that we did not have many classes that we used and designed.
Instead, we focused on the MVC model according to the Singleton pattern. The only thing you need to do is to create a single controller and leave the "type" of the controller for each View, and the actual controller that these types have becomes the controller you created in the first Main. We wanted to take the relationship between the controller and the view into a completely independent or has-a structure, but we could not ignore the interaction between the view and the controller. So we designed the controller in a centralized form.
But here we tried to pull the controller into the interface, but it failed. We did not know how to use it, but most of all, we focused on raising the completeness of the program, rather than extending it through the interface, as a result of deeply considering whether we need to consider reusability with only one controller.
When you build an Java application project that has a main class, the IDE automatically copies all of the JAR files on the projects classpath to your projects dist/lib folder. The IDE also adds each of the JAR files to the Class-Path element in the application JAR files manifest file (MANIFEST.MF).
To run the project from the command line, go to the dist folder and type the following:
java -jar "Lyrics2Music.jar"
To distribute this project, zip up the dist folder (including the lib folder) and distribute the ZIP file.
Notes:
- If two JAR files on the project classpath have the same name, only the first JAR file is copied to the lib folder.
- Only JAR files are copied to the lib folder. If the classpath contains other types of files or folders, these files (folders) are not copied.
- If a library on the projects classpath also has a Class-Path element specified in the manifest,the content of the Class-Path element has to be on the projects runtime path.
- To set a main class in a standard Java project, right-click the project node in the Projects window and choose Properties. Then click Run and enter the class name in the Main Class field. Alternatively, you can manually type the class name in the manifest Main-Class element.