GPU(A100, RTX-A6000)에서 M:N weight pruning 후 tensorRT에서 latency 측정 비교입니다.
- 환경 세팅
- 훈련 및 pruning & fine tuning
- onnx 변환
- tensorRT 변환
으로 진행하였으며, 제대로 진행되었는지 확인하기 위해
pth 파일의 pruning ratio 및 accuracy 확인과
trt엔진 파일의 accuracy 확인 및 latency를 측정 비교를 진행하였습니다.
To get started with weight_pruning_A100-A6000, follow these steps.
$ docker pull whdlsghks/a100_a6000:1.0
#$ docker run -it --gpus all -p 9030:22 --name test10 --ipc host -v /home/keti/:/home/keti/ whdlsghks/a100_a6000:1.0 /bin/bash
$ git clone https://github.com/InhwanCho/Weight-pruning_A100-A6000.git
$ cd main/
# if you use ssh, connect fisrt
#$ service ssh start

# or
$ docker pull nvcr.io/nvidia/tensorrt:23.03-py3
#$ docker run ...
$ git clone https://github.com/InhwanCho/Weight-pruning_A100-A6000.git
$ pip install -r requirements.txt
$ cd main/

# to verify the environment is on set it, just execute below codes(but takes ~2 hours in case of ImageNet)
# before to do, set the path of dataset
$ pwd#currunt directory : ...///main
$ sed -i -e 's/\r$//' auto_python.sh
$ sh auto_python.sh
# please change the folder&file_name first
# origin code : [https://github.com/pytorch/examples/tree/main/imagenet]

$ python Cifar100_train_main.py

# ImageNet / ResNet(50/101/152...)
$ python resnet_training_main.py --MNmode --ONNX=$$$$$.onnx --pretrained=true --arch resnet50
$ python resnet_training_main.py --MNmode --ONNX=$$$$$.onnx --pretrained=true --arch resnet101
$ python resnet_training_main.py --MNmode --ONNX=$$$$$.onnx --pretrained=true --arch resnet152

#CIFAR100 / ResNet56(only)
$ python CIFAR100_training_main.py
# build engine
# if you are using CIFAR100 put '--CIFAR100' option
$ python onnx2trt.py --trtFile=$$$$$.trt --onnxFile=$$$$$.onnx --max_batch=256 --Sparsity

# checking the accuracy
$ python trt_accuracy.py --trtFile=$$$$$.trt

# measure the latency
$ python trt_inference.py --trtFile=$$$$$.trt --batch_size=1 --Sparsity
# you must set pthFile path
$ python MN_check.py --pthFile=./tem_folder/model_best.pth
# set the sh file(sample)
$ sed -i -e 's/\r$//' auto_python.sh
$ vim auto_python.sh
    python onnx2trt.py [--trtFile trtfile] [--onnxFile onnxfile]
             [--pthFile pthfile] [--batch_size batchsize_for_inference]
             [--opt_batch optimal_batchsize_for_set_trtengine_shaep]
             [--maxbatch max_batchsize_for_set_trtengine_shaep]
             [--Sparsity] # Sparsity Enable option default=True
             [--NotUseFP16Mode] # Convert TF32 to FP16
             [--CIFAR100] # dataset=CIFAR100/ default = IMAGENET
- caution
when you measure inference time, you are not supposed to use sh file and you should execute
trt_inference.pyfile with some break time
when you have CUDA version matching error, please import torch after import tensorrt(build/ load engine first)
### show the FP16 result tables ###
A100 table


RTX-A6000 table


### FP16 Summary ###
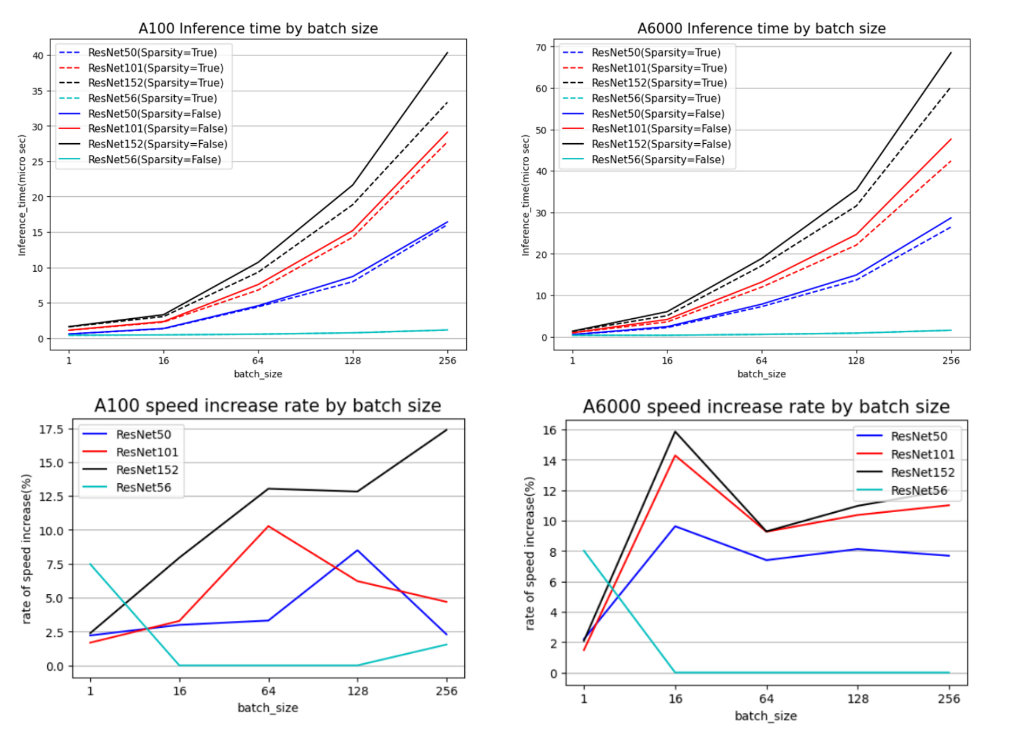
- GPU(A100, A6000)별, batch_size에 따른 trt engine의 추론 속도 차이[위]/변화율[아래]
- 각 실험 당 optimal_batch를 지정하여 engine을 만들어서 실험을 진행
(각 실험 당 1개의 trt_file 생성) - ResNet56은 CIFAR-100 dataset을 사용.
- 추론 속도가 batch=256 이여도 빠르기 때문인지, 추론 속도가 batch=1에서만 약 8% 증가
- ResNet50, 101, 152는 ImageNet을 사용하였고,
- Set Sparsity weight = True 하였을 때 전반적으로 속도가 감소.
[위의 2개의 그래프 A100, 6000 / inference time by batch size] - ResNet50, 101, 152는 batch=1에서는 증가율이 적으나,
- batch=16 이상의 경우 일반적으로 높은 증가율을 보임
[아래 2개의 그래프 A100, 6000 / speed increase rate]

### TF32 Summary ###
ResNet152(ImageNet)에서만 실험(FP16에서 시간 차이가 가장 컸기때문에)
TF32모드에서는 A100에서는 inference time의 증가가 거의 없고,
RTX-A6000에서는 batch_size=1일때만 약 8% 증가
tf32 table

### Refences ###
M:N sparsity Technical blog, NVIDIA 공식 문서 1,공식 문서 2
IExecutionContext — NVIDIA TensorRT Standard Python API Documentation 8.6.0 documentation
- 코드 참고용 tnsorRT, 최신 버전 TensorRT 예제, MN spartsity(pruning)
NVIDIA/trt-samples-for-hackathon-cn
- NM-sparsity/ trt엔진 상세 분석/ 논문리뷰