


AWARE is an OS and Android framework dedicated to instrument, infer, log and share mobile context information, for application developers, researchers and smartphone users. AWARE captures hardware-, software-, and human-based data (ESM). They transform data into information you can understand.
- Accelerometer
- Gyroscope
- Magnetometer
- Gravity
- Rotation
- Motion Activity
- Pedometer
- Location
- Barometer
- Battery
- Network
- Call
- Bluetooth
- Processor
- Proximity
- Timezone
- Wifi
- Screen Events
- Microphone (Ambient Noise)
- Heartrate (BLE)
- Calendar
- Contact
- Fitbit
- Google Login
- Memory
- NTPTime
- OpenWeatherMap
To run the example project, clone the repo, and run pod install from the Example directory first.
Just the following code, your application can collect sensor data in the background. The data is saved in a local-storage.
/// Example1 (Objective-C): Accelerometer ///
Accelerometer * accelerometer = [[Accelerometer alloc] init];
[accelerometer setSensorEventHandler:^(AWARESensor *sensor, NSDictionary *data) {
    NSLog(@"%@",data.debugDescription);
}];
[accelerometer startSensor];
/// Example1 (Swift): Accelerometer ///
let accelerometer = Accelerometer()
accelerometer.setSensorEventHandler { (sensor, data) in
print(data)
}
accelerometer.startSensor()AWARECore, AWAREStudy, and AWARESensorManager are singleton instances for managing sensing/synchronization schedule in the library. You can access the instances via AWAREDelegate. The AWAREDelegate is described in the Installation section.
AWARECore  * core  = [AWARECore sharedCore];
AWAREStudy * study = [AWAREStudy sharedStudy];
AWARESensorManager * manager = [AWARESensorManager sharedSensorManager];
let core = AWARECore.shared()
let study = AWAREStudy.shared()
let manager = AWARESensorManager.shared()AWAREFramework-iOS allows us to synchronize your application and AWARE server by adding a server URL to AWAREStudy. About AWARE server, please check our website.
/// Example2 (Objective-C): Accelerometer + AWARE Server ///
[study setStudyURL:@"https://api.awareframework.com/index.php/webservice/index/STUDY_ID/PASS"];
Accelerometer * accelerometer = [[Accelerometer alloc] initWithStudy:study];
[accelerometer startSensor];

[accelerometer startSyncDB];
// or
[manager addSensor:accelerometer];
/// Example2 (Swift): Accelerometer + AWARE Server ///
study?.setStudyURL("https://api.awareframework.com/index.php/webservice/index/STUDY_ID/PASS")
let accelerometer = Accelerometer(awareStudy: study)
accelerometer.startSensor()
accelerometer.startSyncDB()
// or
manager?.add(accelerometer)Moreover, this library allows us to apply the settings on AWARE Dashboard by using -joinStuyWithURL:completion method.
/// Example3 (Objective-C): AWARE Dashboard ////
NSString * url = @"https://api.awareframework.com/index.php/webservice/index/STUDY_ID/PASS";
[study joinStudyWithURL:url completion:^(NSArray *settings, AwareStudyState state, NSError * _Nullable error) {
    [manager addSensorsWithStudy:study];
    [manager startAllSensors];
}];
/// Example3 (Swift): AWARE Dashboard ////
let url = "https://api.awareframework.com/index.php/webservice/index/STUDY_ID/PASS"
study?.join(withURL: url, completion: { (settings, studyState, error) in
    manager?.addSensors(with: study)
    manager?.startAllSensors()
})AWAREFramework is available through CocoaPods. To install it, simply add the following line to your Podfile:
pod 'AWAREFramework', :git=>'https://github.com/tetujin/AWAREFramework-iOS.git'First, add permissions on Xcode for the background sensing (NOTE: the following permissions are minimum requirements)
-
Info.plist
- Privacy - Location Always and When In Use Usage Description
- Privacy - Location Always Usage Description

-
Capabilities/Background Modes
- Location updates
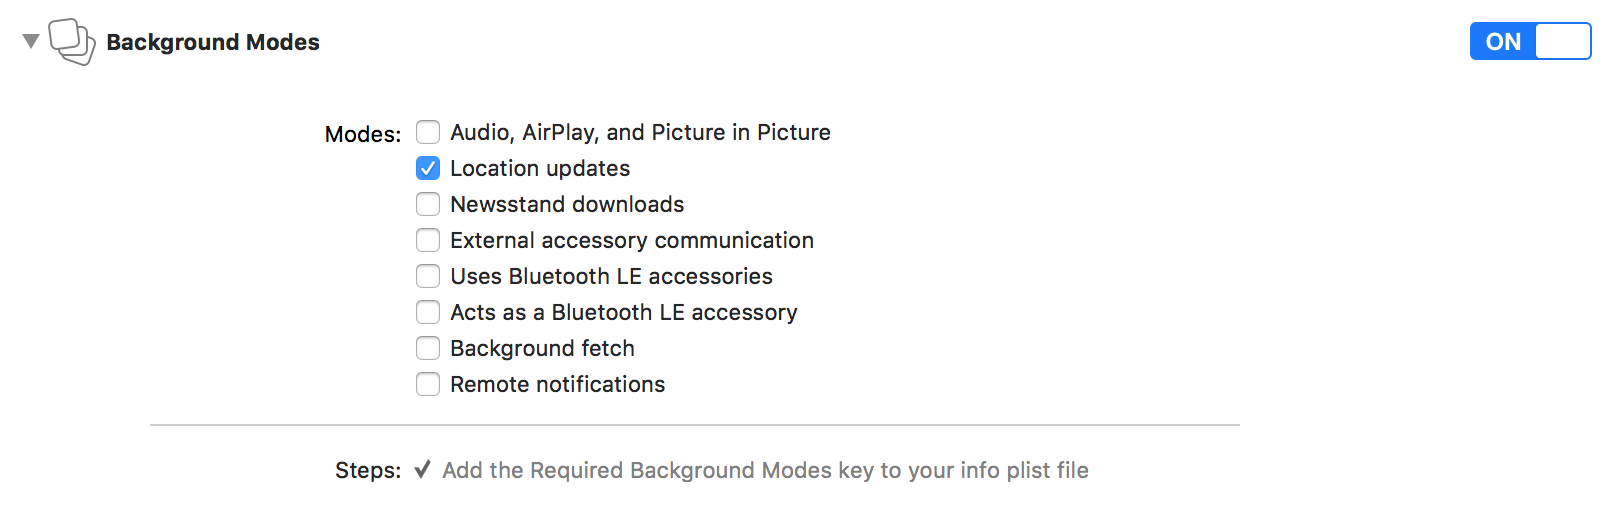
- Location updates


Second, inherit AWAREDelegate at AppDelegate (or equivalent method) as follows.
Objective-C
/// AppDelegate.h ///
@import UIKit;
@import AWAREFramework;

@interface AppDelegate: AWAREDelegate <UIApplicationDelegate>

@end/// AppDelegate.m ///
#import "AppDelegate.h"
@implementation AppDelegate
- (BOOL)application:(UIApplication *)application didFinishLaunchingWithOptions:(NSDictionary *)launchOptions {
[super application:application didFinishLaunchingWithOptions:launchOptions];
AWARECore * core = [AWARECore sharedCore];
[core activate];
return YES;
}
// ... Please call super classes (AWAREDelegate) methods when the application uses other methods on AppDelegate.
@endSwift
import UIKit
import AWAREFramework

@UIApplicationMain
class AppDelegate: AWAREDelegate {

    override func application(_ application: UIApplication, didFinishLaunchingWithOptions launchOptions: [UIApplicationLaunchOptionsKey: Any]?) -> Bool {
        super.application(application, didFinishLaunchingWithOptions: launchOptions)
        let core = AWARECore.shared()
        core.activate()
        return true
    }

    // ... Please call super classes (AWAREDelegate) methods when the application uses other methods on AppDelegate.
}
Finally, call permission requests for the location sensor when the app is opened in first time. (e.g., -viewDidLoad on UIViewController)
Objective-C
AWARECore * core = [AWARECore sharedCore];
[core requestPermissionForBackgroundSensing]; // for background sensing
[core requestPermissionForPushNotification]; // for notifications
Swift
let core = AWARECore.shared()
core.requestPermissionForBackgroundSensing()
core.requestPermissionForPushNotification()This library supports ESM. The method allows us to make questions in your app at certain times. The following code shows to a radio type question at 9:00, 12:00, 18:00, and 21:00 every day as an example. Please access our website for learning more information about the ESM.
/// Objective-C: Initialize an ESMSchedule ///
ESMSchedule * schedule = [[ESMSchedule alloc] init];
schedule.notificationTitle = @"notification title";
schedule.notificationBody = @"notification body";
schedule.scheduleId = @"schedule_id";
schedule.expirationThreshold = @60;
schedule.startDate = [NSDate now];
schedule.endDate = [[NSDate alloc] initWithTimeIntervalSinceNow:60*60*24*10];
schedule.fireHours = @[@9,@12,@18,@21];

/// Make an ESMItem ///
ESMItem * radio = [[ESMItem alloc] initAsRadioESMWithTrigger:@"1_radio"
radioItems:@[@"A",@"B",@"C",@"D",@"E"]];
[radio setTitle:@"ESM title"];
[radio setInstructions:@"some instructions"];

/// Add the ESMItem to ESMSchedule ///
[schedule addESMs:@[radio]];

/// Add the ESMSchedule to ESMScheduleManager ///
ESMScheduleManager * esmManager = [ESMScheduleManager sharedESMScheduleManager];
[esmManager addSchedule:schedule];
/// Swift ///
let schdule = ESMSchedule.init()
schdule.notificationTitle = "notification title"
schdule.notificationBody = "notification body"
schdule.scheduleId = "schedule_id"
schdule.expirationThreshold = 60
schdule.startDate = Date.init()
schdule.endDate = Date.init(timeIntervalSinceNow: 60*60*24*10)
schdule.fireHours = [9,12,18,21]
let radio = ESMItem.init(asRadioESMWithTrigger: "1_radio", radioItems: ["A","B","C","D","E"])
radio?.setTitle("ESM title")
radio?.setInstructions("some instructions")
schdule.addESM(radio)
let esmManager = ESMScheduleManager.shared()
// esmManager.removeAllNotifications()
// esmManager.removeAllESMHitoryFromDB()
// esmManager.removeAllSchedulesFromDB()
esmManager.add(schdule)Please call the following chunk of code for appearing ESMScrollViewController (e.g., at -viewDidAppear: ).
/// Objective-C: check valid ESMs and show ESMScrollViewController ///
ESMScheduleManager * esmManager = [ESMScheduleManager sharedESMScheduleManager];
NSArray * schdules = [esmManager getValidSchedules];
if (schdules.count > 0) {
    /** initialize ESMScrollView */
    ESMScrollViewController * esmView  = [[ESMScrollViewController alloc] init];
    /** move to ESMScrollView */
    [self presentViewController:esmView animated:YES completion:nil];
    /** or, following code if your project using Navigation Controller */
    // [self.navigationController pushViewController:esmView animated:YES];
}
/// Swift ///
let esmManager = ESMScheduleManager.shared()
let schedules = esmManager.getValidSchedules()
if let unwrappedSchedules = schedules {
if(unwrappedSchedules.count > 0){
let esmViewController = ESMScrollViewController.init()
self.present(esmViewController, animated: true) {
}
}
}This library supports 16 typs of ESMs. You can see the screenshots from the link
- Text
- Radio
- Checkbox
- Likert Scale
- Quick Answer
- Scale
- DateTime
- PAM
- Numeric
- Web
- Date
- Time
- Clock
- Picture
- Audio
- Video
tetujin, tetujin@ht.sfc.keio.ac.jp
AWAREFramework is available under the Apache2 license. See the LICENSE file for more info.