Sign up to Heroku.
Then install the Heroku Toolbelt. It is a command line tool to manage your Heroku apps
After installing the Heroku Toolbelt, open a terminal and login to your account:
$ heroku login
Enter your Heroku details.
Email:herokuregistration@herokudeployment.com <Enter Your Own Email>
Password <Heroku password>
Authentication successful.In this tutorial I will deploy an existing project, Django Blog
- Have asics of django concept ie apps, settings, urls, basics of databases eg
- Have django application that you want to deploy to heroku
- Be familiar with working with virtual environments
- Your deployment db is postgres
- django 1.11
- django 2.2.5
We need to add the following to our project.
- Add a
Procfilein the project root; - Add
requirements.txtfile with all the requirements in the project root; - Add
Gunicorntorequirements.txt; - A
runtime.txtto specify the correct Python version in the project root; - Configure
whitenoiseto serve static files.
Heroku apps include a Procfile that specifies the commands that are executed by the app’s dynos.
For more information read on the heroku documentation.
Create a file named Procfile in the project root then add:
web: gunicorn your_project_name.wsgi
This file contains the python version you are using for heroku to use, create runtime.txt in your project root and add your python version.
python-3.6.8 <Replace with your current python version.>
List of Heroku Python Runtimes.
Lets first configure static related parameter in settings.py
BASE_DIR = os.path.dirname(os.path.dirname(os.path.abspath(__file__)))

# Static files (CSS, JavaScript, Images)
# https://docs.djangoproject.com/en/1.9/howto/static-files/
STATIC_ROOT = os.path.join(BASE_DIR, 'staticfiles')
STATIC_URL = '/static/'

# Extra places for collectstatic to find static files.
STATICFILES_DIRS = (
    os.path.join(BASE_DIR, 'static'),
)
Turns out django does not support serving static files in production. However, WhiteNoise project can integrate into your Django application, and was designed with exactly this purpose in mind.
Lets first install Whitenoise pip install whitenoise
NOTE Adding whitenoise to wsgi.py has been deprecated
Next, install WhiteNoise into your Django application. This is done in settings.py’s middleware section (at the top):
MIDDLEWARE_CLASSES = (
    # Simplified static file serving.
    # https://warehouse.python.org/project/whitenoise/
    'whitenoise.middleware.WhiteNoiseMiddleware',
    ...
Add the following setting to settings.py in the static files section to enable gzip functionality.
# Simplified static file serving.
# https://warehouse.python.org/project/whitenoise/

STATICFILES_STORAGE = 'whitenoise.storage.CompressedManifestStaticFilesStorage'Python Decouple is a must have app if you are developing with Django. It’s important to keep your application credentials like API Keys, Amazon S3, email parameters, database parameters safe, specially if it’s an open source repository. Also no more development_settings.py and production_settings.py, use just one settings.py for your whole project.
Install it via pip install python-decouple
dj-database-url is a simple Django utility allows you to utilize the 12factor inspired DATABASE_URL environment variable to configure your Django application.
Install it via pip install dj-database-url
If your under a virtual environment run the command below to generate the requirements.txt file which heroku will use to install python package dependencies
pip freeze > requirements.txt
Make sure you have the following packages if not install the using pip then run the command above again
dj-database-url==0.5.0
Django==1.11.5
gunicorn==19.9.0
Pillow==6.2.0
pkg-resources==0.0.0 **A MUST Remove if present**
psycopg2==2.8.3
python-decouple==3.1
pytz==2019.2
whitenoise==4.1.4
If you are following along with this process you should use the provided requirements.txt as you need to install more python packages, for any app just make sure you have the above packages as a plus.
Firts create a .env file and add it to .gitignore so you don’t commit any sensitive data to your remote repository.
Then add the database url to your .env file in the following format postgres://<username>:<password>@<address>:<port>/<database_name>, see example below
DATABASE_URL='postgres://charles:1234@localhost:5432/articles'- Then replace your database settings in
settings.pywith
#just an example, dont share your .env settings
DATABASE_URL='postgres://charles:1234@localhost:5432/articles'
SECRET_KEY='342s(s(!hsjd998sde8$=o4$3m!(o+kce2^97kp6#ujhi'
DEBUG=True
ALLOWED_HOSTS='.localhost', '.herokuapp.com', '.127.0.0.1'
We then edit settings.py to enable decouple to use the .env configurations.
import os
import dj_database_url
from decouple import config,Csv

SECRET_KEY = config('SECRET_KEY')


DEBUG = config('DEBUG', default=False, cast=bool)
   DATABASES = {
       'default': dj_database_url.config(
           default=config('DATABASE_URL')
       )
   }

db_from_env = dj_database_url.config(conn_max_age=500)
DATABASES['default'].update(db_from_env)

ALLOWED_HOSTS = config('ALLOWED_HOSTS', cast=Csv())First make sure you are in the root directory of the repository you want to deploy
Next create the heroku app
heroku create aerblogCreate a postgres addon to your heroku app
heroku addons:create heroku-postgresql:hobby-devNext we log in to Heroku dashboard to access our app and configure it
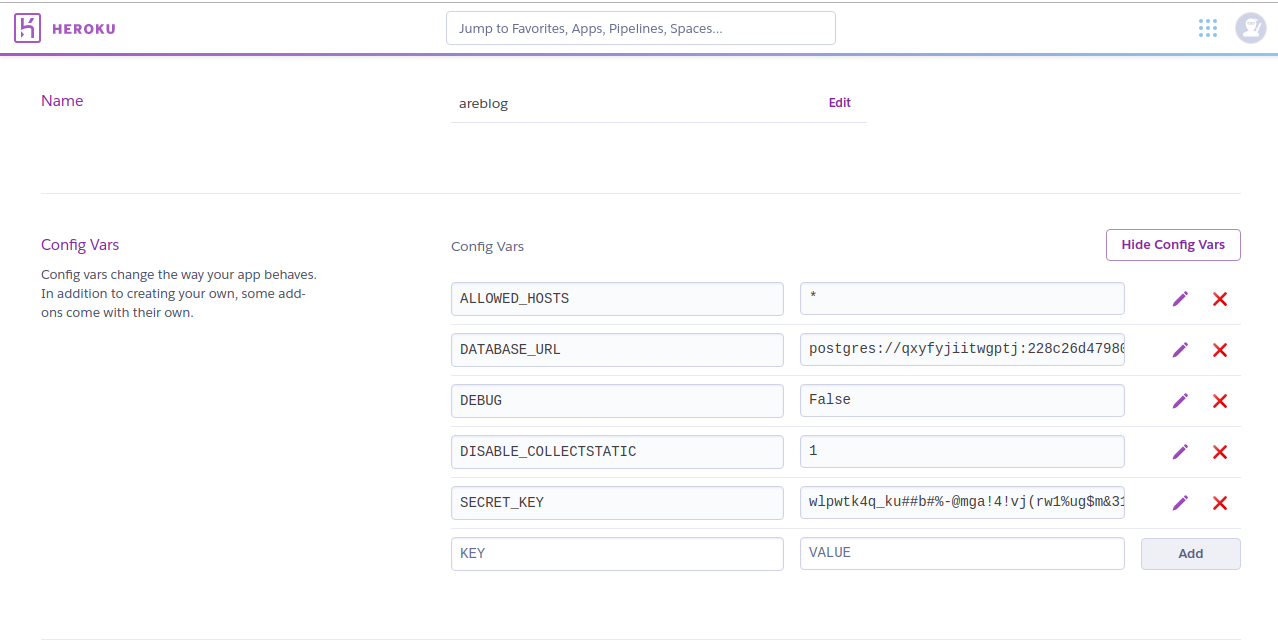
Click on the Settings menu and then on the button Reveal Config Vars:
Next add all the environment vaiables, by default you should have DATABASE_URI configuration created after installing postgres to heroku.
On terminal
heroku config:set <Enter an item from your .env file>
heroku config:set ALLOWED_HOSTS='*'
SECRET_KEY=wlpwtk4q_ku##b#%-@mga!4!vj(rw1%ug$m&312a69oi=klr0#
heroku config:set DEBUG=False
Remember to first set DEBUG to false and confirm that you have added all the confuguration variables needed.
confirm that your application is running as expected before pushing, runtime errors will cause deployment to fail so make sure you have no bugs, you have all the following Procfile, requirements.txt with all required packages and runtime.txt .
On terminal
python manage.py runserver
    or
gunicorn <projectname>..wsgi git push heroku masterIf you did everything correctly then the deployment should be done after a while with an output like this
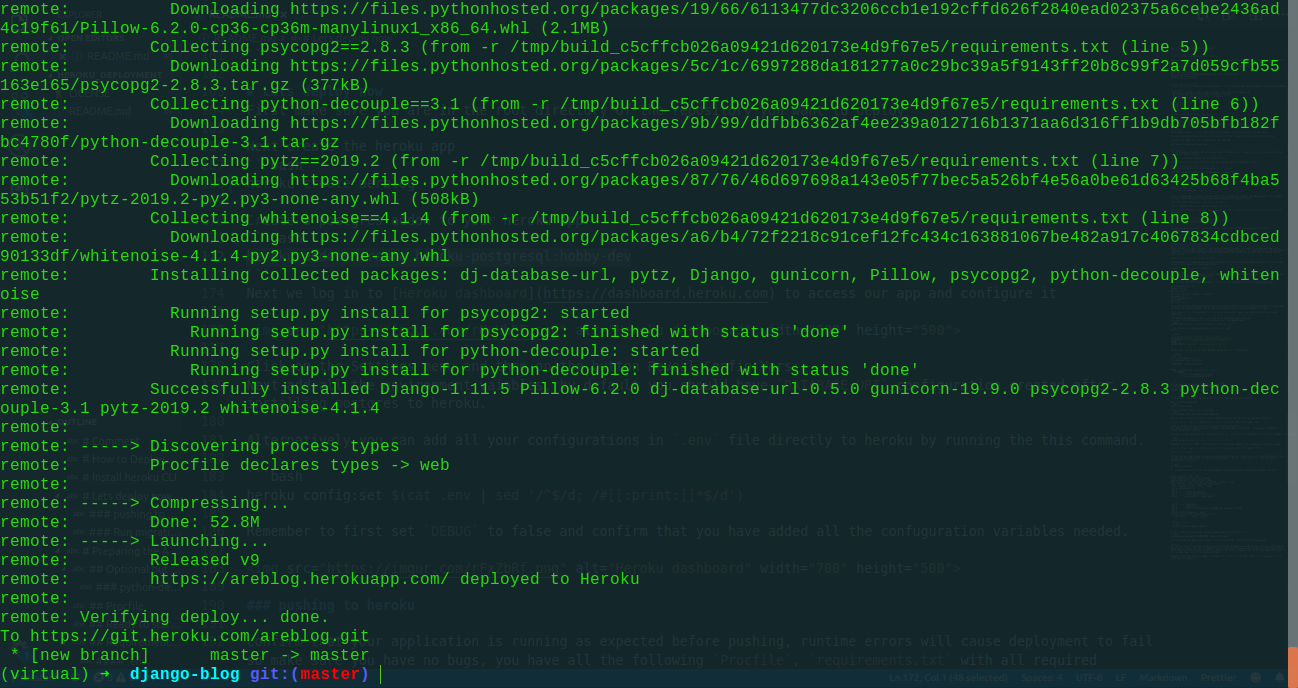
remote:          Running setup.py install for psycopg2: started
remote:            Running setup.py install for psycopg2: finished with status 'done'
remote:          Running setup.py install for python-decouple: started
remote:            Running setup.py install for python-decouple: finished with status 'done'
remote:        Successfully installed Django-1.11.5 Pillow-6.2.0 dj-database-url-0.5.0 gunicorn-19.9.0 psycopg2-2.8.3 python-decouple-3.1 pytz-2019.2 whitenoise-4.1.4
remote:
remote: -----> Discovering process types
remote:        Procfile declares types -> web
remote:
remote: -----> Compressing...
remote:        Done: 52.8M
remote: -----> Launching...
remote:        Released v9
remote:        https://areblog.herokuapp.com/ deployed to Heroku
remote:
remote: Verifying deploy... done.
To https://git.heroku.com/areblog.git
 * [new branch]      master -> master
heroku run python manage.py migrateIf you instead wish to push your postgres database data to heroku then run
heroku pg:push <db_name> DATABASE_URL --app <heroku_app_name>
eg heroku pg:push <db_name> DATABASE_URL --app <heroku_app_name>
You can the open the app in your browser blog
This process is easy to follow but requres you to be keen while dealing with the process.
email me at mikeycharlesm7@gmail.com