Control a Roomba over the Web!
Currently running over on potato.irish
The premise is simple: By the end, here, you'll have moved a little robot in my room. So, bear with me: There is a Queue to control the Roomba -- your spot in line is indicated by the text in the Top-Right Corner:
You're Up!-- You're Up. Your keyboard/screen's connected to the Roomba, giving you the reins for a solid 30 secondsPosition: 2-- You're at bat. You've got access to the live feed, but not to Control.Position: 3-- Ditto.Position: 4-- Here, to save some resources, you can't access the live feed. Instead, you're linked up to another person In Line for a game of Pong. Instructions below.Position: etc-- You've reached the bottom.
You're in one of two boats: Desktop, or Mobile. For both, you'll need to get accustomed to the light latency. About ~300-500ms worth. Still...
Use the keyboard. Here:
- W: Gas, Gas, Gas -- Moves you forward
- S: Reverse Gas, Reverse Gas, You Get the Gist -- Reverse
- A: Rotate left
- D: Rotate Right
- X: Failsafe. When I screw up, hit this button: you'll know that I've screwed up if you start spinning for no reason... or something.
You'll have a Joystick on your right. It should also be fairly straightforward, but be fair-warned that it's not quite like driving a car: Move the Joystick Forward/Backward to move Forward/Backward, and move it Left/Right to move Left/Right. Not to 'turn the wheels' Left/Right. There are only two wheels, dammit.
To my dear left-handed friend Lucien, I dedicate a... I'm sorry, Lucien.
First, you'll need your prerequisites:
- General
- Node.js, NPM, and Git need to be installed locally
- A distinct lack of fear of a Command Line
- Roomba-Wise
- Roomba (500 Series or Above)
- Raspberry Pi (Current Implentation is running Raspbian on a Pi Model 2B)
- Something to Power your Pi (e.g. Battery, Extension Cord + Power Brick, Bluetooth Speaker...)
- A Pi Camera Module
- Some Basic Electronics and Electronics Basics
- A few Male-Male jumper wires
- A Breadboard
- A 10k Resistor and a 22k Resistor
- A similar lack of fear of Screwing Up
If you'd like to deploy it to a Server/VPS, you'll have a little more to do. I've written up a Fairly-Brief guide on the full Potato.Irish Server Repository; that ought to get you started.
"Two roads diverged in a yellow wood." ~ The Road Not Taken, by Robert Frost
You can implement with HTTP or HTTPS, but you'll need SSL Certificates for the latter. The methods for implementation are slightly different.
You will need SSL Certificates for an HTTPS app. I used Certbot
I built the Roamer as an HTTP app, originally; however, I migrated it to HTTPS/SPDY for better load times and better SEO. At the same time, implementing HTTP is quite a bit simpler than HTTPS. But there is still a difference.
That's why I've explicitly named the files http-(component).(js/html) — so that it's easier to see the difference, and to better know how to migrate multiple 'plain/insecure' WebSocket instances to 'WebSocketSecure' instances on HTTPS. That's the reasoning behind the WSSRouter, after all.
Clone into the Repository from the location of your choice.
$ git clone https://github.com/Itimoto/Roomba-Roamer
Install the Dependencies. Start with the Main Project...
$ cd Roomba-Roamer
$ npm install
...Then the H264 Player.
$ cd vendor
$ npm install
For HTTPS:
Move your SSL Certs into the SSL Folder. If you used Let's Encrypt with Certbot and are running a Unix-based OS, you can just run:
$ cd ssl
$ sudo cp /etc/letsencrypt/live/${your.domain.here}/cert.pem cert.pem
$ sudo cp /etc/letsencrypt/live/${your.domain.here}/privkey.pem privkey.pem
$ sudo cp /etc/letsencrypt/live/${your.domain.here}/chain.pem chain.pem
Alternatively, do what feels right. I'm not your supervisor.
For HTTP:
Instead of explicitly routing our WebSocket connections through Port 443 (HTTPS) or Port 80 (HTTP), we'll be routing them through Ports 8083 (for the Pi Stream) and 8082 (for general-communication (e.g. Movement commands, Queue information, etc.))
That means that we'll need to modify our firewall a little bit. If the Pi doesn't connect to the Server, you'll want to open ports 8083 and 8082 on the server
If you're on CentOS 6.7, like me, you can shut down the Firewalls. But that would be bad.
$ sudo service iptables stop
Don't do that. Instead, you can... well, explicitly open them:
$ sudo iptables -A INPUT -p tcp -m tcp --dport 8083 -j ACCEPT
$ sudo iptables -A INPUT -p tcp -m tcp --dport 8082 -j ACCEPT
If you're running the demo locally, however, firewall-modifications shouldn't be necessary.
Now, start the server:
$ cd ..
$ node http-server.js
Or https-server.js. Y'know.
Finally, navigate to either http://localhost or https://localhost if you're running the server locally, or http://your.domain.here or https://your.domain.here.
Ahh, you got me
This one's a bit trickier. There's a Software and a Hardware component to it.
The Pi has plenty of GPIO ports. The ones involved with Serial Comm are 6, 8, & 10:
    (('Up' - Towards Display Port, etc.))
    3v3 Power   | 1 [] 2 |  5V Power
    GPIO2 (SDA) | 3 [] 4 |  5V Power
    GPIO3 (SCL) | 5 [] 6 |  GND ----------(!)
    GPIO4       | 7 [] 8 |  GPIO14 (TXD)--(!)
    GND         | 9 [] 10|  GPIO15 (RXD)--(!)
                |...[]...|
    (('Down' - Towards USB, Eth. etc.))
You can view a better, truer-to-life version here
A Roomba's Serial Interface Port Looks something like this: Thankfully, we only need three wires:
            / |   | \
          / - - - - - \
         |   O  O* O*  |  *: Pin 6, GND; Right - Pin 5, Baudrate Change
         | O* = = =  O*|  *: Left - Pin 4, TXD; Right - Pin 3, RXD
          \   O   O   /
            \ _ _ _ /
Hook up Pin 4 (TXD) on the Roomba to Pin 10 (RX) on the Pi (Yes Voltage Divider)
Pin 3 (RXD) on the Roomba to Pin 8 (TX) on the Pi (No Voltage Divider)
And, if you need to change the Baudrate with a pin, hook up Pin 5 (BRC) on the Roomba to a spare GPIO pin on the Pi.
(Use the documentation to fill in the blanks)
NOTE! Pay extra-careful attention to hooking those two confused lovebirds up. If you mix up the TX and RX on the Roomba and Pi, you'll fry the Pi due to the Logic Voltage Difference (as the Roomba uses 5V Serial Logic, Pi uses 3.3V Serial Logic)
So, when you /do/ hook them up, use a voltage divider to step down the Roomba's Serial TX (5v) to Pi's RX (3v)
The Roomba /can/ detect the Pi's 3v TX, though, so you can hook it up directly there
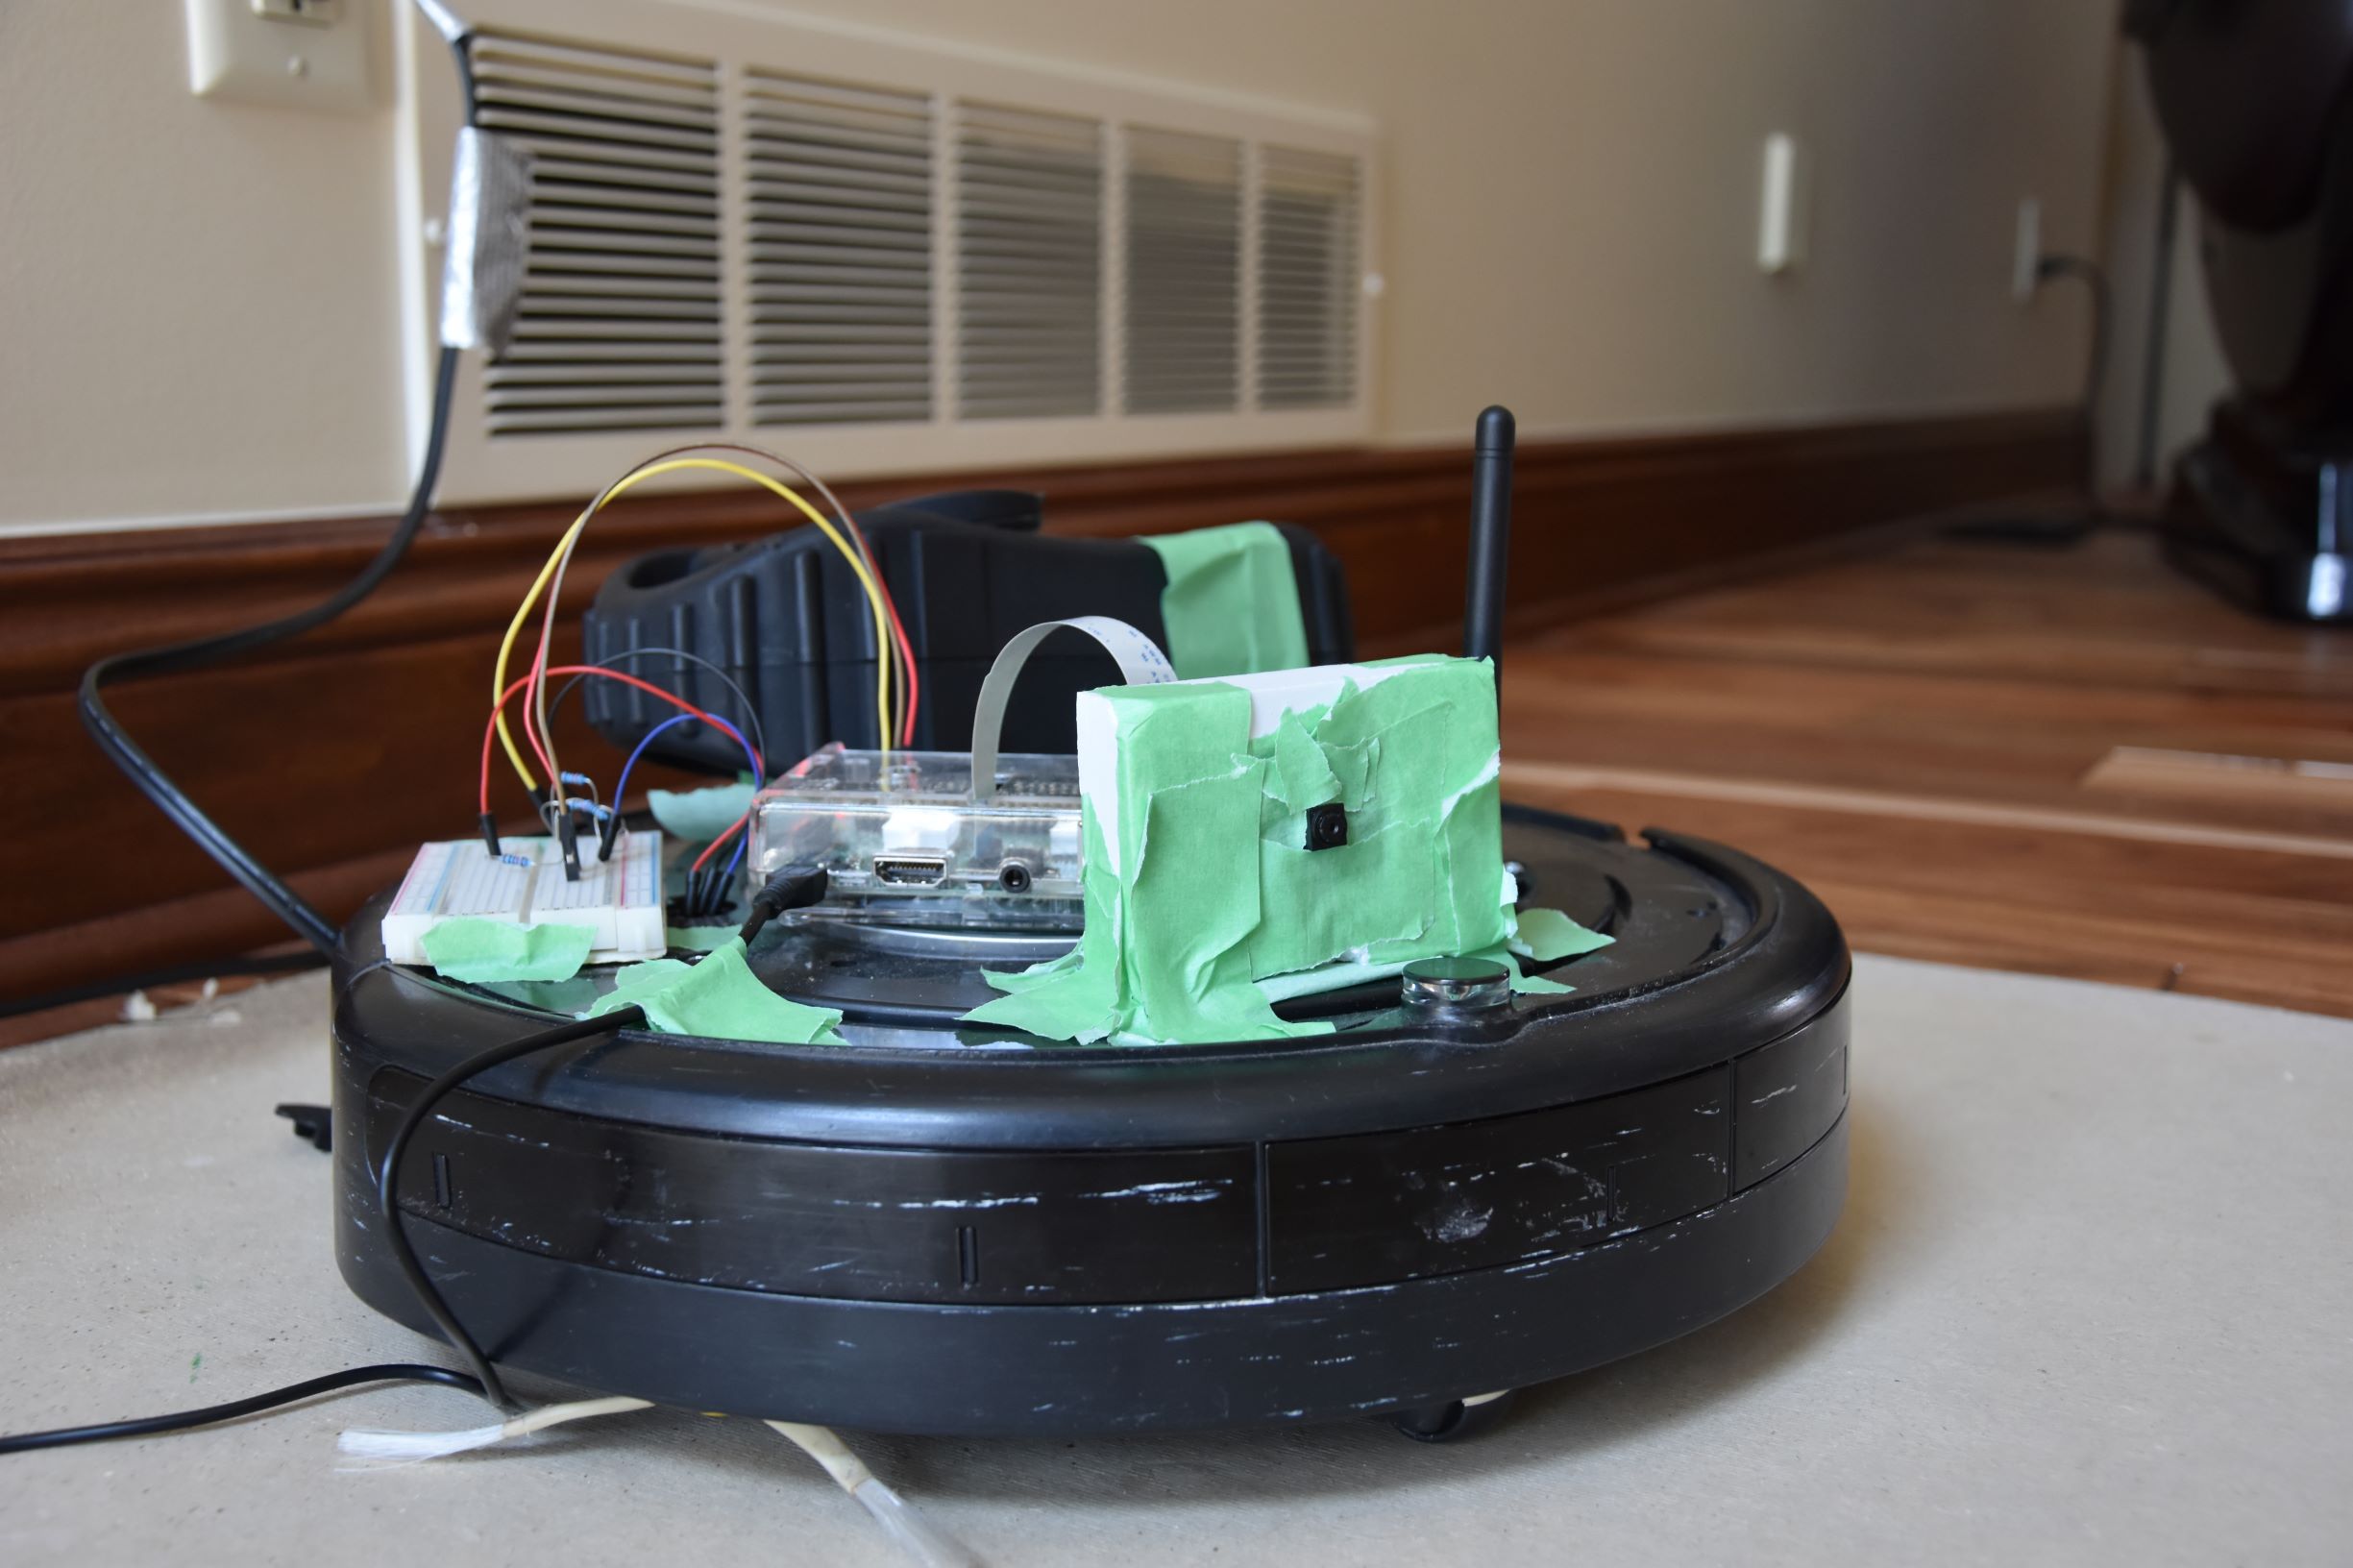
My setup runs something like this:
[Roomba TXD] => 10k Resistor => [Pi RXD] => 22k Res. => GND
And looks something like this:
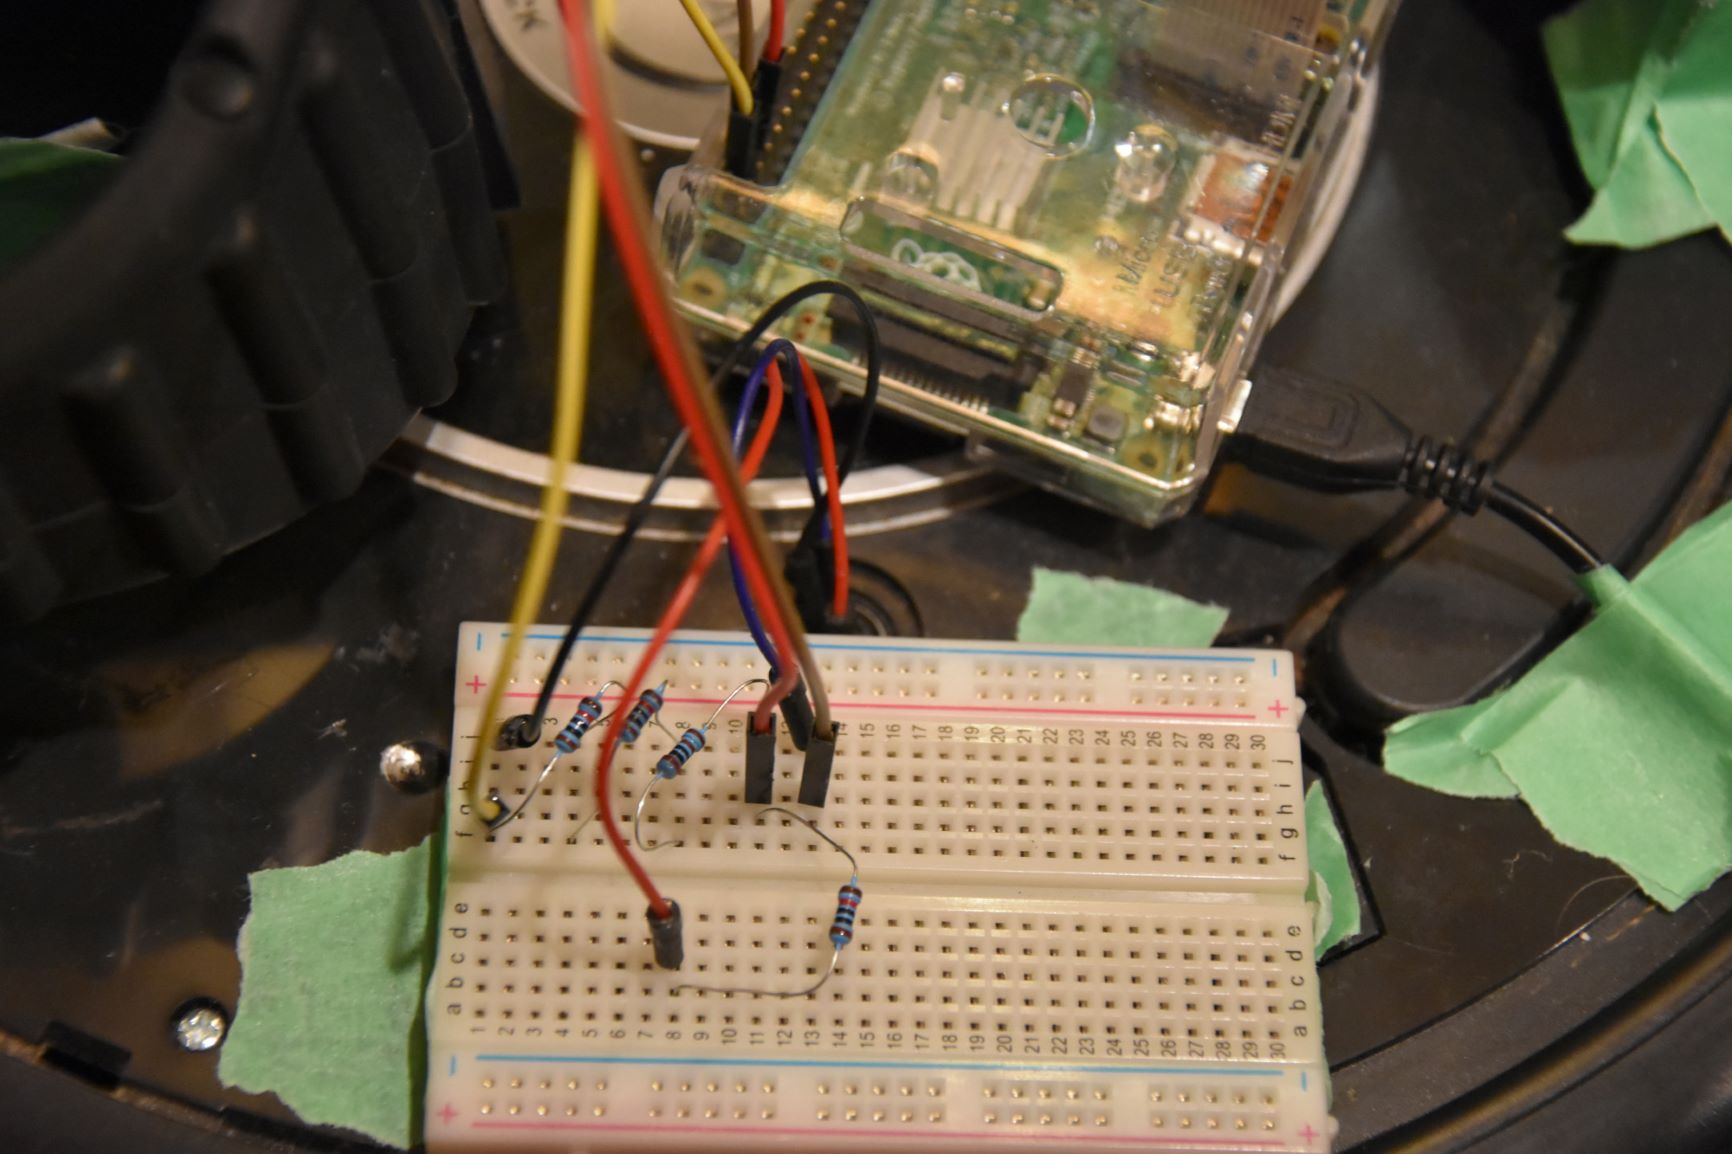
Red is for the Pi's Serial Receiver. Hence the Voltage Divider (20k Ohm to Ground, 11k Ohm to the Roomba's (Red) Transmission Pin)
Brown is for the Pi's Serial Transmission (Hooked up directly with the Blue Wire)
Yellow is for the Pi's Ground Pin. So is Black
Don't smoke your electronics.
The Pi Setup is somewhat-similar to the Server Setup. After SSH-ing into your Pi, clone into the Repository:
$ git clone https://github.com/Itimoto/Roomba-Roamer
Navigate into the _pi-specific directory and install dependencies
$ cd _pi-specific
$ npm install
Now come the trickier parts: modify the source to fit your configuration.
Once you've jerryrigged your Pi's GPIO pins to your Roomba's Pins, you'll need to enable and check your Serial connection (and your Camera Module).
$ sudo raspi-config
> 5. Interfacing Options
> P6 Serial
> "No" to Login Shell
> "Yes" to Serial Port Hardware Enable
>
> 5. Interfacing Options
> P1. Camera
> "Yes" to Camera Interface Enable
Now, you'll want to know where your serial interface is, Software-wise.
$ dmesg | grep tty
> [    0.001076] console [tty1] enabled
> [    0.982525] 3f201000.serial: ttyAMA0 at MMIO 0x3f201000 (irq = 81, base_baud = 0) is a PL011 rev2
> [    3.640798] systemd[1]: Created slice system-getty.slice.
See that ttyAMA0? That's your serial interface. Keep a note of it. Now:
HTTP?
Start editing the roomba-pi-http.js file.
$ nano roomba-pi-http.js
Make sure the hostName variable matches your server's/setup's address.
Local Wifi?
Get your Server's local IP (i.e. the device you're running http-server.js on) With Windows, you can run ipconfig in your Command Prompt.
C:\Users> ipconfig
> ...
> IPv4 Address. . . . . . . : 192.168.0.191
Then replace hostName with the IPv4 Address
//-----WS URLs----
const hostName  = "192.168.0.191";
And portName with the Serial Port you found before:
const op        = require('./lib/roomba-opcodes');  // Makes writing commands easier

const portName  = "/dev/ttyAMA0";
HTTPS?
Start editing the roomba-pi-https.js file.
$ nano roomba-pi-https.js
Make sure the hostName variable matches your server's/setup's address.
Local Wifi?
Get your Server's local IP (i.e. the device you're running https-server.js on) With Windows, you can run ipconfig in your Command Prompt.
C:\Users> ipconfig
> ...
> IPv4 Address. . . . . . . : 192.168.0.191
Then replace hostName with the IPv4 Address
//-----WS URLs----
const hostName  = "192.168.0.191";
And portName with the Serial Port you found before:
const op        = require('./lib/roomba-opcodes');  // Makes writing commands easier

const portName  = "/dev/ttyAMA0";
Finally, run the program.
node roomba-pi-http.js
Or roomba-pi-https.js. Y'know.
What about running it in the background?
You'll need a Supervisor for that. I use PM2.
Install PM2
$ npm install -g pm2
To run it in the background:
$ pm2 start roomba-pi-http.js
To run it on startup:
$ pm2 startup roomba-pi-http.js
Y'know.
It's what started Famine.Potato.Irish, it's what started Pong, and it's what happily constituted the vast majority of my summer.
The Roamer is nothing more than a Roomba hooked up to potato.irish, giving users the ability to control a tiny robot in my home.
To be sure, the idea's not original. My exact implementation, however, might be. But the point remains that I didn't just build it for myself or to learn, but for the chance to interact with friends and family one more time before leaving for College.
Oh, dear sweet heavens. So many. I'll make a list:
- Debugging in Entirely Unfamiliar Territory
- I had zero experience with NodeJS, Networking, Streaming, etc.
- I had a faint idea of the Roamer infrastructure, but didn't know where to start.
- I limited myself to the Node JS Documentation as often as possible, but certain topics left me looking on the forums
- Interfacing with the Roomba
- Thankfully, there's a helpful guide for Opcodes and interfacing
- Streaming Low-Latency Video from a remote location
- This... this took by far the most time to implement and refine.
- I ended up using 131's H264-Live-Player implementation for streaming
- Then, issues arose with multiple-viewers -- the h264 format only sent Initializing Metadata at the beginning of the stream
- Optimizing for Low-Latency Communication
- Backpressuring in Streams
- Managing Memory Leaks (including those in external NPM Modules)
- The multi-week debugging session against Latency-increases over time haunts me to this day
- Working with Asynchronous Operations
- I knew very little about JS, starting the Roamer. In turn, concepts like
PromisesorAsync/Awaitor other aspects of working with the JS Event Loop were foreign, but required for handling linked Communication and Streaming
- I knew very little about JS, starting the Roamer. In turn, concepts like
- Improving Project Reach / SEO ('Search Engine Optimization')
- Migrating the Node Server to HTTPS/SPDY with Let's Encrypt
- Developing Cross-Platform UI and Support
- 'Mobile First' Approaches
- And more. So, so much more.
This project would not have been possible without other, external contributions. Though I'm unsure as to whether to cite them as contributors or vendors, here lie the external libraries used:
- @131's H264 Live Player
- @PimTerry's H264 Header-Data Capture Script
- @ey3ball's Leaky Buffer, coupled with neat exploration and explanation of Stream Backpressuring
- And the remaining remarkably helpful tutorials linked to when applicable.