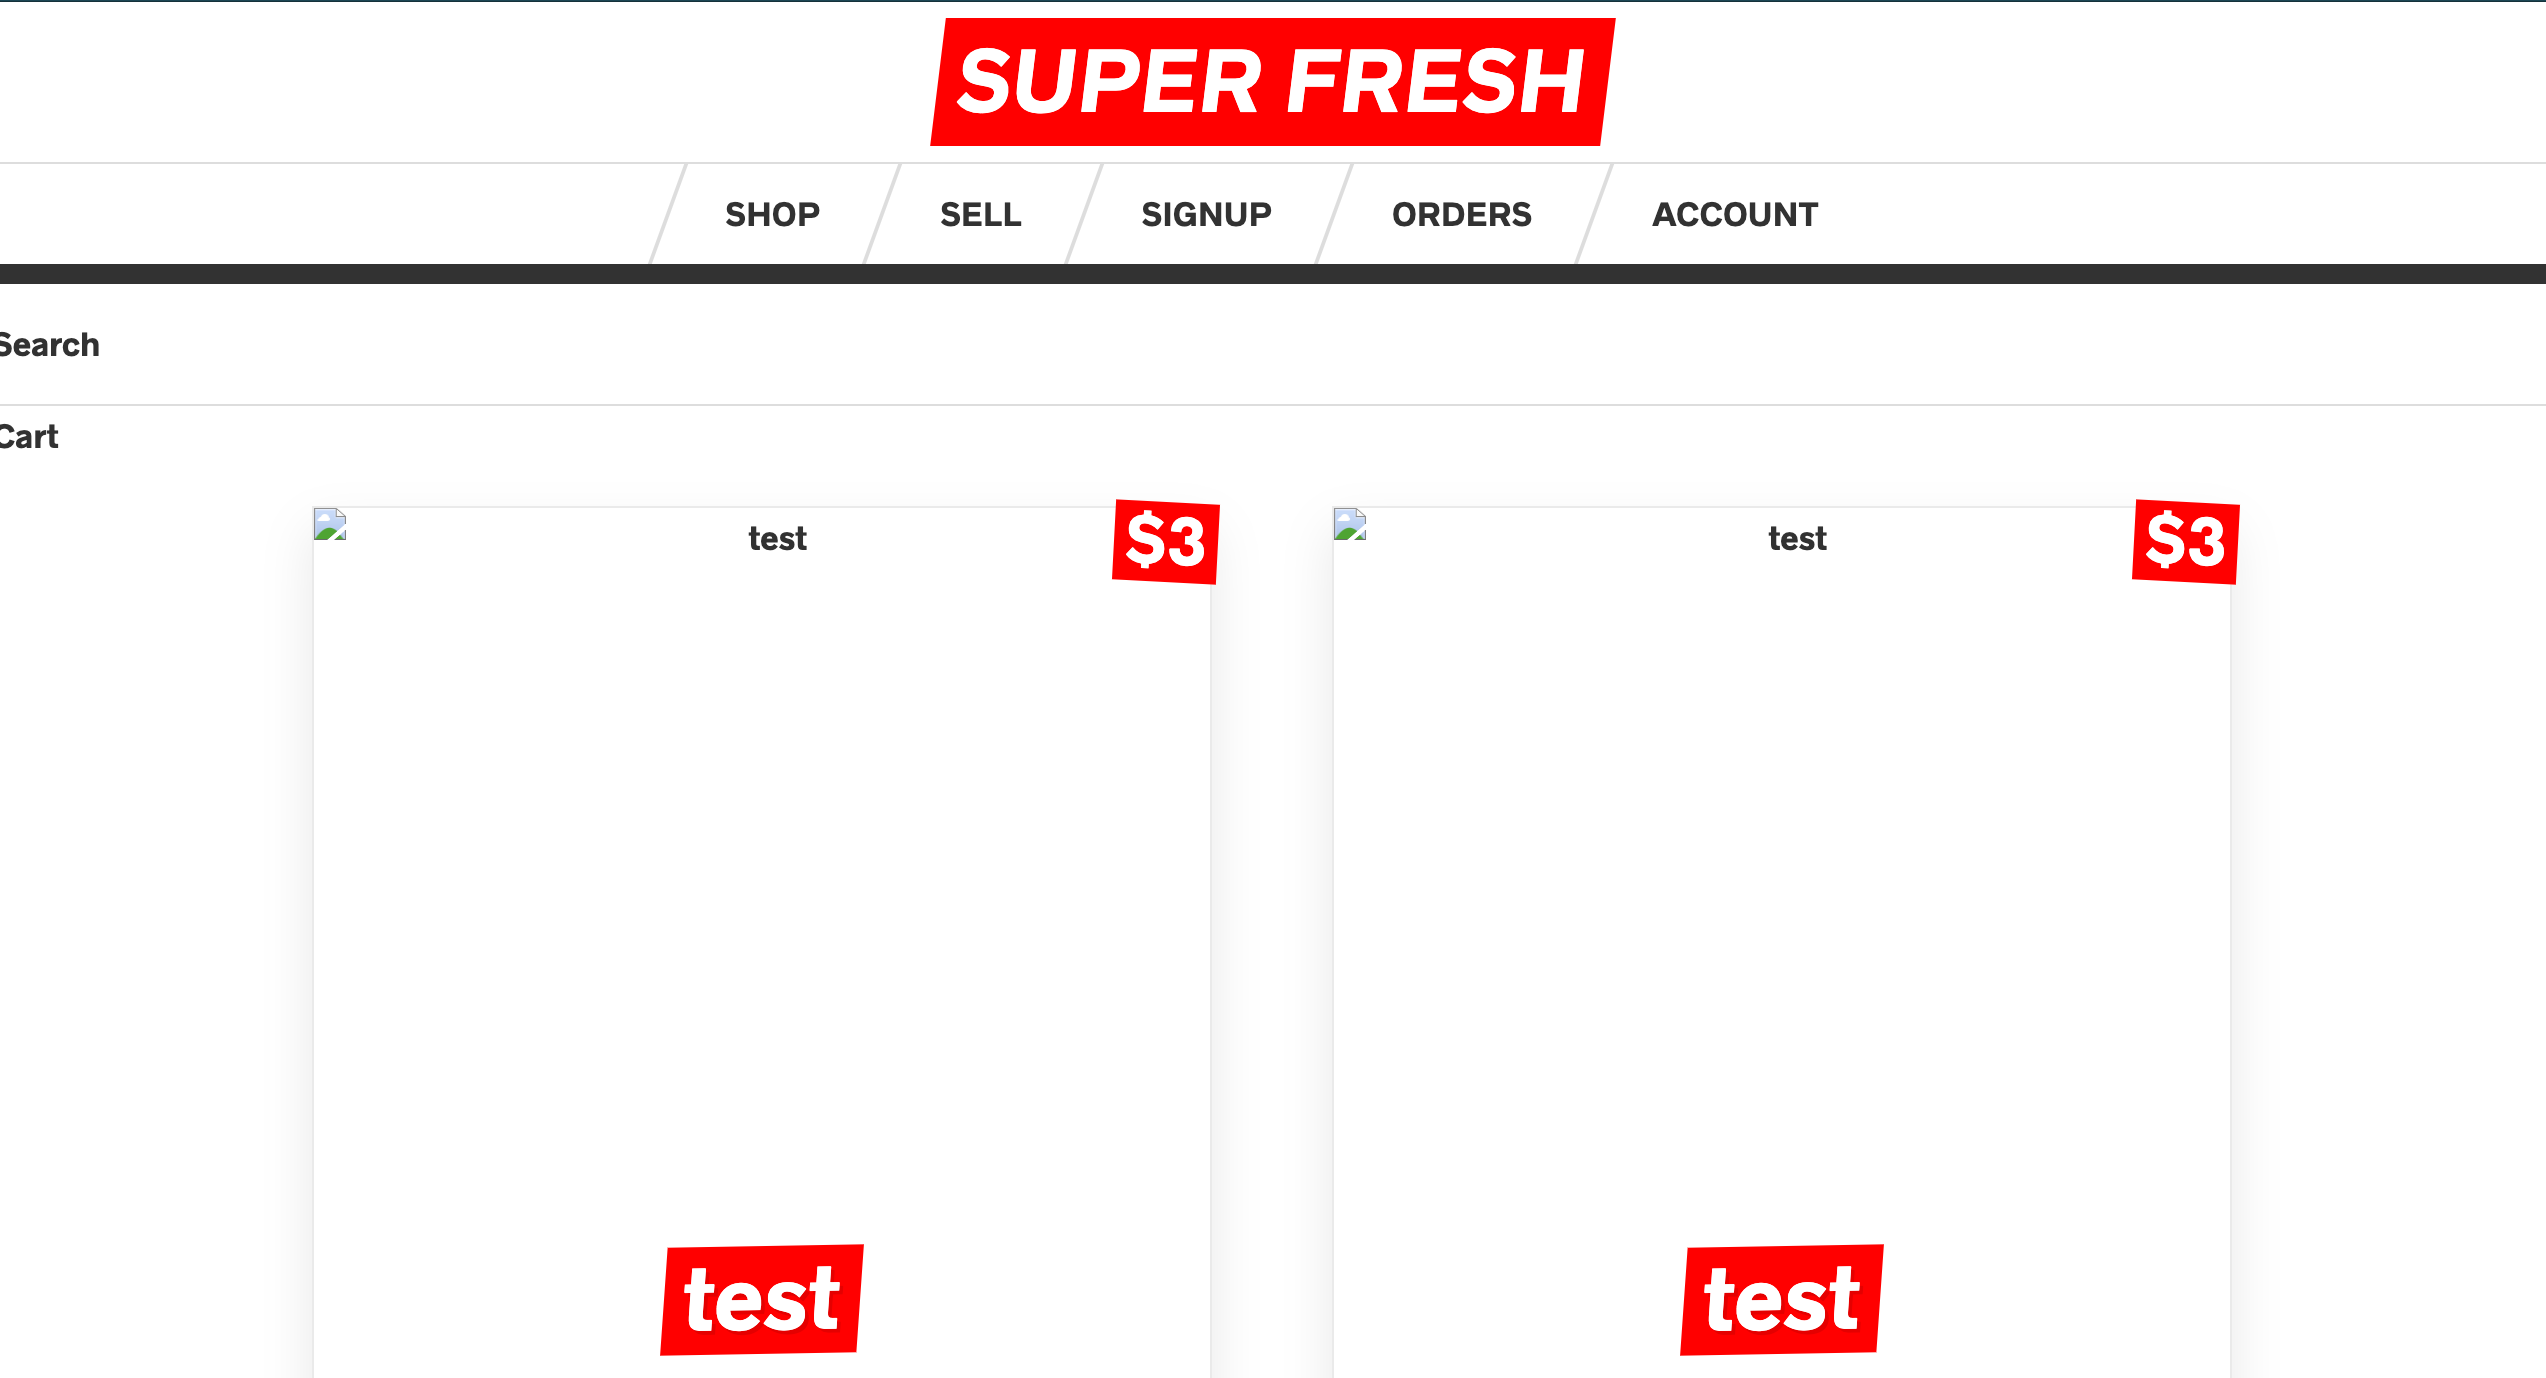
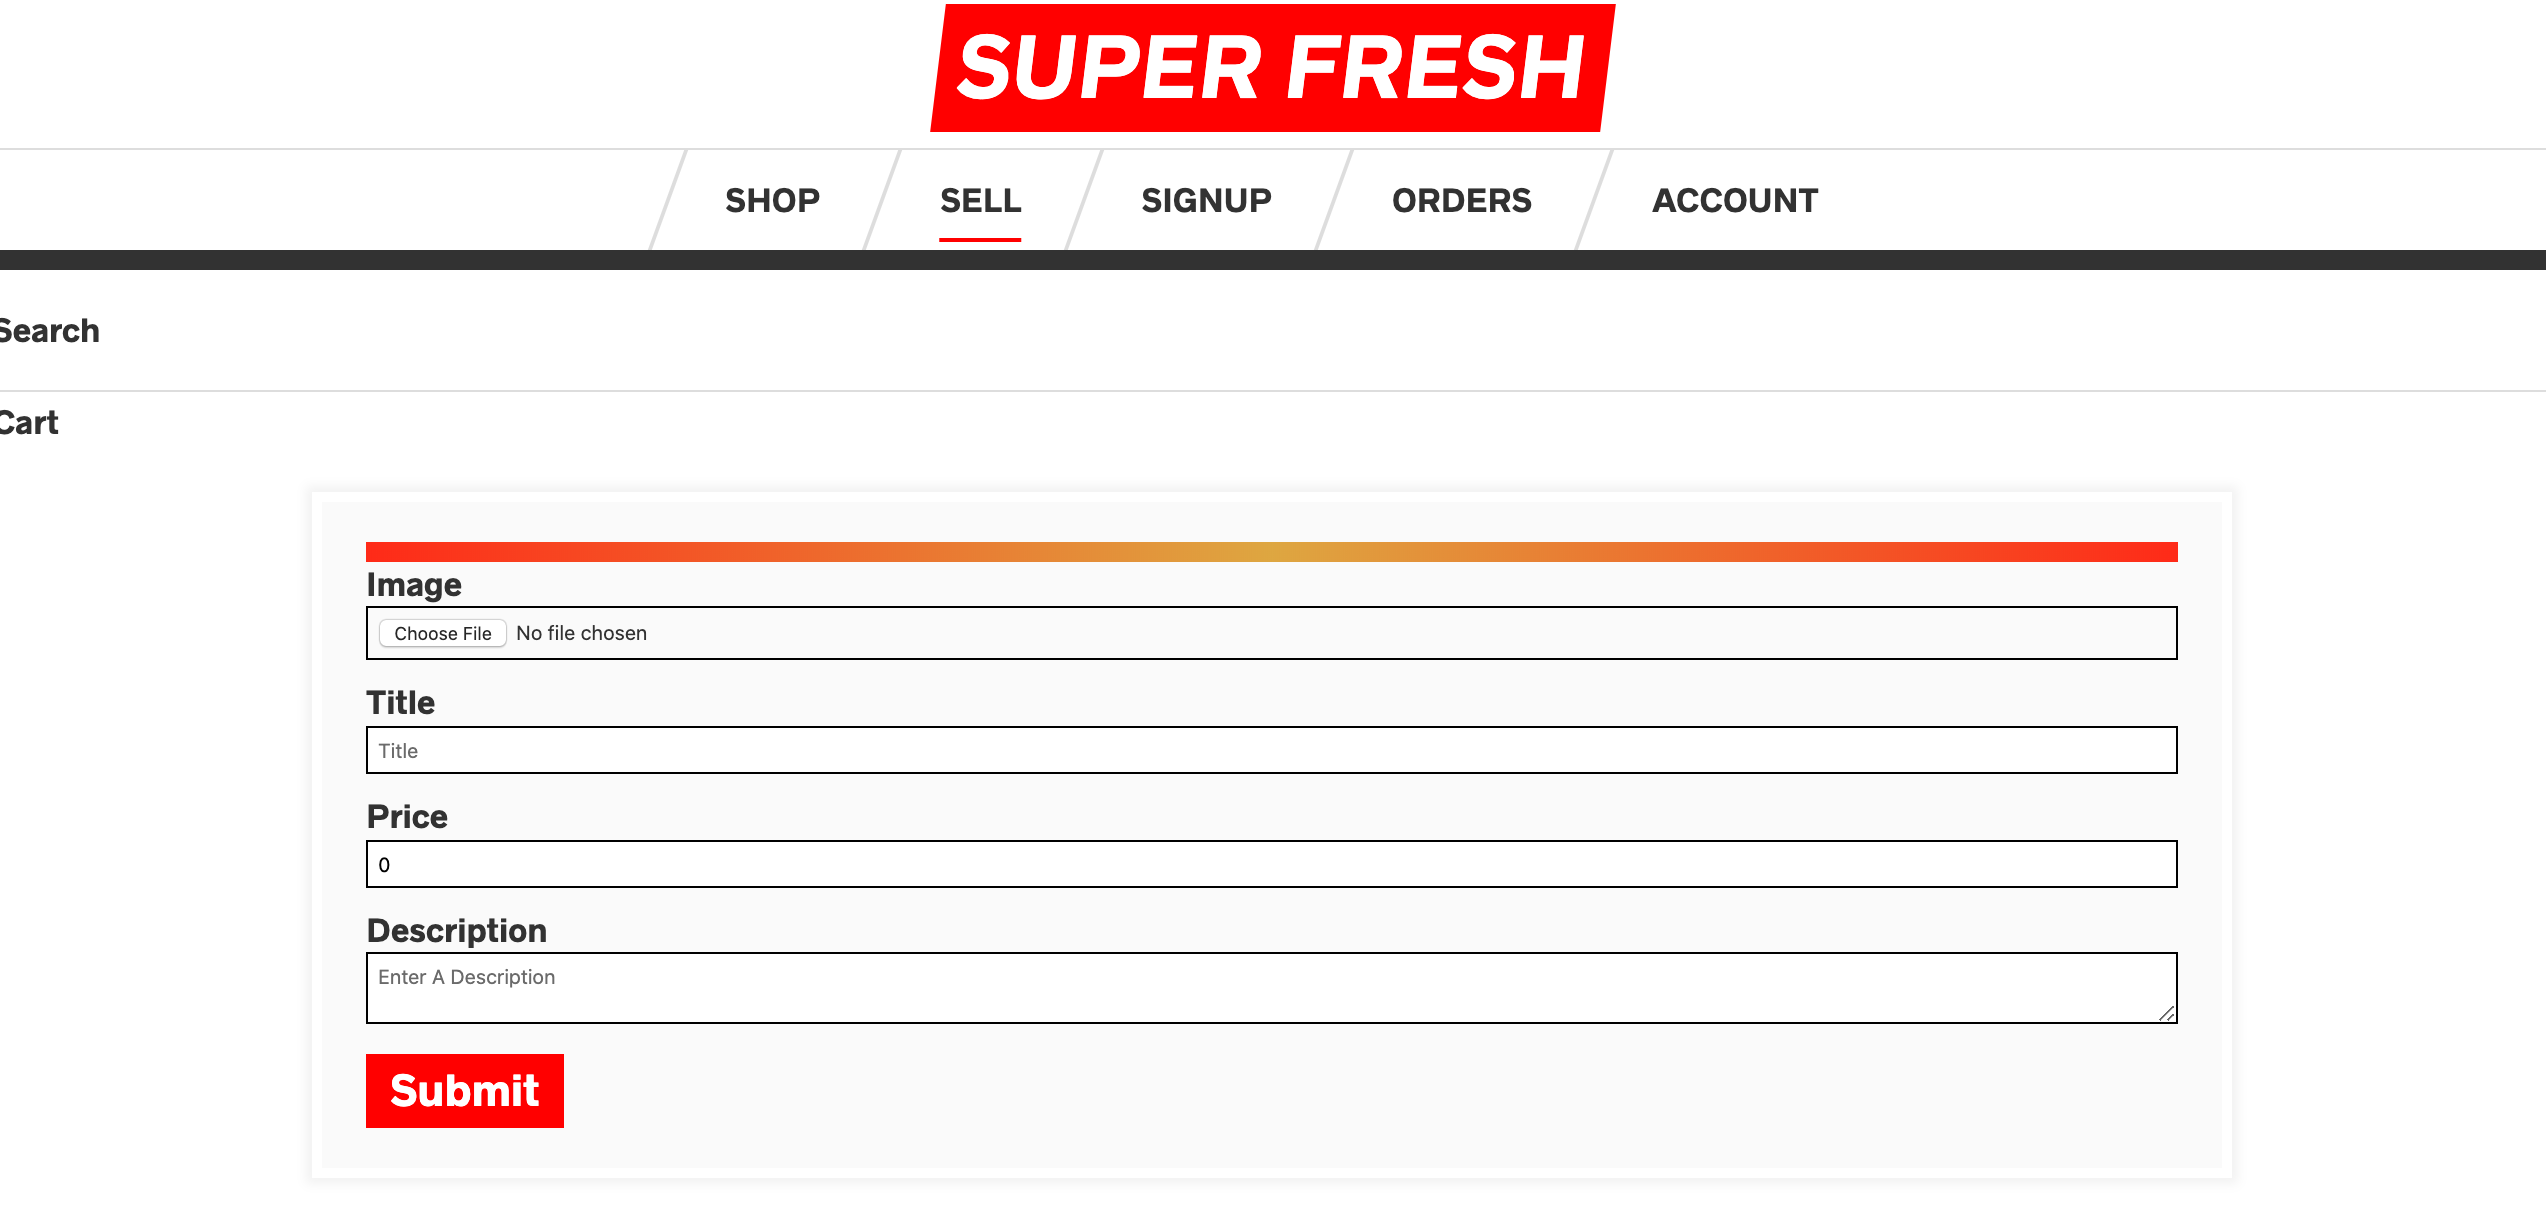
This is a online store that allows use to create a account,login, sell items, add items to you cart, checkout your cart and view your order.
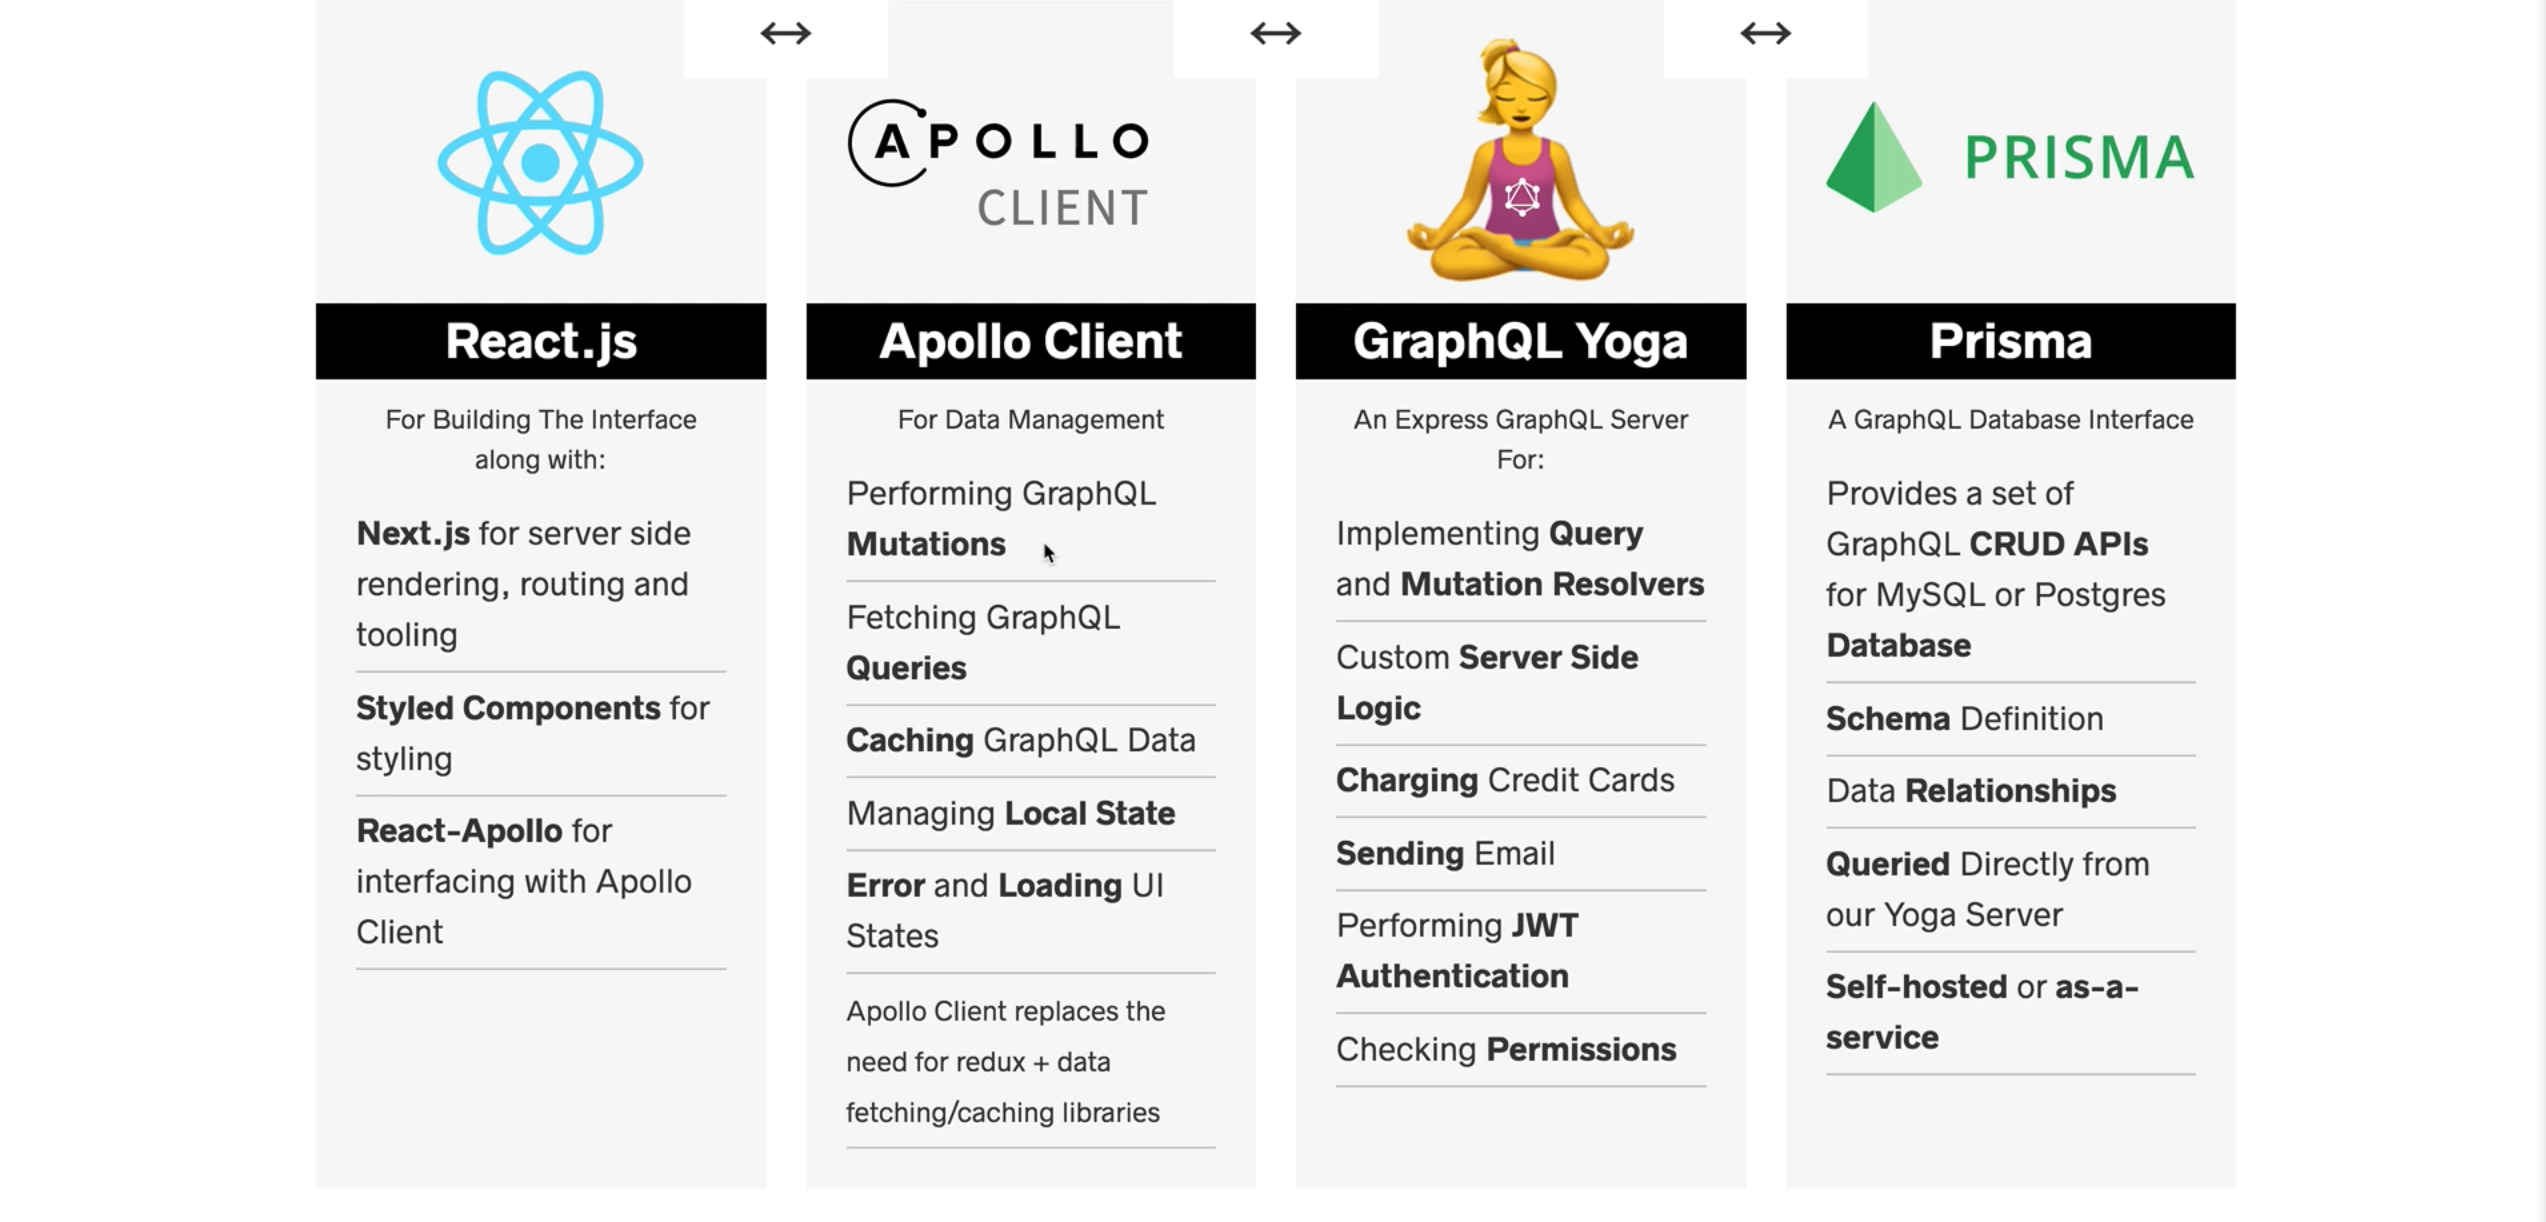
React.js for Building the interface along with Next.js for server side rendering, routing and tooling.
Apollo Client for data management. Performing GraphQL mutations, fetching GraphQL Queries, caching GraphQL data, managing local state, error and loading UI states.
GraphQL Yoda is an express GraphQL Server for implementating Query and mutation resolvers, custom Serverside logic, charging credit cards, sending email, performing authentication, and as well checking permissions.
Prisma is a GraphQL Database interface that provides a set of GraphQLCRUD API's for MySQL or Postgres Database, schema Definition, Data Relationships, Queried directly from Yoga Server, and Self Hosted.
 {// THIS REPLACES THE NEED FOR REDUX AND DATA FETCHING}
I finished the home items page & sell page but I need to finish the rest of the site.
In this tutorial I learned how to do more inline style in React, I rarely do it but Wes Bos has showed me some cool way to bring style via injectGlobal or style the components individually from styled-components.
injectGlobal`
  @font-face {
    font-family: 'radnika_next';
    src: url('/static/radnikanext-medium-webfont.woff2') format('woff2');
    font-weight: normal;
    font-style: normal;
  }

  body {
    padding: 0;
    margin: 0;
    font-size: 1.5rem;
    line-height: 2;
    font-family: 'radnika_next';
  }
or
const SearchStyles = styled.div`
  position: relative;
  input {
    width: 100%;
    padding: 10px;
    border: 0;
    font-size: 2rem;
    &.loading {
      animation: ${glow} 0.5s ease-in-out infinite alternate;
    }
  }
`;

export { DropDown, DropDownItem, SearchStyles };
I am getting better with running both servers and troubleshooting the errors I have been receiving in the terminal. Most of the beginning chapters up to nine I already knew about Next but for the most part, its been a while since I used <router/> by Next.
import NProgress from 'nprogress'; was something cool and new I never heard of. NProgress.js is a nanoscopic progress bar, with this realistic trickle slim progress bars made perfect for Ajax'y applications, displays a animation of a loading bar to tell your users that something's happening, inspired by Google, YouTube, and Medium.
Easy Install and easy implementation:
import NProgress from 'nprogress';

Router.onRouteChangeStart = () => {
  NProgress.start();
};

Router.onRouteChangeComplete = () => {
  NProgress.done();
};

Router.onRouteChangeError = () => {
  NProgress.done();
};
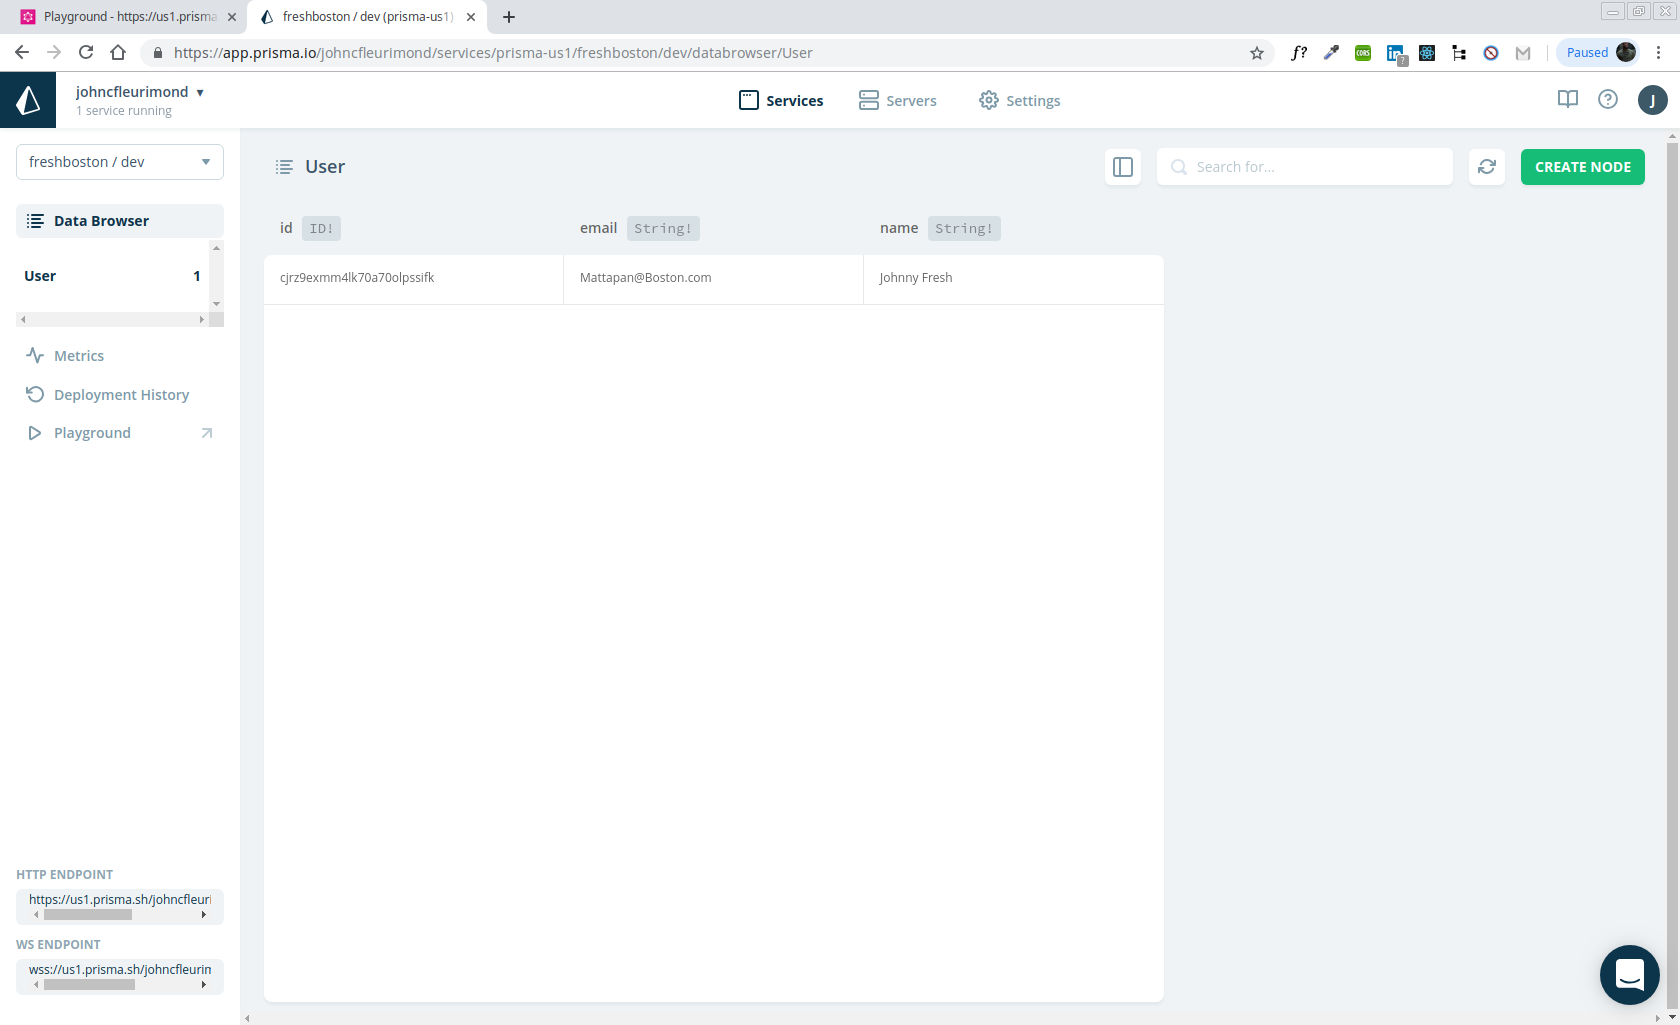
Setting up Prisma was not easy I had ran into a lot of issues with not finding prisma as a command and troubleshooting this issue took up post of my time and finding out my $PATH was not correct. I got some help in slack to config /bin and seeing where certain files are in node_modules, the person that helped me, Mark, thinks my node setup might be a little off because I've been running sudo with npm. When I start doing that it can change permissions on important files to root, which means that after that happens I don't have access to those files anymore under my own user account.
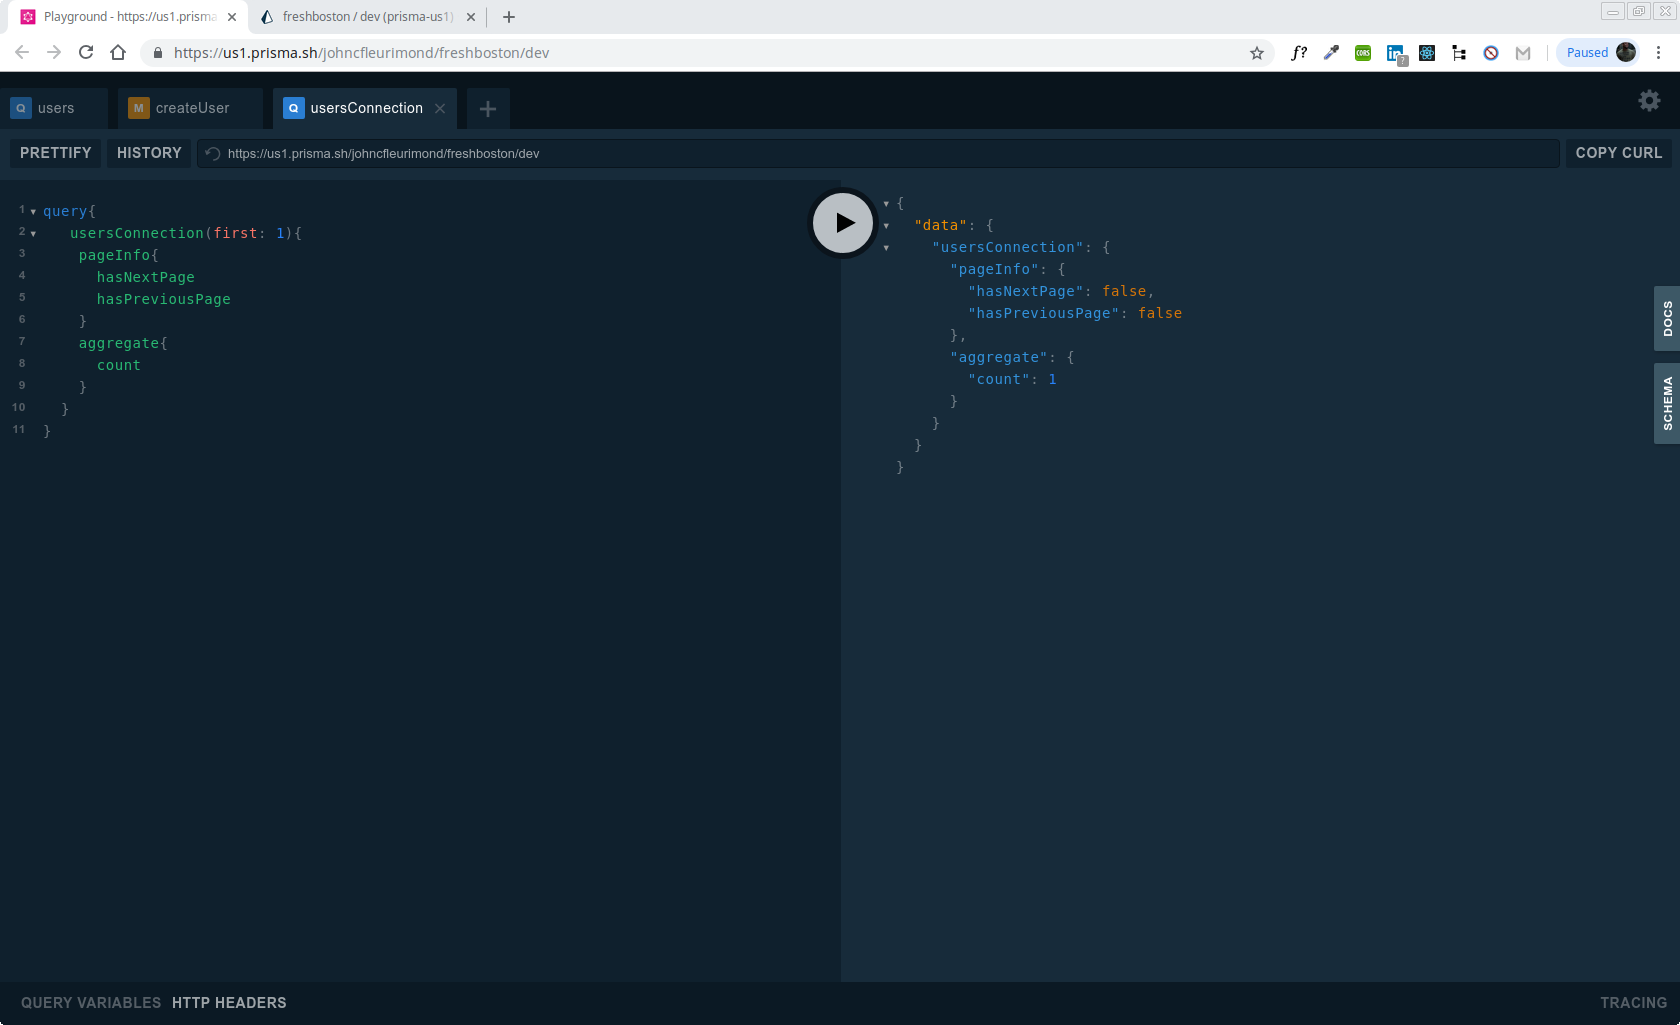
Once we corrected all that Prisma was perfect. I had a variables.env that personal information and keys that I didn't want the public to be like endpoints and such. Onced I config that, I learned that prisma deploy wouldn't work and I had to pass a custom path and had to prisma deploy --env-file variables.env Once I deployed it I got a fast message saying the types it shows the types I created and the type of String. I can see the actual database that I created, the users and emails I passed thru as well. They even have a link in the terminal that GraphQL Database endpoints,in that link has a GraphQL playground that shows you different Queries you can run like so:
  User (Type)
  + Created type `User`
  + Created field `id` of type `ID!`
  + Created field `name` of type `String!`
  + Created field `updatedAt` of type `DateTime!`
  + Created field `createdAt` of type `DateTime!`

After all this I started on the GraphQL server side. So I started my created my database in a variable, made a function called createServer which will ingest a schema.graphql and it will match up everything in the schema with resolvers out of a mutations or query. ( Query resolvers have to do with pulling data and mutations resolvers have to do with pushing data.)
Then in the index.js, I brought in my variables for env, db and createServer. I have MIDDLEWARE to Install but thats on hold. So I can start my server script which is ran by Nodemon.
I also getting better with the git commands and doing git checkout -b NewBranch and making my changes in a separate branch and add all the changes there then switching to the master than merging it. Got used to git pull from changes on the master that the other branches didn't have and troubleshooting most of the errors.
** 💻 🇭🇹 WEBSITE:** John Fleurimond
Once you clone this repo, cd In the project directory for the frontend and backend, you can run:
- run
npm installin thefrontendandbackendfolders infresh-fitsandnpm audit fixif any fixes needed.
- run
npm run devin both folders.
- run
killall -9 nodein the terminal if something is runnning onportfor Macs.