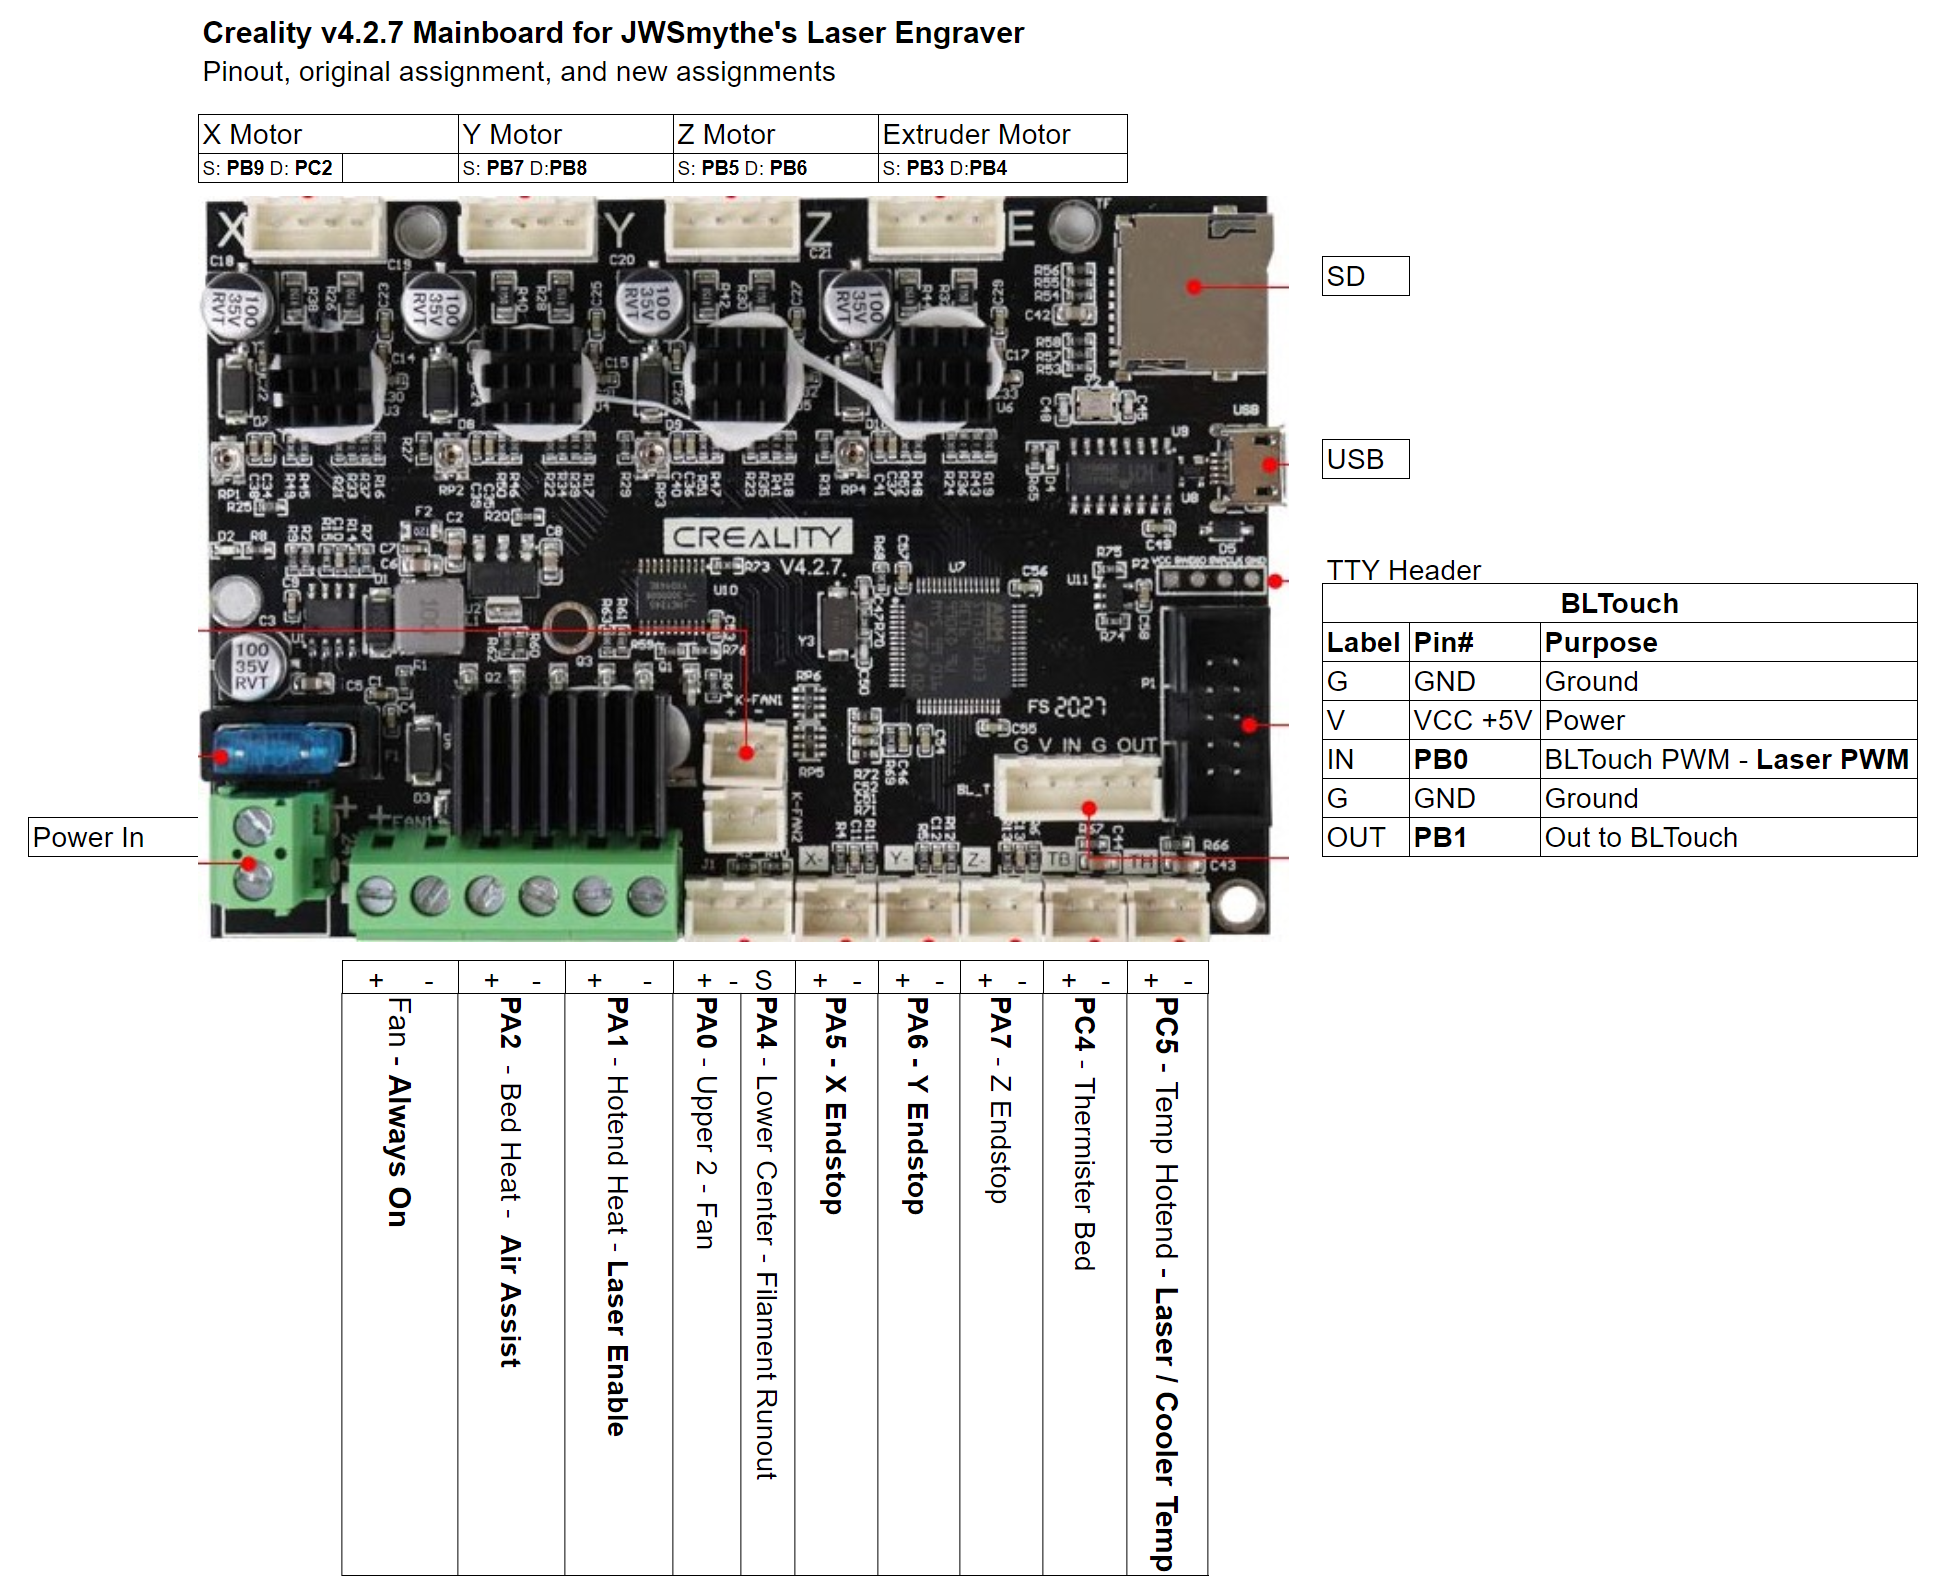
This project uses a Creality 4.2.7 mainboard running Marlin 2.1.2.1 (current) to control a laser engraver/cutter. This should be easy for anyone to port over to using any 3d printer mainboard.
There are 4 parts to this project.
- Hardware
- Laser Machine
- Mainboard
- Endstops (optional)
- Marlin Firmware
- Cutting Software (Lightburn or your preferred software)
- Questions, Comments, and Bug Reports
I am using a Two Trees XY laser engraver. Much like many generic ones with a simple 2020 extrusion in a square.
For the mainboard, I am using a Creality 4.2.7 board. It's cheap enough, available, and well supported. It's what you'll find in any newer Ender 3, and some other Creality machines. It was a spare that I had, so I used it.
I'm using 2 physical switch type endstops on X and Y, so the machine can home to 0,0 each time it runs. They aren't necessary, but they're nice to have.
Make sure your laser machine's stepper power suppy is within specs for your selected mainboard. I belive the Creality 4.2.7 supports 12 and 24 volts. The Two Trees machine steppers and laser operate at 12v.
- Attach your power, stepper, and endstops in the normal locations. If you want dual X or dual Y, you have two extra drivers to use onboard already.
- The laser's power is attached to the hotend heat connector (bottom row, far right pair on the green connector)
- The laser signal/PWM pin goes to the IN pin of the BLTouch header. The center pin of the white 5 pin header.
For this documentation, I'm using the Marlin 2.1.2.1 firmware. That's current right now. Every so often, I'll update the configs to current.
The configuration is pretty simple. It just drops 3 (or 5) things into your Marlin directory, make 1 change, and build it. Copy the files from this repo into the following locations:
- ./Marlin/Configuration.h
- ./Marlin/Configuration_adv.h
- ./Marlin/_Bootscreen.h
- ./Marlin/_Statusscreen.h
- ./Marlin/src/pins/stm32f1/pins_CREALITY_V427_JWS_LASER.h
Edit the file ./Marlin/src/pins/stm32f1/pins_CREALITY_V4.h Add the following 3 lines to the bottom of pins_CREALITY_V4.h
// -jws 20220128 - This is to override any pin definitions earlier, without messing with a bunch of other files.
// It'll be a lot easier to port that to future Marlin versions.
#include "pins_CREALITY_V427_JWS_LASER.h"
Build, flash, you're done.
I built the Config*.h files from the Marlin example file, not the Creality configuration. I included diff files, if you prefer to look for changes that way.
I made the Bootscreen and Statusscreen graphics, just because I wanted it to look nice.
I opted for the fan connector as the PWM pin, because it had the cleanest signal when I was testing with an oscilloscope. You could use the bed heat, thermister pins, Z endstop, or the BLTouch power pins too.
I'm using Lightburn on my laptop for the time being. When you set up the machine, just use the Marlin controller type. In the device settings, you can choose M03/M05 or Inline.
I don't have an air assist or laser cooler yet, so I can't confirm if that part is working, and don't yet have the pins assigned.
Under the GCode tab in the Device settings, you'll need to add these 3 lines to the Start GCode.
; In Marlin, inline mode is enabled with 'M3 I' and disabled with 'M5 I'.
 M3 I
If you wish to contact me, you can do it through here, or via my JWSmythe.com.
If you find a bug, report it through the Issues tab at the top of the page. That way, others encountering the bug you found will be able to fix it before I put the next release together.
