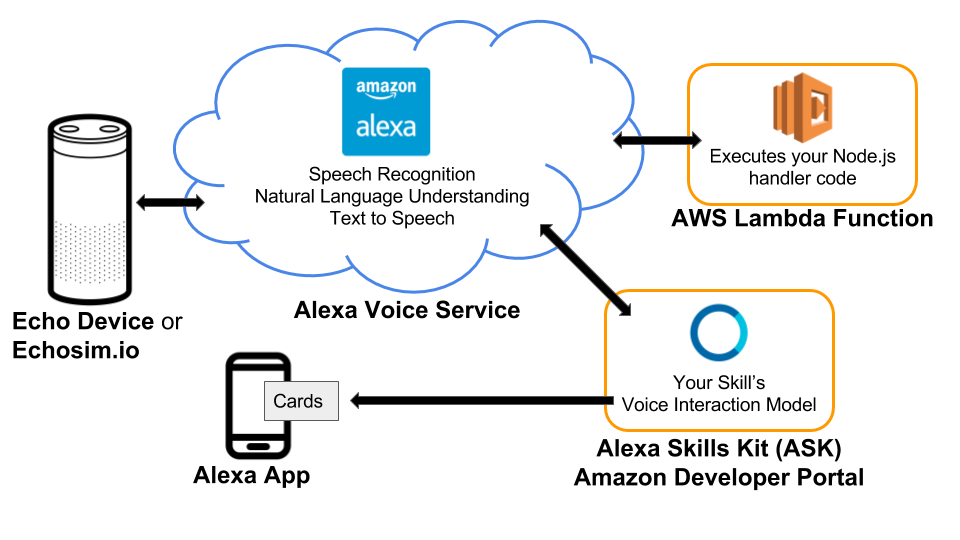
This repo is based on Udacity's AIND-VUI-Alexa Project. I've rewritten the Alexa node.js app using python and Flask-ask. I enjoy building alexa skills with Flask-ask so I wanted to share.
It's time to create your own Alexa Skill!. In this project, you’ll build a fully functional skill for Amazon’s Alexa that provides year-dated facts from AI History (or some other History of your choosing).

We highly recommend you complete the Space Geek lab in the classroom, which steps you through setting up your Amazon Developer and Amazon AWS accounts as well as building the project this one is based on.
Install your starter code locally.
- Download or clone the starter code from GitHub
- Save it in a directory named
AIND-VUI-Alexa. It contains the following directories and files:- speechAssets/IntentSchema.json - intents definition for the interactive model
- speechAssets/SampleUtterances_en_US.txt - utterances for the interactive model
- src/index.py - skill logic and handlers to be run in AWS Lamda
- src/templates.yaml - a template file that loads phrases to be used in your skill responses
- src/app.py - helper file for AWS Lambda deployment; don't need to modify
- src/tests/*.py - various unit tests to be run locally with pytest
Check out flask-ask tutorial blog post for a full step-by-step walk through that goes from creating a virtual env to deployment.
- Navigate to the
AIND-VUI-Alexadirectory of the starter code and open a terminal window. Next, create a python virtual environment.
$ pip install virtualenv
$ virtualenv venv- A directory named venv now exists inside
AIND-VUI-Alexadirectory. The virtual environment will help Zappa identify necessary dependencies that need to be deployed with your code. Next, we need to activate it.
$ source venv/bin/activate (Unix)

$ venv\Scripts\activate (Windows)- The dependencies we need are listed in the
requirements.txtfile and include the Flask-ask library for Alexa as well as pytest test framework for python along with Zappa for deploying to AWS lambda and aws-cli to generate AWS config files. Install them all in your virtual env with the following command:
$ pip install -r requirements.txt- You can now run the provided unit tests from the command line within the
AIND-VUI-Alexa/srcdirectory with the following command. Try it now:
$ pytestThe test code is in four parts: "Part 1", "Part 2", "Part 3", and "Starter Code". The starter code tests should pass and all others should fail.
You can run each individual part like so (from within the src directory):
$ pytest tests/test_starter_code.py- Make sure to checkout the documentation on the Flask-ask Github Repo.
- Note: The flask-ask repo contains various examples, including the Space Geek project in the Samples Directory.
- This repo also includes my sample solutions to each part in separate branches. To see sample solutions to part 1 switch to the branch:
$ git checkout solution_part_1- While developing you can run the code locally and test using Echosim.io and Ngrok without deploying. After you've created the skill in the Amazon console and install Ngrok.
$ npm install -g ngrok - You can try with the starter code.
-
Navigate to the
AIND-VUI-Alexadirectory, open a terminal, and run the app.$ python index.py * Running on http://127.0.0.1:5000/ -
Then, open a second terminal, run the command below, and copy the 'HTTPS' link.
$ ngrok http 5000 -
In the Amazon developer console > 'Configuration' tab, under 'Endpoint' select 'HTTPS', select a graphical region, and paste the URL. Click 'Save' and test it out.
-
- Go through the full tutorial deployment steps to here
- FOR SUCCESSFUL DEPLOYMENT: When setting up the zappa config file with the following command:
$ zappa initIt'll ask you where your app function is located. Make sure that you point it to 'src.app.app' and NOT 'src.index.create_app' or 'src.index.app'. You can also change this in the generated 'zappa_settings.json' file as well. (Why? There's an issue with AWS Lambda and Flask blueprints)
- You can deploy the starter code to verify that it works.
The starter code provides a simple fact skill similar to Space Geek, except a few AI history facts have been provided in an external file, templates.yaml, instead of the space facts. Each fact includes a 4-digit year in its text, which we will use in the project for a new feature.
The project consists of three parts:
- Customize the fact skill
- Add a feature using an additional intent and a slot
- Add conversational elements
Follow the instructions in 'index.py' file and run the unit test after each part is complete.
Can't be submitted to Udacity. This project is just for educational purposes
